Here Are The Clay Materials I Used Throughout The Years


Hello, how are you? Last time I shared with you all the materials I used for bookbinding. And you know, I have a lot of hobbies that I can’t choose what to focus on, but I just like to explore a lot of mediums and crafts that caught my attention and will benefit me in the future, and sometimes it is super overwhelming if you have a lot of hobbies.
But one thing that really caught my eye is making clay specially polymer clay. I tried a lot of different clays, but this one is the most convenient and can handle my impatient self. When I was selling my craft before, clay was the number one thing I sold, and it did pretty well, but… I have this seasonal or monthly thing that makes me not happy, and at that time a lot of things happened, and I am contemplating everything, and one thing that triggered it is the pandemic.
So, I’ve been so serious about it lately, and I can see the progress of skills and experience throughout my clay charms, so I am going to show most or almost everything that I invested in materials throughout my clay journey.
Clay Materials And Their Use:
Clay Materials And Their Use:
Polymer Clays:


You can’t make clay without clay, right? So, before I started my clay hobby, I liked to do my research first and figure out what materials to buy when starting in this kind of hobby. Clay is the first, of course. Next thing is what color you need to buy. Make sure to buy the white, black, and transparent in big sizes, and the rest are small. So, for the colors, I bought the primaries like yellow, red, and blue, and make sure to buy the cool and warm colors and then secondary and earth colors like green and browns, and that’s it.


This is what they look like, they look like a bar of chocolate or a soap.


Grid Storages For Scrap Clay:


For example, I have this extra clay. I can just put it in the grid storage without getting stained so I can use it again later.
Portable Weighing Scale:


I recently discovered that they sell this portable weighing scale. It is small and can weigh a really small clay too, because the weighing scale I used before had a limit on how little it could weigh a clay. I use this for a detail charm if I want to be uniform in size.
Tools For Sculpting:


For the tools, pliers are one of the things you must invest in when you want to make a keychain out of clay, specially this two types; I forget what these types are. One is for cutting, one is the helps to add the keychain.


Next is this acrylic rolling pin. This one is very important because not conditioning the clay is one of the major mistakes when doing clay. Make sure to invest in one. And then these dotting tools with silicone tip this tool job is to add texture to the clay, and for the silicone part, it is to sculpt the clay into the shape that you wanted.


These four I mainly use for adding texture to the clay. From left to right are the wire tool, which is used if you want to add really textured clay. The toothbrush is for a soft one, and the tree brush is in between those two I mentioned earlier, and lastly is this needle tool for detailed texture. I bought a set of these clay tools, but the three are the ones that I only needed.


For the brush, I use a fluffy one, which is the makeup brush, and this nail shape brush, and I have the detail and thin one for detail, but as I edit this blog, I just realized LOL. I use these along with the soft pastels, a great combo for semi-realistic color.


This one is an X-acto Knife. It's needed when working with clay; it cuts clay with a precise, cleaner shape. And very helpful in adding small details to the clay without damaging it.


Of course you'll need a bunch of blades for the replacement.


I just recently discovered these blades too. I use this to cut clean and straight clay. Super helpful, but I rarely use it more than the X-Acto knife.


Before, I used to waste a lot of clay and premix paint because I didn't have a container to store them for use later, but then I discovered this empty paint container, so whenever I make a clay with a glaze on top of it, I can mix some and store the left in it for later use no clay wasted LOL.
Storages and Accessories:


For the storage and accessories. I realize that buying storage for all the accessories is the best thing I ever did, and it put my mind at ease that everything is well organize and I like to keep all the keychains in a bigger storage.


For the jump rings and eyepins, I use this small storage that I really like. Now no more messiness.


I store this hole cutter in a small storage too. I use this for cutting detailed clay.


Then I like to store pre-scraped soft pastels to save time and effort.
Tools To Hold The Clay:


These are acrylic stamping blocks. I use this to hold clay without damaging it during the process, and I use this too to mix the glaze for less mess to clean up after.


I learned from an OG clay artist that using a gum container is good for holding the clay you're sculpting, and I pretty much only use it when it's helpful, so I like to keep it on hand.
For Coating and Glazing Tools:
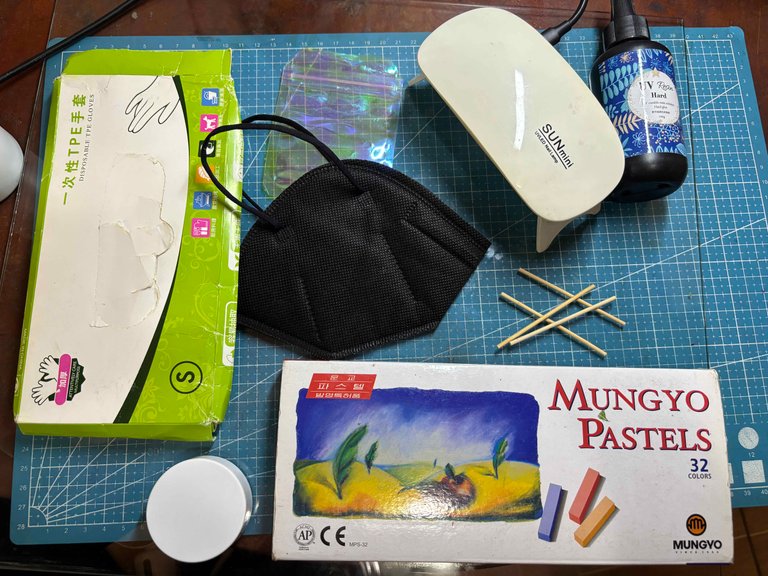

After baking the clay, you need to seal the clay in order to hold the details and protect it at the same time. I use UV resin for that, and I recently discovered that using an empty nail polish brush to apply the resin is better than using a regular brush. I just put it back in the container, and no more messy cleanup later. But make sure to wear a facemask and faceshield to do it.


You cannot dry a UV resin by just drying it in open air. You'll need a UV light to cure and harden it to protect the clay. But you can use the sun as a curing machine too.
Cleaning Tool:


I use alcohol and this container, but I should add the Q-tip, but I ran out of it, so just imagine it was here LOL. I use this to clean before or after I bake the clay.
Liquid Clay:


This one is a handmade liquid clay that I made. I watched a video tutorial on how to make one, so I decided to make one. Maybe I'll need it in the future and I did It helps me to make a donut glazing.
Glittery Powder:


This one is just pure curiosity. This one is called mica powder, so I bought one. I did use it on the star gloom I made before, and I pretty much like it, and I hope I can use it more in the future.
Toothpick:


I use this for my street food clay keychain as a BBQ stick, and I use it until today to apply the glazing.
Storage For Clay:


This square storage, I use this for the ones I sculpted and one that has already finished clay, and it protects them from fine dust that I really hate LOL.
For Shading The Clay:


This is soft pastels. I use this for adding realistic color to the clay I sculpted. I use this one mainly for colors and for coloring the glazing tool.
Sticky Note For Details Clay:


Sticky note. I learned it again from the OG clay artist. Using a sticky note to roll the detail clay this make the clay less oily when adding on the clay, so big help.
For Protection:


Disposable gloves for protection from using UV resin, and this handmade reflector. I use this to block light from UV light to make the clay cure faster.
Baking Tools:


Finally, I almost forgot this. An oven is a need when using polymer clay, and a silicone mat can only be used for the clay and for the clay only.


These are the materials.

I tried hard to organize them LOL.
Thank you for visiting, see you on my next blog. :D
Please take care of your mental health as well.
I hope you are okay today :))
Please take care of your mental health as well.
I hope you are okay today :))

Congratulations @leannwithdoublen! You received a personal badge!
Participate in the next Power Up Day and try to power-up more HIVE to get a bigger Power-Bee.
May the Hive Power be with you!
You can view your badges on your board and compare yourself to others in the Ranking
Check out our last posts:
Thank you for showing us these beautiful and useful work tools for everything you do. Keep creating! ❤️
!discovery
This post was shared and voted inside the discord by the curators team of discovery-it
Join our Community and follow our Curation Trail
Discovery-it is also a Witness, vote for us here
Delegate to us for passive income. Check our 80% fee-back Program