A BLACKPINK SET /UN CONJUNTO DE BLACKPINK (ING-ESP)

ENGLISH VERSION
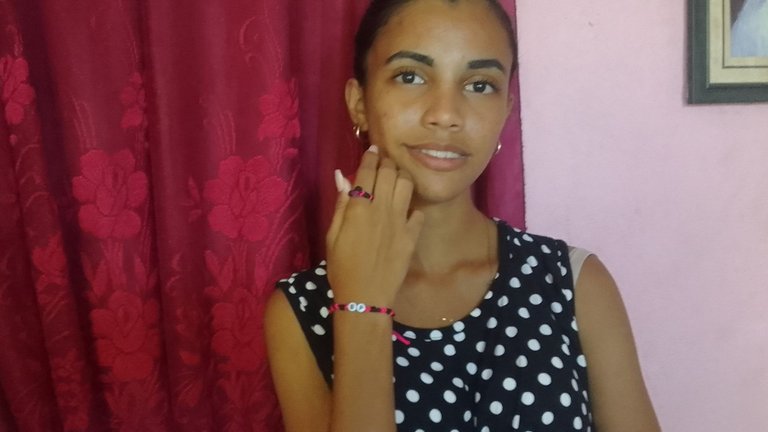
Hello everyone, today I have the pleasure of posting again in this #Jewerly community and this time I do it with a ring and pulse set inspired by my favorite K-POP group BlackPink.
MATERIALS
To make this bracelet and ring set, you only need pink and black Chinese thread. One black pearl and one pink pearl. And two basins with letters, one with a B and the other with a P. Now let's get to work.
RING
The first thing I made was the ring, for this I used 80 cm of black Chinese thread and 80 of pink Chinese thread. (This may vary depending on the size of the finger).And the two black and pink pearls.
FIRST STEP
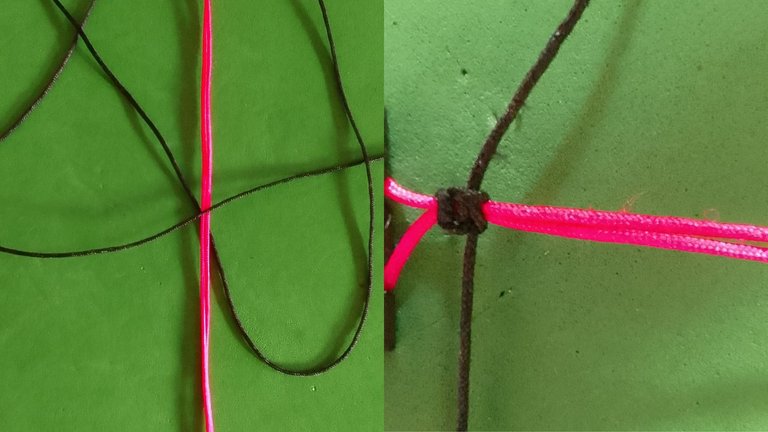
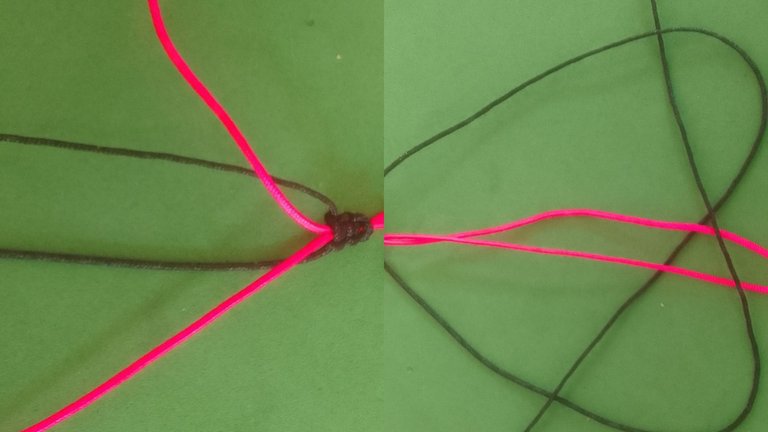
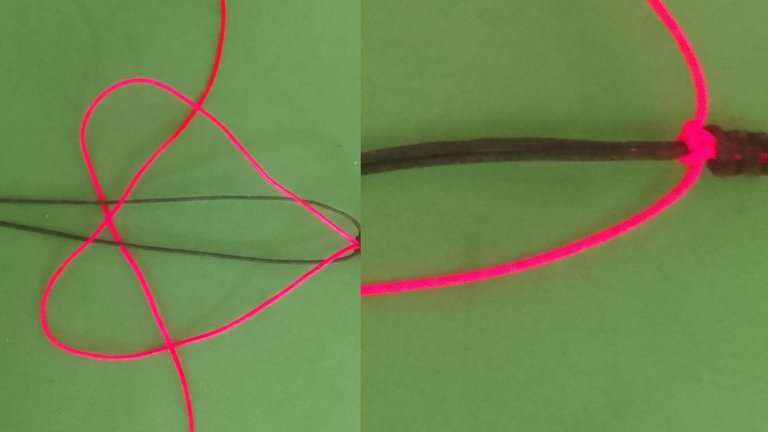
I started by folding the pink thread in half and placing it in the middle leaving an opening and I passed the black thread under the pink one and making sure it was in the center I tied a knot so that it doesn't move from the place, I started knitting with the point of the flat knot. I take the right side of the black thread and pass it to the left side, leaving an opening with the left side of the black thread, we pass it over the black thread that we pass to the left, then under the pink thread, which is the central thread, and we take it out through the opening that we left on the right side. We pull the two ends and the first flat knot is tied. Now we carry out the same procedure for the other side. We take the left side of the black thread and pass it to the side above the arterial threads and leaving an opening on the left side. Then I took the right thread, passed it over the left thread then under the center threads and took it out through the opening on the left side. We pull and we already have the flat knot. We repeat this two more times
SECOND STEP
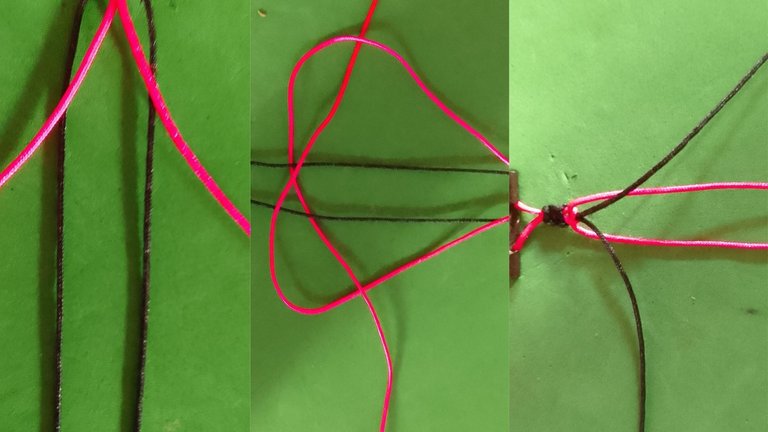
So that the pink thread can also be seen in the fabric, we are going to place the black thread that we were knitting with in the middle and we are going to start knitting with the pink one. Now with the black thread in the center we will make a flat knot with the pink thread. We place the right side of the pink thread and pass it over the black thread that would now be the central thread, leaving an opening on the right side. Then we take the left side and pass it over the right side and under the center threads, pass it through the opening and pull.
THIRD STEP
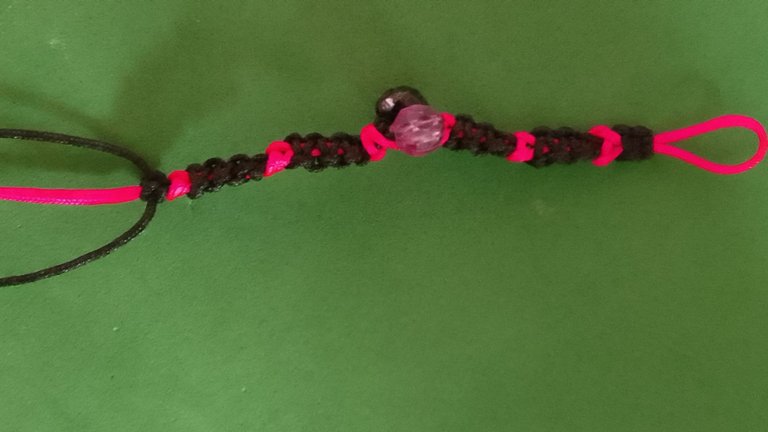
We place the pink thread in the center again and repeat this procedure two more times. We place the black pearls on one side of the thread and the pink one on the other.
We knit again and repeat the previous procedure three more times
FOURTH STEP
To make the closure of the ring we take the central thread that should close the pink and we are going to pass it through the opening left at the beginning. And with the black thread we are going to make four flat stitches.
BRACELET
Now I will explain the bracelet procedure.
FIRST STEP
The first thing was to take the pink thread and fold it in half and placing it in the middle and the black thread I passed it under the pink one and making sure that it was in the center I tied a knot so that it does not move from the place, I began to knit with the flat knot point. I take the right side of the black thread and pass it to the left side, leaving an opening with the left side of the black thread, we pass it over the black thread that we pass to the left, then under the pink thread, which is the central thread, and we take it out through the opening that we left on the right side. We pull the two ends and the first flat knot is tied. Now we carry out the same procedure for the other side. We take the left side of the black thread and pass it to the side above the arterial threads and leaving an opening on the left side. Then I took the right thread, passed it over the left thread then under the center threads and took it out through the opening on the left side. We pull and we already have the flat knot. We repeat this procedure 6 more times
SECOND STEP
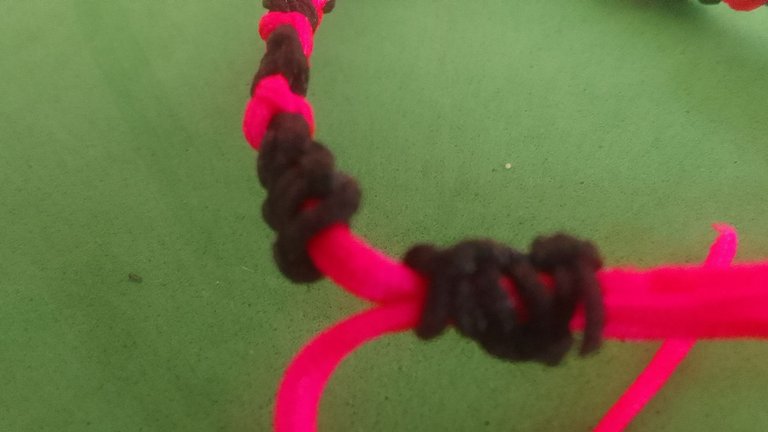
For the pink thread we are going to place the black thread that we were knitting with in the middle and we are going to start knitting with the pink one. Now with the black thread in the center we will make a flat knot with the pink thread. We place the right side of the pink thread and pass it over the black thread that would now be the central thread, leaving an opening on the right side. Then we take the left side and pass it over the right side and under the center threads, pass it through the opening and pull. We do the same on the other side, we take the left side and we are going to pass it to the right side above the central thread, leaving an opening. We take the right thread and pass it over the left one, under the central ones and through the opening we pull and the knot is ready.
THIRD STEP
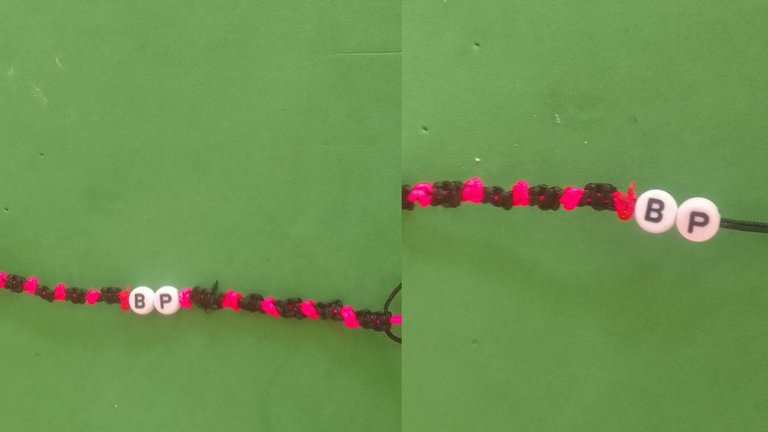
We repeat this procedure 4 more times then we place the sockets with letters, first the B passing it through the two central threads and then the P passing it through the two central threads.
We knit again and repeat the procedure 5 more times.
FOURTH STEP
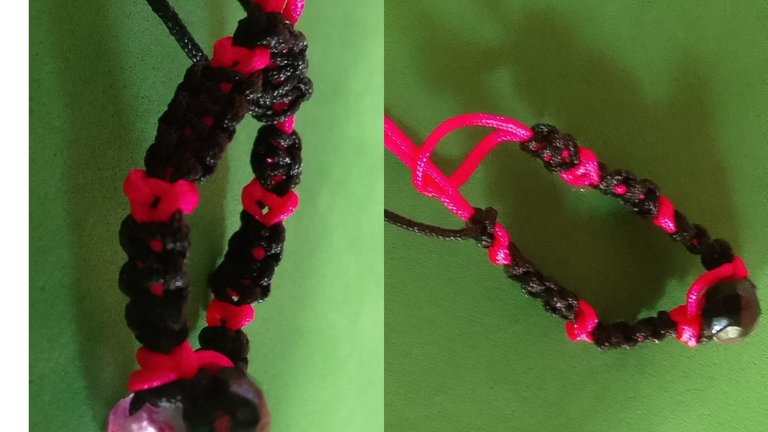
For the closure we take the two central threads that in this case would be the pink one and we place them in the shape of a cross and with a small piece of black thread we make 4 flat stitches for the closure.
This was the result of my work, I hope you like it. I just have to wish you all a nice day.
The photos were taken by my Samsung Galaxy A 03 Core phone and edited in canva
The text was translated by Deepl
VERSIÓN EN ESPAÑOL
Hola a todos hoy tengo el placer de publicar nuevamente en esta comunidad de #Jewerly y esta vez lo hago con un conjunto de anillo y pulsa inspirado en mi grupo favorito de K-POP BlackPink .
MATERIALES
Para realizar este conjunto de pulcera y anillo solo se necesita hilo chino rosado y negro. Una Perla negra y otra rosada. Y dos cuencas con letras una con una B y otra con una P. Ahora sí manos a la obra.
ANILLO
Lo primero que hice fue el anillo para este utilicé 80 cm de hilo chino negro y 80 de hilo chino rosado. (Esto puede variar según el tamaño del dedo).Y las dos perlitas negra y rosada.
PRIMER PASO
Comencé doblando el hilo rosado a la mitad y colocandolo en el medio dejando una apertura y el hilo negro lo pasé por debajo del rosado y asegurándome de que quedó en el centro le hago un nudo para que no se mueva del lugar ,comienzo a tejer con el punto del nudo plano. Tomo el lado derecho del hilo negro y lo paso al lado izquierdo dejando una apertura con el lado izquierdo del hilo negro lo pasamos por encima del hilo negro que pasamos a la hizquierda luego por debajo del hilo rosado que es el hilo central y lo sacamos por la apertura que dejamos en el lado derecho. Alamos las dos puntas y queda el primer nudo plano hecho. Ahora realizamos el mismo procedimiento para el otro lado. Tomamos el lado izquierdo del hilo negro y lo pasamos al lado por encima de los hilos arternales y dejando una apertura del lado izquierdo. Luego tome el hilo derecho lo pasé por encima del hilo izquierdo luego por debajo de lo hilos centrales y lo saqué por la apertura del lado izquierdo, alamos y ya tenemos el nudo plano. Repetimos esto dos veces más
SEGUNDO PASO
Para que también se vea el hilo rosado en el tejido vamos colocar el hilo negro con el que estábamos tejiendo en el medio y vamos a pasar a tejer con el rosado. Ya con el hilo negro en el centro realizaremos un nudo plano con el hilo rosado. Colocamos el lado derecho del hilo rosado y lo pasamos por encima del hilo negro que sería ahora el hilo central dejando una apertura del lado derecho. Luego tomamos el lado izquierdo y lo pasamos por encima del lado derecho y por debajo de los hilos centrales, lo pasamos por la apertura y alamos.
TERCER PASO
Colocamos nuevamente el hilo rosado en el centro y repetimos este procedimiento dos veces más le colocamos las perlitas por un lado del hilo la negra y por el otro la rosada
Volvemos a tejer y repetimos el procedimiento anterior tres veces más
CUARTO PASO
Para hacer el cierre del anillo tomamos el hilo central que debe ser el rosado y lo vamos a pasar por la apertura que deje al principio. Y con el hilo negro vamos a realizar cuatro puntos planos.
PULCERA
Ahora les explicaré el procedimiento de la pulsera.
PRIMER PASO
Lo primero fue tomar el hilo rosado y doblarlo a la mitad y colocandolo en el medio y el hilo negro lo pasé por debajo del rosado y asegurándome de que quedó en el centro le hago un nudo para que no se mueva del lugar ,comienzo a tejer con el punto del nudo plano. Tomo el lado derecho del hilo negro y lo paso al lado izquierdo dejando una apertura con el lado izquierdo del hilo negro lo pasamos por encima del hilo negro que pasamos a la izquierda luego por debajo del hilo rosado que es el hilo central y lo sacamos por la apertura que dejamos en el lado derecho. Aalamos las dos puntas y queda el primer nudo plano hecho. Ahora realizamos el mismo procedimiento para el otro lado. Tomamos el lado izquierdo del hilo negro y lo pasamos al lado por encima de los hilos arternales y dejando una apertura del lado izquierdo. Luego tome el hilo derecho lo pasé por encima del hilo izquierdo luego por debajo de lo hilos centrales y lo saqué por la apertura del lado izquierdo. Alamos y ya tenemos el nudo plano. Repetimos este procedimiento 6 veces más.
SEGUNDO PASO
Para el hilo rosado vamos a colocar el hilo negro con el que estábamos tejiendo en el medio y vamos a pasar a tejer con el rosado. Ya con el hilo negro en el centro realizaremos un nudo plano con el hilo rosado. Colocamos el lado derecho del hilo rosado y lo pasamos por encima del hilo negro que sería ahora el hilo central dejando una apertura del lado derecho. Luego tomamos el lado izquierdo y lo pasamos por encima del lado derecho y por debajo de los hilos centrales, lo pasamos por la apertura y alamos. Hacemos lo mismo del otro lado tomamos el lado izquierdo y lo vamos a pasar al lado derecho por encima del hilo central dejando una apertura. Tomamos el hilo derecho y lo pasamos por encima del izquierdo , por debajo de los centrales y por la apertura alamos y ya está listo el nudo.
TERCER PASO
Repetimos este procedimiento 4 veces más luego colocamos las cuencas con letras primero la B pasándola por los dos hilos centrales y luego la P pasándola por los dos hilos centrales.
Volvemos a tejer y repetimos el procedimiento 5 veces más.
CUARTO PASO
Para el cierre tomamos los dos hilos centrales que en este caso sería el rosa y lo colocamos en forma de cruz y con un pedacito de hilo negro realizamos 4 puntos planos para el cierre .
Este fue el resultado de mi trabajo espero que les guste. Solo me queda decearles a todos un lindo día.
Las fotos fueron tomadas por mi teléfono Samsung Galaxy A 03 Core y editadas en canva
El texto fue traducido por Deepl
https://reddit.com/r/blogs/comments/1c3csxu/un_conjunto_de_blackpink/
The rewards earned on this comment will go directly to the people( @heidy08 ) sharing the post on Reddit as long as they are registered with @poshtoken. Sign up at https://hiveposh.com.
Hermoso conjunto, feliz tarde presiosa 🌹🌷🪻🌸💮🌻🥀🌼🌺🪷💐☘️
Beautiful set, happy afternoon presiosa 🌹🌷🪻🌸💮🌻🥀🌼🌺🪷💐☘️
Gracias 🌺🪷🌸🌸💐🌷
🌹🌷
Very nice combination. Happy day my baby.
Linda combinación. Feliz dia mi niña.
Gracias mami 🥰🥰
Hola amiga que linda te quedaron tus pulseras
Gracias 😊😊😊
Congratulations @heidy08! You have completed the following achievement on the Hive blockchain And have been rewarded with New badge(s)
Your next target is to reach 2500 upvotes.
You can view your badges on your board and compare yourself to others in the Ranking
If you no longer want to receive notifications, reply to this comment with the word
STOPBendiciones , la combinación negro con rojo se ve muy bien. Excelente trabajo
!ALIVE | !BBH | !PGM | !LOLZ
@heidy08! Your Content Is Awesome so I just sent 1 $BBH (Bitcoin Backed Hive) to your account on behalf of @vocup. (4/20)
@heidy08! You Are Alive so I just staked 0.1 $ALIVE to your account on behalf of @ vocup. (4/20)
The tip has been paid for by the We Are Alive Tribe through the earnings on @alive.chat, feel free to swing by our daily chat any time you want, plus you can win Hive Power (2x 50 HP) and Alive Power (2x 500 AP) delegations (4 weeks), and Ecency Points (4x 50 EP), in our chat every day.

lolztoken.com
Or what the judge called a “restraining order”
Credit: reddit
@heidy08, I sent you an $LOLZ on behalf of vocup
(3/10)
ENTER @WIN.HIVE'S DAILY DRAW AND WIN HIVE!