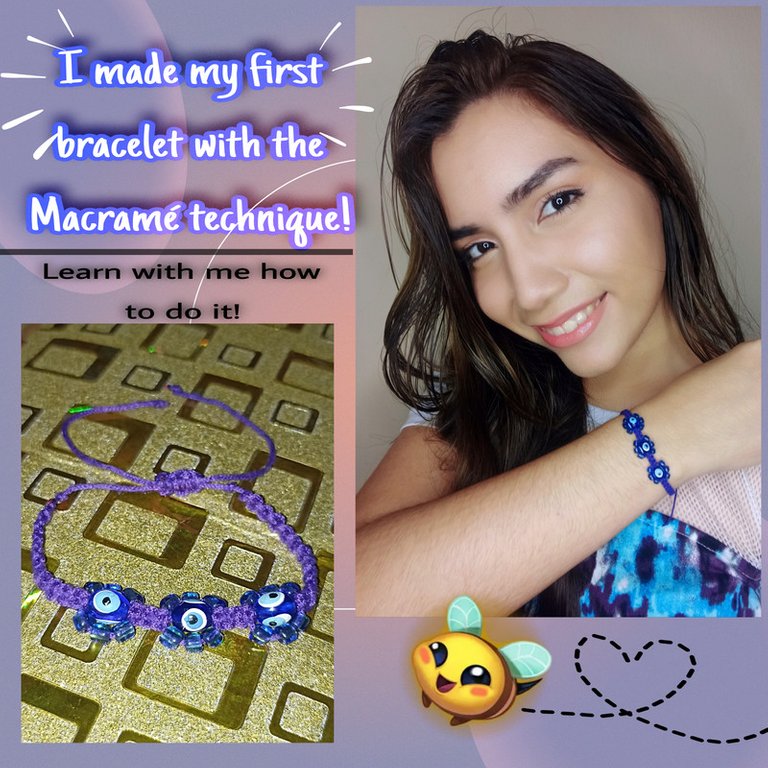
I made my first bracelet with the macramé technique! Learn with me how to do it! [ESP/ENG]
Hola queridos amigos de Hive ❤️ un saludo para todos los que me visitan el día de hoy 🤗. En esta oportunidad les quiero compartir y mostrar mediante un tutorial súper sencillo, como aprendí hacer mi primera pulsera fabricada con la técnica del macramé, ese arte tan bonito creando hermosas prendas con hilos, nudos y todos los accesorios que les desees agregar.
Desde hace ya bastante tiempo me gustaba trabajar con bisutería pero nunca había intentado hacer algo con esta técnica, y como últimamente he visto que están muy de moda este tipo de pulseras, me animé y de paso enseñarles mi proceso de confección. Cómo les digo al principio es bastante sencilla de hacer y con un poco de práctica estoy segura lograrás hacer ese accesorio que tanto deseas.
Para esta pulsera quise comenzar con algo más sencillo, así que solo hice nudos planos intercalando un bonito diseño con piedras decorativas en combinación, usando hilo chino, ojos turcos y cuentas. Y ahora sí, sin más que agregar... Comencémos!!
Hello dear friends of Hive ❤️ greetings to all who visit me today 🤗. In this opportunity I want to share and show you through a super simple tutorial, how I learned to make my first bracelet made with the macramé technique, that beautiful art creating beautiful garments with threads, knots and all the accessories you want to add.
For quite some time I liked working with costume jewelry but I had never tried to make something with this technique, and as lately I have seen that this type of bracelets are very fashionable, I decided to show you my process of making them. As I said at the beginning it is quite simple to make and with a little practice I'm sure you will be able to make that accessory you want so much.
For this bracelet I wanted to start with something simpler, so I just made flat knots interspersed with a nice design with decorative stones in combination, using Chinese thread, Turkish eyes and beads. And now yes, without further ado.... Let's get started!

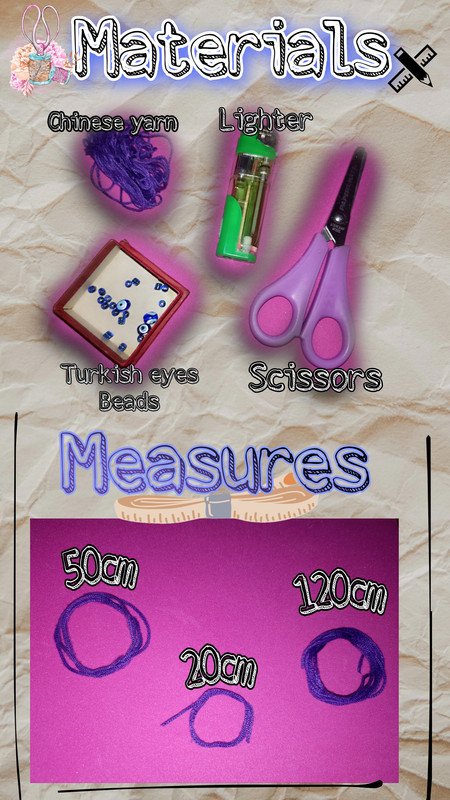

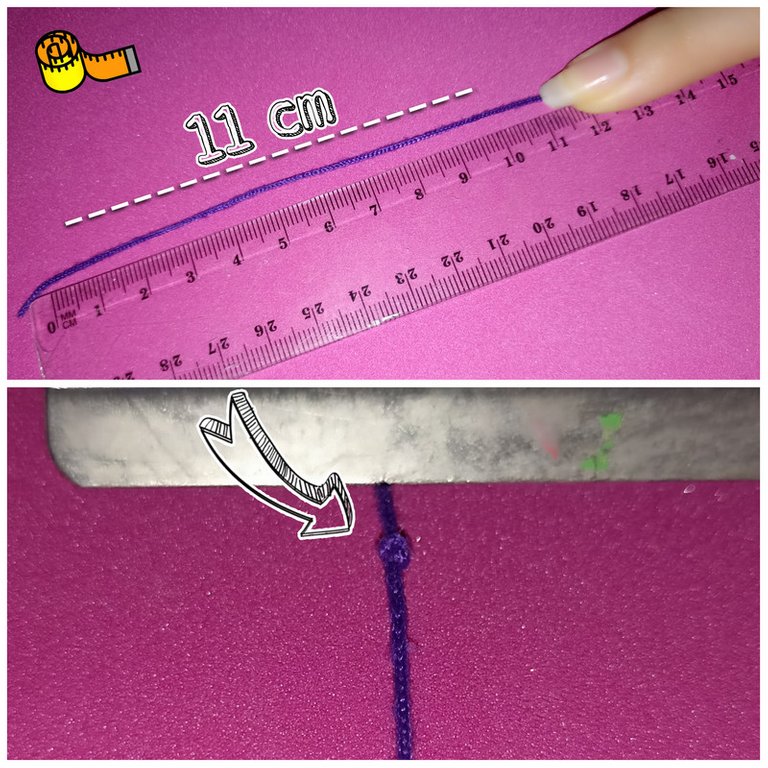
Antes de comenzar, vamos a preparar nuestro lugar de trabajo, para ello vamos a necesitar adicionalmente una tabla con gancho, cinta adhesiva, un lápiz (opcional), un regla o cinta métrica. Una vez tengamos esto a la mano vamos a tomar nuestro hilo de 50 cm y meditemos 11 cm, una vez ubicado el punto haremos un pequeño nudo. Luego colocaremos ese hilo en nuestra tabla sujetándolo antes del nudo, tal como les muestro en las fotos.
Cuando tengamos sujetado el hielo, vamos asegurarlo a la tabla con la cinta, luego debajo de este colocaremos un lápiz para facilitar nuestro trabajo, y ya ahora sí con esto empezamos a trabajar.
Before we start, let's prepare our work place, for this we will need additionally a board with a hook, tape, a pencil (optional), a ruler or tape measure. Once we have this at hand we will take our 50 cm thread and measure 11 cm, once the point is located we will make a small knot. Then we will place that thread on our board holding it before the knot, as I show you in the pictures.
When we have secured the ice, we will secure it to the board with the tape, then under it we will place a pencil to facilitate our work, and now with this we start to work.
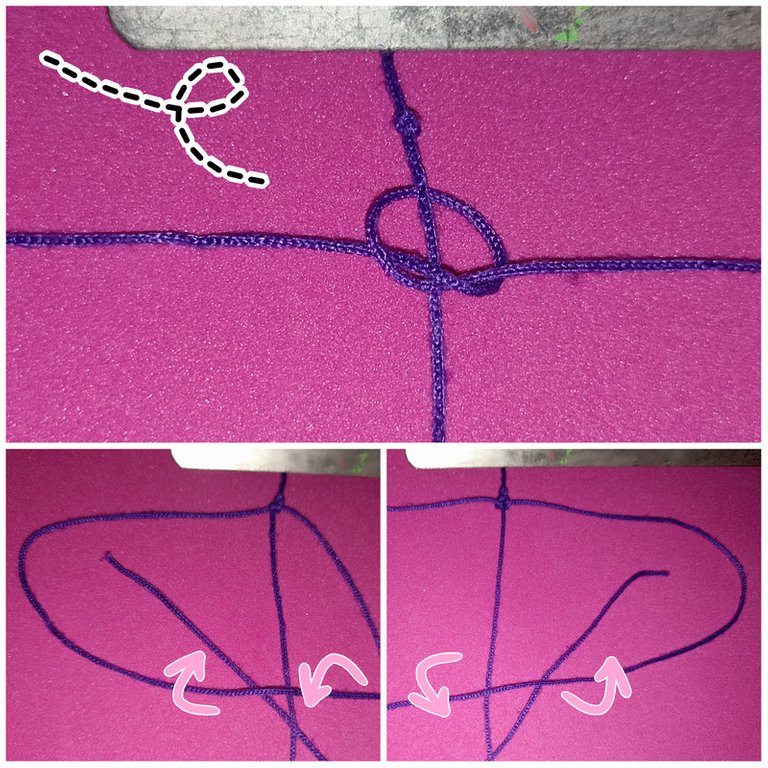
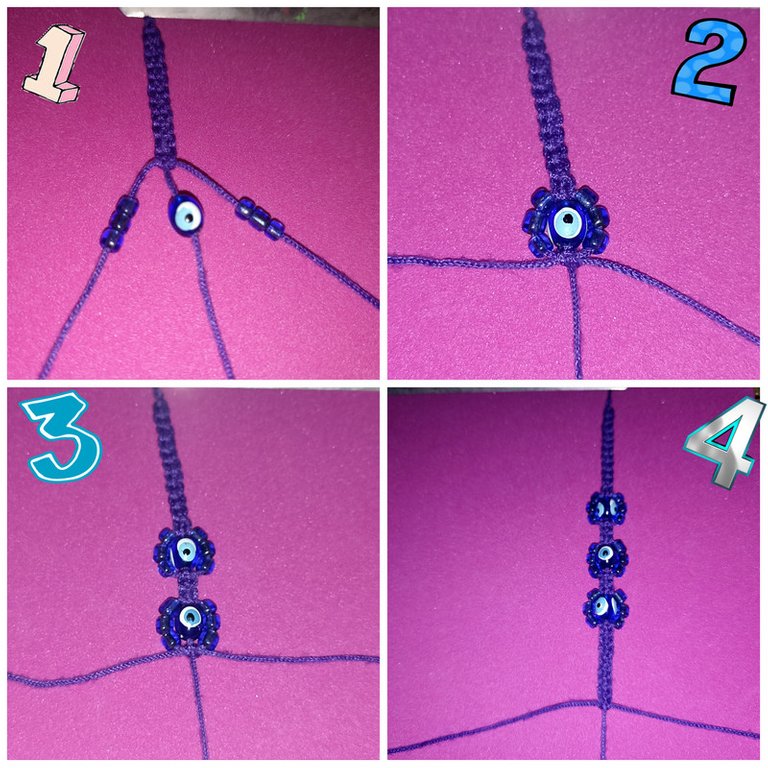
Vamos a pasar por debajo del hilo principal nuestro otro hilo más largo, asegurándonos que ambos extremos midan igual, y ya ubicando la mitad haremos nuevamente un nudo sencillo, luego empezaremos haciendo por un lado una especie de "P", y con el otro hilo vamos a pasar por encima y luego por abajo (Este paso nos quedaría como la primera imagen superior). Repetimos el proceso con el otro lado con la diferencia que ahora será una "P" invertida.
We are going to pass under the main thread our other longer thread, making sure that both ends measure the same, and already placing the middle we will make again a simple knot, then we will start making on one side a kind of "P", and with the other thread we are going to pass over and then under (This step would be like the first image above). We repeat the process with the other side with the difference that now it will be an inverted "P".
Cómo esta pulsera la hice según mi medida de mi muñeca, anteriormente realice 22 nudos para luego pasar hacer el primer diseño con nuestras piedras, para ello introduci una piedra de ojo turco por el hilo principal y tres por los hilos de los extremos. Después cerré realizando nuevamente un nudo. Para éste diseño hice solo 3 intersecciones, así que entre cada espacio hice un total de 4 nudos aproximadamente. Una vez repetido el proceso, continuamos realizando nuevamente los 22 nudos y cerramos con un nudo sencillo como el inicial.
As I made this bracelet according to my wrist measurement, I previously made 22 knots to then make the first design with our stones, for this I introduced a Turkish eye stone by the main thread and three by the threads of the ends. Then I closed the design by tying another knot. For this design I made only 3 intersections, so between each space I made a total of approximately 4 knots. Once the process is repeated, we continue making the 22 knots again and close with a simple knot like the initial one.
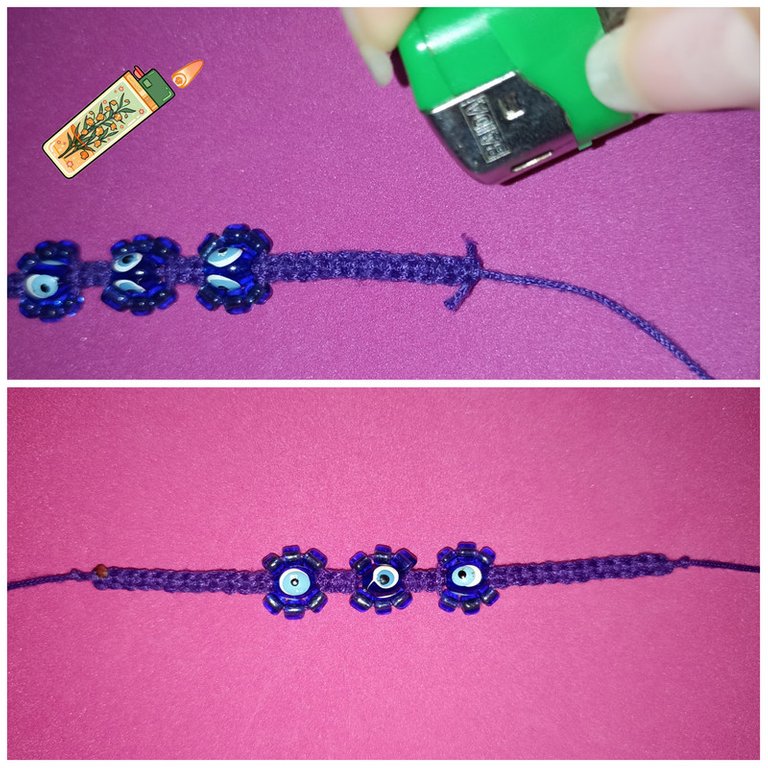
Cortamos el hilo sobrante y con nuestro mechero o yesquero, vamos a quemar las puntas para que no se nos desamarre a futuro. 😁
We cut the excess thread and with our lighter or tinder, we are going to burn the ends so that it does not untie us in the future. 😁
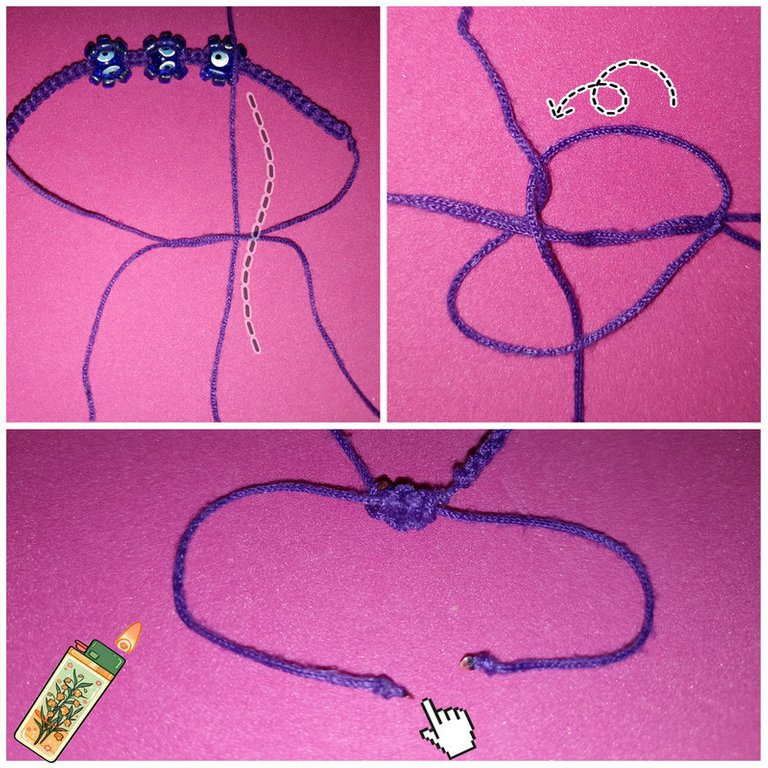
Ahora colocando ambos hilos en paralelo, vamos a utilizar ahora el otro hilo que nos queda de 20 cm, lo colocamos en medio en dónde ambos extremos midan igual, una vez allí haremos nuevamente un nudo sencillo y después haremos nudos planos, según el largo que desees. Finalmente quemamos el hilo sobrante y haremos también unos pequeños nudos en el terminal de cada hilo como un toque decorativo y quemamos sus puntas igualmente.
Now placing both threads in parallel, we are going to use now the other thread that we have left of 20 cm, we place it in the middle where both ends measure the same, once there we will make again a simple knot and then we will make flat knots, according to the length you want. Finally we burn the remaining thread and we will also make a few small knots at the end of each thread as a decorative touch and burn the ends as well.
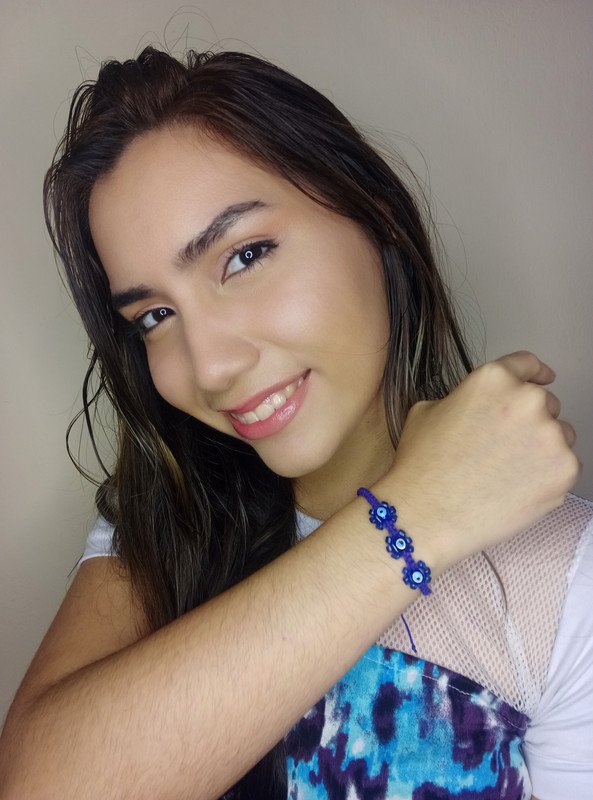
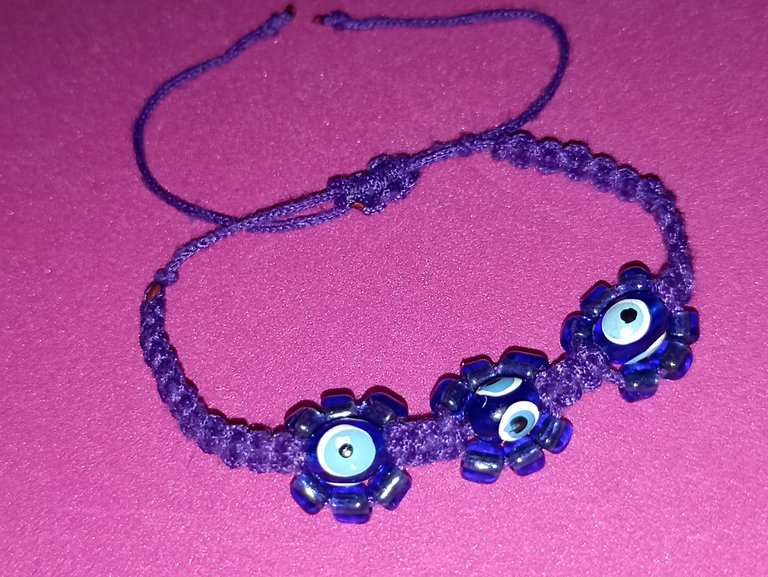
Y aquí les muestro la pulsera terminada, como ven aunque es algo sencilla, este tipo de técnica la hace lucir muy bonita y muy llamativa por su nudos y el lindo diseño con las piedras decorativas que usamos. No le temas a los nudos ! Es súper sencilla de hacer y si te gusto te animo a que lo intentes y lo hagas a tu gusto y con el diseño que más te guste, solo es cuestión de práctica, mucha creatividad y por supuesto un toque secreto de amor para que el trabajo quede con el mejor acabado 🥰. Espero les haya gustado, me encantó mostrarles este pequeño tutorial en mi primera vez realizando la técnica del Macramé, espero compartirles muy pronto nuevos trabajos, con mucho cariño me despido y será hasta la próxima 💕.
And here I show you the finished bracelet, as you can see, although it is somewhat simple, this type of technique makes it look very pretty and very striking for its knots and the nice design with the decorative stones that we use. Don't be afraid of knots ! It is super simple to do and if you like it I encourage you to try it and do it to your liking and with the design you like the most, it's just a matter of practice, lots of creativity and of course a secret touch of love so that the work is left with the best finish 🥰. I hope you liked it, I loved to show you this little tutorial in my first time doing the Macramé technique, I hope to share new works very soon, with much love I say goodbye and will be until next time 💕.
Todo el contenido es de mi autoría y las imágenes son de mi propiedad
Cámara: Redmi note 10s
Uso un aro de luz LED como base para mi teléfono y tomarme las fotos
All content is my own and images are my property
Camera: Redmi note 10s
I use an LED light ring as a base for my phone to take pictures of myself

Edición y Separador|Editing and Separator
App Picsart
Traductor|Translator
DeepL

Te quedó muy lindo 😍 @edwarlyn11
Muchas gracias mi @aksurevm89 me alegra que te haya gustado 🤗💕
Muchas gracias amiga 😊 me alegra que te gustara!!💕
This post was shared and voted inside the discord by the curators team of discovery-it
Join our community! hive-193212
Discovery-it is also a Witness, vote for us here
Delegate to us for passive income. Check our 80% fee-back Program
Thank you so much for your support @discovery-it team 🤗💕!!!!
Your content has been voted as a part of Encouragement program. Keep up the good work!
Use Ecency daily to boost your growth on platform!
Support Ecency
Vote for new Proposal
Delegate HP and earn more
Thank you very much for your support @ecency team 🤗💕.
Felicidades amiga @edwarlyn11 para ser la primera vez te ha quedado muy bien, muy bonita pulsera con ojos, los tonos son muy bonitos, gracias por traer este lindo tutorial. Saludos
Muchas gracias amigos @hive-189504 fue un gusto traer este tutorial mostrándoles mi proceso realizando esta técnica y lo fácil que puede ser si te animas y lo intentas. Espero pronto traer nuevos proyectos usando diferentes tipos de materiales y piedras. Un saludito y gracias por visitarme y comentar 🤗💕
Congratulations @edwarlyn11! You have completed the following achievement on the Hive blockchain and have been rewarded with new badge(s):
Your next target is to reach 800 posts.
You can view your badges on your board and compare yourself to others in the Ranking
If you no longer want to receive notifications, reply to this comment with the word
STOPTo support your work, I also upvoted your post!
Check out the last post from @hivebuzz:
Support the HiveBuzz project. Vote for our proposal!
Que Preciosa te quedó mi linda @edwarlyn11. Hace poco vi una parecida pero parecían margaritas jejeje, se veía tan cuchi. Y con tu paso a paso se ve tan fácil de realizar. Gracias por este práctico tutorial mi preciosa. Un mega abrazo y feliz domingo.
🧿!discovery 30
Muchas gracias mi @maridmc me alegra que te haya gustado 🥰...oye es una buena idea en lugar de colocar ojitos, formar varias flores jugando con los colores 😋. Otro mega abrazo para tí, y como casualmente estoy de cumple tomaré eso como una felicitación 😁🤗..un saludito y feliz día para ti también!!💕
Esta super, @edwarlyn11 me encanta las pulseras de ojitos!
Hola amiga @marleyn 🤗muchas gracias me alegra que te gustara...yo también amo estas pulseras se ven tan hermosas 😊💕. Pronto compartiré otros tutoriales usando este material!!😋
Hola! @edwarlyn, muy coqueta tu pulsera, el macramé es una técnica que en tejidos te puedes destacar combinando nudos con piedras, con encajes, y si combinas los nudos puedes realizar diseños espectaculares, me gustó tu pulserita, feliz día.
Siiiiii 😋 eso es lo que mas me gusta, que con esta técnica puedes dejar volar tu creatividad y jugar con todos los elementos decorativos como bien dices, combinando desde tonos de colores, hilos, tipos de piedras y variedad de nudos. Muchas gracias por tu bonito comentario me alegra un montón que te haya gustado @nhaydu 🤗💕
It's beautiful. I've tried to make this bracelet once but didn't get it right so I dropped it. Lol
Yes hehehe at the beginning it also used to happen to me but I think it's normal just a matter of practice until you get the hang of it.... For me for example after several attempts I finally got it right 🤗💕 greetings beautiful and thanks for visiting and commenting !!!
So you think I should keep trying? I'll do that then to get to perfection cause what you have here is actually pretty and I'd want to make something like it too. Greetings to you and thank you for the encouragement. A big hug❤️
I think so! If you like it and really want to learn you should keep trying 😊, start with something simple to get the hang of the knot, and then later you go trying with other techniques until you become an expert 🤗. Best regards and another big hug for you friend @windgirl 💕
Thank you so much. I'll keep trying and when I get it right, I'll show you my work too🥰