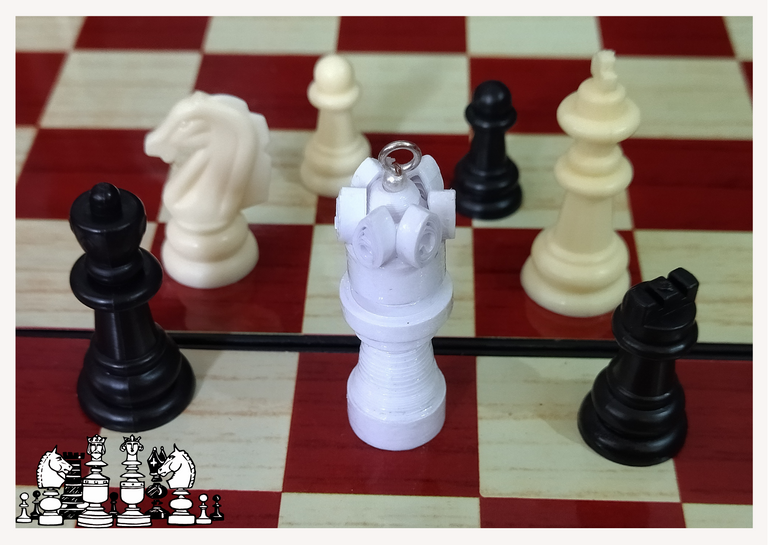
“A Queen for another Queen” // 3D Pendant / Quilling Technique [Eng/Esp]

Hello everyone... ✨
Hello to my dear Hivers and the beloved community of artists #DIYHub, as always very pleased and excited to be here again, showing you my work made with love and especially for you.
This time I bring you a special gift for a great friend that life gave me, I pray to God that this beautiful friendship consolidates every day more, and that it will be for the rest of our lives. As I know she is a lover of chess pieces, and for me she is a Queen since she deserves that title for many reasons, I make this little detail to that Queen of my heart. Beautiful friend I love you a world... 💕
Today I show you a step by step for the realization of a 3D pending of a Chess Queen in the quilling technique.
Hoping that it is to your liking and that if you wish you can materialize it:
Let's get started:😃

Hola a todos... ✨
Hola a mis queridos Hivers y a la querida comunidad de artistas #DIYHub, como siempre muy complacida y emocionada de encontrarme por acá nuevamente, mostrándole mi trabajo hecho con mucho amor y especialmente para ustedes.
En esta oportunidad les traigo un regalo especial para una gran amiga que la vida me regalo, le pido a Dios que esta bella amistad se consolide cada día más, y que sea por el resto de nuestras vidas. Como sé que es amante de las piezas de ajedrez, y para mi ella es una Reina ya que se merece ese título por muchísimas razones, le hago este pequeño detalle a esa Reina de mi corazón. Amiga bella te quiero un mundo... 💕
Hoy les muestro un paso a paso para la realización de un dije en 3D de una Reina de Ajedrez en la técnica de quilling.
Esperando que sea de su gusto y que si lo desean lo pueden materializar:
Comencemos:😃

• Cintas de quilling de 6 y 3mm de ancho blancas.
• Pega blanca extra fuerte (de carpintería).
• Tijera.
• Palillo de altura.
• Trozo de alambre fino.
• Argolla pequeña de bisutería.
• Regla con diversas medidas de circunferencias.
• Alicate punta fina.
- 6 and 3mm wide white quilling ribbons.
- Extra strong white glue (carpentry glue).
- Scissors.
- Height stick.
- Piece of thin wire.
- Small costume jewelry ring.
- Ruler with different circumference measurements.
- Fine-nosed pliers.

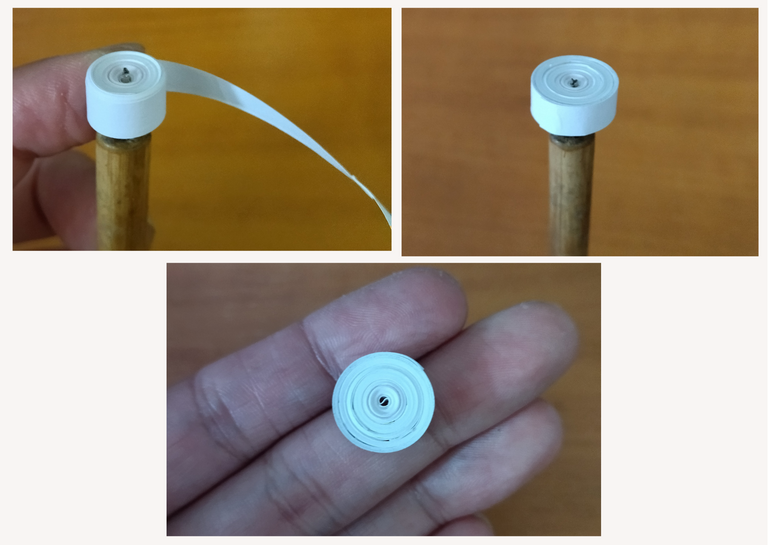
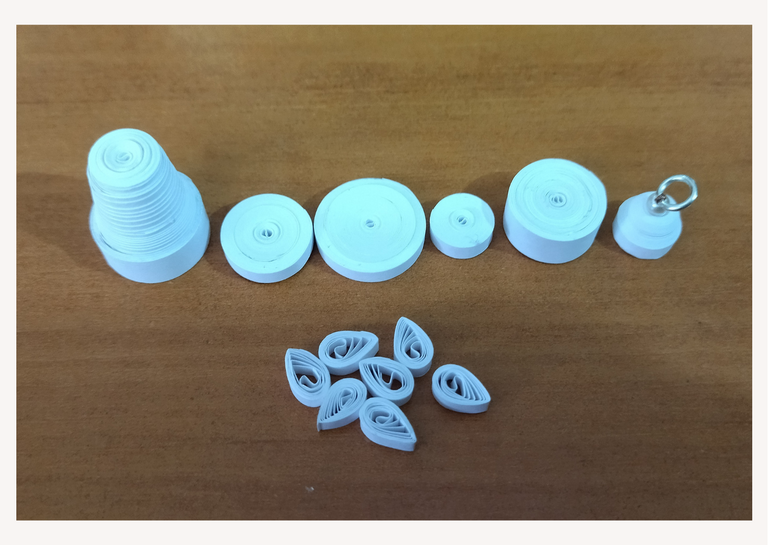
- We will start by taking 6mm wide white quilling ribbons, we will join several of them with a touch of extra strong white glue, to form a single ribbon of 150cms long.
- With the quilling needle we will roll until we reach the end of the ribbon, seal with glue to form a closed circle.
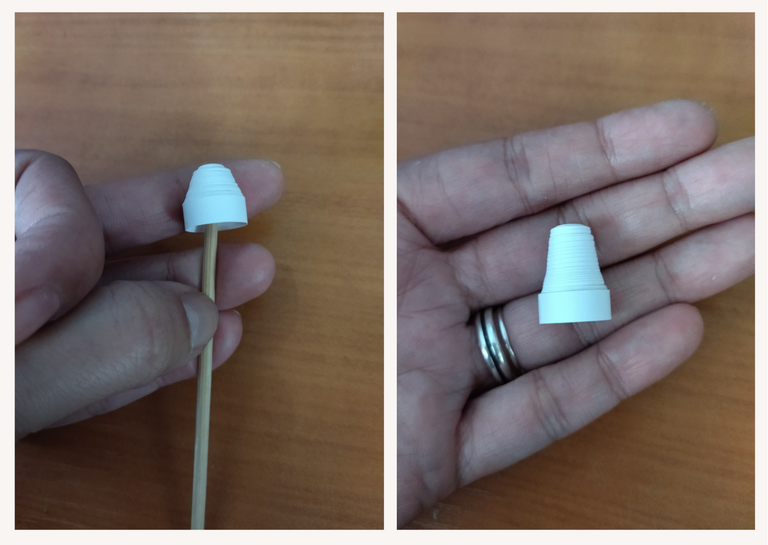
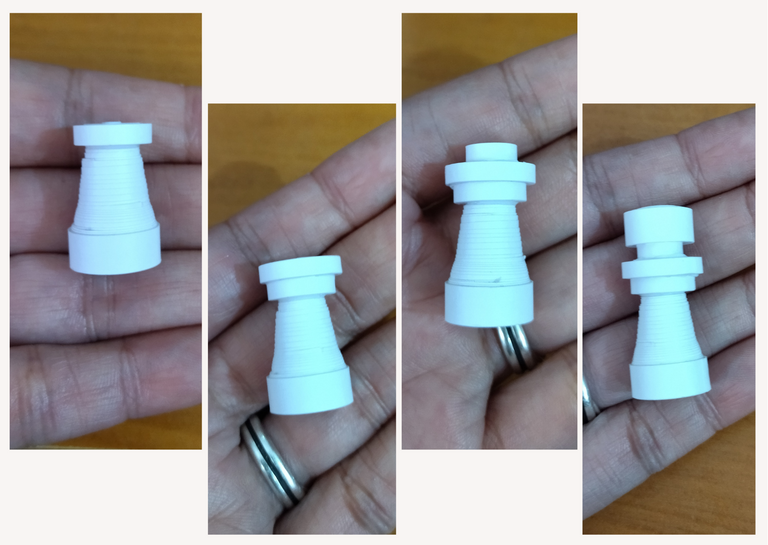
- Once the circle is ready we are going to shape it, with a height stick we will raise a little the circle to give body to it, in the image you will see the shape you want to get.
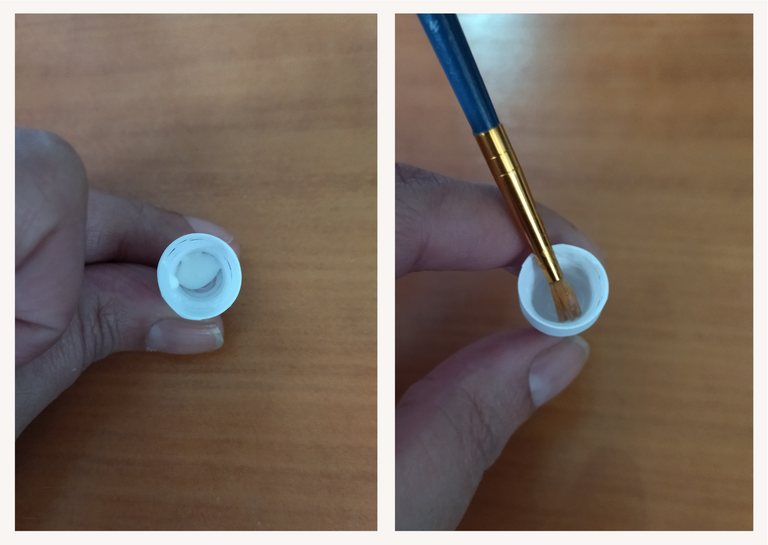
- Once ready in the hollow part we will put a little glue with a brush so that it does not deform.

• Vamos a comenzar tomando cintas para quilling color blanco de 6mm de ancho, uniremos varias con un toque de pega blanca extra fuerte, para formar una sola cinta de 150cms de largo.
• Con la aguja para quilling enrollaremos hasta llegar al final de la cinta, sellamos con pega para formar un círculo cerrado.
• Una vez listo el circulo vamos a darle forma, con un palito de altura subiremos un poco el circulo para darle cuerpo a la misma, en la imagen verán la forma que se desea conseguir.
• Una vez lista por la parte hueca colocaremos un poco de pega con un pincel para que la misma no se deforme.

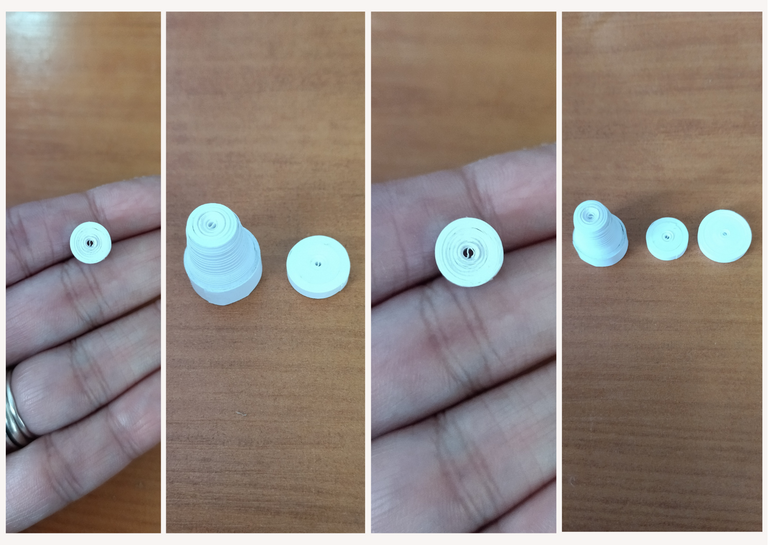
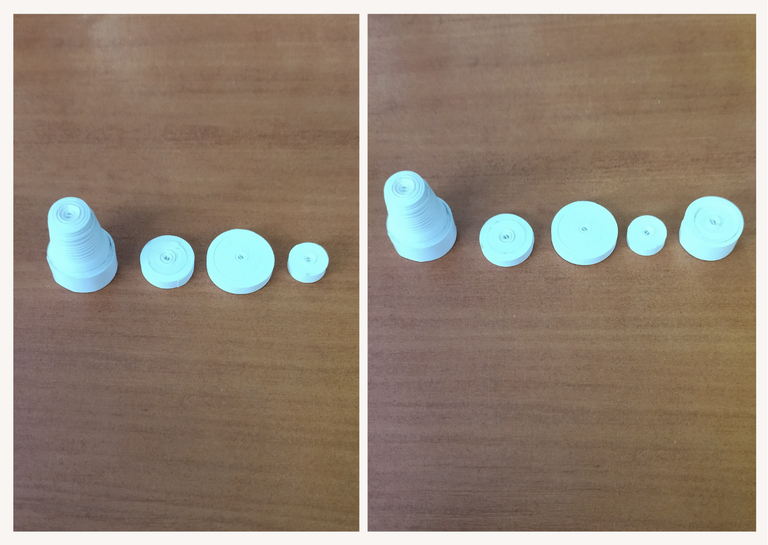
- Under the same process as above, we will take a white quilling ribbon 3mm wide x 100cms long, and with it we will make a closed circle.
- We will continue making a closed circle, with a 3mm wide x 150cms long ribbon.
- We will need another closed circle, made with a 3mm wide x 50cms long ribbon.
- We continue with a 6mm wide x 100cms long ribbon which we will roll up with the needle to get another closed circle.
• Bajo el mismo proceso anterior, tomaremos una cinta para quilling blanca de 3mm de ancho x 100cms de largo, y con ella realizaremos un círculo cerrado.
• Seguiremos realizando un círculo cerrado, con una cinta de 3mm de ancho x 150cms de largo.
• Vamos a necesitar otro círculo cerrado, realizado con una cinta de 3mm de ancho x 50cms de largo.
• Proseguimos con una cinta de 6mm de ancho x 100cms de largo la cual enrollaremos con la aguja para conseguir otro círculo cerrado.
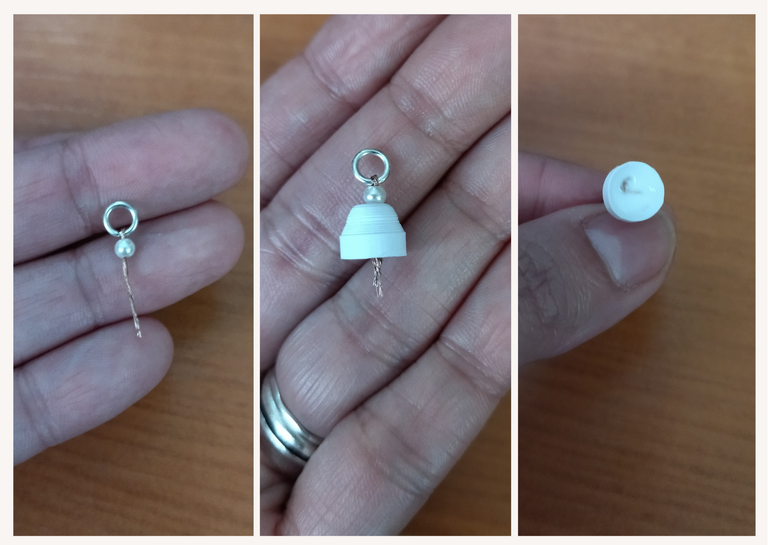
- At this point we will make another closed circle with a 3mm wide x 50cms long ribbon. This circle we are going to mold it a little with the tip of our fingers or with a toothpick, taking a little outwards and adding glue in the hollow part so that it does not lose its shape, we let it dry very well since we must continue working with it.
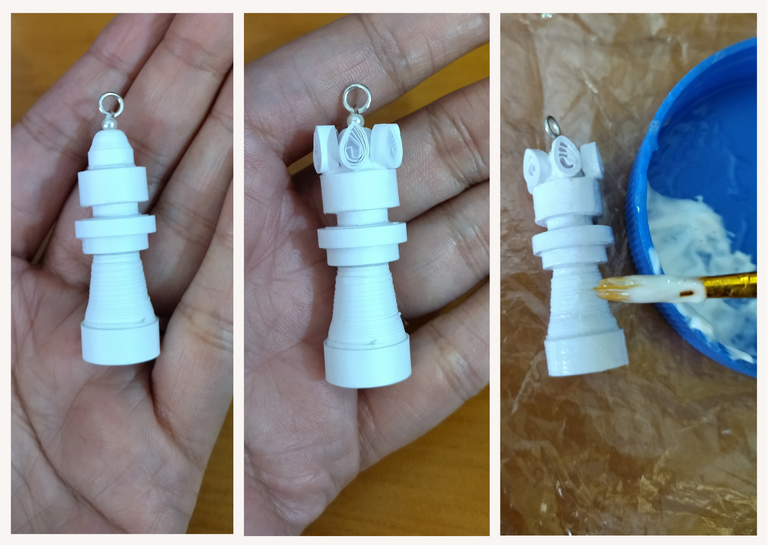
- Take a small white pearl, a small piece of fine wire from a cable that was in disuse and a small costume jewelry ring, assemble them as shown in the image and proceeded to introduce through the hole of the last molded circle that I made, so that the wire does not come out, roll it up and add extra strong white glue and let it dry very well.
• En este punto haremos otro círculo cerrado con una cinta de 3mm de ancho x 50cms de largo. Este círculo vamos a moldearlo un poco con la punta de los dedos o con un palillo de altura, sacando un poco hacia afuera y agregando pega en la parte hueca para que no pierda su forma, dejamos secar muy bien ya que debemos seguir trabajando con él.
• Tome una pequeña perla blanca, un trocito de alambre fino de un cable que estaba en desuso y una argolla pequeña de bisutería, los ensamble como muestra la imagen y procedí a introducir por el agujero del ultimo circulo moldeado que realice, para que no se salga el alambre enrolle y añadí pega blanca extra fuerte dejando secar muy bien.

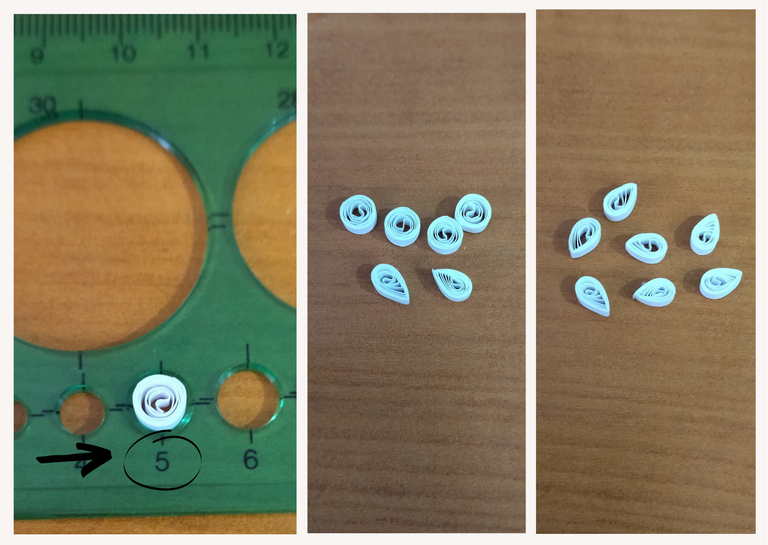
- To finish with the elaboration of the circles we will take several pieces of white tape 3mm wide x 12cms long, with which I made small open circles in the circle number 5 of the ruler with different measures of circumference, and proceeded to mold in the shape of leaves.
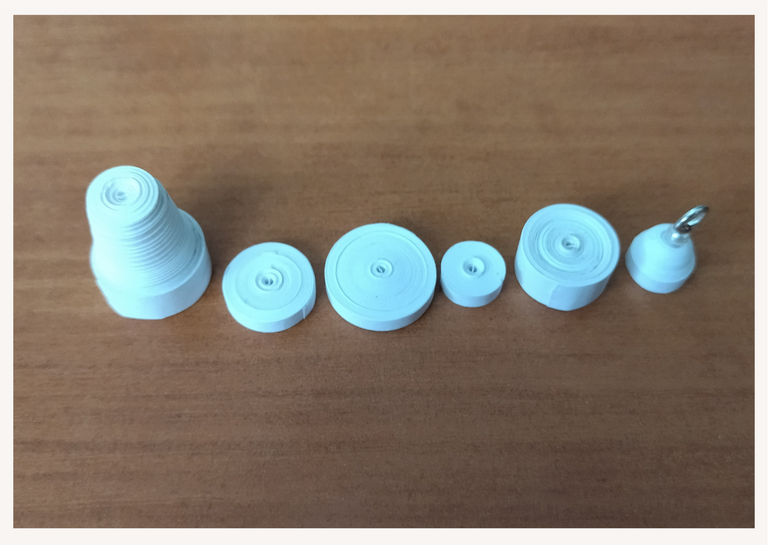
- We are going to assemble our chess Queen, applying extra strong white glue, and joining each circle or piece as you can see in the image, in the order of elaboration shown in the previous pictures.
As you can see basically this charm consists of the elaboration of closed and open circles, with different lengths of ribbons.
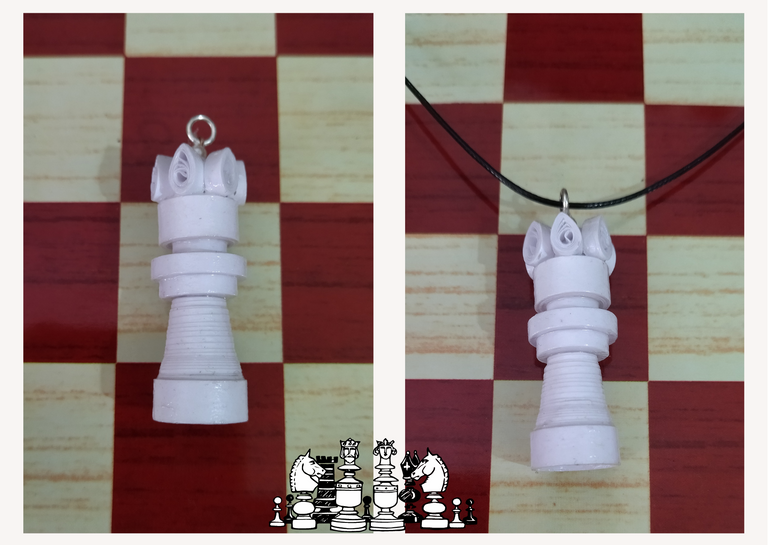
- To finish with my creation, I simply applied its liquid protection (plasticized), with a brush I applied several layers of extra strong carpentry glue, letting it dry between one layer and the other.
In this way I made this special pendant for my beautiful friend. But as every Queen has her King I will soon bring you the charm for her King, so wait for it...❤️
• Para finalizar con la elaboración de círculos tomaremos varios trozos de cinta blanca de 3mm de ancho x 12cms de largo, con las cuales realicé pequeños círculos abiertos en el círculo número 5 de la regla con diversas medidas de circunferencia, y procedí a moldear en forma de hojas.
• Vamos a ensamblar nuestra Reina de ajedrez, aplicando pega blanca extra fuerte, y uniendo cada circulo o pieza tal como pueden apreciar en la imagen, en el orden de elaboración mostrado en las fotografías anteriores.
Como podrán ver básicamente este dije consta de la elaboración de círculos cerrados y abiertos, con diversas longitudes de cintas.
• Para culminar con mi creación, simplemente coloque su protección liquida (plastificado), con un pincel aplique varias capas de pega extra fuerte de carpintería dejando secar entre una capa y otra.
De esta manera realice este dije especial para mi bella amiga. Pero como toda Reina tiene su Rey próximamente les traeré el dije para su Rey, así que espérenlo…❤️


What did you think, did you like it?
I hope you did, I hope you liked my explanation, procedure and photos, I made them with love for you.
"Let out that muse that inspires you, and let your imagination fly".
Thank you all, see you next time. 🌹✨
¿Que les pareció, les gustó?
Espero que sí, que les haya gustado mi explicación, procedimiento y fotos, los hice con mucho cariño por y para ustedes.
"Deja salir esa musa que te inspira, y deja volar tu imaginación".
Gracias a todos, nos vemos en la próxima. 🌹✨
Todas las fotos usadas en este post son de mi autoría y han sido sacadas en mi celular personal un Redmi 9T y editadas Canva Banner y separador hecho por mí en Canva Traducido con la ayuda de DeepL

Un trabajo impresionante @dayadam ... No tienes Límites para expresar tu gran talento... Bendiciones para esas manos creativas.
!discovery 40
Gracias hermosa @chacald.dcymt. Dios te bendiga infinitamente mi corazón... ❤️🌹
This post was shared and voted inside the discord by the curators team of discovery-it
Join our Community and follow our Curation Trail
Discovery-it is also a Witness, vote for us here
Delegate to us for passive income. Check our 80% fee-back Program
Thanks @chacald.dcymt and @discovery-it ✨
https://leofinance.io/threads/chacald.dcymt/re-leothreads-2yydgramt
https://leofinance.io/threads/dayadam/re-leothreads-h8nhsaye
The rewards earned on this comment will go directly to the people ( chacald.dcymt, dayadam ) sharing the post on LeoThreads,LikeTu,dBuzz.
Thanks @poshthreads ✨
You are so creative.. What did you come up with that idea? I even thought it was a real chess piece..
I thought it was printed through a 3d printer and then I was amazed seeing the steps. She's so talented with this quilling technique.
Thank you and thanks a thousand times. I love reading this. Hugs and again thanks for the support and comment @diyhub 😊💕
Thank you my dear for your comment. I made it with a lot of love for a special friend since she likes those chess figures, with the desire we can think of many things, everything is in wanting to do it. Greetings @jane1289 ✨
Wow! Esto es increíble, no sabía que se podían hacer cosas así de hermosas. En la primera imagen no pude imaginar que era está técnica. Quedé fascinada con el proceso. Felicidades amiga tu talento es una gran bendición!
She is very talented with this Quilling Technique.
Thank you very much for the compliment and support @diyhub. I am gratified by your words. I try to do my best. Regards... ✨
Gracias mi bella @jetta.amaya, por tu lindo comentario, me alegra que te gustara el trabajo. En efecto con esta técnica se logran cosas hermosas ya que es muy versátil y se presta para mucho. Trato de hacer lo mejor que puedo, aunque no te creas que me falta mucho por aprender. Amen y amen. Mil bendiciones para ti también... ✨
Si quieres formar parte de nuestro trail de curación ingresa a HIVEVOTE, haciendo clic en la imagen del capybara aristocratico. Capybaraexchange tu casa de cambio, rapida, confiable y segura
Gracias por el apoyo @capybaraexchange ✨
Great work! 👍
Thank you very much for your comment. Regards @mdasein ✨
Oh my!!! You made it through papers?!!! I thought a 3d printer printed it. Great work.
Thank you for your nice comment and support. I love this technique and as you see you can achieve beautiful things. A thousand blessings, greetings @diyhub ✨
the result is beautiful..if you look at it you won't think it is made of paper.
I'm glad you liked it, I tried to do my best. Thanks for your comment @john0928 ✨
Congratulations @dayadam! You have completed the following achievement on the Hive blockchain And have been rewarded with New badge(s)
Your next target is to reach 8000 replies.
You can view your badges on your board and compare yourself to others in the Ranking
If you no longer want to receive notifications, reply to this comment with the word
STOPCheck out our last posts:
Thanks @hivebuzz ✨
That's great @dayadam! We're excited to see your commitment to Hive! Keep it up!
Jeez... This was a very creative thing.
It looks so so real
Thank you for your nice comment and support. I love this technique and as you see you can achieve beautiful things. A thousand blessings, greetings @sperosamuel15 ✨
Its a cool technique
You're welcome
💕
Wow this is so creative and perfect like a 3d printer . Never knew paper can even do these ❤️
This technique is wonderful and very versatile, it lends itself to make many beautiful things. Thank you very much for your comment. Regards @graciousvic ✨
That's nice
I play chess but it been a while tho
Hopefully you can pick it up again, Thanks for your comment, I'm glad you liked it @graciousvic ✨
Yeah sure just busy with school things now
You did a great job with this and am happy that you made it with so much love.
Well done dear 💕💃
Thank you very much, with love you get to do many things, I'm glad you liked it. Hugs @monica-ene ✨
Whaaaat?! No me imaginaba que la pieza completa era hecha con los rollitos, me sorprendió mucho que construiste paso a paso la estructura y la forma de la corona quedó súper.
Definitivamente un trabajazo, mis felicitaciones por seguir siempre superándote y continuar sorprendiéndonos con tus creaciones. Esto de la técnica 3D es ya una versión muy pro de Daya jajaja.
Que fino que tengas ese arte para algazara a los que quieres con regalitos así de impresionantes, te deseo muchos éxitos de mi parte. 🤗
Gracias hermosa, siempre para mi es un placer leerte por aquí, y mas apreciar tus bellos comentarios hacia mi trabajo. Me encanta hacer cositas para los que quiero, parece que últimamente me he dedicado mucho a eso, y de esa manera lo hago con mas amor.
Un abrazo fuerte para ti mi linda @ninaeatshere. Bendiciones... ✨
Amiga sin duda alguna toda una obra de arte Dios siga bendiciendo tus manos, te quedó hermosa🌹🌹😍😍😍😍🌹😍🤗
Gracias mi bella, muy agradecida por tu comentario. Amen. Mil bendiciones para ti también @yraimadiaz ✨
Me encanta, es un diseño muy original. Seguro que a tu amiga le encantó este presente. ¡Bellísimo!
Me alegra que te haya gustado cariño. A mi amiga le encanto, me resta hacer otras piezas que le prometí luego de esta sorpresa, para hacerlas llegar a sus manos muy pronto. Bello día para ti @creacioneslelys ✨
Igualmente 😊🫂☺️
This is a beautiful pendant, @dayadam. And it seems pretty easy to make. Thanks for sharing your step by step.