[Esp/Eng] ✨Dulcero con osito navideño. // Candy dish with Christmas teddy bear.✨
✨¡Hola amigos amantes de la creatividad! Espero que estén todos bien.✨
🔸Sin más que añadir, a continuación los dejo con el paso a paso:
✨¡Hello friends who love creativity! I hope you are all well.✨
Good afternoon, friends! I hope you're having a wonderful week. I'm happy to stop by and share a cute idea with you. This time, I'm sharing the step-by-step instructions for making a cute candy holder with a Christmas teddy bear. I know it's the last week of the month and there are only a few days left until the end of the year. That's why I wanted to take advantage of the time to make a candy holder, in case anyone forgot to give a nice little gift. With this cute decoration, a note, and some candy, you can solve that problem, haha.
🔸Without more to add, then I leave you with the step by step:

♥️ESPERO QUE TE GUSTE,
¡Empecemos!
♥️I HOPE YOU LIKE IT,
Let's start!

✂️ MATERIALES | ✂️ MATERIALS
- Cartulina metalizada verde.
- Foami escarchado blanco.
- Foami marrón.
- Foami crema.
- Foami rojo.
- Pinturas y marcadores.
- Pegamento.
- Tijeras.
- Regla.
- Hoja blanca.
- Lápiz.
- Green metallic cardstock.
- White glitter foam.
- Brown foam.
- Cream foam.
- Red foam.
- Paints and markers.
- Glue.
- Scissors.
- Ruler.
- White paper.
- Pencil.
🌟 PROCEDIMIENTO | 🌟 PROCESS
✨PASO 1:
Lo primero, como siempre, es dibujar en una hoja blanca el diseño pensado para este dulcero, para que al tener clara la idea, que en este caso es la decoración del oso, con un gorrito y bufanda, pero, además, quise una decoración extra de copitos de nieve para acompañar la decoración principal. Al tener listo todo el diseño, es momento de transferir a los colores correspondientes de foami, como explico a continuación:
✨Cabeza: 5.5 cm x 3.5 cm en foami marrón.
✨Cuerpo: 4.5 cm x 2 cm en foami marrón.
✨Hocico: 2 cm x 1.3 cm en foami crema.Gorro: 4 cm x 1 cm en foami rojo.
✨Borde del gorro y pon pon: 3 cm x 1 cm y 1 cm en foami escarchado blanco.
✨Bufanda: 4 cm x 1 cm en foami rojo.
✨Copos de nieve: 3 cm en foami escarchado blanco.
✨STEP 1:
The first step, as always, is to sketch the design for this candy holder on a blank sheet of paper. This way, I have a clear idea of the bear, which in this case is decorated with a hat and scarf. I also wanted to add some snowflake decorations to complement the main design. Once the design is complete, it's time to transfer it to the corresponding colors of foam, as explained below:
✨Head: 5.5 cm x 3.5 cm in brown foam.
✨Body: 4.5 cm x 2 cm in brown foam.
✨Snout: 2 cm x 1.3 cm in cream foam.
✨Hat: 4 cm x 1 cm in red foam.
✨Hat trim and pom-pom: 3 cm x 1 cm and 1 cm in white glitter foam.
✨Scarf: 4 cm x 1 cm in red foam.
✨Snowflakes: 3 cm in white glitter foam.
 |  |
|---|
✨PASO 2:
Al estar listas y recortadas las piezas, es momento de mi parte favorita, que es darle color a los bordes de cada una de las piezas, con pinturas o marcadores, utilizando colores que hagan contraste; en mi caso, utilicé un tono de marrón más oscuro para el cuerpo del oso y para el hocico, mientras que para las piezas de foami rojo, utilicé un tono negro y dejamos secar para luego dar más detalles, como definir rostro, orejas, cuerpo y bufanda con marcadores.
✨STEP 2:
Once the pieces are ready and cut out, it's time for my favorite part: coloring the edges of each piece with paint or markers, using contrasting colors. In my case, I used a darker shade of brown for the bear's body and snout, while for the red foam pieces, I used black. We let it dry before adding more details, such as outlining the face, ears, body, and scarf with markers.
 |  |
|---|
✨PASO 3:
Al estar listas las piezas, es momento de comenzar a pegar en el orden correspondiente, siempre comenzando con la cabeza, hocico, gorro navideño, parte baja del cuerpo y, por último, la bufanda.
✨STEP 3:
Once the pieces are ready, it's time to start gluing them in the correct order, always beginning with the head, snout, Christmas hat, lower body, and finally, the scarf.
 |  |
|---|
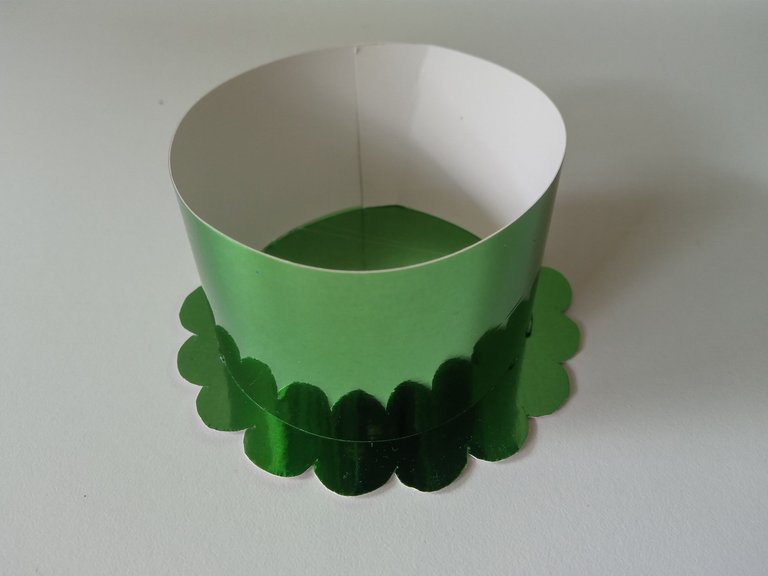
✨PASO 4:
Ahora sí, es momento de sacar las medidas para el dulcero. En este caso, debemos tomar la cartulina metalizada verde (o la del color de preferencia) y recortamos una tira de 25 cm x 5 cm que serán las paredes del dulcero, mientras que, para la base, vamos a hacer una circunferencia de 10 cm a la cual le vamos a recortar unos bordes ovalados, tipo flor.
✨STEP 4:
Now it's time to take the measurements for the candy holder. In this case, we need to take the metallic green cardstock (or any color you prefer) and cut a strip 25 cm x 5 cm, which will be the sides of the candy holder. For the base, we'll make a 10 cm circle and cut oval, flower-like edges around it.
 |  |
|---|
✨PASO 5:
Al estar listo, formamos el dulcero, como se muestra en la imagen a continuación, seguido de la decoración del oso en medio, pero más, dando a la parte superior del dulcero y, por último, pegamos los copos de nieve a los lados del oso.
✨STEP 5:
Once that's done, we assemble the candy holder, as shown in the image below. Then, we decorate the bear in the center, positioning it towards the top of the holder, and finally, we glue the snowflakes to the sides of the bear.
 |  |
|---|
✨And that's it, friends! That's how you can make this cute candy holder to get you out of a last-minute bind, haha. You can also make a much simpler decoration. I hope you liked the step-by-step instructions and are inspired to make it!
❤️Until the next post.
✨RESULTADO: | ✨RESULT:
 |  |
|---|

Todas las fotografías son de mi propiedad.
Separador y Fotos editadas en Canva
All photographs are my property.
Photos edited in Canva
Lovely candy dish friend, we love it and we commend your creativity.
selected by @ibbtammy
Muchas gracias amigos ! Me alegra que te haya gustado.💕
Que bellooo, se ve super lindo, veré si hago uno, pero creo que lo haría con un muñequito de nieve que esos me gustan mucho.
Claro, puedes hacerlo a gusto con cualquier personaje, es perfecto para algún detalle o hasta para día de reyes.💕
Que cuchii 😍
Muchas gracias amiga
WoW!! Que dulce!! Esta perfecto por los niños! :)
!discovery
Muchas gracias espero les sirva de ayuda 💕
This post was shared and voted inside the discord by the curators team of discovery-it
Join our Community and follow our Curation Trail
Discovery-it is also a Witness, vote for us here
Delegate to us for passive income. Check our 80% fee-back Program
Muchas gracias por el apoyo amigos 💕