Beautiful charm bracelet / Hermosa pulsera con dijes
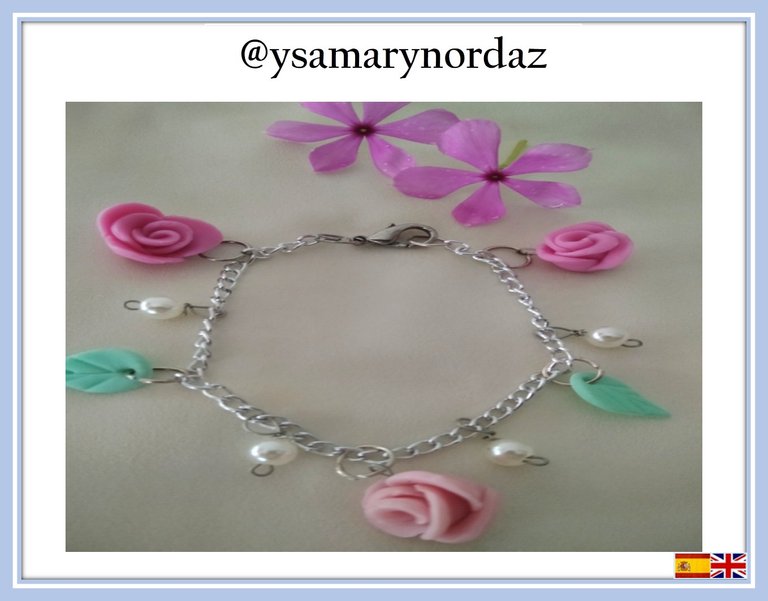
Hello friends of this great community of #DIYHub. Dangle charm bracelets are a great accessory option for anyone who wants to add a personalized and unique touch to their look. These bracelets are characterized by having small charms that hang from the chain, which can be made of different materials, such as gold, silver, stainless steel, among others. The pendants can be very varied and include everything from symbols, images, initials and even precious stones. Today I want to show you step by step how to make a bracelet with charms made of flexible clay and also adorned with pearls. I hope you like this step by step. Let's start!
Hola amigos de esta gran comunidad de #DIYHub. Las pulseras con dijes colgantes son una excelente opción de accesorios para cualquier persona que quiera añadir un toque personalizado y único a su look. Estas pulseras se caracterizan por tener pequeños dijes que cuelgan de la cadena, que puede ser de diferentes materiales, como oro, plata, acero inoxidable, entre otros. Los dijes pueden ser muy variados e incluyen desde símbolos, imágenes, iniciales y hasta piedras preciosas. El día de hoy quiero mostrarte un paso a paso, de cómo elaborar una pulsera con dijes hechos en masa flexible y adornada también con perlas. Espero te guste este paso a paso ¡Vamos a comenzar!

Materials:
•Flexible clay: pink, aquamarine and fuchsia
•Moisturizing lotion
•Rolling pin
•Pottery clay cutter
•Metallic ball
•Plier
•Leaf cutter
•Small round cutter
•Silver chain (15cm)
•6 jump rings
•1 Jewelry clasp
•4 pearls
•4 Silver wire
Materiales:
•Masa flexible de colores rosado, aguamarina y fucsia
•Crema humectante
•Rodillo
•Esteca de cuchilla
•Bolillo metálico
•Pinza
•Cortador de hoja
•Cortador redondo pequeño
•Cadena plateada (15cm)
•6 aros de bisutería
•1 broche
•4 perlas
•Alambre plateado
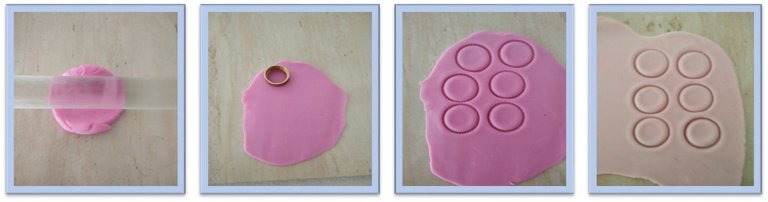
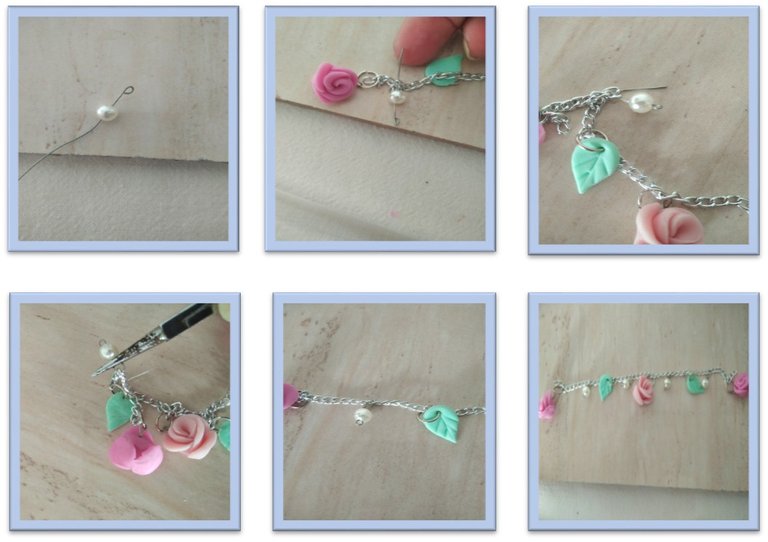
Step 1
Clean the surface where you will work the clay and spread a little moisturizer on it, in this way you will prevent the clay from sticking. Likewise, place it in your hands to make it easier to knead. Take the fuchsia-colored clay and place it on the surface, with the help of the rolling pin, spread it out. Once extended, place the cutter in the shape of a circle and extract 6 pieces, carry out the same procedure with the pink clay.
Paso 1
Limpia la superficie donde trabajarás la masa y unta un poco de crema humectante en ella, de esta manera evitarás que la masa se pegue. Igualmente, coloca en tus manos para que sea más fácil el amasado. Toma la masa de color fucsia y colócala sobre la superficie, con la ayuda del rodillo extiéndela. Una vez extendida, coloca el cortador en forma de círculo y extrae 6 piezas, realiza este mismo procedimiento con la masa de color rosado.
Step 2
Once you have the 6 circles, join them by their edges. Now roll up to form the flower. Repeat this procedure until you have 2 fuchsia flowers and 1 pink flower.
Paso 2
Una vez tengas los 6 círculos, únelos por sus bordes. Ahora ve enrollando hasta formar la flor. Repite este procedimiento hasta tener 2 flores de color fucsia y 1 flor de color rosado.

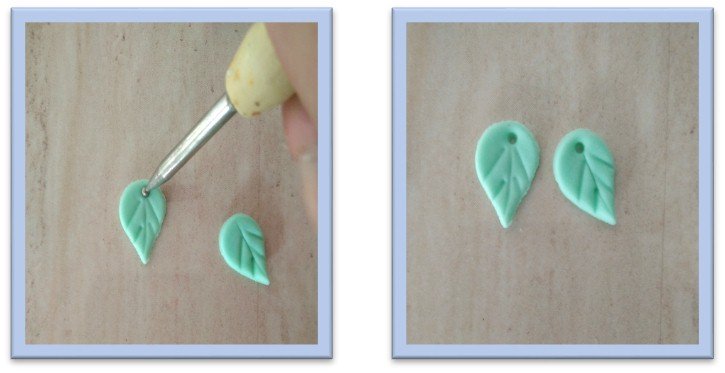
Step 3
Take the aquamarine clay and place it on the surface, with the help of the rolling pin, spread it out. Once extended, place the blade-shaped cutter on the clay to cut and extract 2 pieces. Then, with the help of the cutter, mark the ribs of the same. Finally, open a hole in the upper part of the leaves with the metal ball.
Paso 3
Toma la masa de color aguamarina y colócala sobre la superficie, con la ayuda del rodillo extiéndela. Una vez extendida, coloca el cortador en forma de hoja sobre la masa para así cortar y extraer 2 piezas. Luego, con la ayuda de la esteca de cuchilla, marca las nervaduras de las mismas. Por último, abre un orificio en la parte superior de las hojas con el bolillo metálico.

Step 4
Cut 1.5 cm of wire, then bend its tip. Repeat this same procedure 2 more times. Next insert the wire inside the flexible clay flowers, as the clay is wet it will stick easily.
Paso 4
Corta 1.5 cm de alambre, luego dobla su punta. Realiza este mismo procedimiento 2 veces más. Seguidamente, inserta el alambre dentro de las flores de masa flexible, como la masa es húmeda este pegará fácilmente.

Step 5
Take the chain and place a hoop in the center of it and place the pink flower. Then, place the fuchsia flowers at each end. Carry out the same procedure now, placing the leaves as shown in the image.
Paso 5
Toma la cadena y coloca un aro en el centro de la misma y coloca la flor rosada. Luego, coloca en cada extremo las flores de color fucsias. Realiza el mismo procedimiento ahora colocando las hojas como se observa en la imagen.
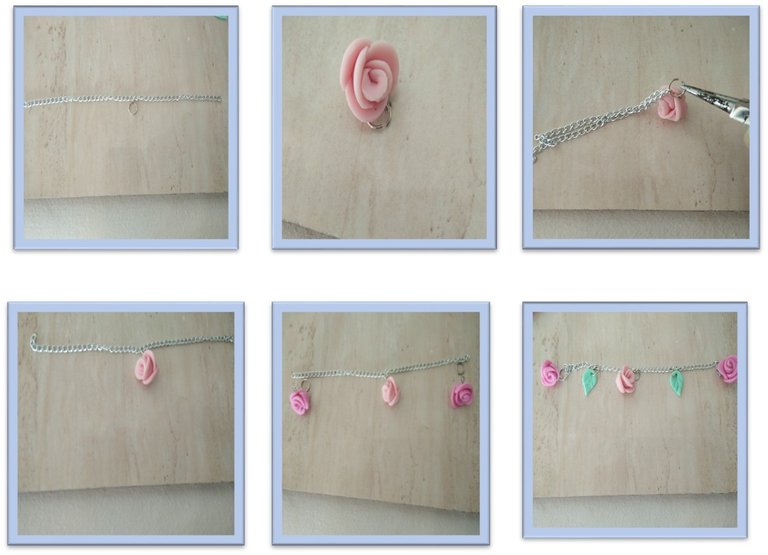
Step 6
Cut the 2.5 cm wire and with the help of the pliers bend its tip. Then, insert the wire into one link of the chain and secure the link with the pliers. Distribute the pearls in the spaces of the chain. Lastly, place a ring at the end of the chain and the clasp at the other.
Paso 6
Corta el alambre de 2.5 cm y con ayuda de la pinza dobla su punta. Luego, inserta el alambre en un eslabón de la cadena y asegura el mismo con la pinza. Distribuye las perlas en los espacios de la cadena. Por último, coloca un aro en el extremo de la cadena y en el otro el broche.


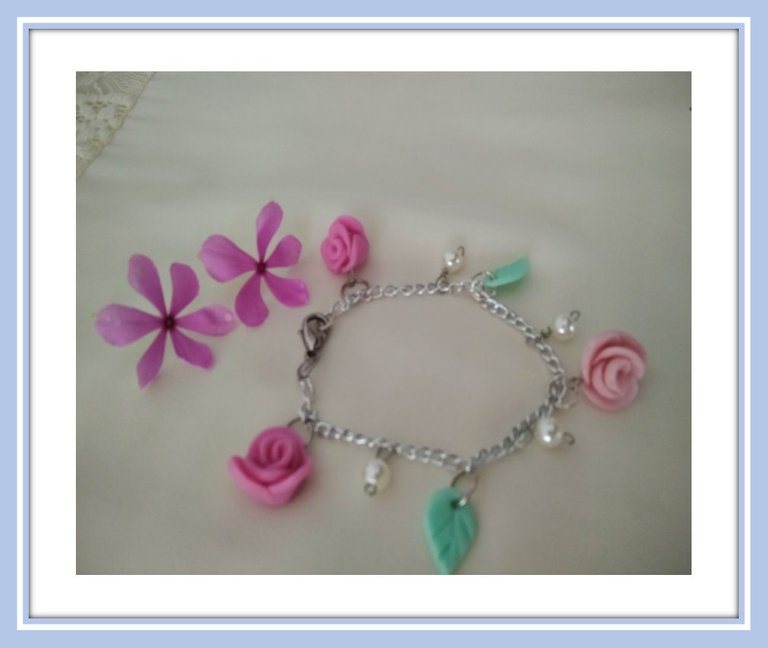
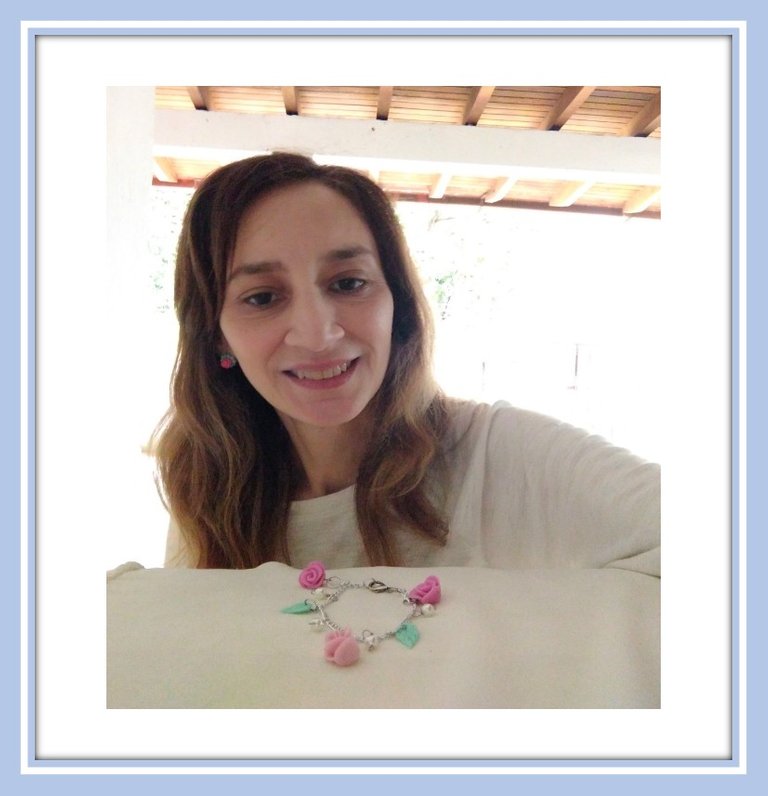
The bracelet is already finished, it has been very beautiful and delicate. This can be a perfect gift for any special person in your life or to decorate your own bracelets. So, go ahead and add charms to your favorite accessories, always giving them your personal touch! See you soon!
La pulsera ya está terminada, ha quedado muy bonita y delicada. Esta puede ser un regalo perfecto para cualquier persona especial en tu vida o para decorar tus propias pulseras. ¡Así que anímate a añadir dijes a tus accesorios favoritos dándole siempre tu toque personal a estos! ¡Hasta una próxima oportunidad!
The images were taken by myself with my Redmi Note 8 cell phone.
Translation: Google Translation
I used the program Microsoft Power point
Las fotografías fueron tomadas por mí con mi teléfono celular Redmi Note 8.
Utilicé el programa Microsoft Power point
Traducción: Google Translation
they don't come any prettier than this.
The pearls and adornment is so wonderful.
Nicely done
Que hermoso trabajo amiga saludos un abrazo.
Hola amigo, muchas gracias por todos tus mensajes siempre motivándome a seguir trabajando ¡Un abrazo!
What a lovely looking chain, I've never charm chain, I love it, the process to make it is quite easy to follow as well, I thought it would take more.
Hello dear @glorydee. I am happy that you liked this charm bracelet. Thank you very much for writing to me. Take care!
!discovery 27
!DIY
This post was shared and voted inside the discord by the curators team of discovery-it
Join our Community and follow our Curation Trail
Discovery-it is also a Witness, vote for us here
Delegate to us for passive income. Check our 80% fee-back Program
Un trabajo muy hermoso. Tienes mucha habilidad para las manualidades. Felicitaciones. Gracias por compartir estimada @ysamarynordaz. Un fuerte abrazo desde Maracay.
https://twitter.com/irvinc1/status/1670207285388345344?t=jRwo4F306ulbMiyRNzyFIg&s=19
Hola @irvinc muchas gracias por tu lindo mensaje, me alegra saber que te ha gustado mi trabajo ¡Saludos!
That bracelet is beautiful, I loved the colors, it looks quite easy to make. Thanks for sharing. 🤗
Hello dear @lauracraft. I am happy that you liked this charm bracelet. Thank you for your message. Take care!
This charm necklace looks really adorable. I like how creative you got with the pink flowers and green leaves. You did a great job dear.
!diy