Diy Organizador de Cables / Diy Cable Organizer
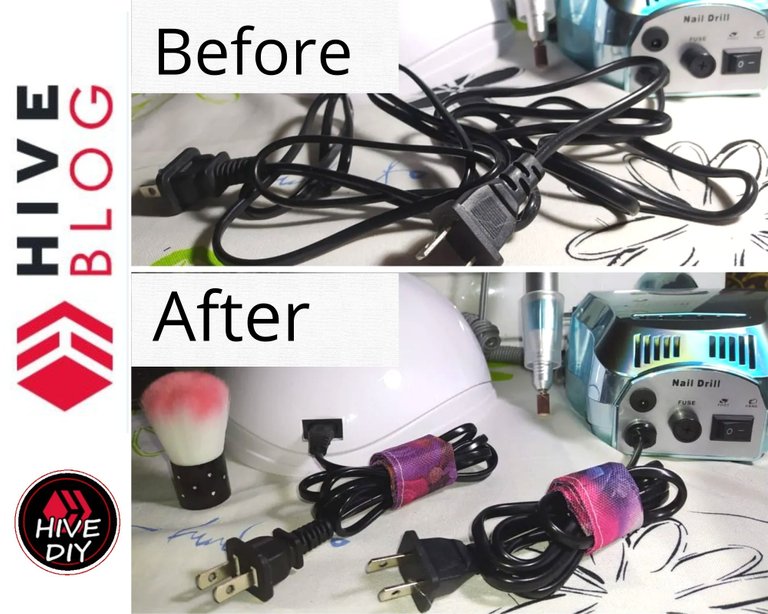
Saludos a todos ❤️❤️ El Diy Organizador de Cables que les traigo hoy me llegó la inspiración por un breve momento de locura con cables por todos lados con mis electrodomésticos y equipos electrónicos. Me disponía a buscar unas ligas como siempre hago, para amarrarlos pero cuando tengo que quitar las ligas para usar los cables, es otro desastre porque se rompen, se ponen pegajosas algunas, se pierden, etc. Entonces pensé en hacer algo que me permita amarrar y desamarrar de forma práctica, que no se deterioren fácilmente, que pueda personalizar y que me gusten mucho.
Disfruto mucho los Proyectos Utilitarios, esos que me facilitan el día a día, me traen orden y que son apreciados por todos, porque siempre se agradece algo que sea funcional y hermoso, siempre que otras personas lo ven, también quieren tenerlos y éste proyecto no fue la excepción.
Te invito a ver el Tutorial con Infografía descriptiva que les preparé...
Greetings to all ❤️❤️ The Diy Cable Organizer that I bring you today I was inspired by a brief moment of madness with cables everywhere with my appliances and electronic equipment. I was going to look for some rubber bands as I always do, to tie them but when I have to remove the rubber bands to use the cables, it is another disaster because they break, some get sticky, they get lost, etc. So I thought of making something that allows me to tie and untie in a practical way, that does not deteriorate easily, that I can personalize and that I like very much.
I really enjoy the Utilitarian Projects, those that make my day to day easier, bring me order and are appreciated by everyone, because something that is functional and beautiful is always appreciated, whenever other people see it, they also want to have it and this project was no exception.
I invite you to see the Tutorial with descriptive infographic that I prepared for you...

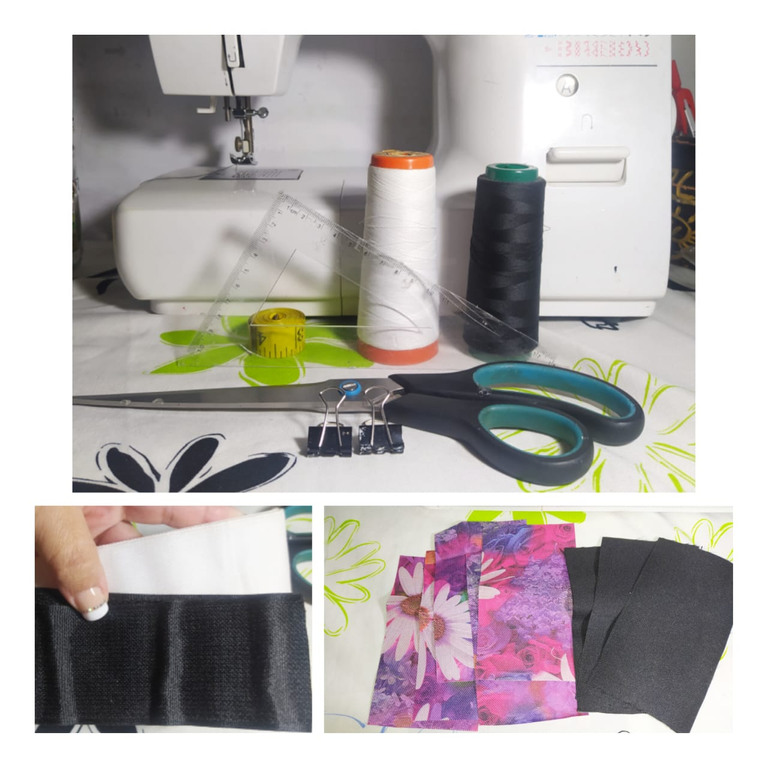
- Máquina de coser
- Hilos - Tijera - Regla - Cinta Métrica
- Clips de presión
- Velcro (cierre mágico)
- Loneta Sky
- Sewing machine
- Threads - Scissors - Ruler - Tape Measure
- snap clips
- Velcro (magic closure)
- Sky Canvas

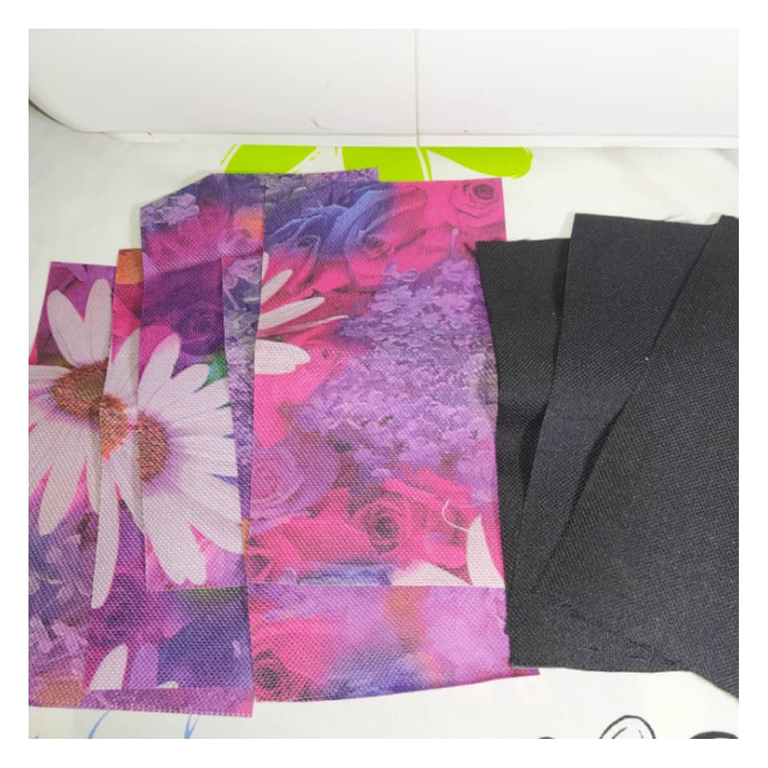
Las piezas de estos Organizadores de Cables se pueden elaborar de cualquier tamaño, el que hice es ideal para amarrar electrodomésticos o equipos de electrónica medianos y de los más comunes que usamos cotidianamente.
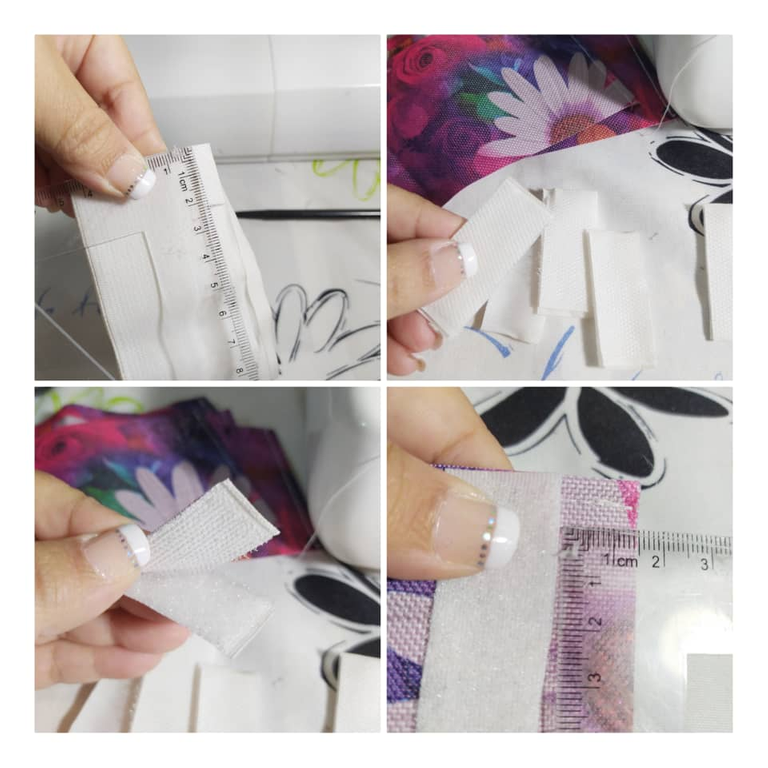
Para ello corté rectángulos de 9 cms por 16 cms en loneta sky, pero además puedes utilizar cualquier otro género, me gustó éste porque aporta algo de rigidez y fuerza, y pienso que es mejor para amarrar más fuertemente la cantidad de cable que va a usar. Aquí te muestro como trabajé, ya que hice varios y como en cadena de producción, todos en un mismo paso o proceso a la vez... Te muestro!
The pieces of these Cable Organizers can be made in any size, the one I made is ideal for tying medium-sized appliances or electronic equipment and the most common ones that we use on a daily basis.
For this I cut 9 cm by 16 cm rectangles in sky canvas, but you can also use any other kind, I liked this one because it provides some rigidity and strength, and I think it is better to tie more tightly the amount of cable what are you going to use Here I show you how I worked, since I did several and as a production chain, all in the same step or process at the same time... I show you!
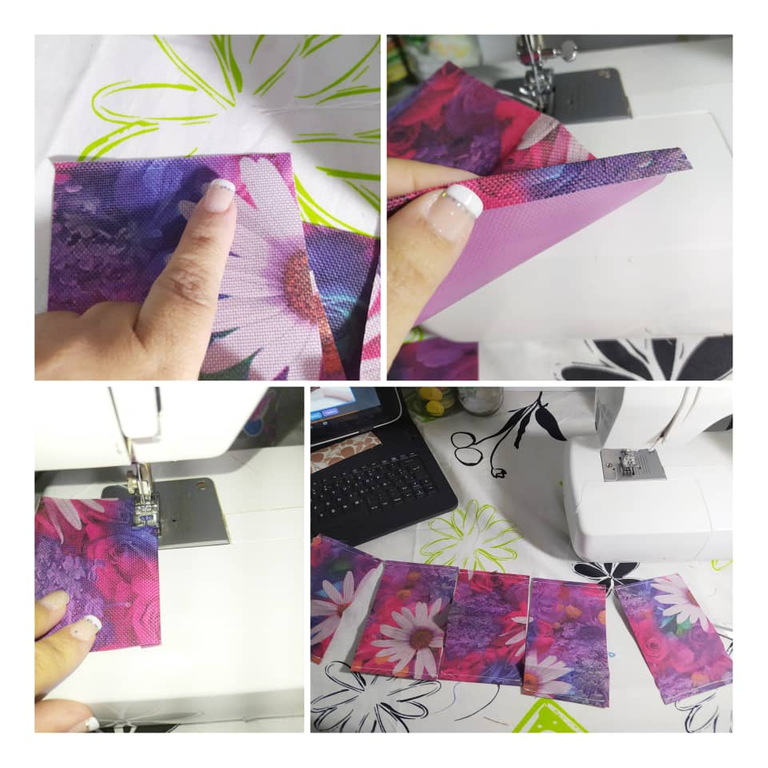
Cada rectángulo le cosí los extremos más delgados, es decir los extremos que miden 9 cms, doblando un borde de 1cm aproximadamente. Para ello utilicé a máquina de coser en costura recta. Conforme iba terminando un extremo, metía otra pieza a la máquina, sin cortar el hilo. Esto me permite trabajar más rápido, al tiempo que ahorro hilo que gastaría innecesariamente y que además me generaría desperdicios molestos.
A continuación verás este proceso, y puedes apreciar como salen de la máquina de coser todos los que voy haciendo al mismo tiempo, como sería en cadena de producción o fábrica... Prueba trabajar así, te encantará porque puedes hacer varios al mismo tiempo y no te desgastas o cansas tan fácilmente.
Bueno, cuando los saques de la máquina de coser si puedes separarlos y limpiar los hilos que le quedan.
Each rectangle I sewed the thinnest ends, that is, the ends that measure 9 cms, folding an edge of approximately 1cm. For this I used a sewing machine in straight seam. As he finished one end, he put another piece into the machine, without cutting the thread. This allows me to work faster, while saving thread that I would spend unnecessarily and that would also generate annoying waste.
Next you will see this process, and you can see how all the ones I am making come out of the sewing machine at the same time, as it would be in a production line or factory... Try working like this, you will love it because you can make several at the same time and you don't get worn out or tired so easily.
Well, when you take them out of the sewing machine if you can separate them and clean the remaining threads.
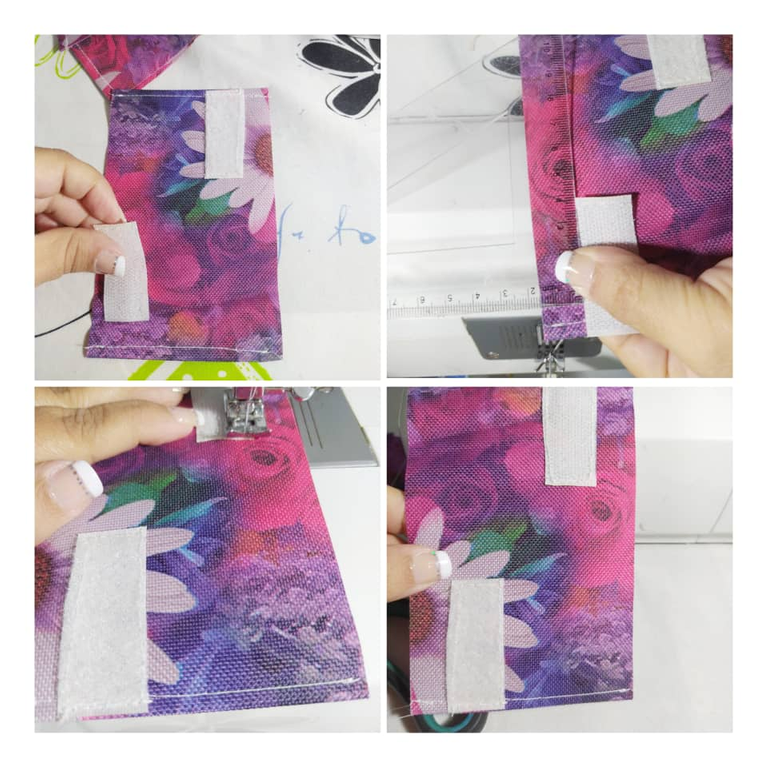
Voy a preparar el otro material que sería el Velcro o cierre mágico, el que usé tiene de ancho 5 cms. Marqué y corté piezas de 2 cms, Ocuparé para cada Organizador una piezas de Velcro, el cual voy a separar y una de las piezas la coso en el borde de la loneta que cosí en el paso anterior, a 1,5 cms del borde del largo.
I am going to prepare the other material that would be the Velcro or magic closure, the one I used is 5 cm wide. I marked and cut 2 cm pieces, I will occupy for each Organizer a piece of Velcro, which I am going to separate and one of the pieces I sew on the edge of the canvas that I sewed in the previous step, 1.5 cm from the edge of the long.
Coso por todo el alrededor, levantando el pie de la máquina de coser para dar vuelta en las esquinas del velcro.
I sew all the way around, lifting the foot of the sewing machine to turn at the corners of the Velcro.

En el otro extremo hago exactamente igual, pero en la esquina contraria o diagonal, como lo ves en el collage.
At the other end I do exactly the same, but in the opposite or diagonal corner, as you see in the collage.
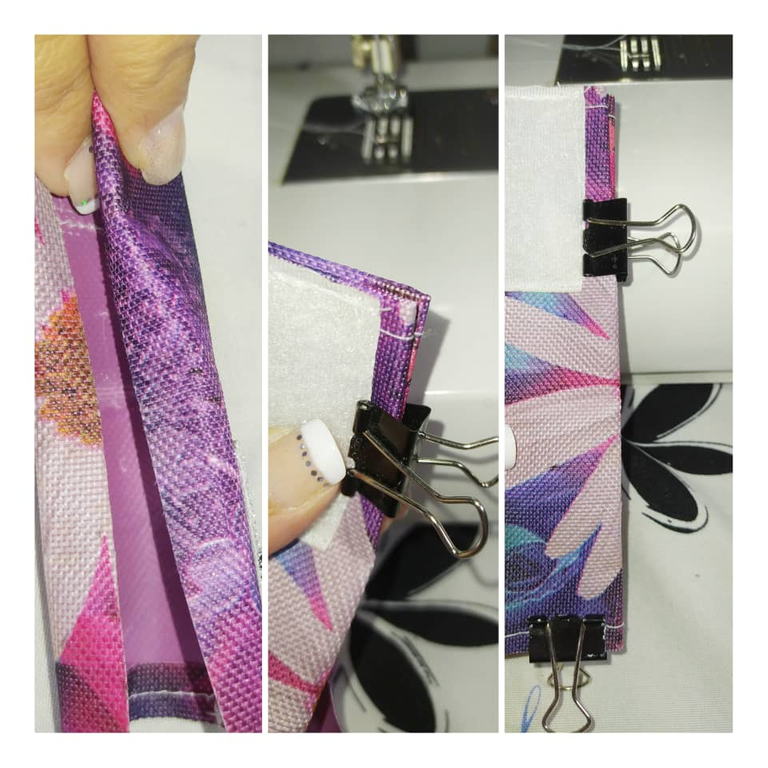
Ahora voy a trabajar en los extremos largos de mi rectángulo. Doblo hacia adentro o revés de la loneta, como 1 cm en cada largo y luego doblo nuevamente ahora por la mitad, y uso los clips de presión para asegurar que la pieza no se mueva.
Now I'm going to work on the long ends of my rectangle. I fold the canvas in or wrong, about 1cm in each length and then fold it back in half now, and use the pressure clips to make sure the piece doesn't move.
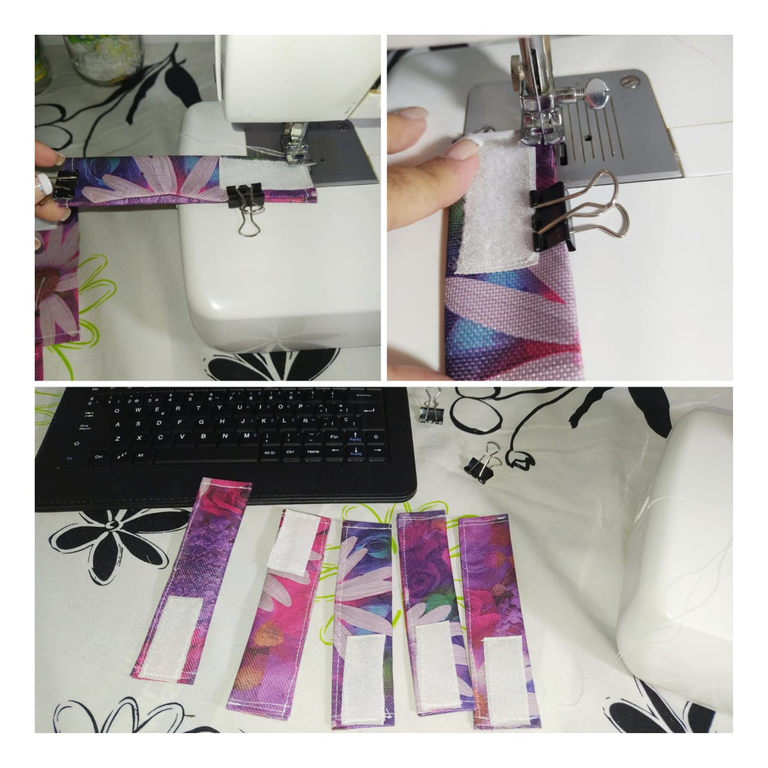
Coso alrededor, yo no cosí donde dobla la loneta, pero si quieres puedes dar la vuelta completa, yo preferí coser solo donde necesitaba unir. Esta parte la puedes hacer igual como en cadena de producción, terminas con una pieza y montas la otra seguida sin cortar los hilos, solo cuando termines que separas y limpias todo.
I sew around, I did not sew where the canvas folds, but if you want you can go all the way around, I preferred to sew only where I needed to join. You can do this part the same way as in the production line, you end up with one piece and assemble the other one in a row without cutting the threads, only when you finish you separate and clean everything.
El objeto de colocar los velcros en las esquinas contrarias, es que al doblar y coser la pieza, te quede una pieza del velcro de un lado y la otra pieza del otro lado para que puedas hacer el círculo y cerrar uniendo los velcro.
Así ya están listos los Organizadores de Cables son muy fuertes pero flexibles a la vez, y serán tan vistosos según el diseño de la loneta que utilices.
The purpose of placing the velcro in the opposite corners is that when you fold and sew the piece, you will have a piece of velcro on one side and the other piece on the other side so that you can make the circle and close by joining the velcro.
So the Cable Organizers are ready, they are very strong but flexible at the same time, and they will be so attractive depending on the design of the canvas you use.
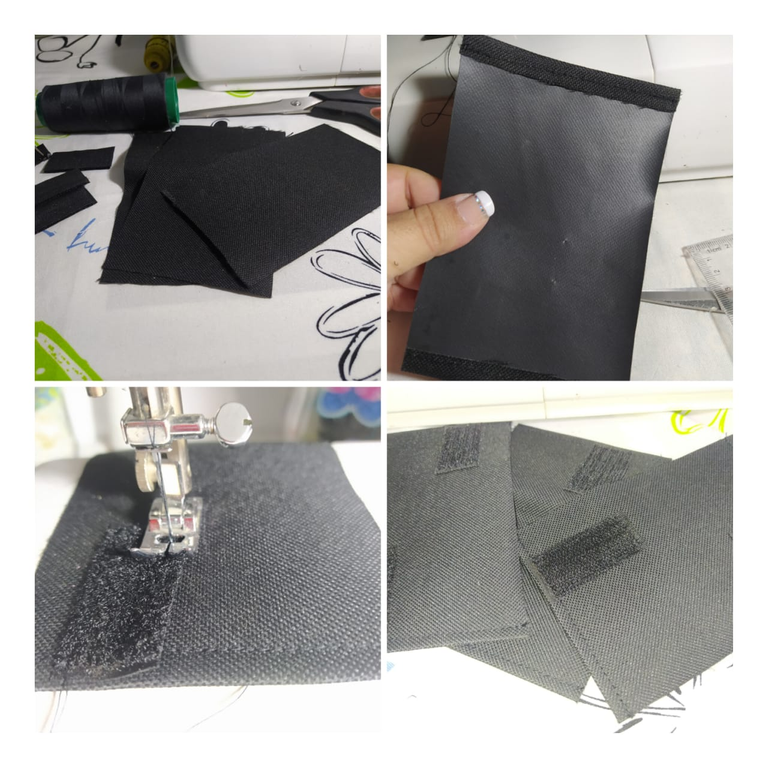
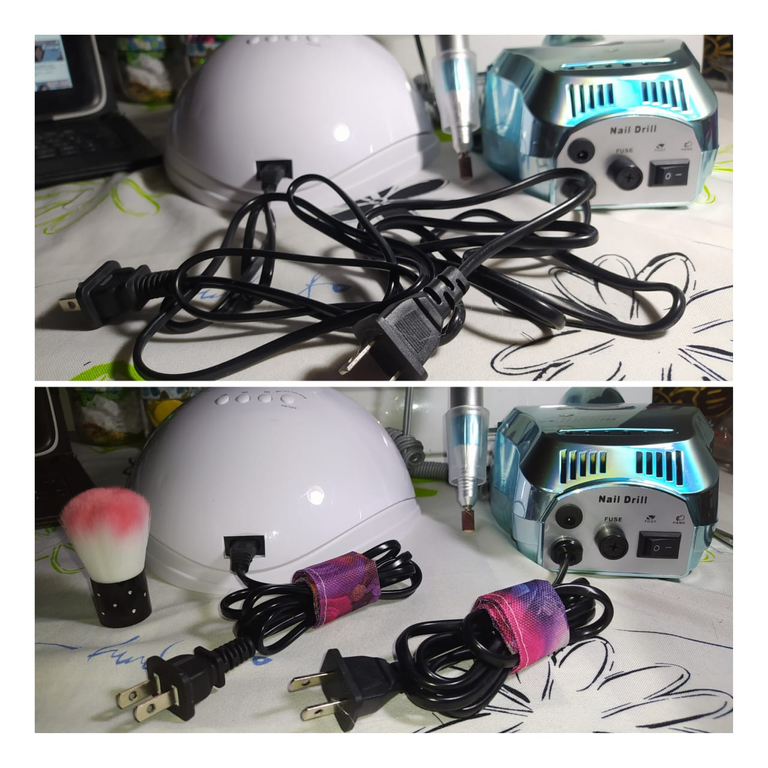
También realicé otros con loneta sky de color negro, ya que mi hijo quería usarlo en su escritorio donde tiene varios equipos de computación y muchos cables, pero no quería que resaltaran, sino que quería ya por fin tener ordenado todo pero que los organizadores fuesen negros como los cables.
El mismo proceso, lo puedes apreciar a continuación:
I also made others with black sky canvas, since my son wanted to use it on his desk where he has several computers and many cables, but he did not want them to stand out, but he wanted to finally have everything tidy but for the organizers to be black. like the wires.
You can see the same process below:
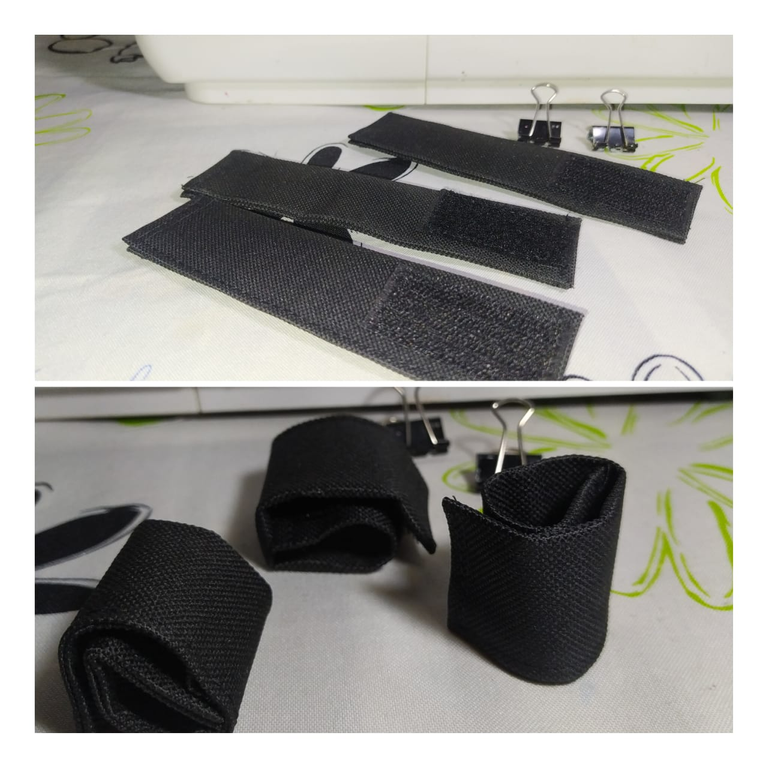
Y quedaron así, también se ven muy bellos.
And they stayed like this, they also look very beautiful.
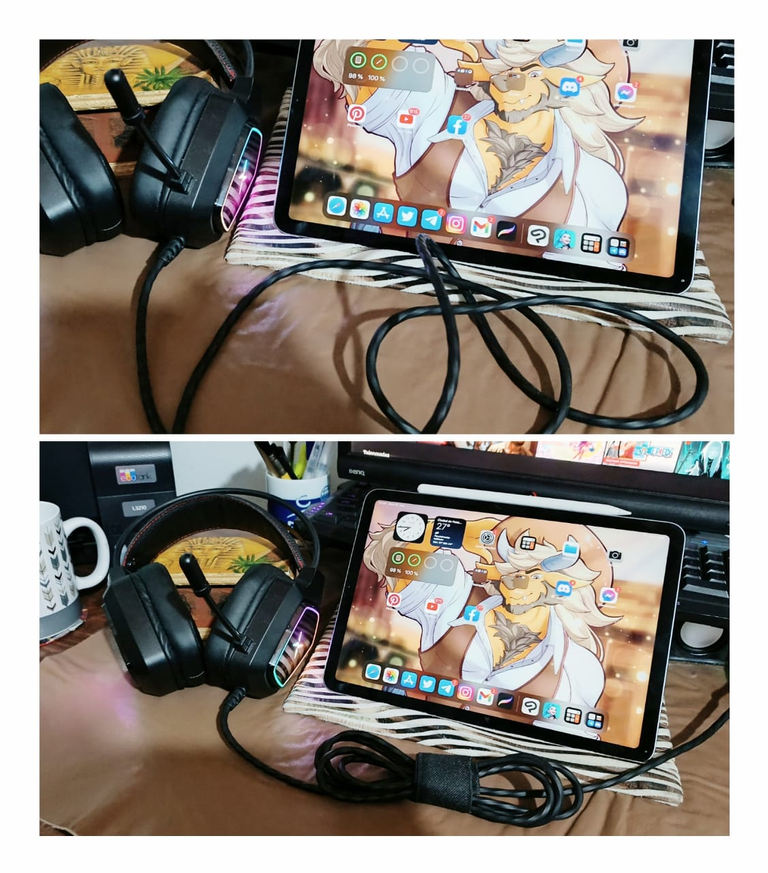
Fíjate como se ven en el escritorio de mi hijo, quien es Ilustrador Digital:
Look how they look on the desktop of my son, who is a Digital Illustrator:
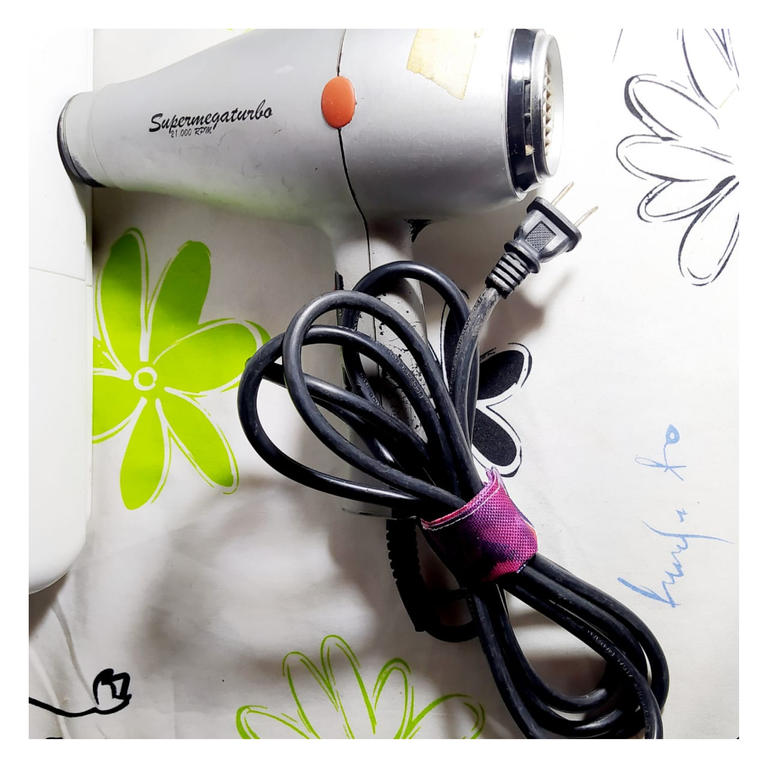
Mis equipos también están muy organizados ahora, a continuación te muestro varios, y ya tengo que hacer más porque oficialmente ya soy Loca Amarra Cables y es que quiero organizar todo, todo, todo... Me encantó...
My teams are also very organized now, below I'll show you several, and now I have to do more because I'm officially Cable Tie Crazy and I want to organize everything, everything, everything... I loved it...
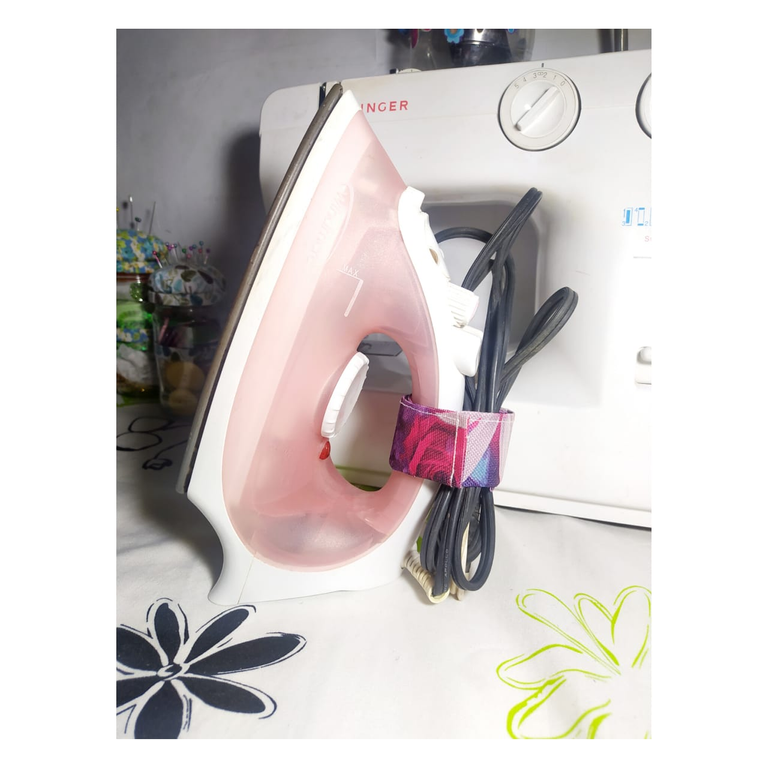
Para mi plancha hice una medida especial, ya que el rectángulo inicial lo hice de 9 cms por 25 cms, y quedó muy bien para ajustar el cable a la misma plancha, ahora la puedo parar en cualquier parte sin problema con los cables.
For my iron I made a special measurement, since I made the initial rectangle 9 cm by 25 cm, and it was very good to adjust the cable to the iron itself, now I can stop it anywhere without any problem with the cables.
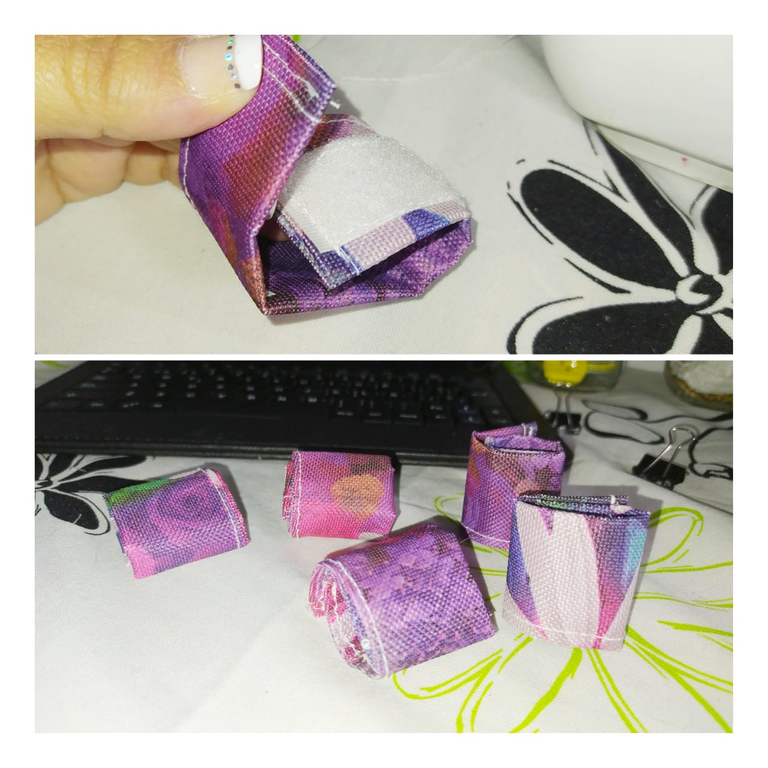
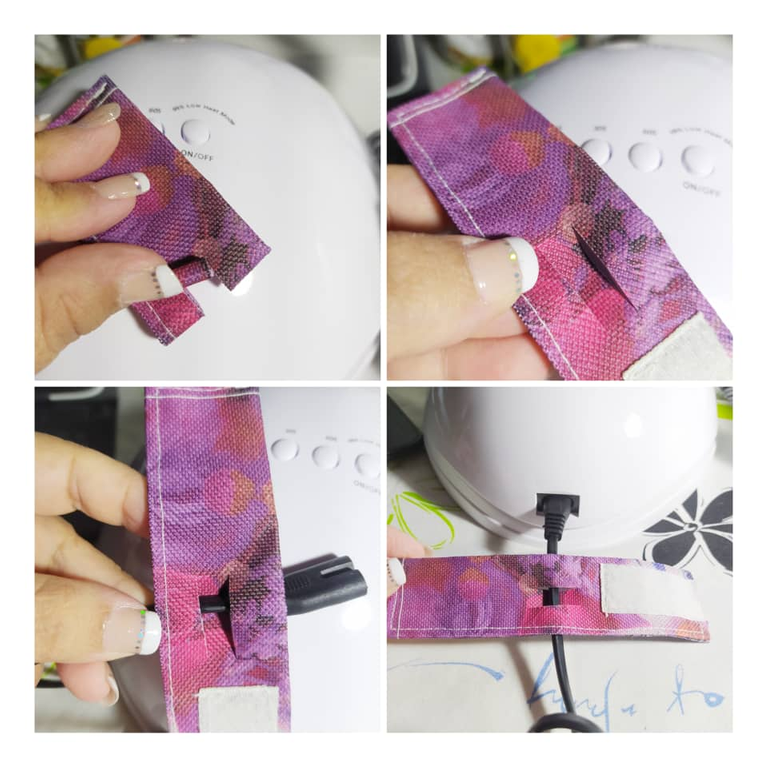
Un Tip adicional...
Cuando el cable se puede separar del equipo, como en esta lámpara de secado de uñas, puedes tomas tu organizador, lo doblas por la mitad y con la tijera haces dos cortes paralelos pequeños, que no alcancen al velcro, como se ve a continuación:
An additional tip...
When the cable can be separated from the equipment, as in this nail dryer lamp, you can take your organizer, fold it in half and with the scissors make two small parallel cuts, that do not reach the velcro, as seen below:
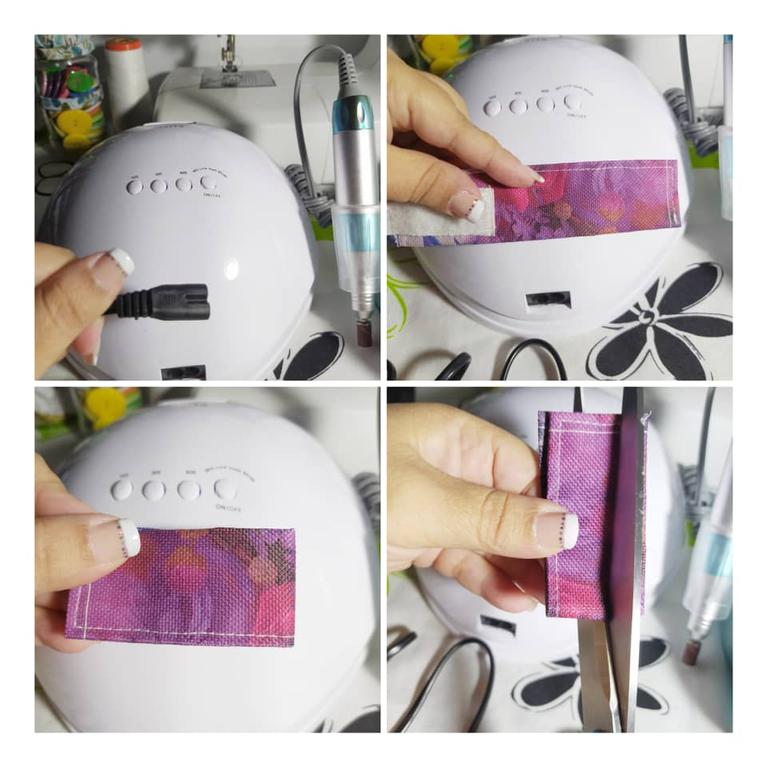
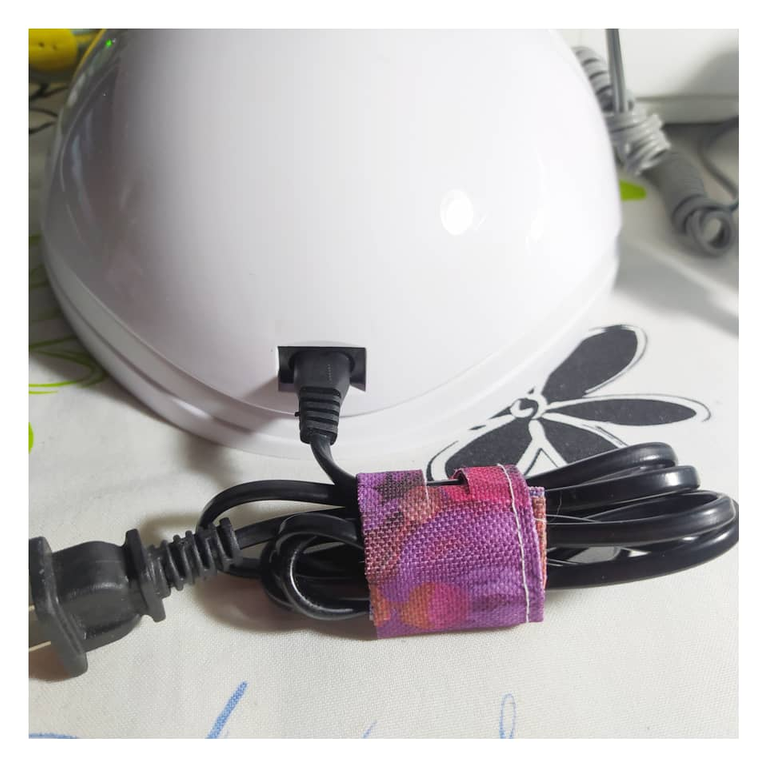
Al abrir de nuevo la pieza se ve así, por ahí puedes pasar el cable vas a tener el organizador siempre pegado al cable. Ahí mismo puedes doblar el cable para guardarlo. Es buenísimo porque siempre lo vas a tener ahí pegado...
When you open the piece again it looks like this, you can pass the cable through there, you will always have the organizer attached to the cable. Right there you can bend the cable to store it. It's great because you'll always have it stuck there...
Deseo que te guste mucho este Tutorial, es muy sencillo de hacer y te da mucha satisfacción tener todos los cables ordenados. Y siempre puedes incluso hacer un juego de cinco o seis piezas, los metes en una bolsita y te aseguro que es un bello detalle para regalar a quien sea y que lo va a apreciar y a usar inmediatamente.
Te invito cordialmente a mi próxima publicación... Besos...
I hope you like this Tutorial very much, it is very easy to do and it gives you great satisfaction to have all the cables in order. And you can always even make a set of five or six pieces, put them in a bag and I assure you that it is a beautiful detail to give to anyone and that they will appreciate it and use it immediately.
I cordially invite you to my next publication... Kisses...
---------- ❤️❤️❤️❤️ ----------
Las fotos las tomé con mi teléfono Redmi Note 8 y las edité en la App InShot y son de mi propiedad @yennysferm71.
Por favor no las utilices sin mi Autorización.
También edité con https://www.canva.com/
Utilicé el Traductor Google
Mi redes sociales:
Discord: YennysYaneth#0189
Twitter: @yennysferm
Instagram: @yennysyaneth
I took the photos with my Redmi Note 8 phone and edited them in the InShot App and they are my property @yennysferm71.
Please do not use them without my Authorization.
I also edited with https://www.canva.com/
I used Google Translate
My social networks:
Discord: YennysYaneth#0189
Twitter: @yennysferm
Instagram: @yennysyaneth
Has sido votado por
PROYECTO ENLACE
'Conectando Ideas y Comunidades'
PROYECTO ENLACE es un proyecto de curación de habla hispana enfocado en recompensar contenido de calidad y apoyar autores en su proceso de crecimiento en HIVE.
Creemos y apostamos por el futuro de esta gran plataforma, y estamos muy emocionados de poder hacerla crecer junto a esta comunidad. Así que te invitamos a usar nuestra etiqueta ENLACE y estar atento a todas las actividades que tenemos preparadas y que estaremos publicando en breve.
¿QUIERES AUTOMATIZAR TUS GANANCIAS DE CURACIÓN? SE PARTE DEL PROYECTO ENLACE APOYANDO A NUESTRO TRAIL EN HIVE.VOTE INGRESA AQUÍ PARA CONOCER LOS DETALLES.
¿QUIERES INVERTIR ENLACE? DESCUBRE COMO HACERLO Y GENERAR INGRESOS DE FORMA SEMANAL MEDIANTE TU DELEGACIÓN DE HP AQUÍ TE EXPLICAMOS COMO.
Te invitamos a participar en nuestro servidor de Discord: https://discord.gg/3S9y7BbWfS
Atentamente
EQUIPO ENLACE 2022
https://twitter.com/yennysferm/status/1528635234295627777
The rewards earned on this comment will go directly to the person sharing the post on Twitter as long as they are registered with @poshtoken. Sign up at https://hiveposh.com.
Muy buenos amiga, me gustan como quedaron estos organizadores.
Gracias @eylis ahora tengo que hacer más, porque quiero ver organizado todo...
Gracias...
Hola @eylis... Gracias amiga 😘😘
😍😍😍
Hola @makeup.byely gracias x pasar x aquí 😘😘
@yennysferm71 muy prácticos los pondré en práctica por qué hay veces el.poco de cables nos vuelven loca gracias por compartir 🤗🤗🤗🤗❤️❤️❤️❤️❤️❤️❤️🌹🌹🌹🌹😊😊😊😊👏👏👏👏👏✨✨✨✨🥰🥰🥰🥰😍😍😍😍
@yraimadiaz así es amiga, yo ya soy la Loca Amarra Cables, xq siento q todos deben estar amarrados ahora...
Gracias por pasar x aquí, y x comentar 😘😘
Excelente idea @yennysferm71. Muchísimas gracias por compartir... Saludos.💕
Gracias a ti @dayadam x la interacción 😘😘
Congratulations @yennysferm71! You have completed the following achievement on the Hive blockchain and have been rewarded with new badge(s):
Your next target is to reach 400 replies.
You can view your badges on your board and compare yourself to others in the Ranking
If you no longer want to receive notifications, reply to this comment with the word
STOPSupport the HiveBuzz project. Vote for our proposal!