🎨 {13/12/23} ✦ Tutorial: "Let's make Franskenstein-shaped baskets!" 🎃 ⚡ ✨ [Halloween 2023 Summary] ✦ 🇪🇸 │ 🇺🇸
✦ Goodbye Halloween 2023! For 2024 I promise to do something bigger and more ambitious! ✦

🇪🇸 ~ ¡Bienvenidos! 💕 Ésta es la 4ta y última parte de la serie de tutoriales del proyecto "Do it Yourself" que elabore para celebrar "Halloween 2023" en el formato de canastas de dulces para niños, y cuyo proceso registre exclusivamente para mi blog de Hive 🍬 👌
🇺🇸 ~ Welcome! 💕 This is the 4th and final part of the series of tutorials for the "Do it Yourself" project that I made to celebrate "Halloween 2023" in the format of kid's candy baskets, and whose process I recorded exclusively for my Hive blog 🍬 👌

 |  |
|---|
Ha sido un viaje entretenido, y aunque fuera de fechas, primero que nada estoy satisfecha con perseverar en compartir los registros de los proyectos que logro fotografiar, a veces por cuestión de tiempo e iluminación no guardo nada, por eso lo que logro recopilar de estos momentos significa mucho para mi, y me hace feliz poder dejar una constancia que sirva a otros, y también un bonito recuerdo al que puedo regresar cada vez que quiera revivir este tiempo.
It has been an entertaining trip, and although out of dates, first of all I am satisfied with persevering in sharing the records of the projects I manage to photograph, sometimes due to time and lighting issues I do not keep anything, so what I manage to collect of these moments means a lot to me, and it makes me happy to leave a record that serves others, and also a nice memory to which I can return every time I want to relive this time.
Y como se trata de la ultima parte, y no tengo programado hacer cestas de nuevo por un largo, largo tiempo, explicare con detalle de nuevo el paso a paso, pero como siempre, con una serie de "extra tips" para mejores resultados. ¡Disfruten! ✨
And since this is the last part, and I am not scheduled to make baskets again for a long, long time, I will explain in detail again the step by step, but as always, with a series of "extra tips" for better results. Enjoy! ✨
• 𝕊𝕋𝔼ℙ 𝔹𝕐 𝕊𝕋𝔼ℙ 𝕋𝕌𝕋𝕆ℝ𝕀𝔸𝕃 •
« How to make a Frankenstein-themed basket »
 | | |
|---|
💚 El primer paso es encontrar un modelo que sea de tu agrado, recomiendo que la silueta general sea de líneas rectas sin detalles agudos o demasiado curvos.
💜 The first step is to find a model that is to your liking, I recommend that the overall silhouette should be straight lines with no sharp or overly curved details.
✦ Sheets of regular paper or recycled paper are always good for making good patterns ✦
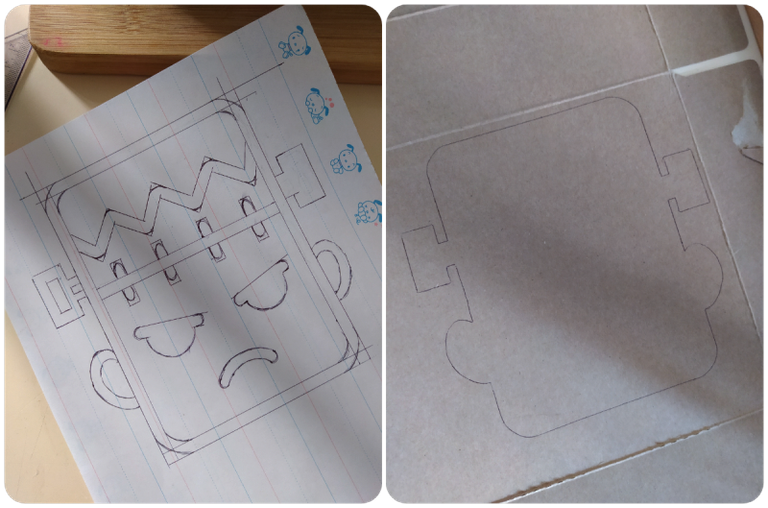
💚 En base al modelo escogido, vas a trasladarlo a papel regular con todos sus detalles primero con lápiz, y luego lo repasaras con bolígrafo o marcador punta fina. Después, replicaras este primer patron 2 veces en cartulina o carton de reciclaje.
💜 Based on the chosen pattern, you will transfer it to regular paper with all its details first in pencil, and then you will go over it with a pen or a fine tip marker. Then, replicate this first pattern 2 times on cardboard or recycled cardboard.
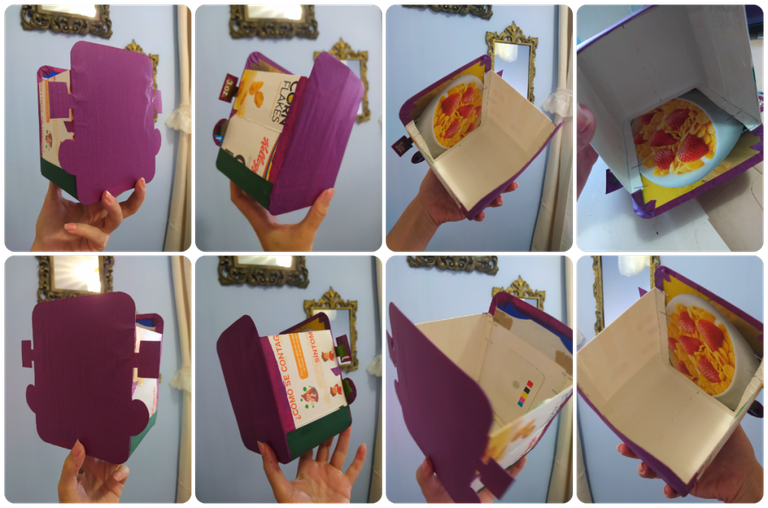
✦ When the body of the basket is ready, the first thing to do is to glue a strip of cardboard on the base, only after that, line both the back and the front side with dark purple crepe paper ✦
💚 Una altura de entre 16 y 20 cm para esta pieza esta bien, recomiendo un ancho que no supere los 10 cm, también, la tira de cartulina que sera "las paredes" de la cesta no debe sobrepasar la línea del cabello del personaje.
💜 A height of between 16 and 20 cm for this piece is fine, I recommend a width of no more than 10 cm, also, the strip of cardboard that will be the "walls" of the basket should not exceed the hairline of the character.
✦ Add little school glue to this part, or preferably glue stick. If you add too much glue, the humidity can disfigure the whole piece ✦
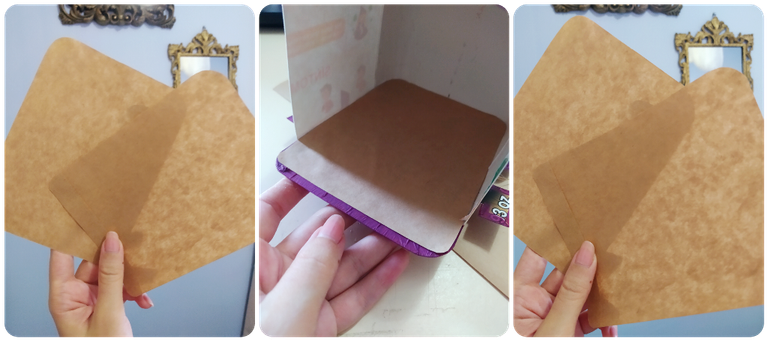
💚 Antes de empezar con las decoraciones exteriores, vamos a forrar la parte interna. Puede ser con cualquier papel de color sólido o decorativo, pero yo prefiero el papel de aspecto natural, como el que se utiliza en los sobres para archivos.
💜 Before we start with the outside decorations, let's line the inside. This can be with any solid color or decorative paper, but I prefer natural looking paper, such as that used for file envelopes.
✦ To help the paper stay taut at the smallest corners or sharp angles, use toothpicks or popsicle sticks to gently push the paper ✦
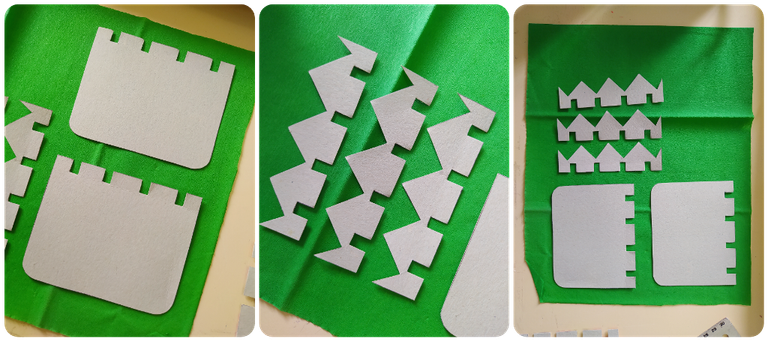
💚 Para el rostro con todos sus detalles correspondientes, volveremos al patron de papel y recortaremos todas sus piezas, descartaremos "el margen" que nos queda, y nos quedaremos solo con las siluetas interiores, que transferirás de manera individual a más carton, y luego forraras con papel crepe del color que corresponda.
💜 For the face with all its corresponding details, we will go back to the paper pattern and cut out all its pieces, we will discard "the margin" that we have left, and we will keep only the inner silhouettes, which you will transfer individually to more cardboard, and then line with crepe paper of the corresponding color.
✦ For the back of the ears and the nails on the head, glue small pieces of the same paper you used on the inside, it will give a nice and clean effect no matter where you look at the basket ✦
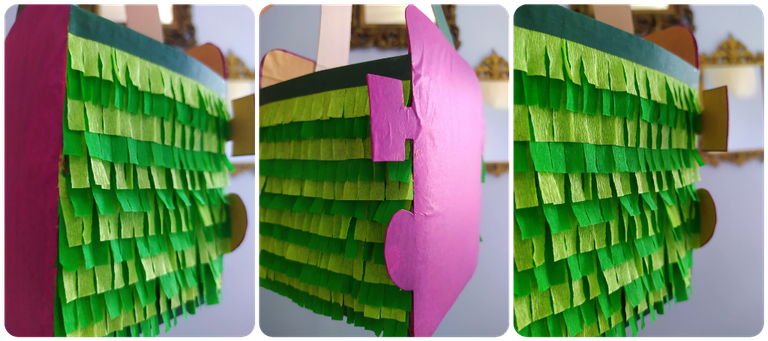
💚 Para "las paredes exteriores" de la cesta, vamos a utilizar 2 tonos diferentes de color verde para que se vea festivo y dinámico. El ancho de las tiras de papen no debe superar los 2 o 2.5 cm de ancho. Y remataremos la línea superior con una tira de cartulina color verde oscuro, de 1 cm de ancho.
💜 For the "outer walls" of the basket, we will use 2 different shades of green to make it look festive and dynamic. The width of the papen strips should not exceed 2 or 2.5 cm wide. And we will finish off the top line with a strip of dark green cardboard, 1 cm wide.
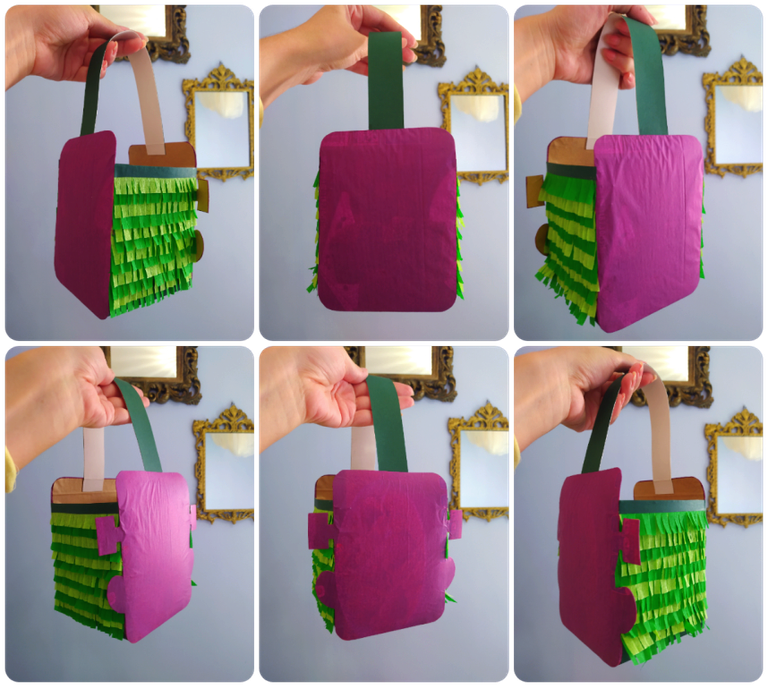
✦ The handle is glued with school glue or hot glue, centered on the inside of the basket at a distance of 2 to 3 cm from the edge. See carefully the pictures to know how to install it ✦
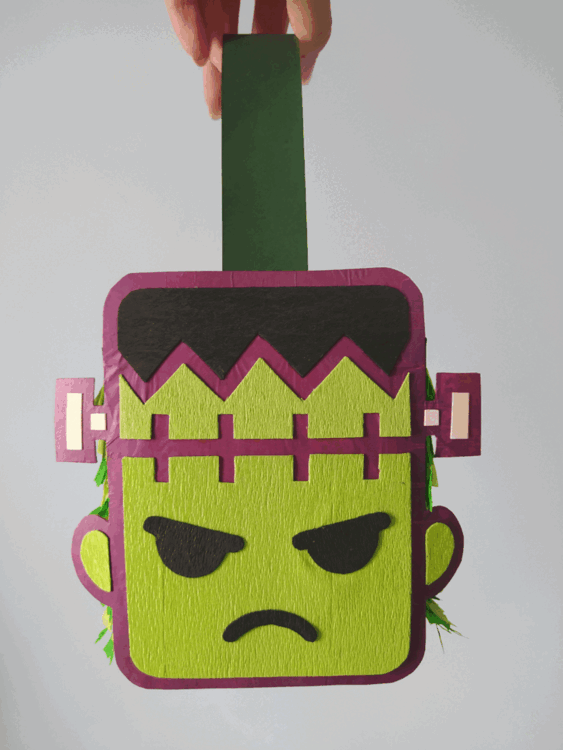
💚 En esta etapa el proyecto debería verse mas o menos así. Para la agarradera la cesta recortaras una tira de 3.5cm de ancho x 30 cm de largo. Para una mejor terminación puedes pintarla en su cara externa o pegarle una cara de cartulina del mismo tipo que utilizaste para la base de la cesta.
💜 At this stage the project should look something like this. For the basket handle you will cut out a strip of 3.5cm wide x 30 cm long For a better finish you can paint it on the outside or glue a cardboard face of the same type you used for the base of the basket.
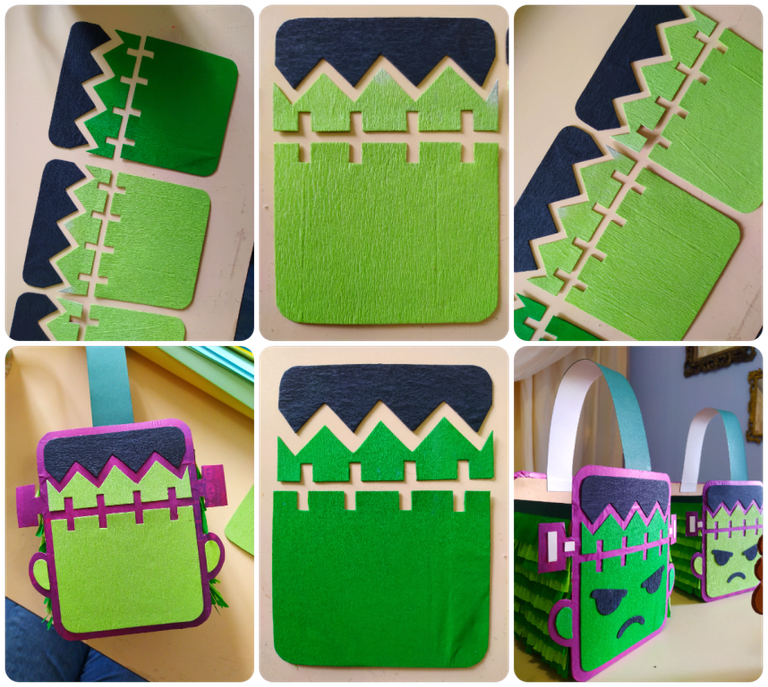
✦ Leaving the background in a purple or brown color is better because it will highlight the green color and other details of the face ✦
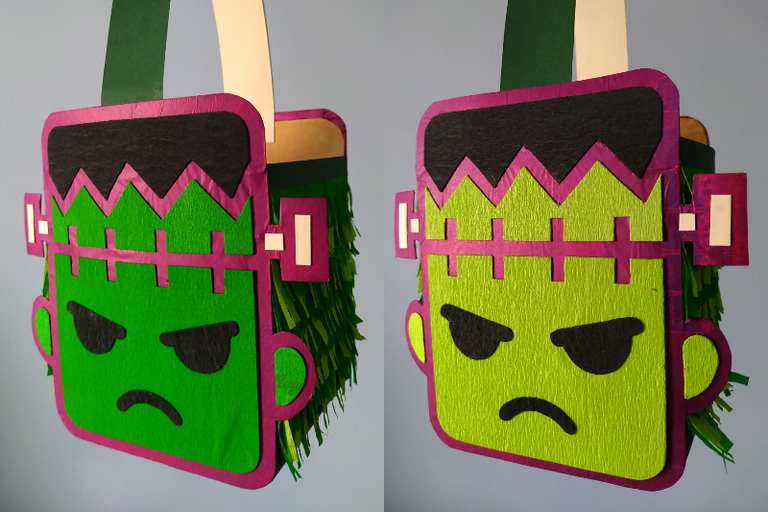
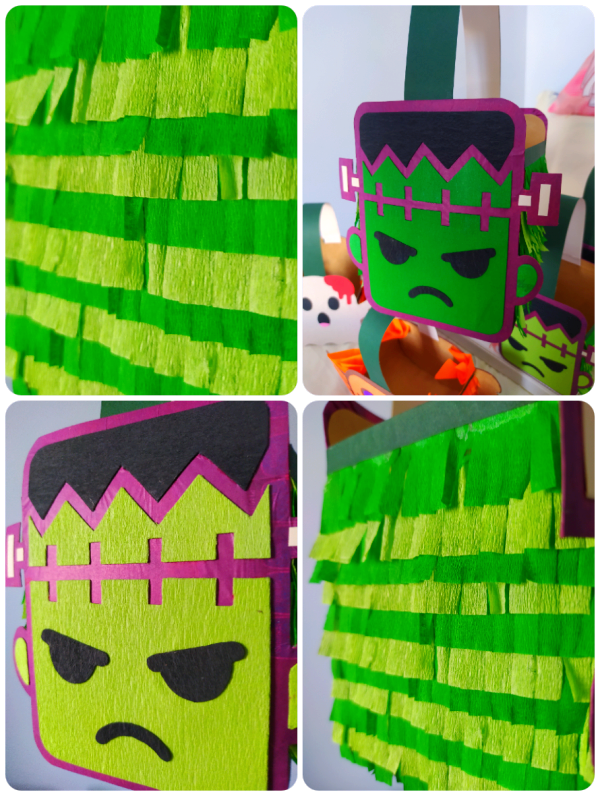
💚 Para este diseño puedes utilizar cualquier tono de color verde, yo escogí un verde muy saturado bastante llamativo, y una color manzana mas claro. Recomiendo evitar un tono muy pálido o desaturado porque le dará un aspecto triste a la cesta.
💜 For this design you can use any shade of green, I chose a very saturated green quite striking, and a lighter apple color. I recommend avoiding a very pale or desaturated shade because it will give a sad look to the basket.
✦ Remember to let the baskets rest for at least 2 hours before use ✦
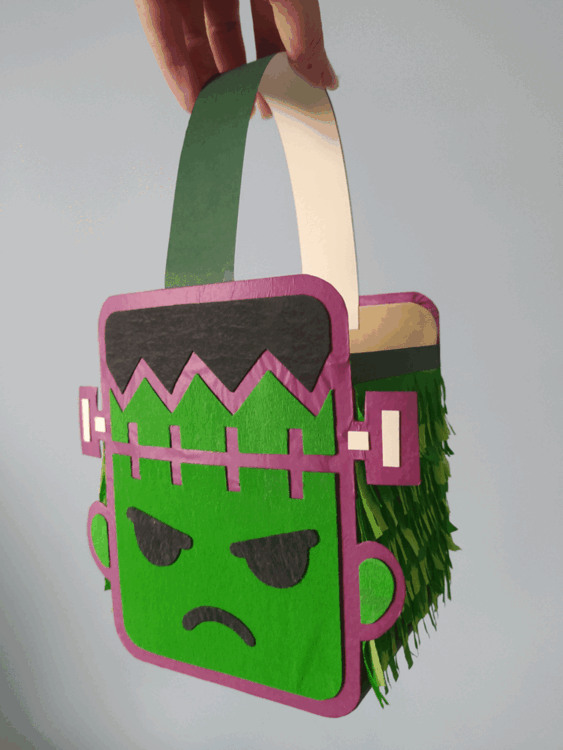
💚 Para instalar todas las piezas vamos a colocar la cesta en una mesa o superficie recta, estable y limpia mirando boca arriba. Vas a poner primero todas las piezas sin pegamento, y cuando se vea como quieres y los espacios estén proporcionados, quitaras una por una, le colocaras pegamento (no demasiado) y regresaras a la posición donde estaba. Repite el proceso con todas las piezas.
💜 To install all the pieces we are going to place the basket on a straight, stable and clean table or surface facing up. You will first put all the pieces without glue, and when it looks the way you want and the spaces are proportionate, you will remove one by one, put glue (not too much) and return to the position where it was. Repeat the process with all the pieces.
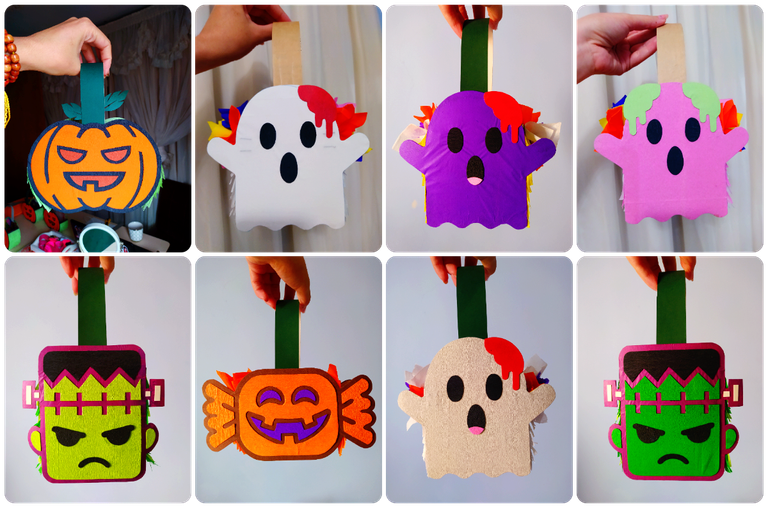
• C O M P L E T E D • P R O J E C T •
« Candy baskets with different cartoon motifs, end of Halloween 2023 project »
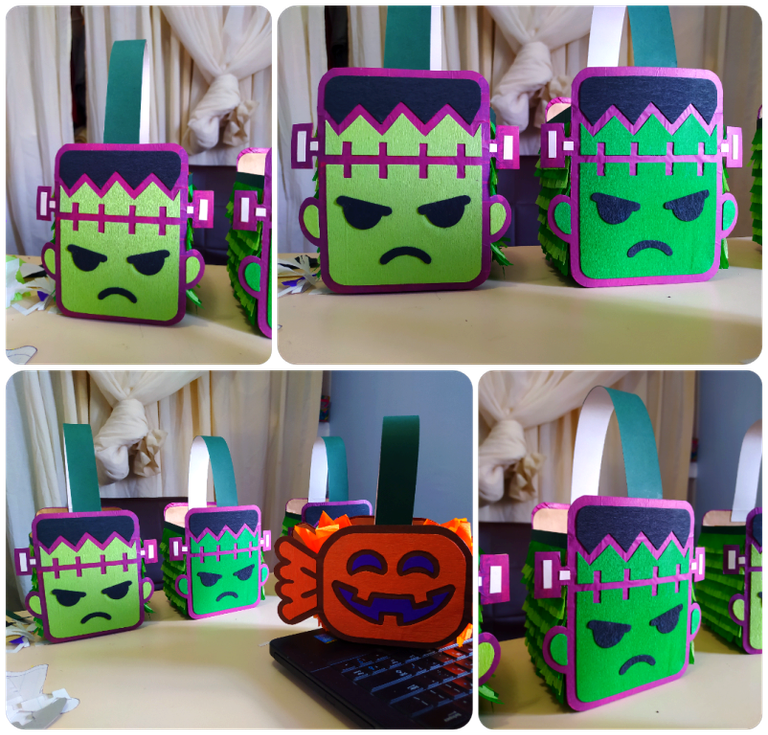
✦ Mission accomplished! Aren't they beautiful? ✦
Éste motivo en especial fue el favorito de muchos niños aquí, aunque el puesto número 1 se lo llevaron los fantasmitas. Tambien elaboré un modelo de gatito negro pero de esa pieza no tuve chance de guardar fotografías, y algunos diseños se quedaron sin realizar por falta de tiempo (quería hacer unos porquecitos con alitas de murciélago).
This motif in particular was the favorite of many children here, although the number 1 spot went to the little ghosts I also made a black kitty model, but I didn't have the chance to save pictures of that piece, and some designs were left unmade due to lack of time (I wanted to make some bat winged cupcakes).
✦ Chau Chau friends, I know you made many children happy. It has been a good festive day, although it is totally new to celebrate it here ✦

Y así concluye otra pequeña gran aventura en esta parte de mi vida crafteril. Siempre es buen momento para recordar que cualquier ocasión, por mas inusual que sea, es buena razon para poner manos a la obra.
Las manualidades nos ayudan a mantenernos atentos a los detalles, a conservar la destreza en nuestras manos y a disminuir los niveles de estrés o tristeza en nuestro organismo; y en un tiempo tan acelerado como es este en el que vivimos ahora, las actividades que nos ayuden a fijar nuestra atención más allá de "lo inminente de cada día" son muy preciadas.
Espero te hayas divertido y sobre todo disfrutado este recorrido, muchas gracias por estar aquí, y si haces tus propias cestas temáticas no dudes en etiquetarme por favor (っ╹ᆺ╹)っ 💕
And so concludes another great little adventure in this part of my crafty life. It's always a good time to remember that any occasion, no matter how unusual, is a good reason to get busy.
Crafts help us to keep our attention to detail, to keep our hands dexterous and to lower the levels of stress or sadness in our bodies.
And in such a fast-paced time as the one we live in now, activities that help us to fix our attention beyond "the imminent of each day" are very precious.
I hope you had fun and most of all enjoyed this tour, thank you so much for being here, and if you make your own themed baskets feel free to tag me please (っ╹ᆺ╹)っ 💕


✨ 🍓 All texts and images by @Tesmoforia 🍓 ✨
🚨 ¡Please do not take, edit or republish my material without my permission! 🚨
💌 ¿Do you wish to contact me? [email protected] 💌
🌙 Banner, signature and separators by Keili Lares
Está espectacular!! Me encanta
Muchas gracias Dani ! ! 💙
https://twitter.com/hivediy47901/status/1735714639931937143