Lindo porta lápices doble de Mario Bros con materiales Reciclados. / Cute Mario Bros double pencil holder with recycled materials..
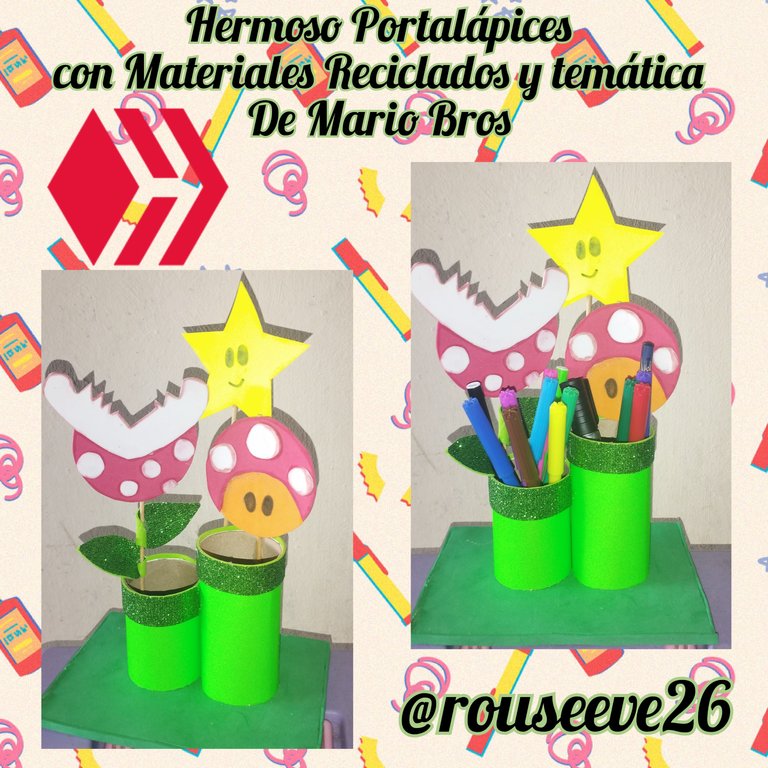
Feliz tarde a todos amigos creativos de @diyhub y la plataforma y de @hive, aquí vamos empezando con energía este post, otra vez yo creando algo diferente que me gustó mucho la temática de este portalápices, A mí hermanito le gusta mucho los juegos y Mario Bros le encanta, Por eso decidí regalarle este portalápices para que el organice sus colores y lápices o lo que el quiera. El resultado fue muy lindo y Materiales que utilice realmente fueron pocos.espero que este post sea de ayuda para ustedes y que puedan crearlo fácilmente y darle una linda sorpresa a esos niños y porque no tambien a nosotros los adolescentes nos gustan mucho para nuestra mesa de estudios tener todo organizado al momento de hacer nuestras tareas.
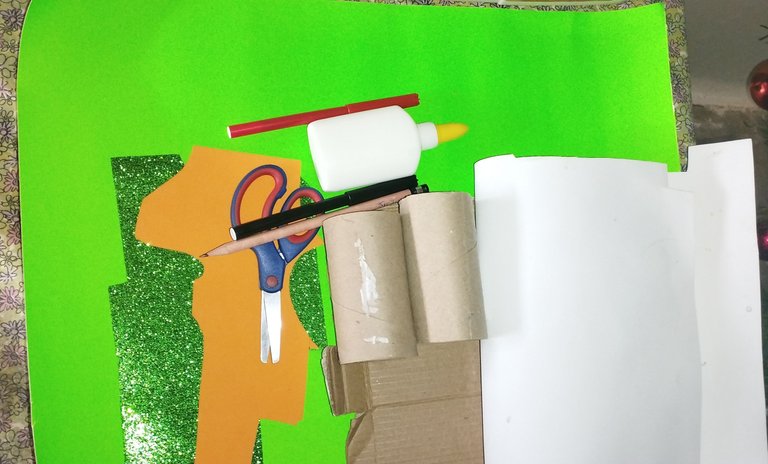
Materiales Utilizados:
✓ Cartulina verde.
✓ Cartulina amarilla.
✓ Foami verde escarchado.
✓ Foami verde.
✓ Retazos de Foami rojo, naranja y blanco.
✓ Silicón caliente.
✓ Rollos de papel higiénico.
✓ Cartón Reciclado.
✓ Palillos de altura.
Paso a Paso:
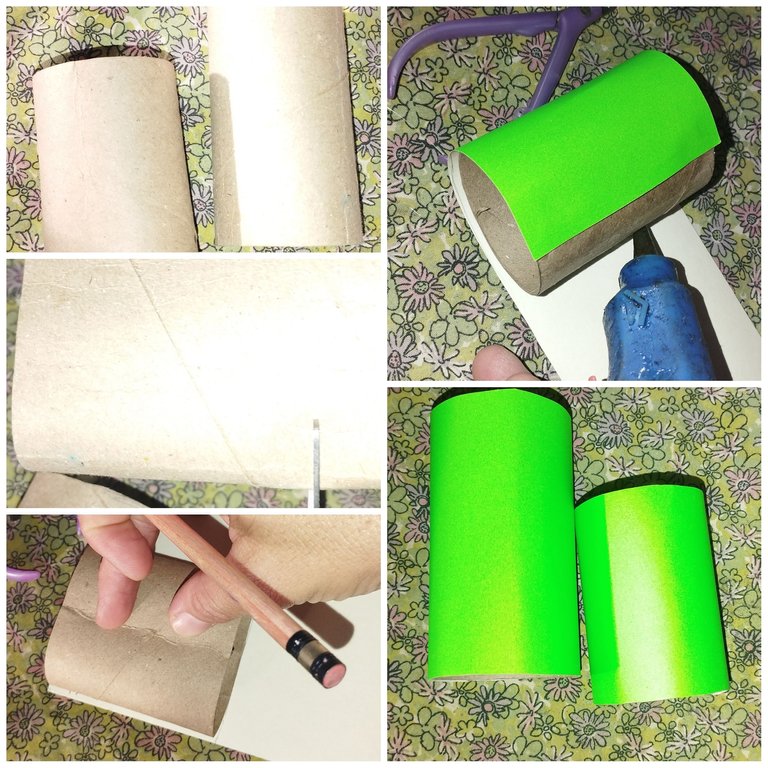
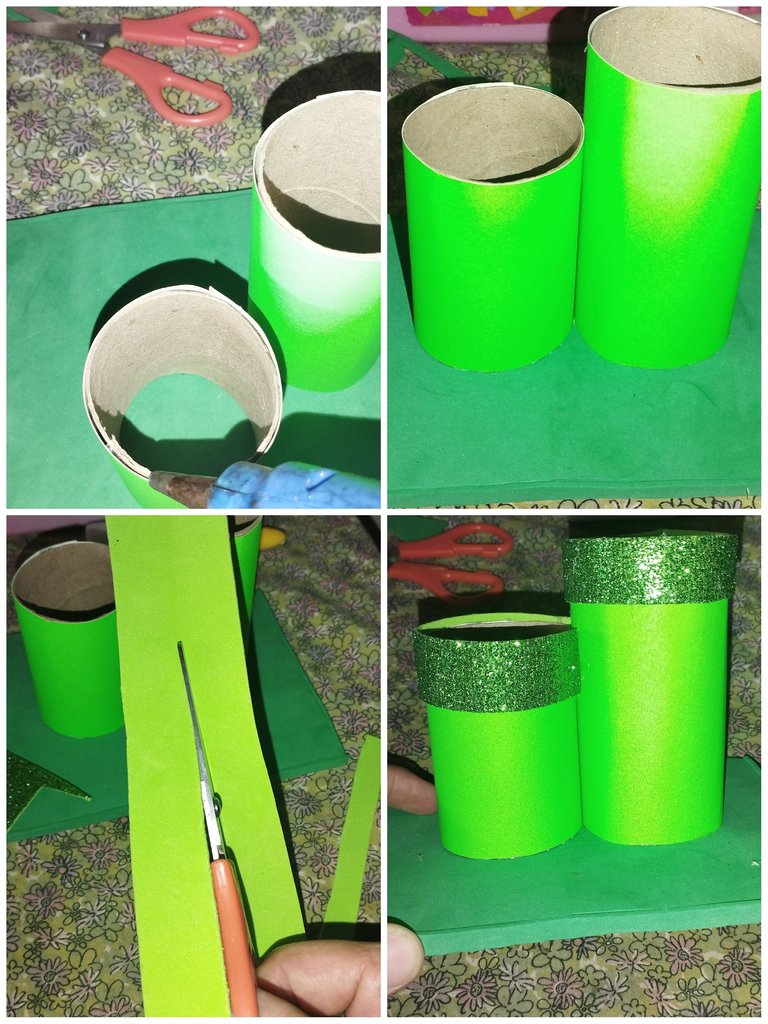
Primero:
Aquí lo primero que hice fue decorar el rollito de papel y cortarlos a la medida deseada yo dejé uno del largo original y el otro le corte al rededor de 20 centímetros esto es algo que es totalmente personal ya que se le puede cortar menos o más dependiendo de su preferencia, luego medi la cartulina con cada rollito y lo fui pegando en la cartulina verde.primero la idea era pegarlo con pega pero no funcionó, entonces lo pegue con el silicón caliente y ahí si fue mejor el resultado.
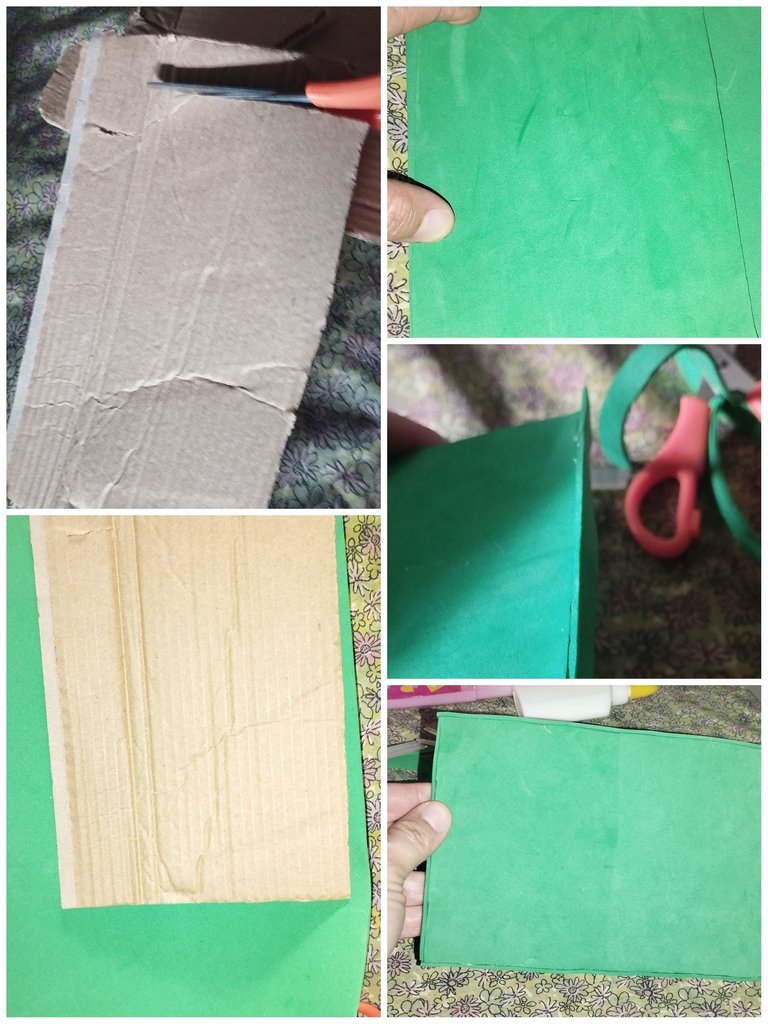
Segundo:
En el cartón hice una medida de 40 centímetros por 40 y lo recorte luego lo pegue en el foami y por los dos lados le coloque foami para forrarlo por completo. Una vez listo corte un listón de 1 centímetro para colocarlos alrededor del cuadrado y así poder oculta los bordes del cuadrado ya que está será la base del porta lápiz
Tercero:
Ahora pegamos los rollitos ya forrados en el cartón cuadrado también ya forrado muy bien, corten un listón del foami verde escarchado de 5 centímetros y lo corte por la mitad sacando dos listones de 2,50 centímetro cada uno, lo pegue al borde de cada rollo de papel higiénico.
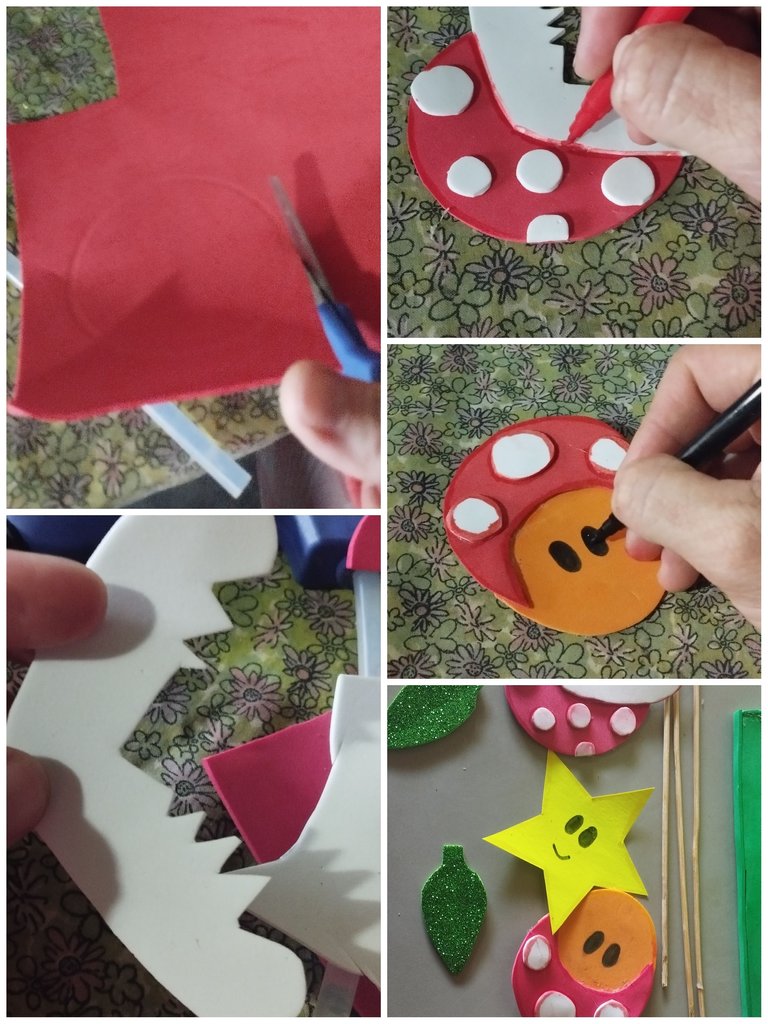
Cuarto:
Con los retazos de foami hice unas insignias muy populares del juego de Mario Bros el cual fue una planta flor venenosa, una estrella y por su puesto a Mario Bros.
Lo hice a mano alzada ya que no tenía idea de cómo hacerlo pero ahí quedó si ustedes no lo hacen lo pueden imprimir y colocarlo yo quería así hecho también de Foami.
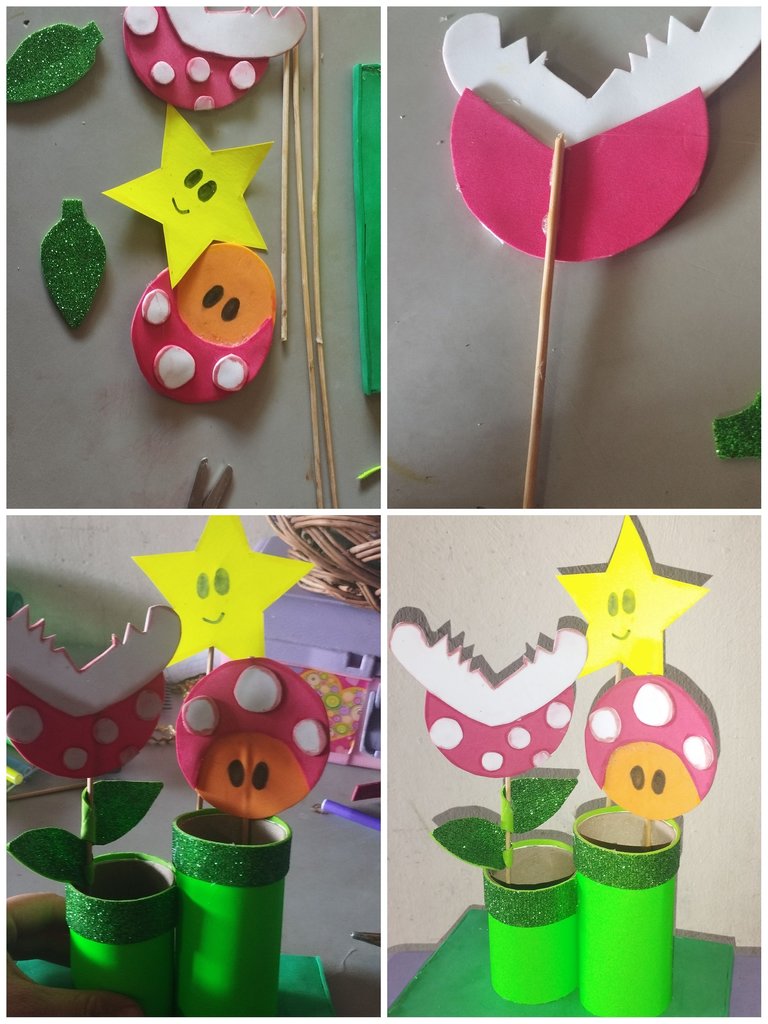
Quinto:
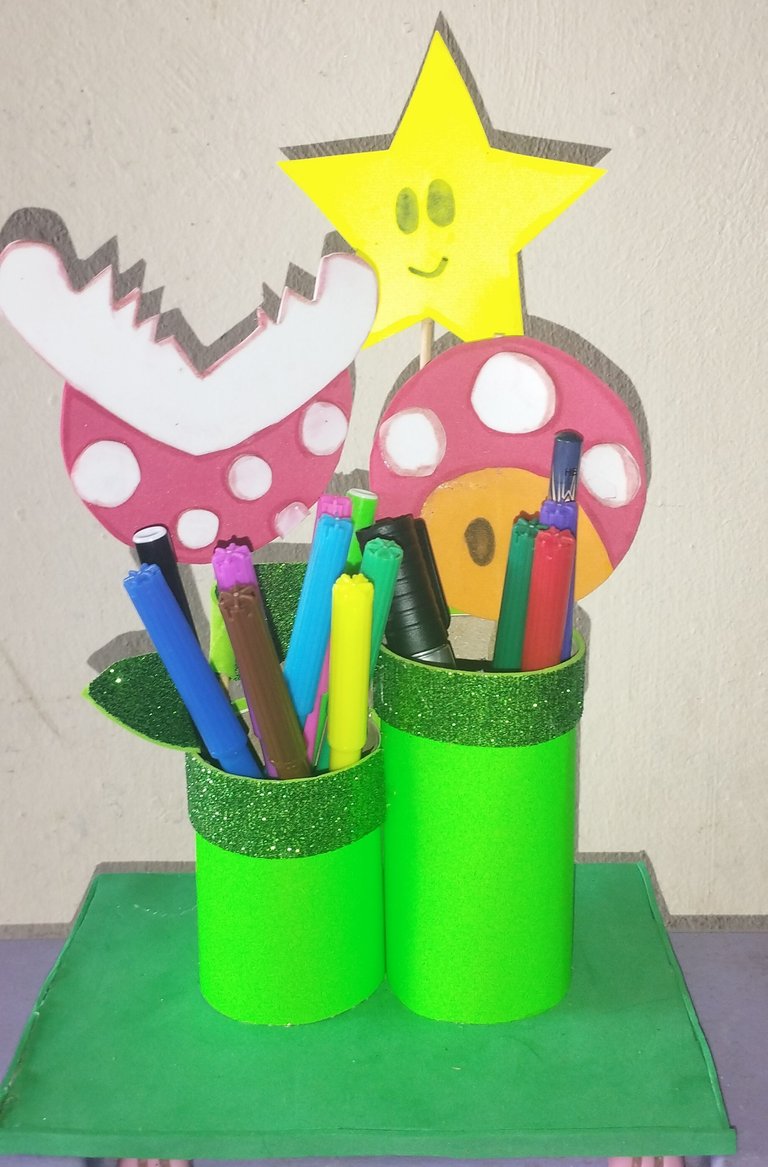
Una ves terminado todo este proceso anterior uno todas mis piezas las pegue en los palillos de alturas y las agregue a mis rollos que ya estaban listos para terminar con sus decoraciones. Luego ya se pueden colocar: colores, creyones o lo que deseen, también pueden ser caramelos por que no!.
Mi hermano estaba muy feliz con este regalo. Bueno espero le guste. Y lo disfrute mucho.
Muchas gracias por el apoyo amigos, esperando pronto estar nuevamente por acá.
¡Saludos!
Las imagenes me pertenecen, fueron tomadas de mi teléfono Redmi 10.
Las imágenes fueron editadas por programa de editor de fotos Polish.
traductor: Deepl Traslator.
English
Happy afternoon to all creative friends of @diyhub and the platform and @hive, here we go starting with energy this post, again me creating something different that I really liked the theme of this pencil holder, My little brother really likes games and Mario Bros loves it, So I decided to give him this pencil holder for him to organize his colors and pencils or whatever he wants. The result was very nice and the materials I used were really few.I hope this post will be helpful for you and that you can easily create it and give a nice surprise to those children and why not also to us teenagers we like a lot for our study table to have everything organized when doing our homework.
Materials Used:
✓ Green card stock.
✓ Yellow poster board.
✓ Green frosted foami.
✓ Green foami.
✓ Red, orange and white Foami scraps.
✓ Hot glue.
✓ Toilet paper rolls.
✓ Recycled cardboard.
✓ Tall sticks.
Step by Step:
First:
Here the first thing I did was to decorate the paper roll and cut them to the desired size I left one of the original length and the other cut about 20 centimeters this is something that is totally personal because you can cut less or more depending on your preference, then I measured the cardboard with each roll and I was sticking it on the green cardboard. First the idea was to stick it with glue but it did not work, then I stuck it with hot silicone and there was a better result.
Second:
In the cardboard I made a measure of 40 centimeters by 40 and then I cut it out and glued it on the foami and on both sides I put foami to cover it completely. Once ready cut a 1 centimeter ribbon to place around the square to hide the edges of the square as this will be the base of the pencil holder.
Third:
Now we glue the rolls already lined in the square cardboard also already lined very well, cut a ribbon of frosted green foami of 5 centimeters and cut it in half taking out two strips of 2.50 centimeters each, glue it to the edge of each roll of toilet paper.
Fourth:
With the scraps of foami I made some very popular badges of the Mario Bros game which was a poisonous flower plant, a star and of course Mario Bros.
I did it freehand as I had no idea how to do it but there it was if you do not do it you can print it and place it I wanted to also made of Foami.
Fifth:
Once this whole previous process was finished, I glued all my pieces onto the height sticks and added them to my rolls that were ready to finish with their decorations. Then you can place: colors, crayons or whatever you want, they can also be candies because why not!
My brother was very happy with this gift. Well I hope you like it. And I enjoyed it a lot.
Thank you very much for the support friends, hoping to be here again soon.
Greetings!
The images belong to me, they were taken from my Redmi 10 phone.
Images were edited by Polish photo editor program.
translator: Deepl Traslator.
Te quedó muy hermoso, de seguro tu hermano si estubo muy contento
Muchas gracias por el apoyo.. saludos bella
Muy lindo bella .. muy buen trabajo 🤗❤️
Gracias mi linda .. saludos
Quedó muy lindo, gracias por compartir 😊
Hola gracias.. saludos amiga 🤗❤️
Hermosísimo te ha quedado.. 🤗🤗, gracias por compartir tu proceso.
Gracias 🤗❤️❤️❤️❤️😍
Wow,this will be so pretty in my room ,stationery or office space.
The colors give it a classic touch.
I hope you enjoy it friend .. yes the colors are beautiful 🤗 thanks for stopping by and commenting.
Hola amiga Muchas gracias por compartir realmente has hecho un increíble trabajo realizando este hermoso Porta lá pices qué bueno ya tengo una idea para realizar uno en casa y con esta temática Muchas gracias por compartir bendiciones para ti.
Hola gracias amiga por tu apoyo. Amén igualmente 🤗
hermosa la temática de Mario Bros quedo muy colorido y bien hecho
Gracias amiga.. que bueno que te gustó, saludos
Que hermoso y útil proyecto, usar material de provecho e una forma de reducir costos y la emisión de basura; Mario es uno de mis personajes favorito.
!DIY
Gracias a mi también me gusta mucho Mario..y si hay que cuidar el ambiente, Muchas gracias.
You can query your personal balance by
!DIYSTATSThank You