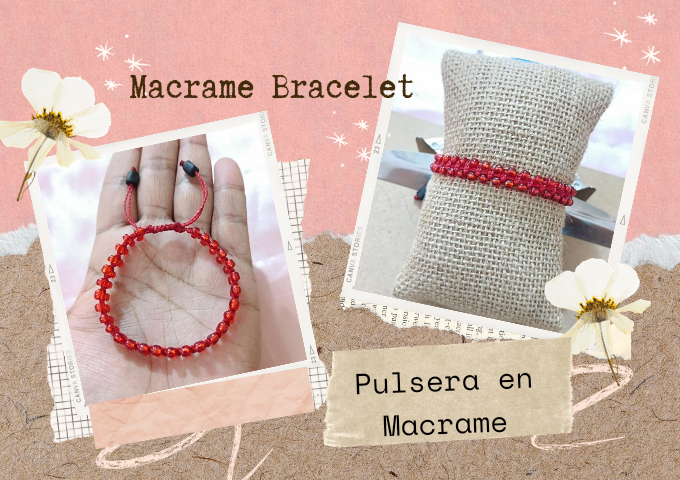
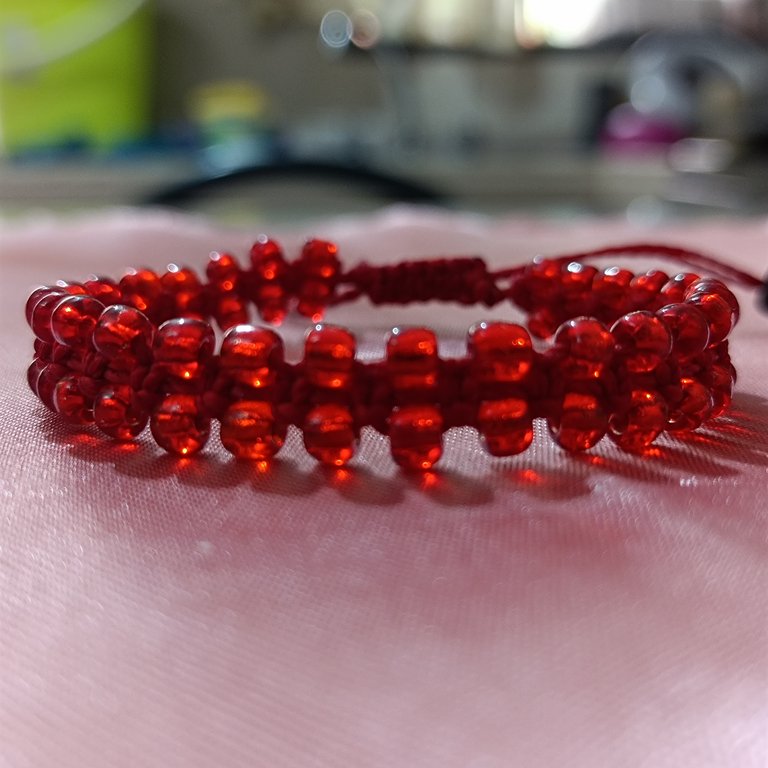
Tutorial: Macrame bracelet with red beads // Pulsera en macrame con cuentas rojas
Happy and blessed day, greetings to all #hive friends especially the #jewelry community again with you, I have been a little absent due to personal situations that I have had to live these last two weeks, my mom says that God does not give us burdens that we can not carry, it is totally true, happy and happy to be here again.
For those who like macramé bracelets here I bring you a very nice and easy to make model, a red bracelet made with red waxed nylon and mustard, for this type of macramé weaving we will use the flat knot, I like to use waxed nylon because it is ideal for this technique.
In this case I use the linhasita brand of 1mm thick, it is a waxed nylon very pleasant to the touch that leaves no traces of wax as other brands on the market, if you have not used it in macramé I highly recommend it.

Feliz y bendecido día, saludos a todos los amigos de #hive especialmente a la comunidad de #jewelry nuevamente con ustedes, he estado un poco ausente debido a situaciones personales que me ha tocado vivir estas dos últimas semanas, dice mi mamá que, Dios no nos da cargas que no podemos llevar, es totalmente cierto, alegre y contenta de poder estar nuevamente por acá.
Pará aquellas personas que les gusta el macramé en pulseras acá les traigo un modelo muy bonito y fácil de hacer, una pulsera roja hecha con mostacilla y nailon encerado color rojo, para este tipo de tejido en macramé utilizaremos el nudo plano, me gusta utilizar el nailon encerado ya que para esta técnica es ideal.
En este caso yo utilizo el de la marca linhasita de 1mm de grueso, es un nailon encerado muy agradable al tacto que no deja restos de cera como otras marcas que hay en el mercado, si no lo ha utilizado en macramé te lo recomiendo mucho.
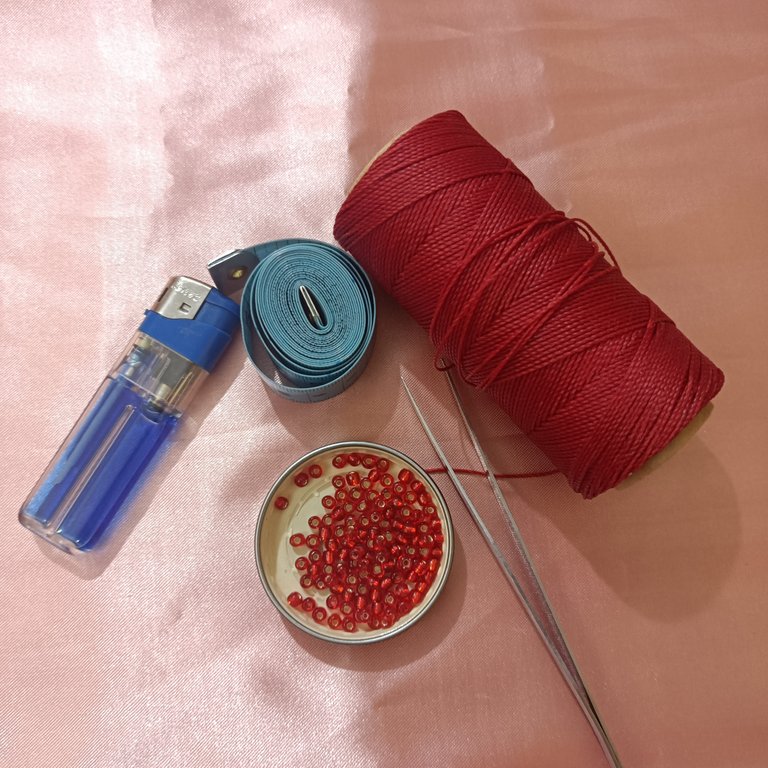
Materials
- Waxed nylon or the thread of your choice
- Red mustard
- Scissors
- Tape measure
- A loom if you like, I use a writing board, like the one in the picture, for me it is easier and more practical.
Materiales
- Nailon encerado o el hilo de tu preferencia
- Mostacilla roja
- Tijeras
- Cinta métrica
- Un telar si es de tu gusto, yo utilizo una tabla de apoyo para escribir, como la que se en la foto, para mí es más fácil y practico.
Step by step
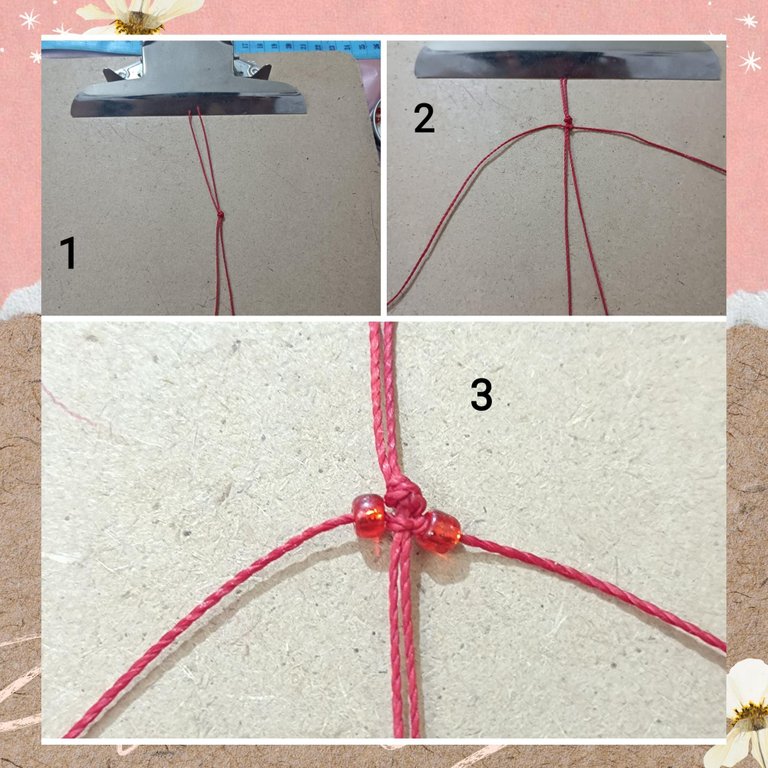
First
Cut two threads of 37cm each, leave a space of about 6cm and make a knot, attach to the board, take another thread of about one meter.
Second
We tie a knot with the one meter thread in the 37cm thread. To keep it in the middle, 50cm to the right and 50cm to the left, we introduce a bead at each end of the longer thread.
Paso a paso
Primero
Cortamos dos hilos de 37cm cada uno, dejamos un espacio de aproximadamente 6cm y hacemos un nudo, sujetamos a la tabla, tomamos otro hilo de alrededor de un metro.
Segundo
Hemos un nudo con el hilo de un metro en el hilo de 37cm. Que nos quede a mitad, 50cm a la derecha y 50cm a la izquierda, introducimos una mostacilla en cada extremo del hilo de mayor longitud.
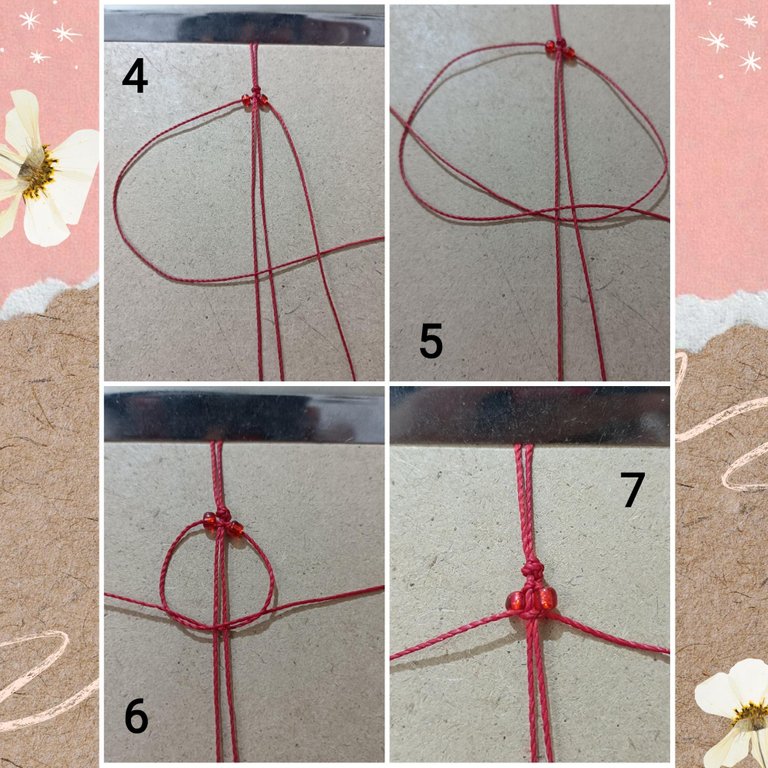
Third.
We proceed to make our flat knot from left to right.
We take the left thread and we make a kind of 4 passing over the two threads of the center and under the thread of the right, then the thread of the right side we pass it under the threads of the center and the left, it is like a kind of 8.
Tercero.
Procedemos a realizar nuestro nudo plano de izquierda a derecha.
Tomamos el hilo izquierdo y realizamos una especie de 4 pasando por encima de los dos hilos del centro y por debajo del hilo de la derecha, seguidamente el hilo del lado derecho lo pasamos por debajo de los hilos del centro y del izquierdo, nos queda como una especie de 8.
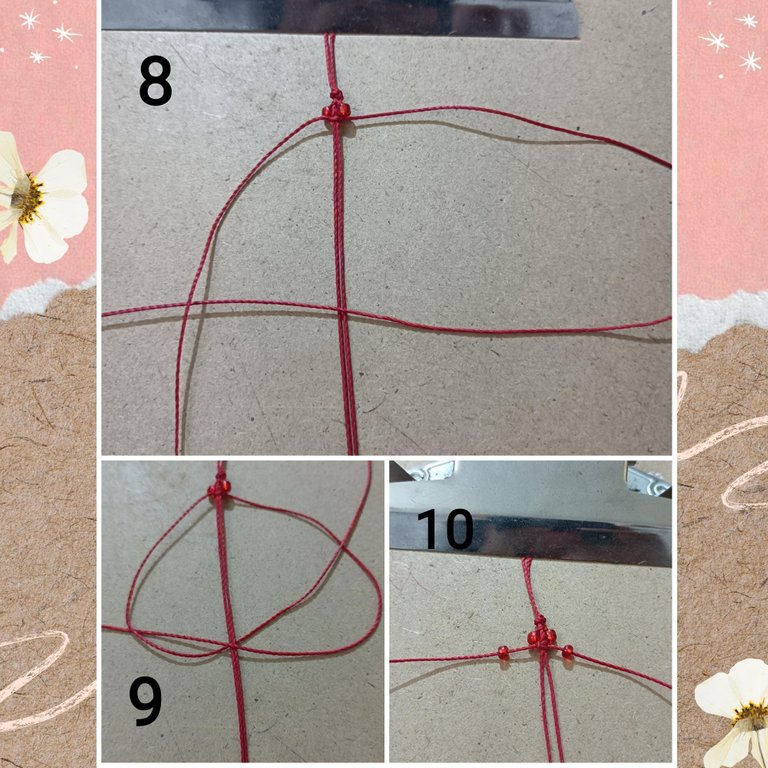
Fourth
We do the same process as above but this time we start with the right side thread, we make a kind of 4 we pass over the middle and under the left thread, then the left end we pass them under the middle and the left. so on we place the beads until we get the length we want.
Cuarto
Realizamos el mismo proceso anterior pero esta vez comenzamos por el hilo del lado derecho, hacemos una especie de 4 pasamos por encima de los hilos del medio y por debajo del izquierdo, luego el extremo izquierdo los pasamos por debajo de los del centro y el izquierdo. así sucesivamente colocamos la mostacilla hasta obtener la longitud que deseamos.
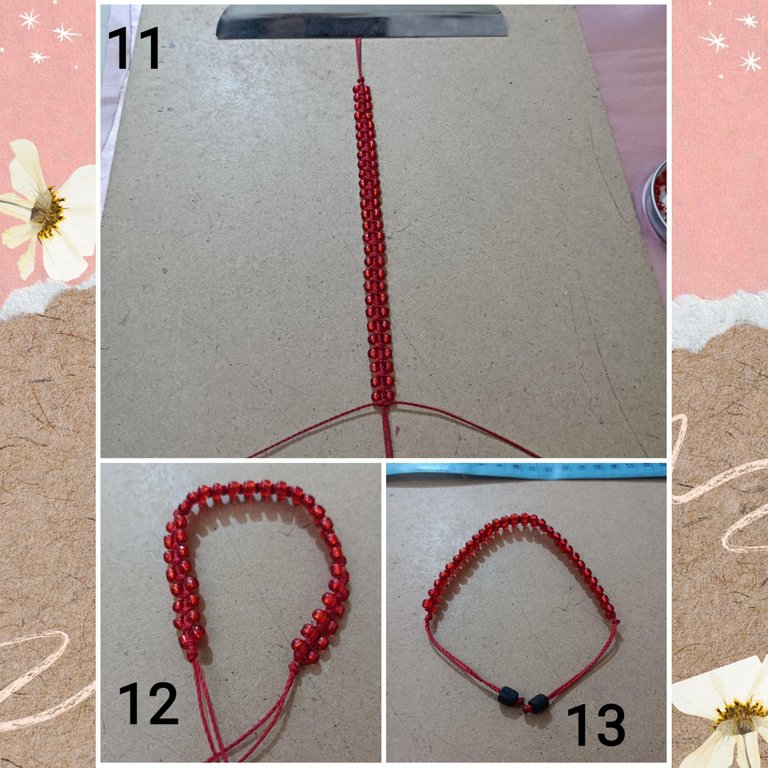
Fifth
To finish we cut the leftover threads, at each end of the bracelet we place the beads of your choice in this case I used some of jet close with a knot, do not forget to burn the thread every time you make a cut, this to prevent the thread from unraveling.
Quinto
Pará terminar cortamos los sobrantes de los hilos, en cada punta de la pulsera colocamos las cuentas de tu preferencia en este caso yo utilice unas de azabache cerremos con un nudo, no se te olvide quemar el hilo cada vez que realices un corte, esto para evitar que el hilo se deshile.
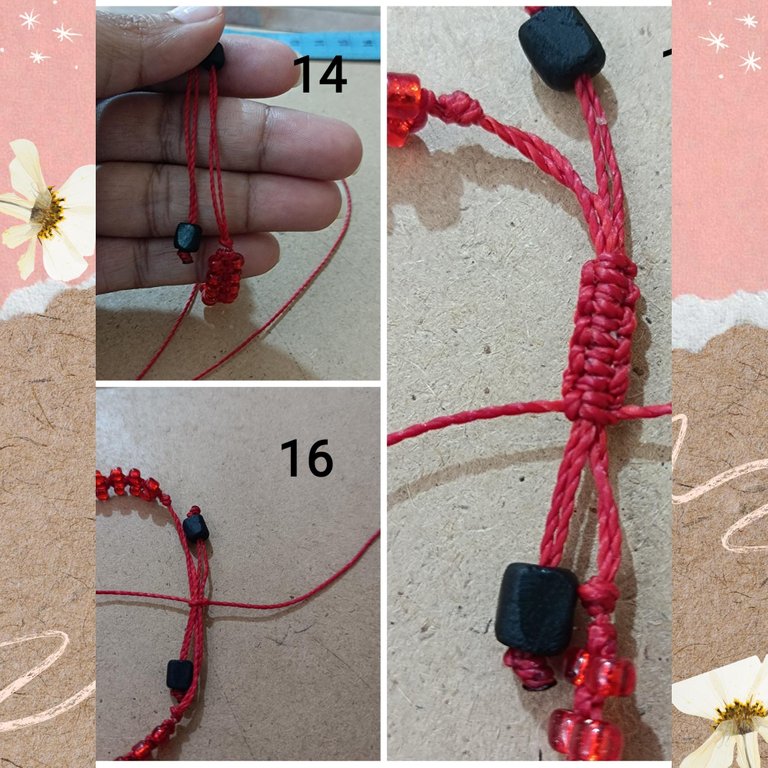
As a last step we close the bracelet with a flat knot as shown in photo N (16-17).
Como último paso hacemos el cierre de la pulsera con un nudo plano tal como se aprecia en la foto N (16-17)
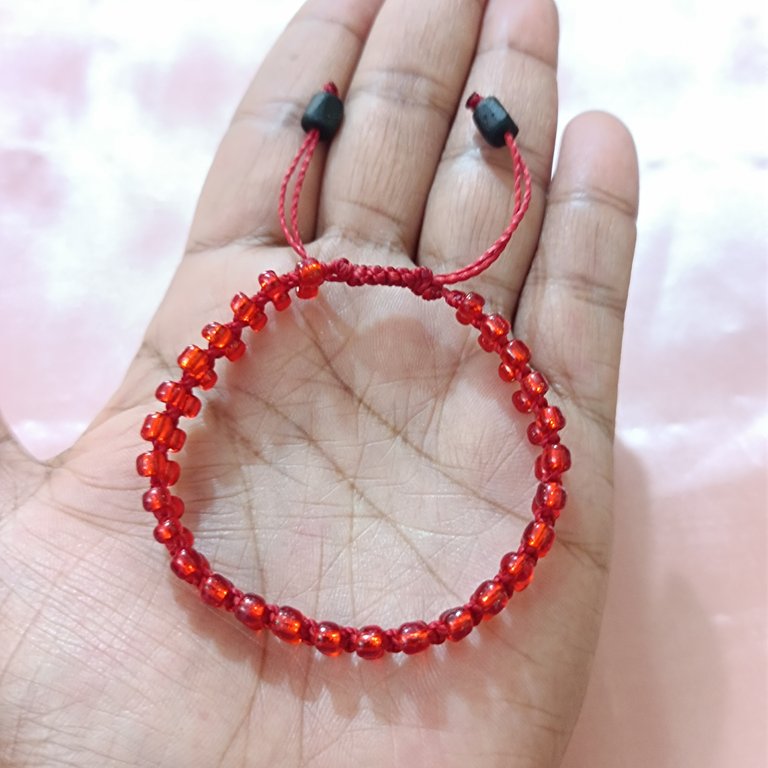
I hope you are encouraged to make this beautiful bracelet, remember that you can always use the materials of your choice.
Espero se animen a realizar esta linda pulsera, recuerda que siempre puedes utilizar los materiales de tu preferencia.

Photography: my authorship
Jewelry design and making: @monicamm
Photo editing: Canva
Translator www.DeepL.com
Fotografía: mi autoría
Diseños y elaboración de joyería: @monicamm
Edición de fotos: Canva
Traductor www.DeepL.com
Thank you for sharing this amazing post on HIVE!
Your content got selected by our fellow curator @hafizullah & you just received a little thank you via an upvote from our non-profit curation initiative!
You will be featured in one of our recurring curation compilations and on our pinterest boards! Both are aiming to offer you a stage to widen your audience within and outside of the DIY scene of hive.
Join the official DIYHub community on HIVE and show us more of your amazing work and feel free to connect with us and other DIYers via our discord server: https://discord.gg/mY5uCfQ !
If you want to support our goal to motivate other DIY/art/music/homesteading/... creators just delegate to us and earn 100% of your curation rewards!
Stay creative & hive on!
Yay! 🤗
Your content has been boosted with Ecency Points, by @monicamm.
Use Ecency daily to boost your growth on platform!
Support Ecency
Vote for new Proposal
Delegate HP and earn more
Te ha quedado hermosa está pulsera amiga @monicamm nos encanta cuando con el Macramé se une con las piedras, un excelente trabajo y un bonito paso a paso.
Gracias 😊
Un trabajo hermoso, me alegra tenerte nuevamente por acá @monicamm ! Tu madre es sabía, ya verás que con el favor de Dios y el universo todo lo que estés pasando se va a solventar con bien! No pierdas la fe... Sigue creando, innovando y siendo cada día tu mejor versión! Ánimo.