Chicken Parmesan - The Recipe! [Ger/Eng]
Kurzes Intro
In meinem ersten Food-related Post möchte ich meine Herangehensweise beim Zubereiten von Chicken Parmesan mit dir teilen. Ich verspreche dir, dass du dieses Rezept einfach nachkochen kannst. Deine Liebsten werden auf jeden Fall begeistert sein! 😊 Hier eine Liste, die du an Zutaten für dieses Gericht benötigst!
Zutaten Hähnchen:
- 500-600 Gramm Hähnchenbrust
- Mehl
- 1-2 Eier
- Paniermehl
- Salz und Pfeffer
- Öl
- 125 Gramm Mozzarella
Zutaten Sauce:
- 300-400 Gramm Tomaten am Stück
- Eine große Zwiebel
- 1-2 Knoblauchzehen
- Salz und Pfeffer
- Öl
- 250-350 Gramm Brokkoli
Short Intro
In my first food-related post, I want to share with you my approach to making Chicken Parmesan. I promise you that you can easily recreate this recipe. Your loved ones will definitely be delighted! 😊 Here's a list of what ingredients you'll need for this dish!
Ingredients chicken:
- 500-600 grams of chicken breast
- flour
- 1-2 eggs
- breadcrumbs
- salt and pepper
- oil
- 125 grams of mozzarella
Ingredients sauce:
- 300-400 grams of tomatoes in pieces
- One large onion
- 1-2 cloves of garlic
- salt and pepper
- oil
- 250-350 grams of broccoli
Schritt 1: Vorbereitungen Schnitzel
Wie bei jedem guten Gericht, müssen wir auch hier zuerst die Vorbereitung der Zutaten treffen.
- Wir nehmen uns als erstes die Hähnchenbrust vor. Da diese auf einer Seite deutlich dicker ist als auf der anderen, klopfen wir sie mithilfe eines stabilen, schweren Gegenstands wie einem Nudelholz in Schnitzelform. Nimm dir dafür am besten einen großen Gefrierbeutel und platziere mittig darin die Hähnchenbrust. Versuche dabei, dein Schnitzel gleichmäßig dünn auszuklopfen.
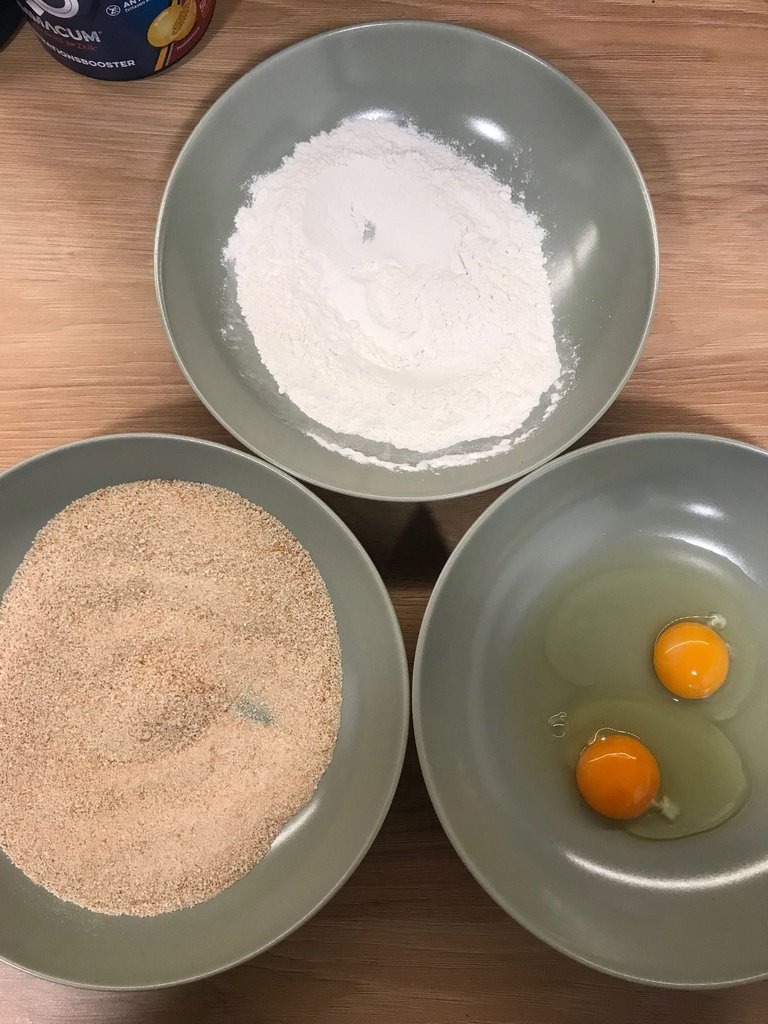
- Als nächstes bereiten wir die Panade vor. Nimm dir 3 große Teller, und verteile in einem Mehl, in dem nächsten verquirlen wir ein Ei und in dem letzten platzieren wir Paniermehl.
- Gib zu den 3 Tellern jeweils etwas Salz und Pfeffer hinzu, da wir das Fleisch nicht direkt Würzen.
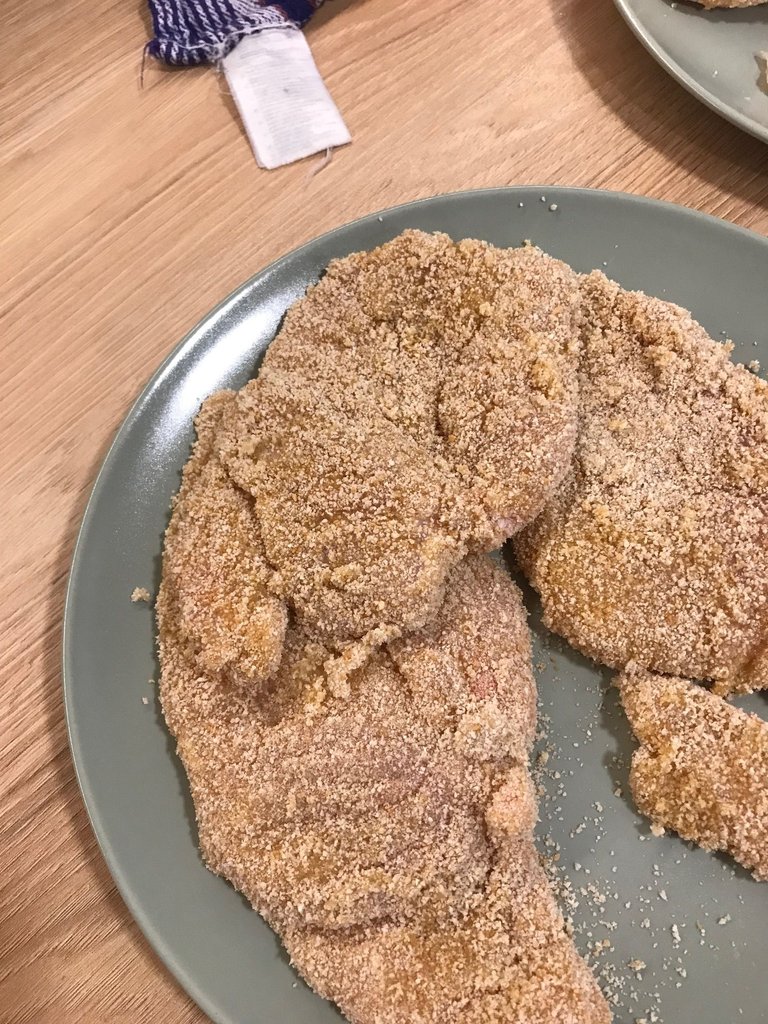
- Um das Hähnchen zu panieren, nehmen wir es und bedecken es gründlich mit dem Mehl, bevor wir es in das verquirlte Ei und anschließend im Paniermehl wenden.
- Wir lassen das wunderschön panierte Schnitzel für 30 Minuten auf einem frischen Teller ruhen.
- Platziere deine Mozzarellakugel nun im Gefrierfach. Dadurch können wir den Mozzarella später besser reiben.
Step 1: Preparing the Schnitzel
As with any good dish, we must first prepare the ingredients.
- The first thing we do is cut the chicken breast. Since it is much thicker on one side than the other, we use a sturdy, heavy object such as a rolling pin to pound it into a cutlet shape. Take a large freezer bag and place the chicken breast in the middle of it. Try to pat your cutlet out evenly and thinly.
- Next we prepare the breading. Take 3 big plates, and in one of them we put flour, in the next one we whisk an egg and in the last one we put breadcrumbs.
- Add a little salt and pepper to each of the 3 plates, as we do not season the meat directly.
- To bread the chicken, we take it and cover it thoroughly with the flour before turning it in the beaten egg and then in the breadcrumbs.
- We let the beautifully breaded schnitzel rest on a fresh plate for 30 minutes.
- Now place your mozzarella ball in the freezer. This will allow us to grate the mozzarella better later.
Schritt 2: Weitere Vorbereitungen
Während unser Hähnchen ruht beschäftigen wir uns mit der Sauce. Dafür dürfen wir auch ein paar Vorbereitungen vornehmen:
- Wir nutzen die Zeit, schnappen uns den Brokkoli, und schneiden diesen mit einem scharfen Messer in mundgerechte Rösschen.
- Dann würfeln wir die Zwiebel schön klein, und den Knoblauch hacken wir fein.
- Im Anschluss Vierteln wir die Tomaten, um den Garprozess später etwas zu beschleunigen.
- Das wars mit den Vorbereitungen! Auf geht's, lass' uns Braten!
Step 2: Further preparations
While our chicken rests, we deal with the sauce. For this we may also make a few preparations
- We take advantage of the time, grab the broccoli, and with a sharp knife, cut it into bite-sized rosses.
- Then we dice the onion nice and small, and finely chop the garlic.
- Then we quarter the tomatoes to speed up the cooking process a little later.
- That's it for the preparations! Let's go, let's roast!
Schritt 3: Hähnchen anbraten
Jetzt geht es ans Eingemachte, wir braten das Hähnchen an!
- Besorge dir eine dicke bzw. schwerere Pfanne, die die Hitze gut halten kann.
- Dreh den Herd auf mittlere Hitze, und gib einen guten Schuss Öl hinein, sodass der Pfannenboden gut bedeckt ist. Das Hähnchen muss nicht komplett mit Öl bedeckt sein!
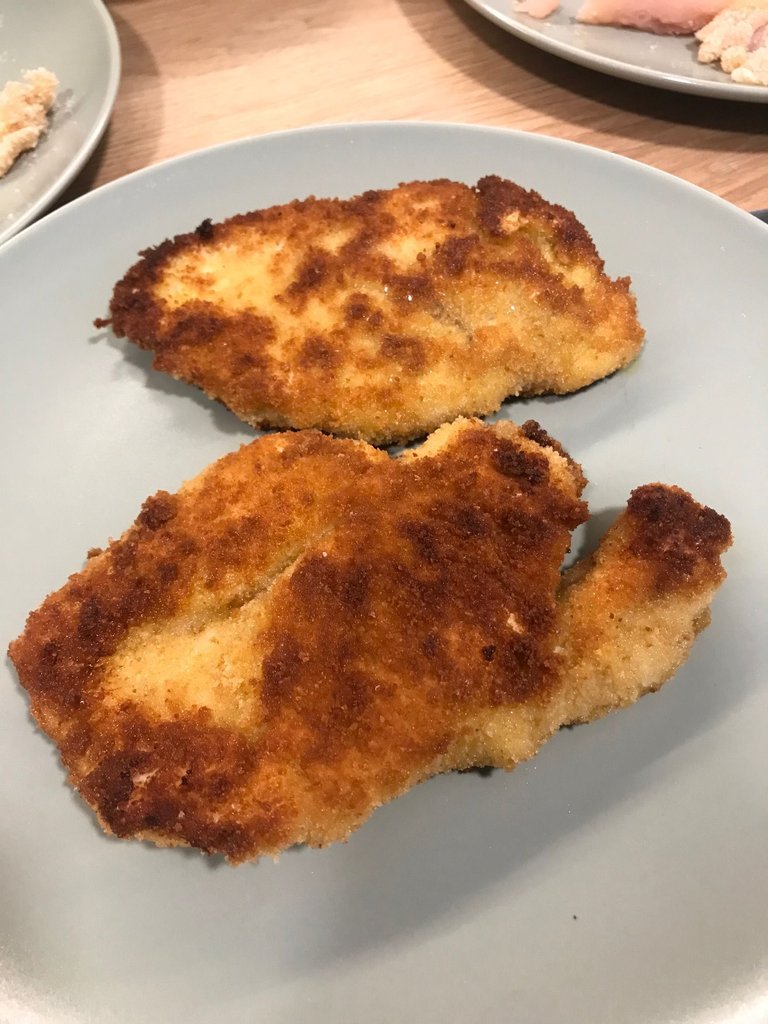
- Warte, bis das Öl heiß geworden ist, und leg das erste Schnitzel hinein.
- Wende das Schnitzel nach 3 Minuten, und brate es auf der anderen Seite für weitere 3 Minuten.
Step 3: Sear the chicken
Now it's time to get down to business, we're frying up the chicken!
- Get a thicker or heavier pan that can hold heat well.
- Turn the stove to medium heat, and add a good dash of oil so that the bottom of the pan is well covered. The chicken does not have to be completely covered with oil!
- Wait until the oil is hot and put the first cutlet in it.
- Turn the cutlet after 3 minutes, and fry it on the other side for another 3 minutes.
Schritt 4: Die Sauce
Wir haben es fast geschafft. Das wichtigste ist erledigt, du hast hoffentlich das Hähnchen gut durchgebracht! Jetzt geht's um die Sauce!
- Schwitze die Zwiebeln und den Knoblauch in derselben Pfanne an, indem du auch das Hähnchen gebraten hast. Das wird später dabei helfen, die Sauce durch die Brotkrümel etwas anzudicken, und es ist noch Öl in der Pfanne. Solltest du merken, dass du zu wenig Öl hast, oder die Temperatur zu hoch gewählt ist (der Knoblauch soll nicht verbrennen), kannst du jetzt nachjustieren.
- Gib etwas Salz zu dem Zwiebel/Knoblauch Gemisch und lass das Ganze vor sich auf kleiner Flamme hin köcheln, bis es weich und glasig ist.
- Sobald das Gemisch eine schöne Konsistenz hat, gib die geviertelten Tomaten hinzu, dreh die Hitze für 1-2 Minuten auf und reduziere sie anschließend wieder auf mittlere Hitze. Lass die Sauce für 10 Minuten köcheln.
- Jetzt ist ein guter Zeitpunkt, um mit Salz und Pfeffer abzuschmecken. Anschließend ist die Sauce fertig.
Step 4: The Sauce
We're almost there. The most important thing is done, hopefully you got the chicken well done! Now it's time for the sauce!
- Sauté the onions and garlic in the same pan you fried the chicken. This will help thicken the sauce a bit later with the bread crumbs, and there is still oil in the pan. If you notice that you don't have enough oil, or the temperature is too high (you don't want the garlic to burn), you can readjust now.
- Add a little salt to the onion/garlic mixture and let it simmer over low heat until soft and translucent.
- Once the mixture has a nice consistency, add the quartered tomatoes, turn up the heat for 1-2 minutes and then reduce it back to medium heat. Let the sauce simmer for 10 minutes.
- Now is a good time to season with salt and pepper. Then the sauce is ready.
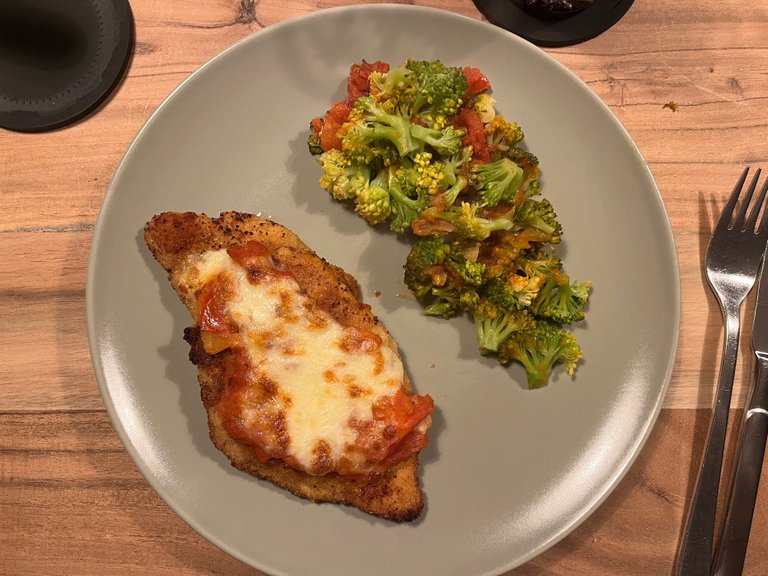
Schritt 5: Die Zielgerade!
Es ist Zeit die Lorbeeren zu pflücken!
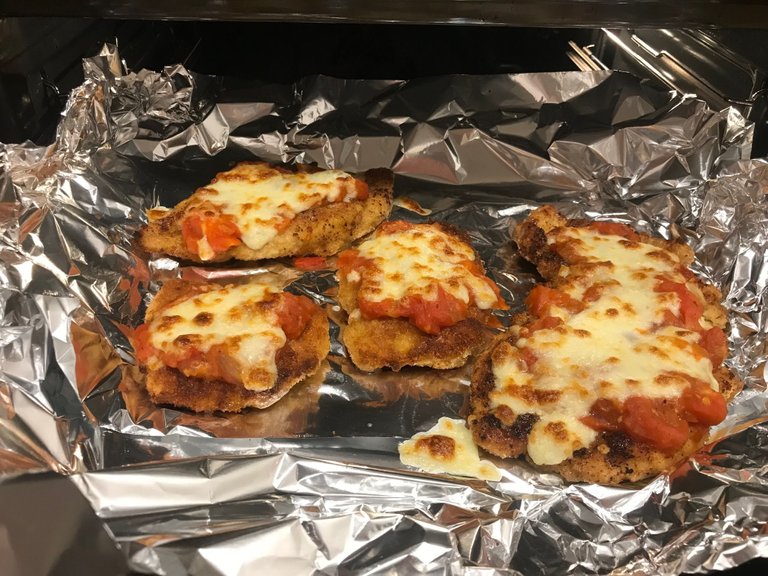
- Für das Finale legen wir die Hähnchenbrüste auf ein Backblech, dass wir vorher mit Alufolie ausgelegt haben.
- Jetzt kommt ein Teil der Tomatensauce als Lage auf unsere Schnitzel.
- Nun müssen wir den Mozzarella aus dem Gefrierfach holen, und mit einer Reibe auf dem Hähnchen verteilen.
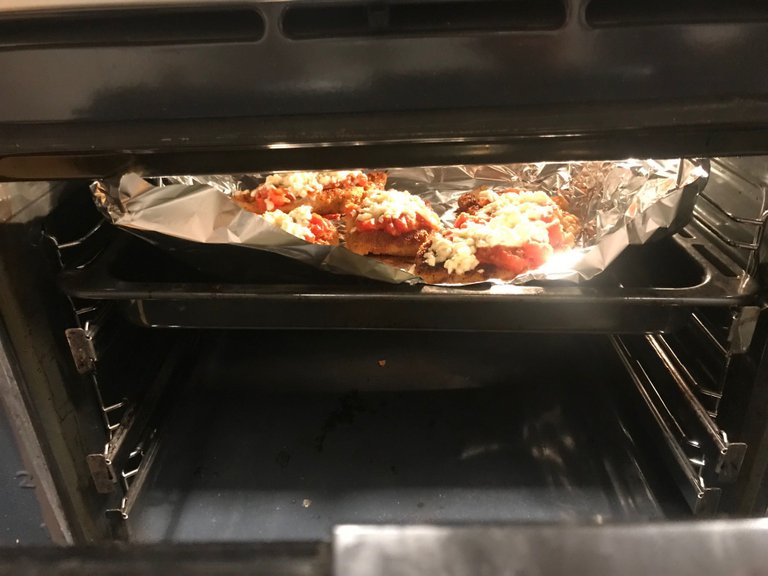
- Im Backofen nutzen wir nun die "Grillfunktion" um mit der Oberhitze des Grills den Mozzarella zu schmelzen, aber das Hähnchen nicht zu verbrennen oder auszutrocknen, indem wir nur die Oberseite erhitzen.
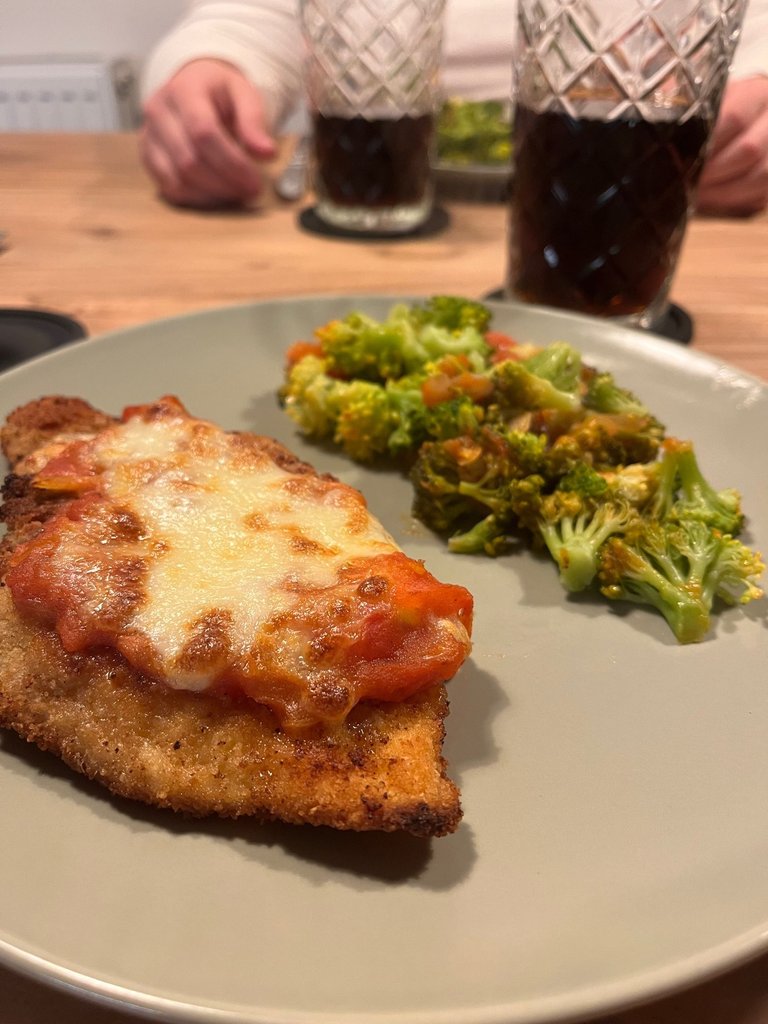
- Während das Hähnchen den finalen Touch erhält, werfen wir den Brokkoli auf die Tomatensauce, schließen die Pfanne mit einem Deckel (der im besten Fall passt), und lassen den Brokkoli 5 Minuten bei niedriger Hitze dünsten.
- Jetzt musst du nur noch alles zusammenfügen, und das Gericht ist fertig! 😊

Step 5: The home stretch!
It's time to pick the laurels!
- For the finale, we put the chicken breasts on a baking tray that we have previously covered with aluminum foil.
- Now some of the tomato sauce goes as a layer on our cutlets.
- Then we need to get the mozzarella from the freezer, and spread it on the chicken with a grater.
- In the oven, we now use the "grill function" to melt the mozzarella with the top heat of the grill, but not burn or dry out the chicken by heating only the top.
- While the chicken is getting the final touch, we toss the broccoli on top of the tomato sauce, close the pan with a lid (which fits best), and let the broccoli steam for 5 minutes over low heat.
- Now you just have to put everything together and the dish is ready! 😊
Hat dir der Beitrag gefallen?
Wenn dir der Beitrag gefallen hat, freue ich mich dich in den nächsten Beiträgen wiederzusehen! Vielleicht hast du weitere Tipps, die mich auf meiner kulinarischen Reise begleiten. Ich freue mich über dein Feedback und weitere Rezeptvorschläge! Viel Spaß beim Nachkochen! 🤤
Did you enjoy this post?
If you liked the post, I look forward to seeing you in the next posts! Maybe you have more tips that accompany me on my culinary journey. I look forward to your feedback and more recipe suggestions! Have a great time recooking! 🤤
Richtig gut gelungen, sieht toll aus!
Ich danke dir! 😊 Hat auch ziemlich Bock gemacht!
Thank you for sharing this amazing post on HIVE!
Your content got selected by our fellow curator @stevenson7 & you just received a little thank you via an upvote from our non-profit curation initiative!
You will be featured in one of our recurring curation compilations and on our pinterest boards! Both are aiming to offer you a stage to widen your audience within and outside of the DIY scene of hive.
Join the official DIYHub community on HIVE and show us more of your amazing work and feel free to connect with us and other DIYers via our discord server: https://discord.gg/mY5uCfQ !
If you want to support our goal to motivate other DIY/art/music/homesteading/... creators just delegate to us and earn 100% of your curation rewards!
Stay creative & hive on!
Yay! 🤗
Your content has been boosted with Ecency Points, by @mario89.
Use Ecency daily to boost your growth on platform!
Support Ecency
Vote for new Proposal
Delegate HP and earn more
Sieht ja richtig lecker aus 🤤
Vielen Dank! Gehört zu einem meiner Lieblingsgerichte, weil es relativ einfach und gesund ist! 😊
Congratulations @m1sterjw! You have completed the following achievement on the Hive blockchain and have been rewarded with new badge(s):
Your next target is to reach 300 upvotes.
You can view your badges on your board and compare yourself to others in the Ranking
If you no longer want to receive notifications, reply to this comment with the word
STOPCheck out the last post from @hivebuzz:
Support the HiveBuzz project. Vote for our proposal!