🦋🦋 TUTORIAL|| Elaboration Of Multifunctional Foamis Butterflies 🦋🦋 [Esp/Eng]
Saluditos a todos mis queridos amigos creativos de Hive y @hivediy les deseo como siempre salud y felicidad. Hace ya unos días estaba dándole vuelta a la cabeza, para elaborar algún detalle con los que pudiera decorar el stand de mi emprendimiento verde 🌿 no quería que fueran planta ya me parecía se vería muy sobre cargado si el stand de por si es para lucir planta y macetas. En fin después de tanto darle vueltas, me acordé de la mariposas y lo mucho que tienen que ver con las flores, los jardines etc.
Greetings to all my dear creative friends of Hive and @hivediy I wish you as always health and happiness. A few days ago I was thinking about making some details with which I could decorate the stand of my green venture 🌿 I didn't want them to be plants as I thought it would look too overloaded if the stand itself is to show off plants and pots. Anyway, after thinking about it so much, I remembered butterflies and how much they have to do with flowers, gardens, etc.
Así pues decidí poner manos a la obra y elaborar tres mariposa multiusos en diferentes colores para colocarlas en un lado de la parte superior de stand y darle el toque que deseaba.🦋🦋🦋 Y sé que de pronto tienes curiosidad por saber porque multiusos ??? Sencillo y es puedes utilizarlad para decorar el lugar que desees paredes, cuadernos, dulceros, bolsitas, y hasta donde la imaginación te lo permita. Este proyecto no es muy complicado y podemos hacerlo en un día si nos lo proponemos así hacerlo, con muy pocos materiales y económicos, no solo puede ser con foamis, también pueden ser de papel, cartón , cartulina etc. Quédate conmigo hasta el final y seguro te divertirás en es este momento creativo.
So I decided to get to work and make three multipurpose butterflies in different colors to place them on one side of the top of the stand and give it the touch I wanted.🦋🦋🦋🦋 And I know you're suddenly curious to know why multipurpose? Simple and you can use it to decorate any place you want: walls, notebooks, candy boxes, bags, and wherever your imagination allows. This project is not very complicated and we can do it in one day if we want to do it that way, with very few and inexpensive materials, not only with foamis, they can also be made of paper, cardboard, cardboard etc. Stay with me until the end and I'm sure you will have fun in this creative moment.

🦋🦋 MARIPOSAS MULTIUSOS EN FOAMI || MULTIPURPOSE FOAMI BUTTERFLIES 🦋🦋


Para hacer estas lindas mariposas en foami multiusos necesitaremos los siguientes materiales:
✓Foamis diversos colores
✓Tijeras
✓Moldes de mariposas
✓Pegamento
✓Lapiz
To make these cute butterflies in multipurpose foami we will need the following materials:
✓Foamis various colors.
✓Scissors
✓Butterfly molds
✓Glue
✓Polish


Para la elaboración de estas hermosas mariposas realicé estos pocos y sencillos pasos
Paso Uno:
Es los foamis seleccionados para la elaboración de las mariposas, se coloca el molde de las mismas y con el lápiz se trazan las mariposas que serán la base son todas lisas.✅
To make these beautiful butterflies I did these few simple steps
Step One:
Is the foamis selected for the elaboration of the butterflies, place the mold of the same and with the pencil trace the butterflies that will be the base are all smooth.✅

PASO DOS :
En este siguiente paso se recorta la transferencia del molde en el foami para obtener la forma.
STEP TWO :
In this next step the transfer of the mold is cut out of the foami to obtain the shape.

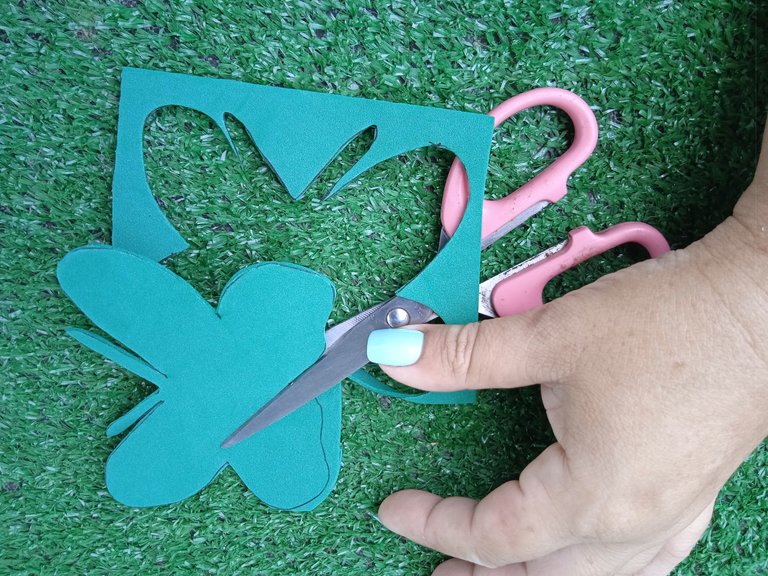
PASO TRES :
Seguido haré la parte superior de la mariposa con el lápiz haré nuevos trazos y cortaré con pequeños orificios para que sobre salga la parte inferior de la mariposa 🦋 y pueda detallarse la parte lisa del foami escarchado.
STEP THREE :
Next I will make the upper part of the butterfly with the pencil I will make new strokes and cut with small holes so that the lower part of the butterfly comes out 🦋 and the smooth part of the frosted foami can be detailed.


PASO CUATRO :
Una vez que ya haya elaborado todos los pasos anteriores ya procedo a colocarla las mariposas una sobre otra con el pegamento.
STEP FOUR :
Once I have already elaborated all the previous steps I proceed to place the butterflies one on top of the other with the glue.

PASO QUINTO :
Este es el paso final ya las mariposas multiusos de foami están listan para colocarlas en el espacio deseado y verlas decorar como esperaba.
STEP FIVE :
This is the final step and the multipurpose foami butterflies are ready to be placed in the desired space and see them decorate as expected.


Espero que te haya gustado este sencillo tutorial que este día traje para ti y te animes a realizarlo . Las mariposas son una linda idea para decorar cualquier ocasión y pueden ser usadas tanto por adultos como chicos y seguro lucirán excelente y nos dejarán muy bien parados. Al ser tan versátiles las mariposas pueden ser grandes o pequeñas todo dependerá del gusto de su elaborador.
I hope you liked this simple tutorial that I brought for you today and I encourage you to make it. Butterflies are a nice idea to decorate any occasion and can be used by both adults and children and surely look great and will leave us very well standing. Being so versatile butterflies can be large or small, it all depends on the taste of the maker.


✓Todas las fotografías son de mi propiedad ,capturadas con mi Redmi A9. Banner inicial, final y separadores elaborados con Canva edición gratuita.
✓Deelptraductor fue utilizado para esta publicación.
Éxitos y bendiciones para todos 🙏🏻 hasta las próxima publicación.
¡Tengan un feliz día!
¡Gracias por detenerte a leer!
All photos are my property, captured with my Redmi A9. Banner initial, final and dividers made with Canva free edition.
✓Deelptraductor was used for this publication.
Success and blessings to all 🙏🏻 until the next posts.
Have a happy day!
Thanks for stopping by to read!

Yay! 🤗
Your content has been boosted with Ecency Points, by @hive-130560.
Use Ecency daily to boost your growth on platform!
Support Ecency
Vote for new Proposal
Delegate HP and earn more
Preciosas tus mariposas y combinan muy bien
Gracias querida @jorgelissanchez por tu visita y agrable comentario me alegra haya sido de tu agrado . Saludos 😊