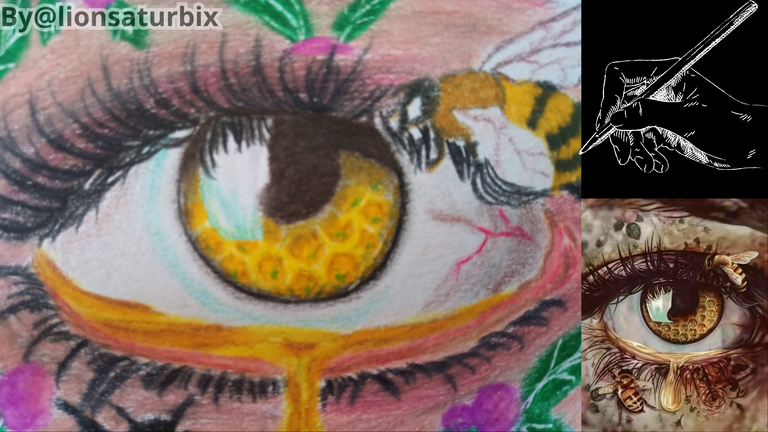
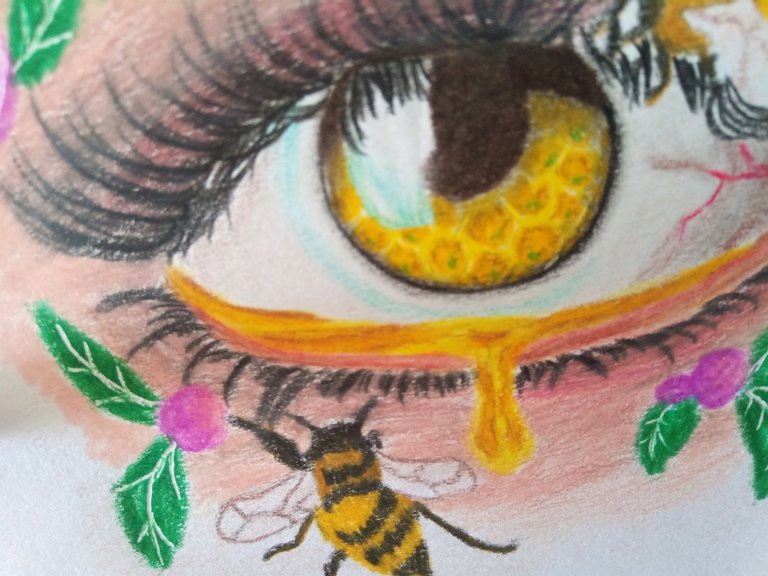
Eyes are the soul of mankind, and bees are the life of mankind / (ENG/ESP)

Bienvenidos mis queridos amigos, amantes del arte y artistas.
Hoy les presentó mi participación al concurso con el tema de la abeja que la comunidad @diyhub está llevando a cabo en este mes.
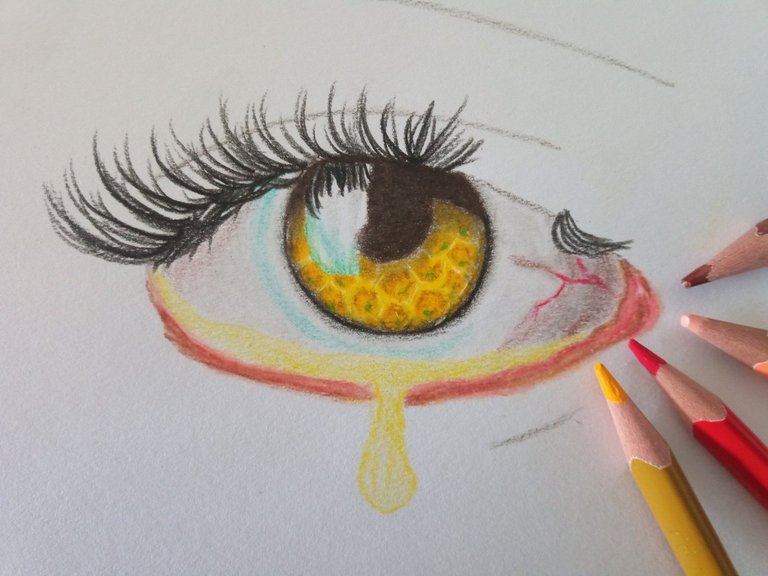
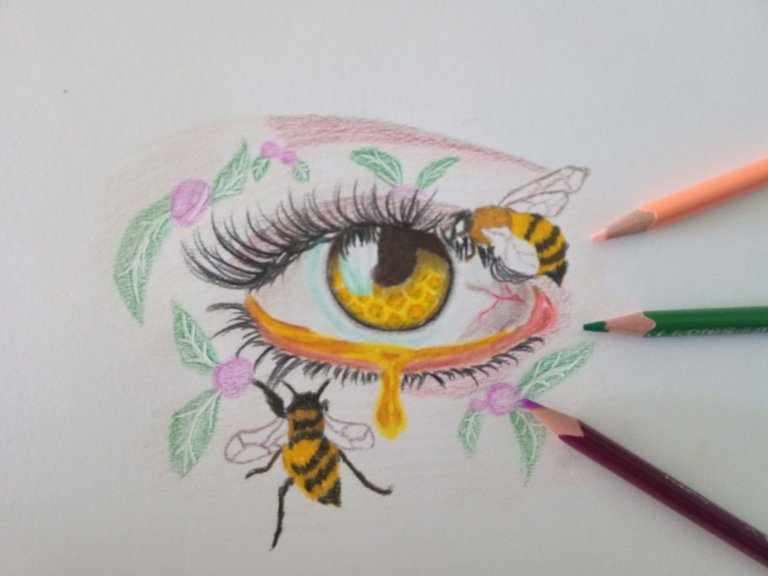
Mi participación será de un ojo con lágrima de miel y abejas con algunas flores, este arte tiene como objetivo mostrar el sentimiento que se tiene a estas increíbles trabajadoras y que sin ellas no existiéramos en el mundo, ya que ellas se encargan de polinizar las plantas para que estas puedan producir el fruto que consumimos día a día.
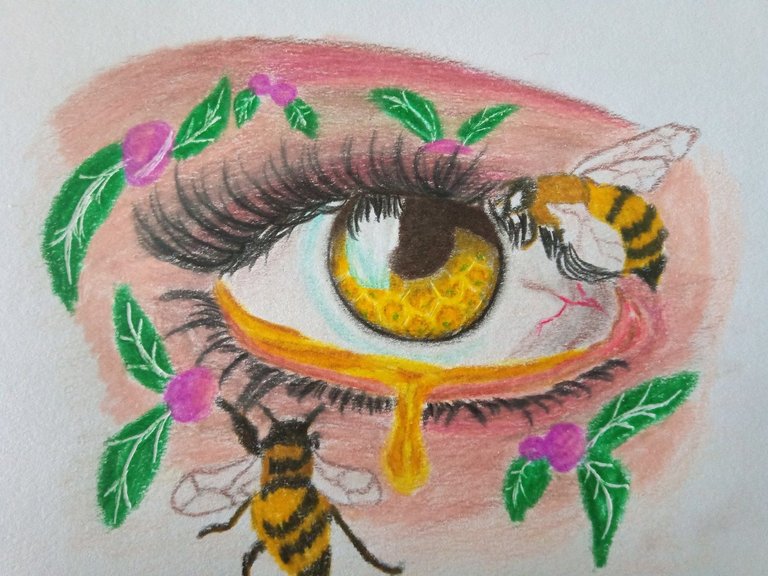
El estilo del dibujo es el semi realista, también quise dibujar un ojo porque soy amante de experimentar con el sentimiento que transmites, son lo que le dan vida a todo tipo de dibujo y fotografía, sin más preámbulo te presentó el proceso de creación de mi dibujo.
Welcome my dear friends, art lovers and artists.
Today I present you my participation to the contest with the bee theme that the @diyhub community is carrying out this month.
My participation will be of an eye with honey tear and bees with some flowers, this art aims to show the feeling that we have to these incredible workers and that without them we would not exist in the world, since they are responsible for pollinating the plants so that they can produce the fruit that we consume every day.
The style of the drawing is semi realistic, I also wanted to draw an eye because I love to experiment with the feeling that you transmit, they are what give life to all kinds of drawing and photography, without further ado I present the process of creating my drawing.
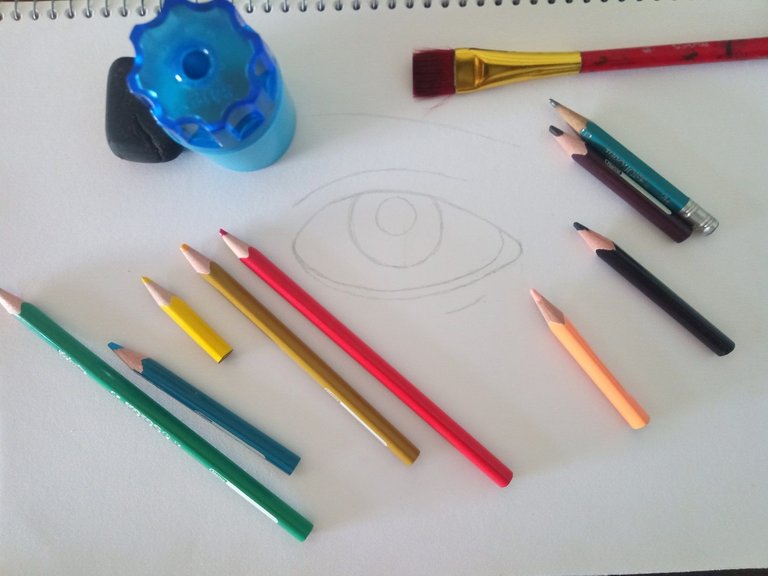
Las herramientas que use para crear mi dibujo fueron los siguientes:
Lápiz de grafito 2B.
Difuminadora.
Block de dibujo marca Caribe.
Borrador moldeable.
Sacapuntas con depósito.
Colores marca Kores como:
Negro.
Morado.
Azul claro.
Jade.
Verde.
Dorado.
Ocre quemado.
Amarillo.
Carne.
Bermellón.
Café.
Café bandyke
The tools I used to create my drawing were the following:
2B graphite pencil.
Diffuser.
Caribe drawing pad.
Moldable eraser.
Pencil sharpener with reservoir.
Kores brand colors such as:
Black.
Purple.
Light blue.
Jade.
Green.
Gold.
Burnt ocher.
Yellow.
Flesh.
Vermilion.
Brown.
Bandyke coffee
 |  |
|---|
Cabe destacar, que para hacer un dibujo que posea todos los detalles es necesario que trabaje en una hoja extremadamente grande, de lo contrario cuando lo hacemos pequeño difícilmente le podemos agregar todos los detalles.
En mi caso lo hice pequeño porque ya mis pobres colores estan diciendo adiós jajaja, los he usado tanto en mis anteriores dibujos que ya estos se agotaron rápido, porque si hay algo que hay que tener en cuenta, es que para un dibujo semi realista a color lleva mucho tono y hay que afincar mucho el crayón para que los poros de la hoja de trabajo se llenen para poder crear estos dibujos sin espacios en blanco.
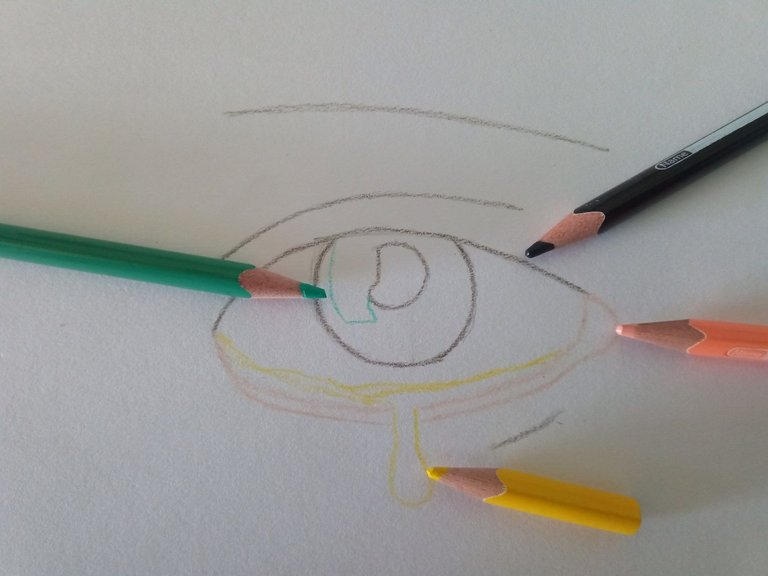
El primer paso fue crear las líneas semi curvas del ojo con los crayones para saber de qué tono va cada espacio.
Seguidamente, comencé a trabajar primero con el iris y la pupila, aquí quise hacer todo por partes hasta terminar cada uno de los espacios de este dibujo por completo.
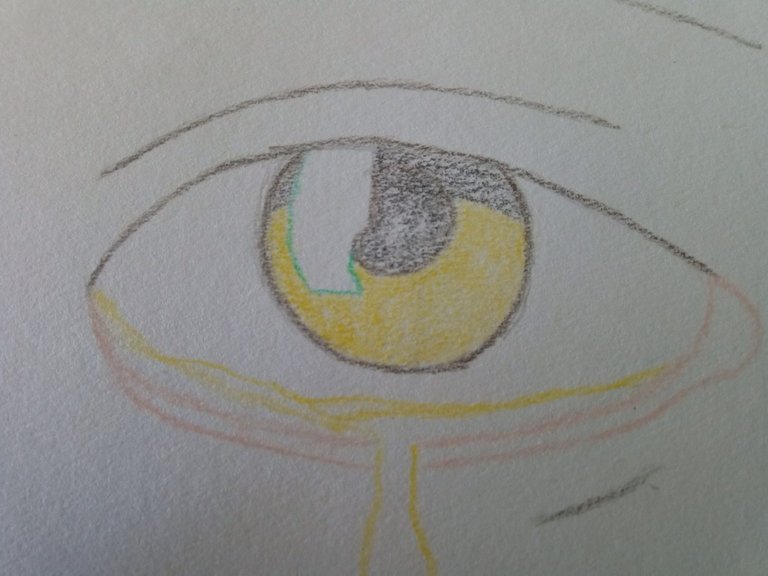
Como ya el tono blanco se me había agotado por completo, he tenido que dejar los espacios en blanco para poder destacar el brillo del ojo, trabajo que no fue fácil, ya que para mí es más fácil pasar el tono blanco de primero porque resaltaría más el brillo del ojo, aun así continúe con mi trabajo usando otros tonos más adelante.
It should be noted that to make a drawing that has all the details it is necessary to work on an extremely large sheet, otherwise when we make it small we can hardly add all the details.
In my case I made it small because my poor colors are already saying goodbye hahaha, I have used them so much in my previous drawings that these were exhausted quickly, because if there is something that must be taken into account, is that for a semi realistic color drawing takes a lot of tone and you have to sharpen the crayon a lot so that the pores of the worksheet are filled to create these drawings without white spaces.
The first step was to create the semi-curved lines of the eye with the crayons to know what tone each space is.
Next, I started to work first with the iris and the pupil, here I wanted to do everything in parts until I finished each of the spaces of this drawing completely.
As the white tone had already run out completely, I had to leave the spaces in white to be able to highlight the brightness of the eye, work that was not easy, since for me it is easier to pass the white tone first because it would highlight more the brightness of the eye, even so I continued with my work using other tones later on.
 |  |
|---|
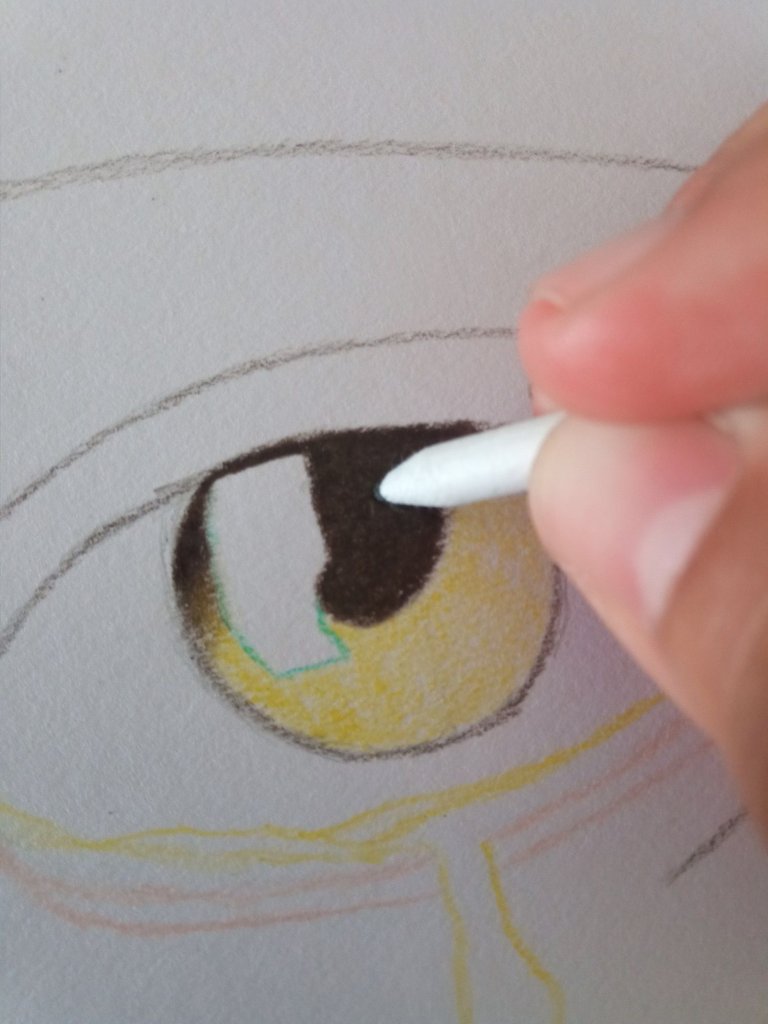
Luego de valorizar el iris y la pupila, quise usar una difuminadora para ver si lograba degradar los espacios de sombreado de la pupila, de verdad quede sorprendido con el resultado, porque quedo mejor de lo que yo pensaba.
Con un poco de ayuda del Crayón negro, fui degradando un poco más las partes de negro para posteriormente usar nuevamente la difuminadora y crear este efecto de degradado de la sombra.
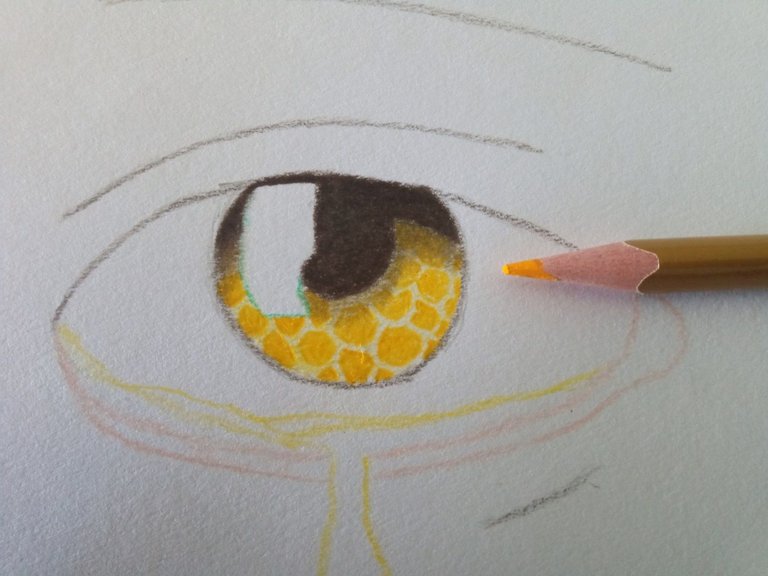
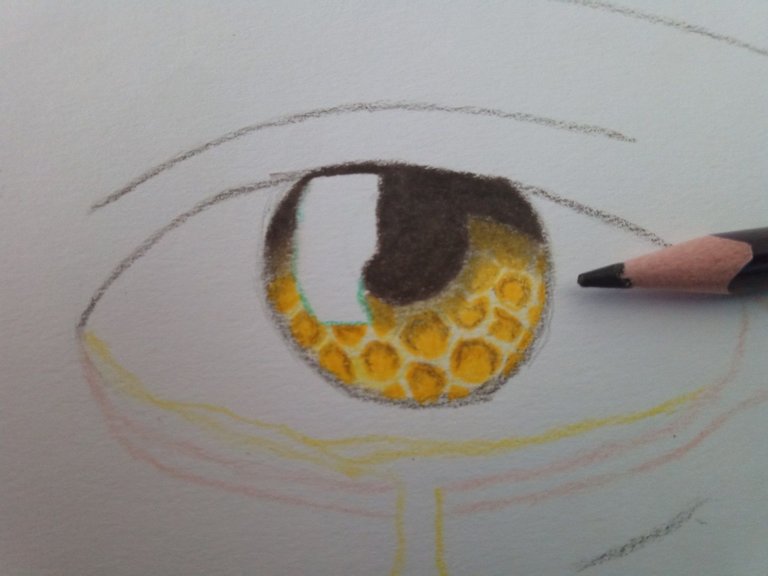
Luego de este paso comencé a hacer los hexágonos que simbolizan el panal de las abejas, antes de este había valorizado con el tono amarillo para agregar la primera capa de valorizado en el iris y luego use el tono ocre quemado para agregar los hexágonos.
Podemos notar la diferencia de tonos de estos dos crayones, respetando siempre el espacio de iluminación.
After enhancing the iris and the pupil, I wanted to use a blender to see if I could degrade the shaded areas of the pupil, I was really surprised with the result, because it was better than I thought.
With a little help of the black crayon, I was degrading a little more the black parts to later use again the blender and create this gradient effect of the shadow.
After this step I began to make the hexagons that symbolize the honeycomb of the bees, before this I had valorized with the yellow tone to add the first layer of valorized in the iris and then I used the burnt ocher tone to add the hexagons.
We can notice the difference of tones of these two crayons, always respecting the illumination space.
 |  |
|---|
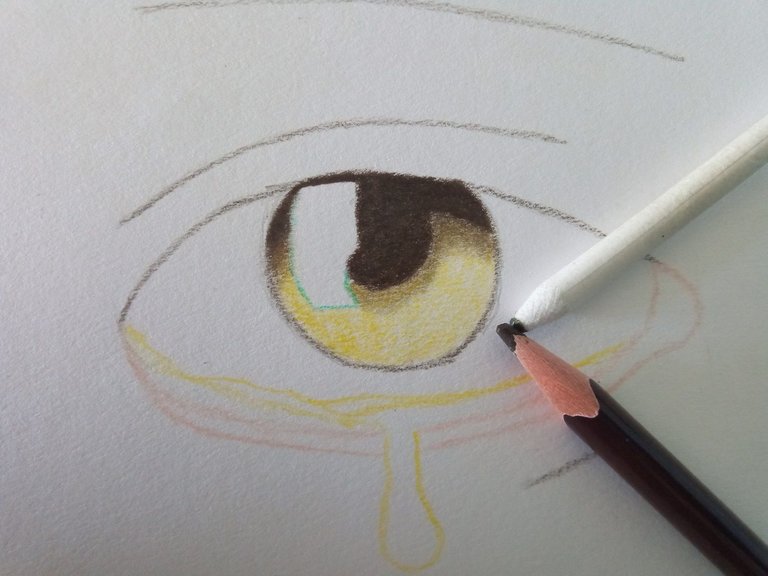
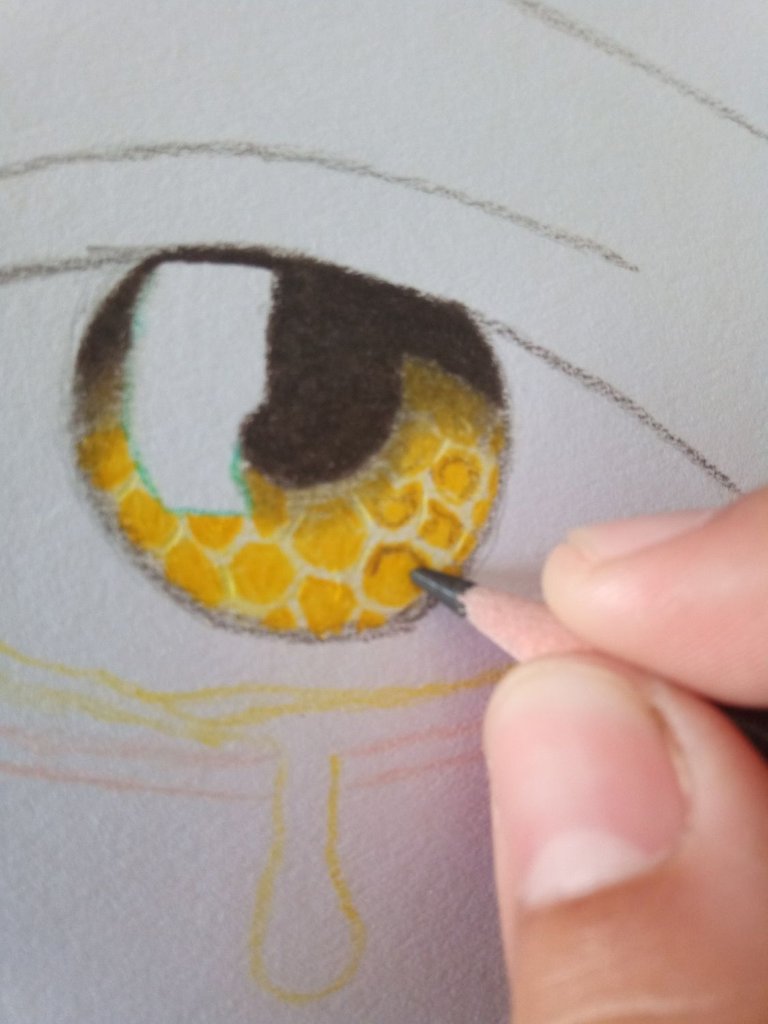
Luego de crear los hexágonos, comencé a usar el crayón con el tono café para crear una pequeña profundidad en cada uno de los hexágonos que hice anteriormente.
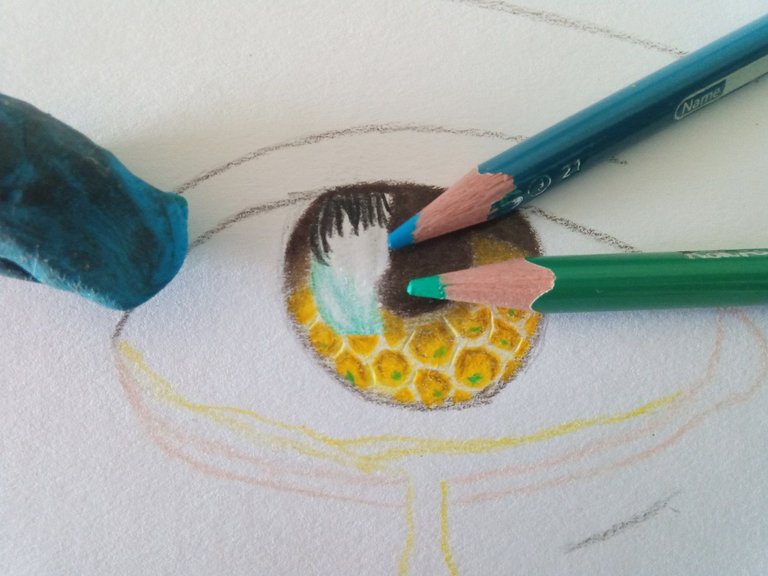
Después comencé a usar dos tonos, el jade y el azul claro, para crear un efecto de brillo un poco más intenso en la parte del iris.
Seguidamente, con la ayuda de mi borrador moldeable, comencé a degradar la parte donde use los tonos anteriormente mencionados, provocando que estos tiendan a desaparecerse un poco y se mezclen más con el entorno.
After creating the hexagons, I started using the crayon with the brown shade to create a little depth in each of the hexagons I made earlier.
Then I started using two shades, the jade and the light blue, to create a slightly more intense shimmer effect in the iris part.
Next, with the help of my moldable eraser, I started to degrade the part where I used the aforementioned tones, causing them to tend to fade a bit and blend in more with the surroundings.
 |  |
|---|
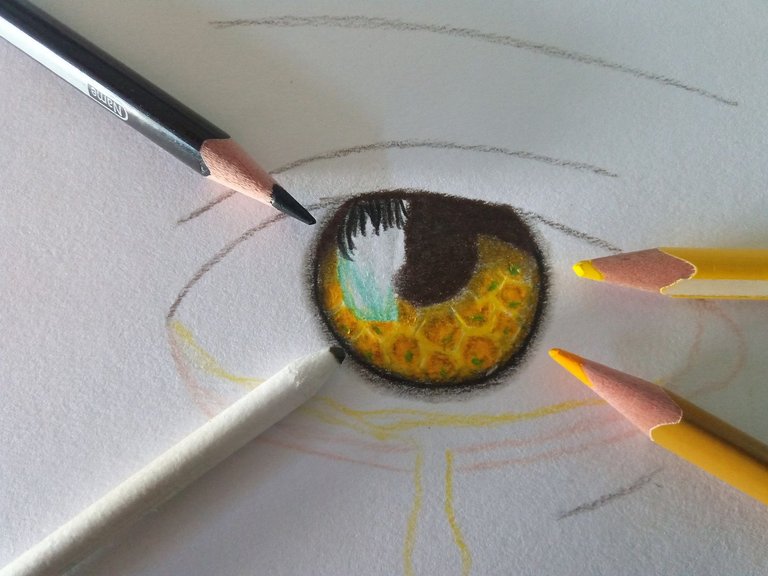
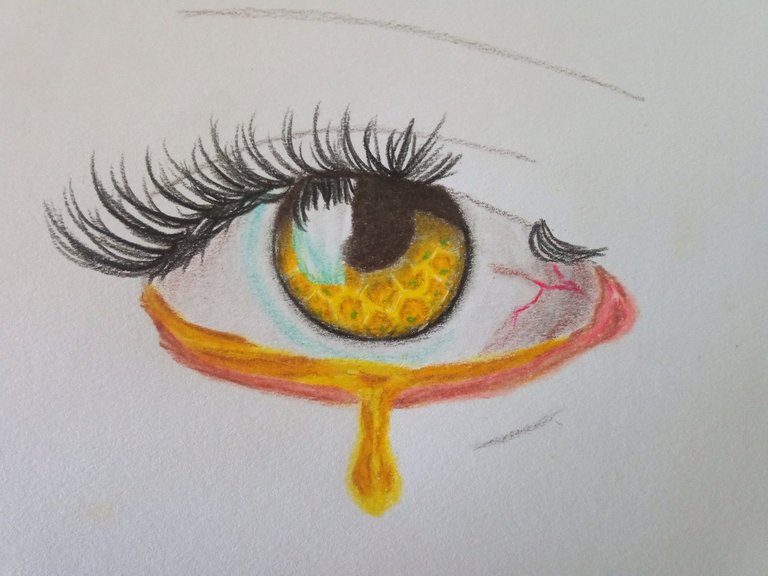
Al terminar con el brillo del ojo, comencé a trabajar con el degradado del iris por la parte de los bordes, seguidamente usé la difuminadora para degradarlo completamente.
Después le agregué las pestañas superiores y agregué la última capa de valorizado en el iris y pupila, posteriormente comencé a valorizar la lágrima de miel y a arruga donde se encuentra ubicado el lagrimal y los parpados.
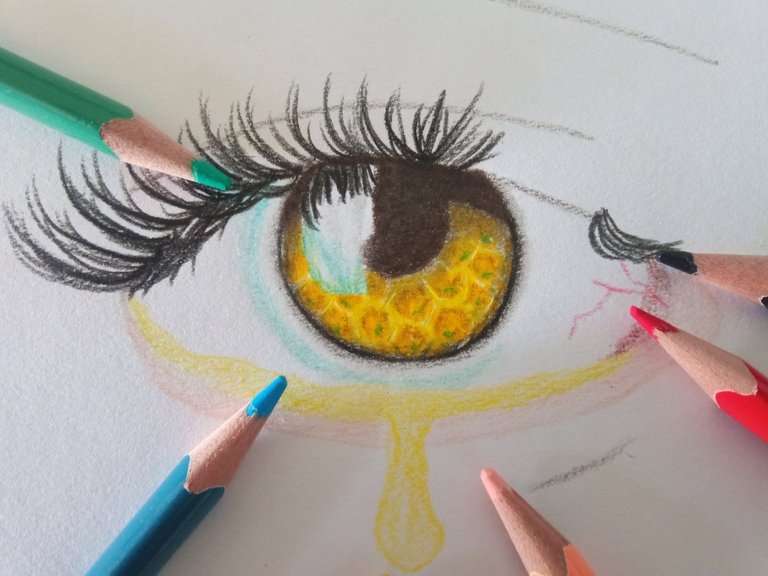
Por los alrededores del iris use el color jade con el azul para crear una iluminación más en la esclerótica del ojo, después use el Carmen para crear una vena y que se notara un poco y el café para degradar un poco la parte del lagrimal.
Posteriormente, agregue más capas de tonos en los parpados y el lagrimal para poder separar la lágrima de miel con el parpado de la mejor forma.
When I finished with the brightness of the eye, I began to work with the gradient of the iris by the part of the edges, then I used the blender to degrade it completely.
Then I added the upper eyelashes and added the last layer of highlighting on the iris and pupil, then I started to highlight the honey tear drop and the wrinkle where the tear trough and the eyelids are located.
Around the iris I used the color jade with blue to create a more illumination in the sclera of the eye, then I used Carmen to create a vein and the brown to degrade a little the part of the tear.
Then, add more layers of shades on the eyelids and the tear trough to separate the honey tear with the eyelid in the best way.
 |  |
|---|
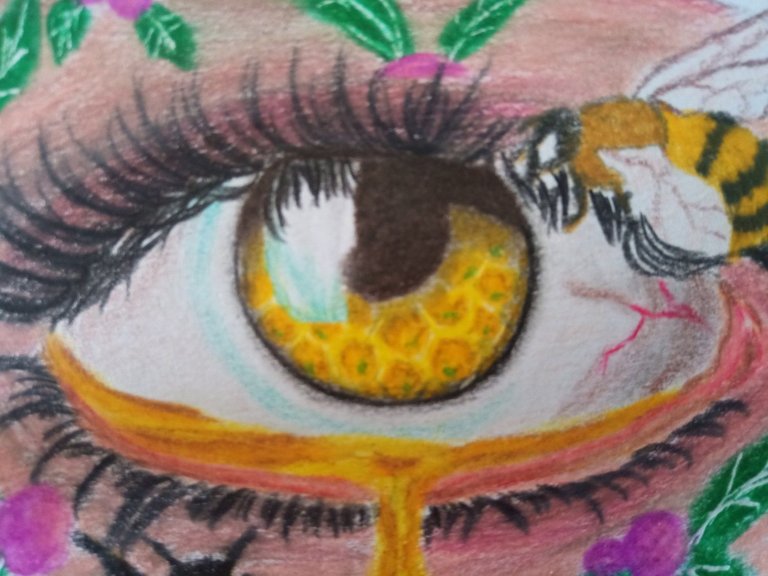
Una vez terminado con el parpado, comencé a trabajar con la lágrima de miel usando los tonos amarillo, ocre quemado y café, todo fue trabajado con diferentes capas, a medida que lo hacía fui profundizando más el crayón para rellenar el poro de la hora y así no quedaran espacios en blanco.
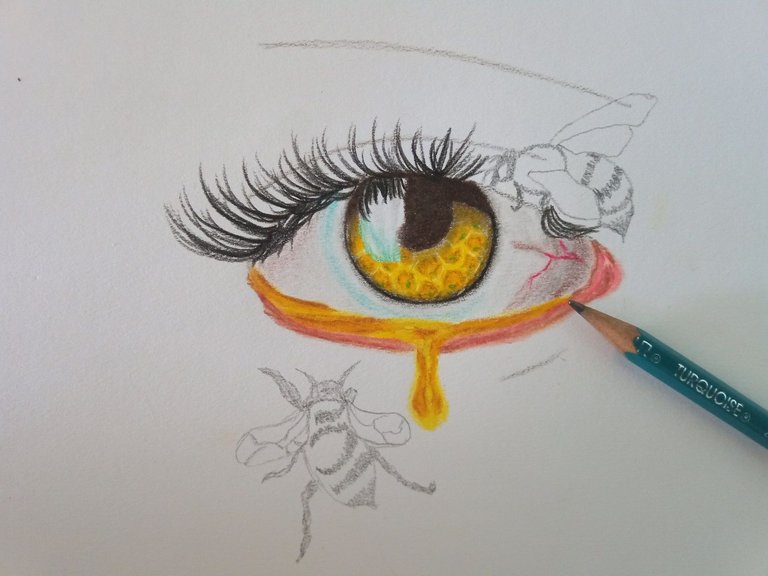
Después, con la ayuda del lápiz de grafito 2B, comencé a dibujar las dos abejas, una se encuentra en la parte inferior del ojo y el otro en la parte superior, esto lo hice de esta manera para detectar el espacio en la que debían serlo para que se notaran más en mi dibujo, ya que estos son los protagonistas del tema de mi dibujo.
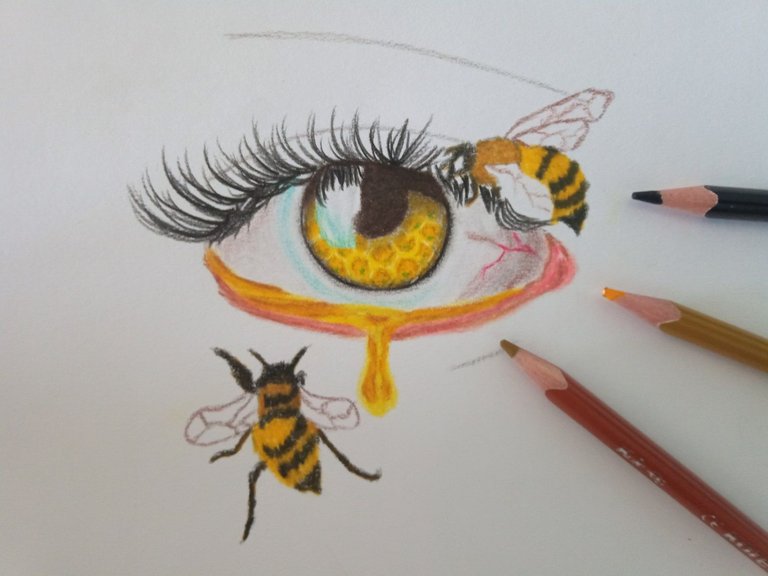
Por último, comencé a agregar sus respectivos tonos como el negro, ocre quemado, amarillo y café.
Once finished with the eyelid, I started to work with the honey tear using the yellow, burnt ocher and brown tones, everything was worked with different layers, as I was doing it I was deepening more the crayon to fill the pore of the hour and so there were no blank spaces.
Then, with the help of the graphite pencil 2B, I began to draw the two bees, one is in the lower part of the eye and the other in the upper part, I did it this way to detect the space in which they should be so that they would be more noticeable in my drawing, since these are the protagonists of the subject of my drawing.
Finally, I began to add their respective tones such as black, burnt ocher, yellow and brown.
 |  |
|---|
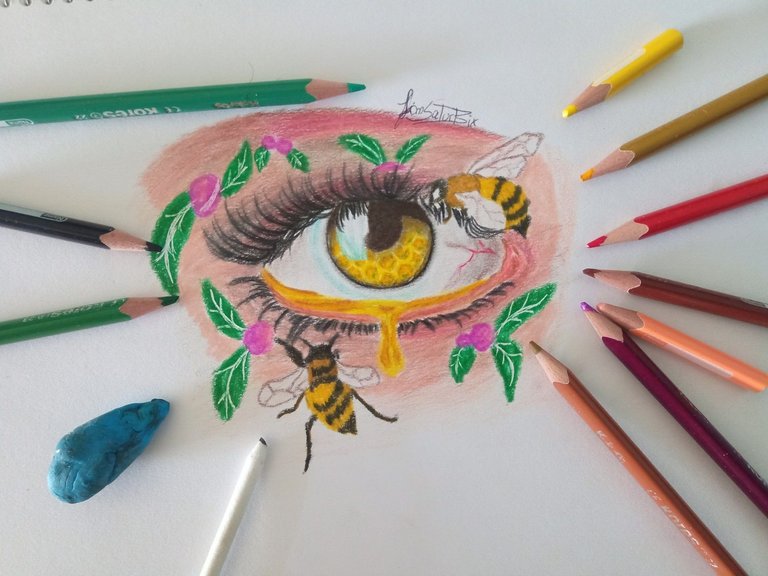
Al terminar de trabajar con las abejas quise agregar algunas flores y frutas, las mismas fueron valorizadas con el tono verde y morado, pero aquí comencé a tomar en práctica algo nuevo que aprendí, así que lo explicaré en otra publicación más adelante.
De esta forma, con estas técnicas, pude hacer mi dibujo, muchas gracias por llegar hasta aquí en mi publicación, espero que te haya gustado, hasta la próxima.
When I finished working with the bees I wanted to add some flowers and fruits, they were enhanced with the green and purple tone, but here I started to put into practice something new I learned, so I will explain it in another post later.
In this way, with these techniques, I was able to make my drawing, thank you very much for coming this far in my publication, I hope you liked it, see you next time.

![]()

Discord LionSaturBix#7545

Source / Fuente Castle of Castlevania
Source / Fuente Terra Blade of Terraria
Los separadores son de mi autoría, las imágenes tienen su fuente, las ediciones del GIF son creados por mí, las fotografías fueron tomadas con la ayuda de mi teléfono Bison X Umidigi.
The separators are authored by me, the images have their source, the GIF edits are created by me, the pictures were taken with the help of my Bison X Umidigi phone.
Programas que utilicé para crear mi diseño es este:
This is the program I used to create my design:
Gif y portada cortesía de Canva
Gif and cover courtesy of Canva
Traducido por Deepl

Wow
This is an incredible work of art mate.
Such talent
Many estimated thanks, I'm glad you liked it.
Wooow, such hyper realistic art. Thank you for entering the contest. Good luck
Thank you for your support
!giphy wow
!PIZZA
Via Tenor
Thanks dude :D
!giphy welcome
Via Tenor
$PIZZA slices delivered:
@bhattg(1/10) tipped @lionsaturbix
Impresionante ilustración, lograste un acabado realista, con excelente efectos, me gustó, muy llamativo, saludos.
Muchas gracias, me alegro de que te haya gustado, tomo su tiempo pero los resultados fueron lo máximo.
But what a nice drawing, I congratulate you, I can tell you love to draw, good luck in the contest.
Thank you very much, indeed I love drawing, the same to you, good luck in the contest.
Wowww que belleza de dibujo amigo, quedo espectacular, esa mirada parece tan real y llena de detalles. Felicidades por tu trabajo, y mucha suerte en el concurso @lionsaturbix 🐝💕
!DIY
Muchas gracias @dayadam me alegro de que te haya gustado, igualmente para ti, mucha suerte en el concurso😇
You can query your personal balance by
!DIYSTATSSaludos, le deseo la mejor de las suertes, amigo. Su dibujo está bastante bueno.
Muchas gracias estimado, me alegro de que te haya gustado
Me encanta el arte surrealista!, aunque este es semi realista pero tambien me gusta!
Muchas gracias, me alegro de que te haya gustado, para el surrealista tendría que hacerlo mas grande, particularmente este me quedo mucho mas pequeño, los dibujos grandes llevan mas detalles y estoy trabajando en uno de ese tamaño.