[ENG-ESP] PEDESTAL FAN REPAIR AND MAINTENANCE
WELCOME TO MY BLOG
Hellooo. helloaaaa! Greetings my dear DiyHub. The tutorial is something that is outside the range of what I am used to but I cannot not share it with you. Since the heat wave began in the city, the air conditioning equipment in my house has suffered irreversible damage. My air conditioning was the first to be affected, due to electrical failures in the sector, the compressor stopped working and the repair is very expensive. So due to this event I resorted to using the pedestal fan I have to ventilate the kitchen or when I didn't require air conditioning. The change in the climate has been so terrible that at home we have never suffered from such high temperatures and the suffocation has made us use the fan 24/7. without a rest. Its transfer from my kitchen to the bedroom and vice versa has caused its operation to be irregular.
Below I will tell you in detail the solution to this situation.
BIENVENIDOS A MI BLOG
¡Holaaa. holaaaaa! Saludos mis estimados de DiyHub. El tutorial es algo que sale fuera del rango de lo que acostumbro pero que no puedo no compartirlo con ustedes. Desde que comenzó la ola de calor en la ciudad, los equipos de acondicionamiento de mi casa han sufrido daños irreversibles. Mi aire acondicionado fue el primero que se vio afectado, debido a las fallas eléctricas del sector, el compresor dejó de funcionar y la reparación es muy costosa. Así que debido a este acontecimiento recurrí al uso del ventilador de pedestal que tengo para ventilar la cocina o cuando no requería el aire acondicionado. Ha sido tan terrible el cambio en el clima, que en casa nunca habíamos sufrido de tan altas temperaturas y el sofoco ha hecho que el uso del ventilador sea 24/7. sin descanso. Su traslado de mi cocina al dormitorio y viceversa, ha generado que su funcionamiento sea irregular.
A continuación te cuento en detalle,la solución a esta situación.
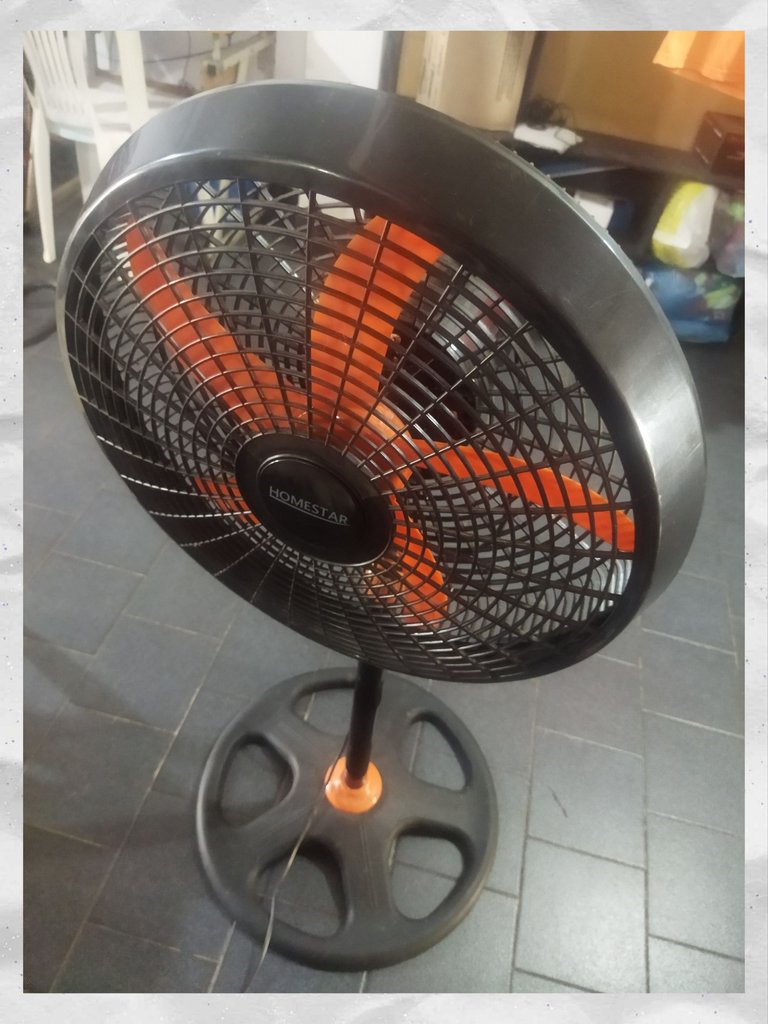
This is my Homestar brand pedestal fan, it has been running continuously for weeks, without interruption. Last week it started making a strange noise and the amount of air started to decrease. I started watching tutorials on YouTube to see if I dared to repair it myself or if I had to call a technician. The fan stopped working and although I noticed that the motor was making noise. I dared to apply what I had seen in the tutorials since it is not very complicated.
Este es mi ventilador de pedestal Marca Homestar, desde hace semanas ha estado funcionando de forma continua, sin descaso. La semana pasada comenzó a hacer un ruido extraño y la cantidad de aire empezó a disminuir. Comencé a ver tutoriales en youtube para ver si me atrevía a repararlo yo misma o si tenía que llamar a algún técnico. El ventilador dejó de funcionar y aunque observaba que el motor sonaba. Me atreví a aplicar lo que había visto en los tutoriales ya que no es algo muy complicado.
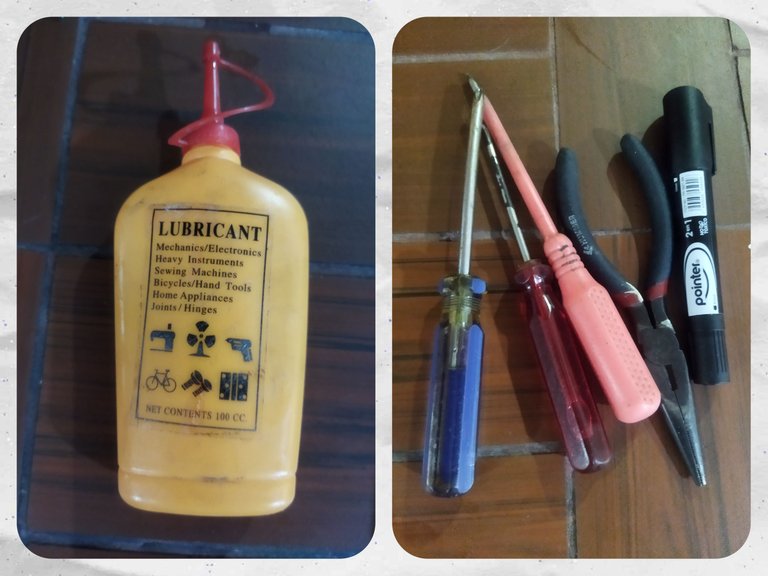
The materials and tools I used were slotted and slotted screwdrivers, a tweezer, and lubricating oil. This oil that I show is of low quality, soon I will buy one of better quality to maximize the operation of my appliances.
Los materiales y herramientas que utilicé fueron destornilladores de estría y de pala, una pinza y aceite lubricante. Este aceite que muestro es de baja calidad, próximamente compraré uno de mejor calidad para maximizar el funcionamiento de mis electrodomésticos.
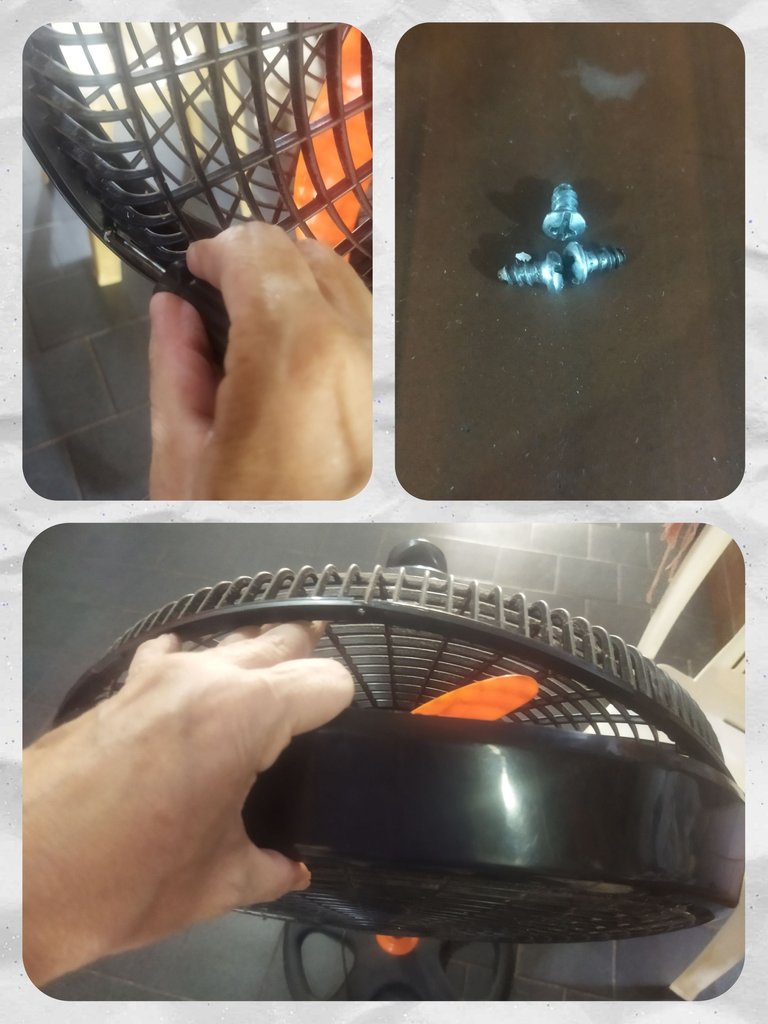
First I made an observation of how to uncover my fan, if it had screws, nuts or some other form of security. Seeing that there were 3 knurled screws, I took the appropriate screwdriver and proceeded to remove the front cover.
Primeramente hice una observación de cómo destapar mi ventilador, si tenía tornillos, tuercas o algún otra forma de seguro. Al divisar que eran 3 tornillos de estría, tomé el destornillador adecuado y procedí a retirar la tapa frontal.
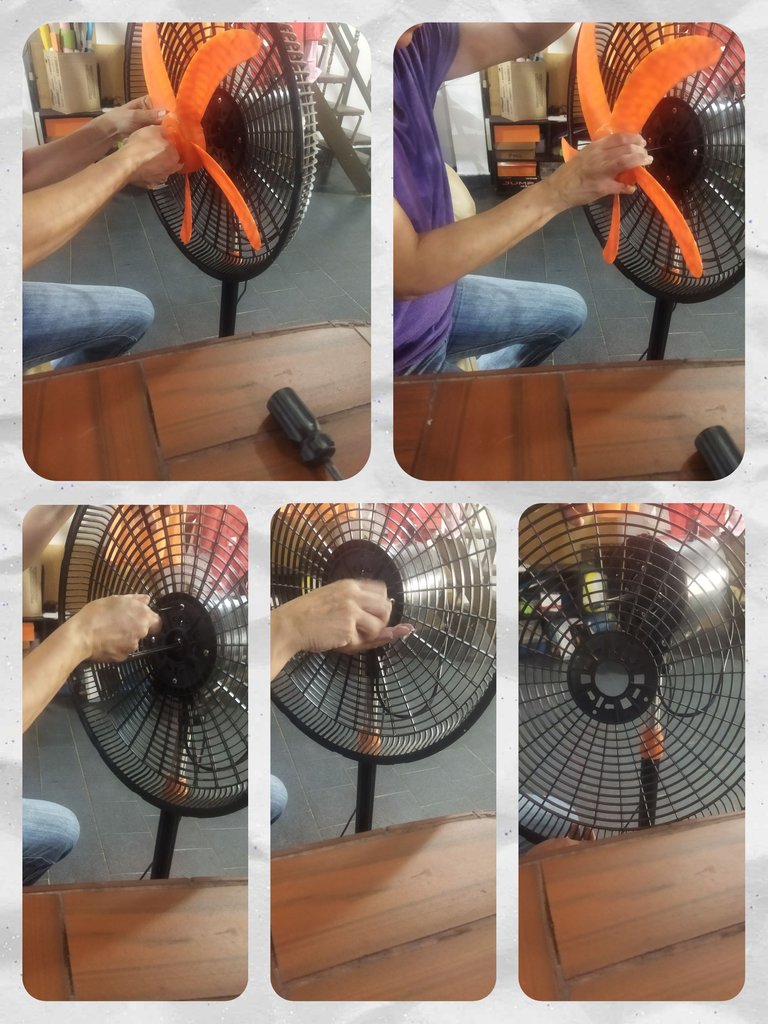
Once the cover was removed, I unscrewed the cover that holds the blade and then removed it.
And then with the slotted screwdriver I removed the rear cover of the fan.
Una vez retirada la tapa desenrosqué la tapa que sostiene el aspa para luego retirar la misma.
Y seguidamente con el destornillador de estrías retiré la tapa trasera del ventilador.
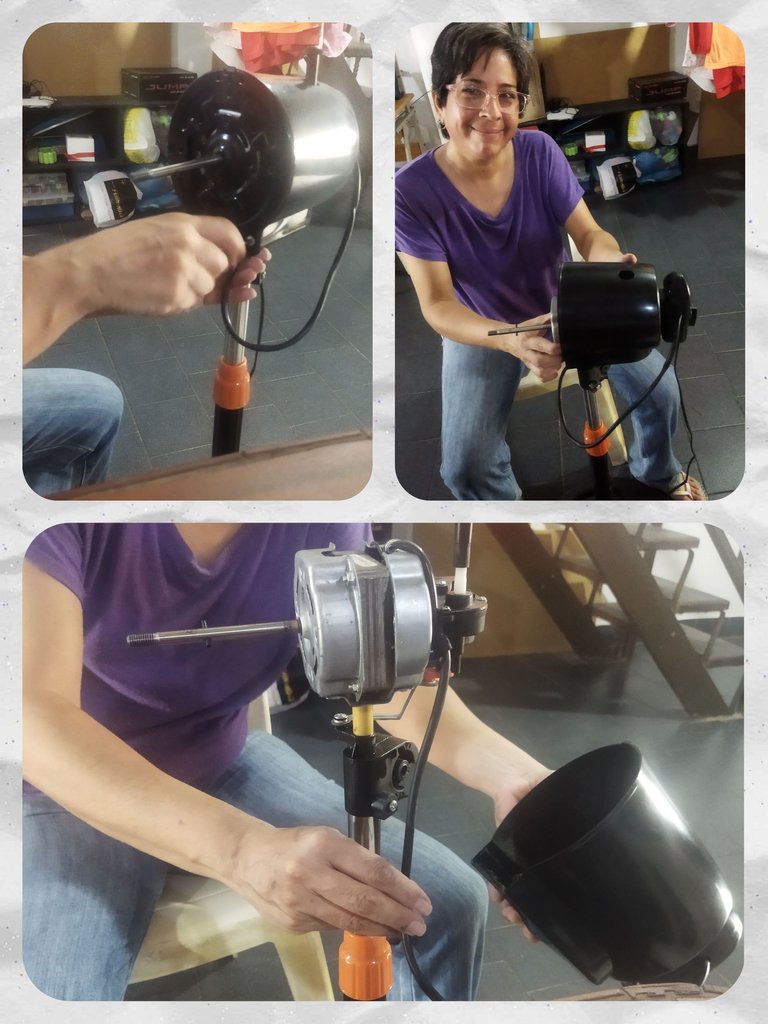
Now we are going to dismantle the engine protection cover. This casing is held in place by 4 knurled screws and has the on/off switch attached to the back, so you have to be very careful not to pull hard and take off the cables.
Ahora vamos a desarmar la tapa protectora del motor. Esta carcasa esta sostenida por 4 tornillos de estría y lleva pegada en la parte trasera la switchera de encendido y apagado, así que hay que hacerlo con mucho cuidado de no halar fuerte y despegar los cables.
Now with the motor in sight, we need to clear the part where the shaft that moves the blade is located. It is this area that we are going to carry out maintenance, apart from those that we are going to carry out as we remove the pieces.
As you can see, my fan did not have a lot of dust because I had recently cleaned it, just to remove the dirt. Otherwise, I recommend using a brush to remove dust and other foreign agents.
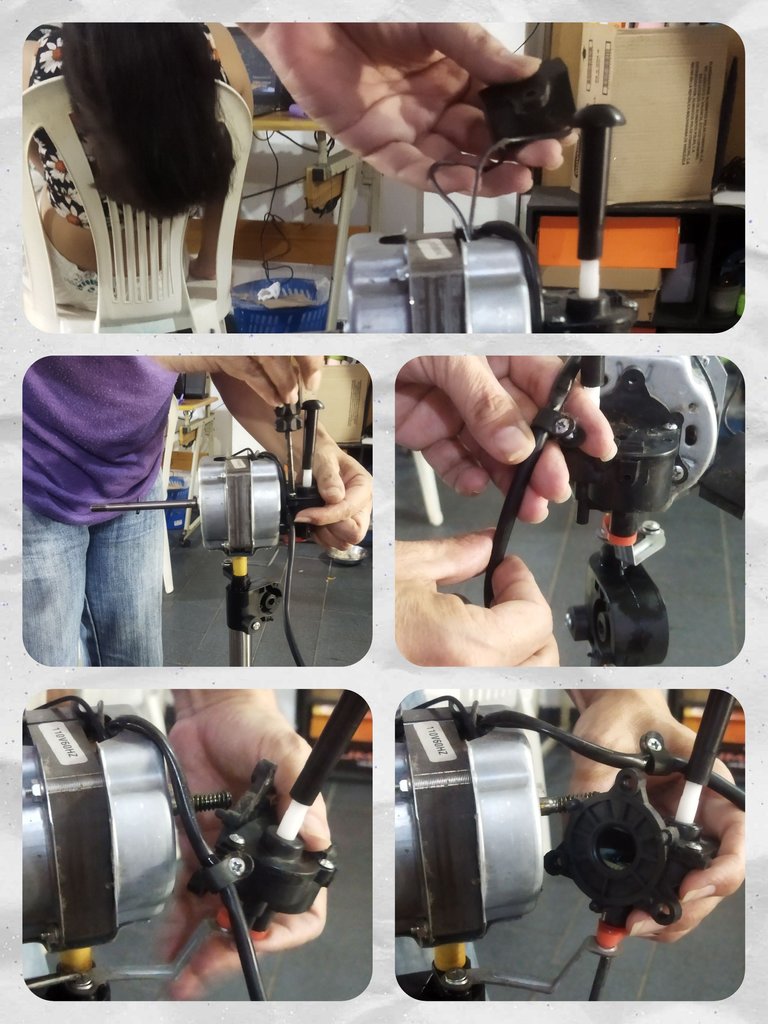
At the back of the engine, we find a piece that makes the fan rotate. It is attached with 3 knurled screws. We remove carefully not to do sudden stretches.
Ya con el motor a la vista, necesitamos despejar la parte donde se encuentra el eje que mueve el aspa. Es esta zona que vamos a realizar el mantenimiento, a parte de las que vamos a realizar a medida que vamos retirando las piezas.
Como pueden observar, mi ventilador no tenía gran cantidad de polvo porque recientemente le había realizado una limpieza, solo para retirar la suciedad. En caso contrario, les recomiendo usar una brocha para retirar el polvo y otros agentes extraños.
En la parte trasera del motor, nos encontramos con una pieza que es la que hace que el ventilador gire. Está pegada con 3 tornillos de estrías. Retiramos con cuidado de no hacer estiramientos bruscos.
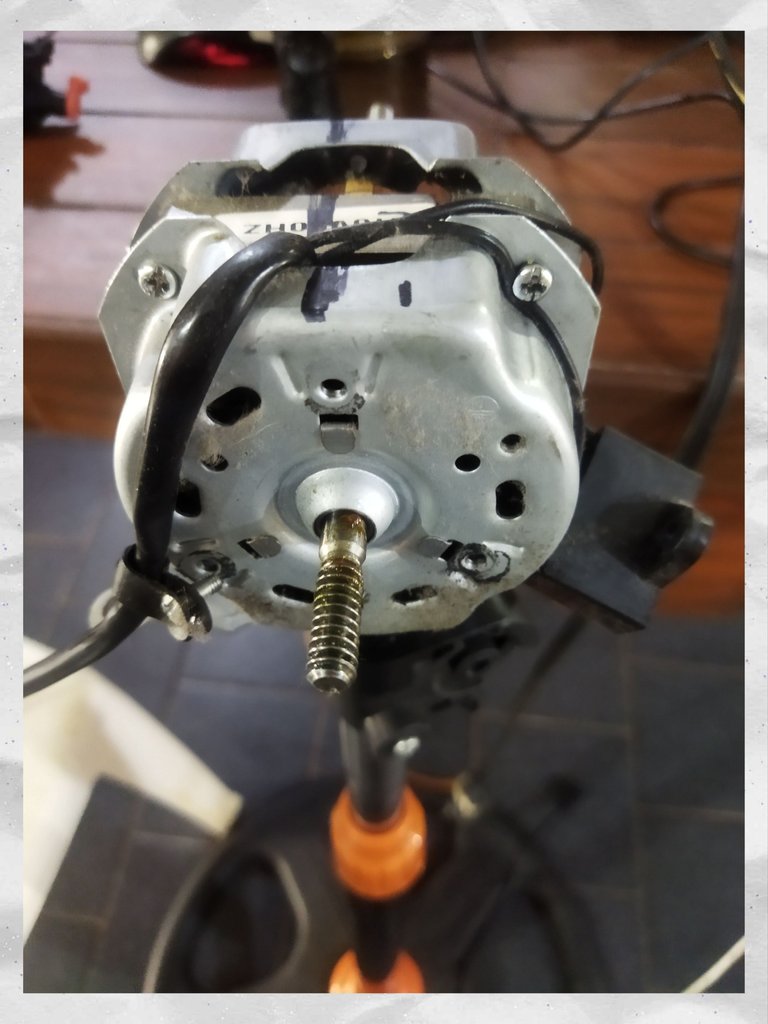
Here we can clearly see the fan shaft. It has no dirt, no tangled hair, but it is rigid, it does not turn to the right or left but it has movement from the inside out.
Aquí ya podemos observar claramente el eje del ventilador. No tiene suciedad, ni cabellos enredados, pero está rígido, no gira ni a la derecha, ni a la izquierda pero tiene movimiento de adentro hacia afuera.


I tried to remove the pieces to get to the internal part of the engine but it was impossible, since the screws were very stuck and my strength was not enough to loosen them. But if you try and manage to take them off, what you should do is mark the 3 pieces so that when you go to assemble it again you do it properly.
Intenté retirar las piezas para llegar a la parte interna del motor pero fue imposible, ya que los tornillos estaban muy pegados y mi fuerzo no dió para aflojarlos. Pero si intetas y logras despegarlos, lo que debes hacer es marcar las 3 piezas para que cuando vayas a ensamblarlo nuevamente lo hagas de la forma adecuada.
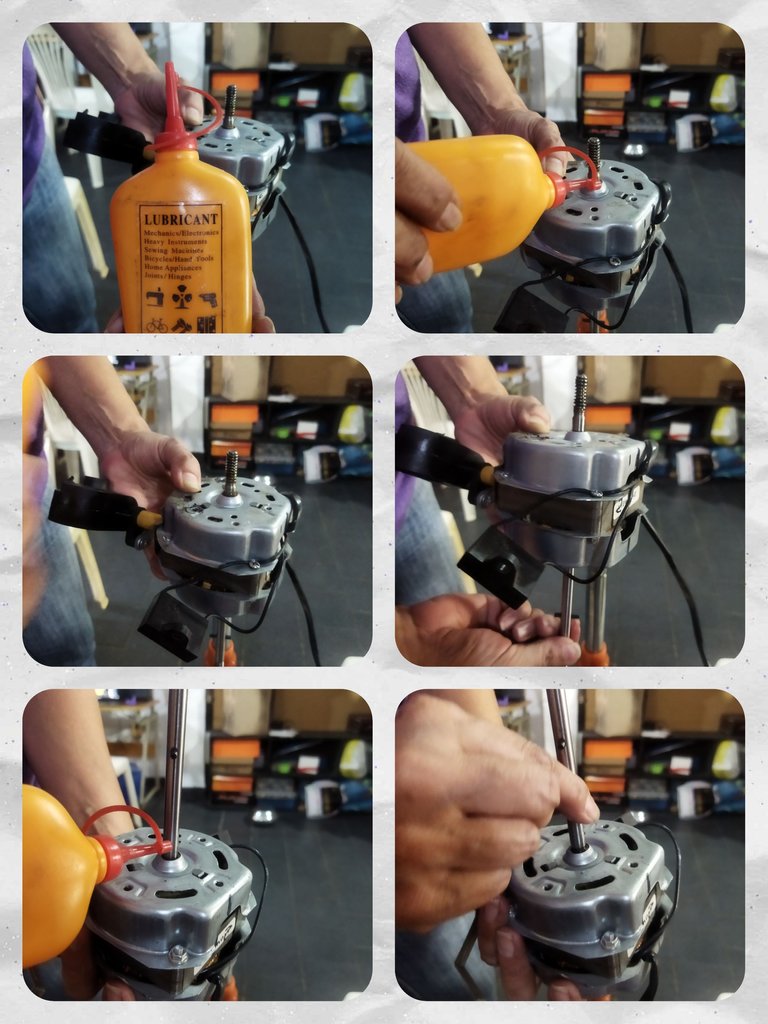
Since I couldn't open it, I lubricated it with this lubricating oil I had at home. It's not a very good quality oil but I think it will do the job while I buy a better one. I positioned the motor vertically and added a small amount of lubricant and moved it up and down and then rotated to the sides where it was stiff. I performed this operation two more times and then turned to the opposite side and did the same procedure, getting the axis to rotate without difficulty, from right to left and from bottom to top.
En vista de que no pude abrir, realicé la lubricación con este aceite lubricante que tenía en casa, no es un aceite de muy buena calidad pero creo que hará la función mientras compro uno mejor. Posicioné el motor de forma vertical y agregué una pequeña cantidad de lubricante y moví de arriba hacia abajo y luego giré a los lados, donde estaba rígido. Realicé esta operación dos veces más y luego voltee del lado contrario e hice el mismo procedimiento, consiguiendo que el eje girara sin dificultad, de derecha a izquierda y de abajo hacia arriba.
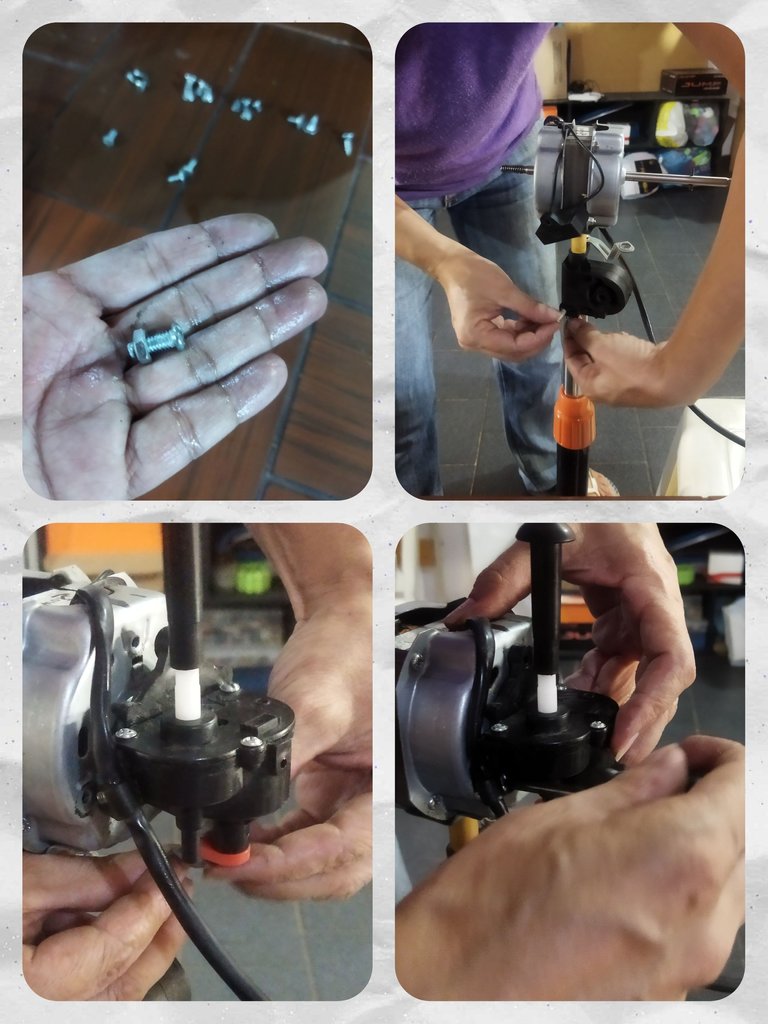
Once I was satisfied with the lubrication, I proceeded to reassemble the fan. As you can see in image No. 1. I was arranging the screws as I removed them so that at the time of assembly I wouldn't make a mistake.
The first thing I did was mount the motor to the fan base. Then the piece that rotates the fan from left to right. and fix the engine.
Una vez conforme con la lubricación procedí a ensamblar nuevamente el ventilador. Como pueden observar en la imagen Nº1. fui ordenando los tornillos a medida que los fui retirando para que al momento del ensamblaje no equivocarme.
Lo primero que hice fue montar el motor en la base del ventilador. Luego la pieza que hace girar el ventilador de izquierda a derecha. y fijarla de motor.
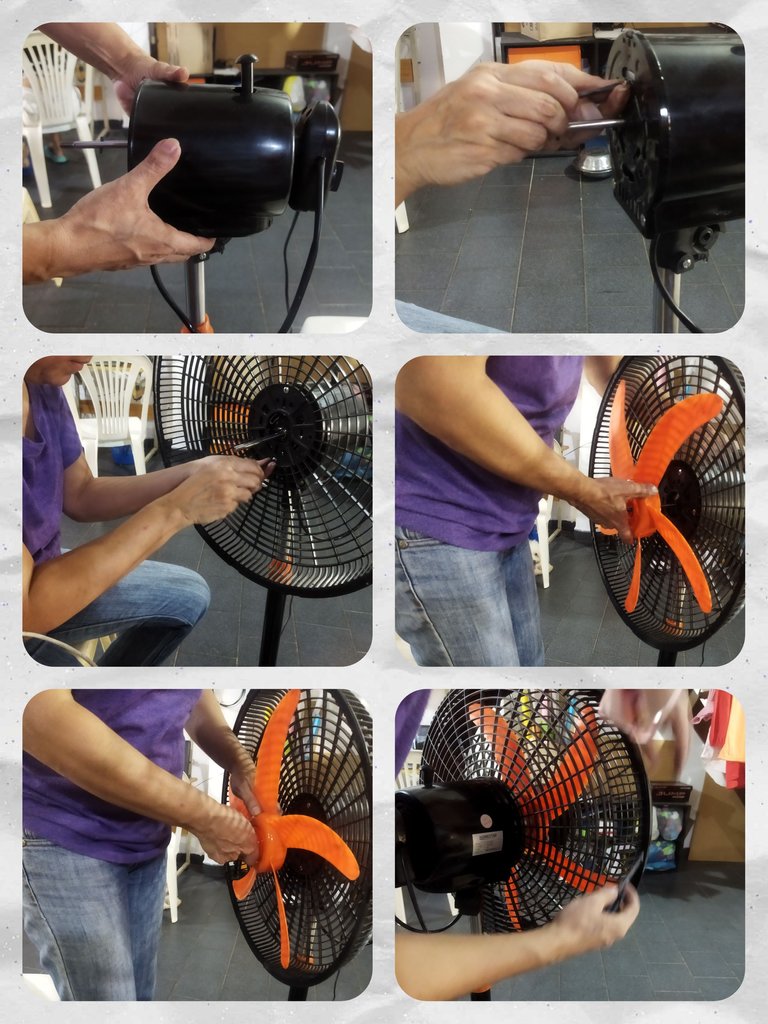
I placed the protective motor casing and fitted it with its cover. And finally the back cover, the blade and the front cover.
Coloqué la carcasa protectora del motor y ajuste con su tapa. Y finalmente la tapa trasera, el aspa y la tapa frontal.
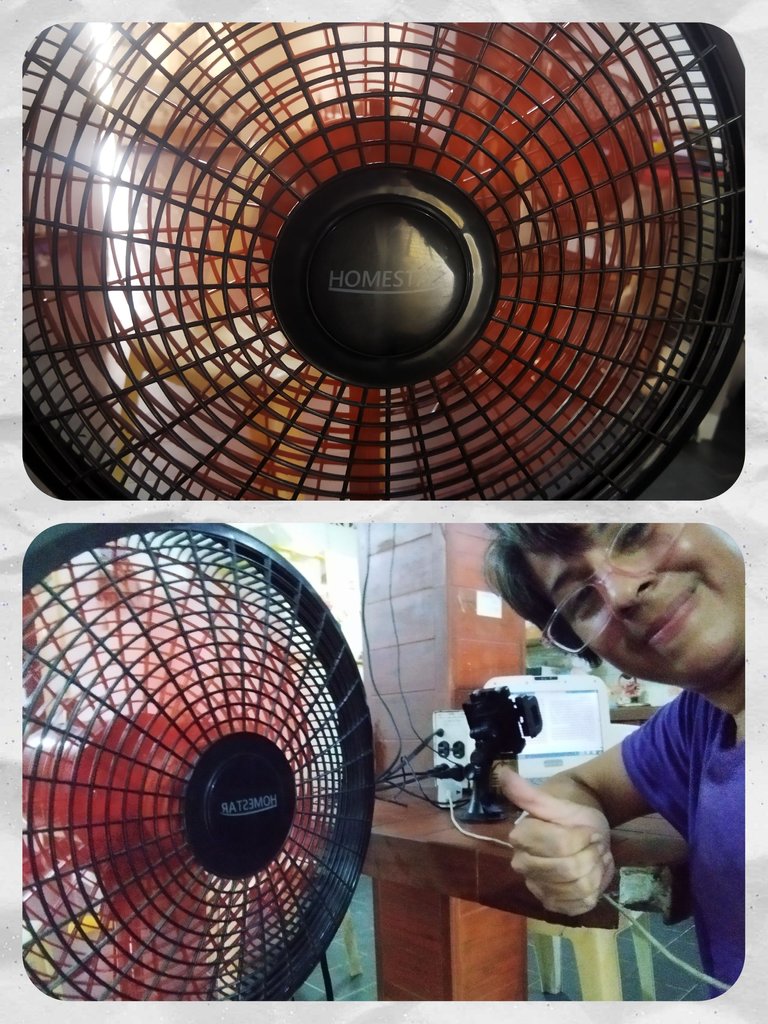
Then I turned it on and it started running hard again, which IMHO means the fan needed maintenance and lubrication on the motor. Many times we believe that doing maintenance is just cleaning the covers and the blade, but from time to time we should give the motor a little TLC and not wait like me for it to stop working.
It is not a difficult task to perform and is done within 1 hour at the latest. I had already asked how much a technician charges to check and maintain these fans and the price varies between 5 to 10%, if no part has been damaged. So as you see my friends, I have saved myself some money and learned something new. I hope you like it and dare to try it. See you.
Luego lo encendí y comenzó a funcionar co fuerza nuevamente, lo que significa en mi humilde opinión que el ventilador necesitaba mantenimiento y lubricación en el motor. Muchas veces creemos que hacer mantenimiento es solo limpiar las tapas y el aspa, pero de vez en cuando debemos hacerle un cariñito al motor y no esperar como yo que dejara de funcionar.
No es una tarea difícil de realizar y se hace a mas tardar en 1 hora. Ya había preguntado cuánto cobra un técnico por revisar y hacerle mantenimiento a estos ventiladores y el precio varía entre 5 a 10&, si no se ha dañado alguna pieza. Así que como ven mis amigos, me he ahorrado algo de dinero y he aprendido algo nuevo. Espero que te guste y te atrevas a intentarlo. Nos vemos.
Te felicito Briceño 🤣 con lo que te ahorraste ahora puedes comprar el lubricante de mejor calidad. ¡Contratada!
Ahora en serio 😃 es posible que el técnico le hubiera encontrado una pieza dañada y el costo hubiera sido de más de 10$. Que bueno que arriesgaste e hiciste tu misma la revisión. Gracias a estos tutoriales escritos y a los vídeos muchas personas actualmente han aprendido a reparar sus artefactos. ¡Ahorro para todos!
Esperemos que la ola de calor termine antes de que nos quedemos sin aires y sin ventiladores. Gracias por compartir tu paso a paso. ¡Saludos!
Precisamente me he atrevido porque muchas veces es una nimiedad lo que impide el funcionamiento de los artefactos, algún cable despegado o en mi caso falta de aceite lubricante, que se puede solucionar sin la intervención del técnico, que en algunas ocasiones te dicen que hay piezas dañadas para incrementar el costo de la reparación. Sólo hay que intentar si no es complicado como en este caso. Gracias por comentar.
Es verdad, hay que atreverse. 🙋
Ohhh amiga @linita , pero que excelente trabajo, precisamente tengo un ventilador aquí de pedestal dejo de funcionar hace tiempo y buena falta que me hace. Debería de atréveme a revisarlo, que buen material nos regalas. Este calor es insoportable y todo es tan costoso que debemos convertirnos en multifacéticos. Gracias por esto...
!DIY
Pues amiga @dayadam atrévete sin miedo, si al encenderlo sientes que el motor suena pueda que solo necesite un poco de lubricante. En caso de no ser por la falta de lubricante quizás sean las bobinas que se dañaron. Aquí aprendemos o aprendemos. Solo necesitamos unas cuantas herramientas y ver varios tutoriales e ir probando. Que podemos perder, si ya lo habíamos guardado en el depósito como inservible 🤭🤭
You can query your personal balance by
!DIYSTATSAn excellent job of repair and maintenance, very useful with a great result, congratulations. Thanks for sharing in our community // Un excelente trabajo de raparacion, y mantenimiento, de mucha utilidad con un gran resultado, felicidades. Gracias por compartir en nuestra comunidad
Wonderful, you did a very great work, finding time to repair this fan is good because if you take it to electrician outside it would have cost you enough money, you do well oooooooh, thanks for sharing
Yes, I dared after watching a few tutorials and observing that it was not that difficult. The good thing is that there were no damaged parts, just lack of maintenance. Thank you for stopping by leaving your comment.
You are welcome Dear
Congratulations, your post has been upvoted by @dsc-r2cornell, which is the curating account for @R2cornell's Discord Community.
Enhorabuena, su "post" ha sido "up-voted" por @dsc-r2cornell, que es la "cuenta curating" de la Comunidad de la Discordia de @R2cornell.
Le felicito por haber tomado la oportunidad de hacer el servicio por usted misma.
Dato: ese tipo de motores tienden a fallar por el desgaste de los cojinetes, ya que por lo general no traen rodamiento. Son unas bocinas que se desgastan con el uso.
Mientras la marca del ventilador sea de más calidad, las bocinas duraran más tiempo, pero inevitablemente se desgastan y el eje del motor se bloquea.
No es difícil hacer el cambio, pero puede que en algo de tiempo sea necesario. Hay buenos tutoriales en internet para hacer ese servicio, solo le aconsejo que cuando desarme el motor para cambiar las bocinas, se lleve el eje para que le vendan la medida correcta.
La felicito por la iniciativa de dar usted misma el mantenimiento, no le tuvo miedo al problema, se instruyó como solucionarlo y acto seguido le fue arriba al problema, felicidades. Esos ventiladores cuando llevan mucho tiempo de uso y sin mantenimiento les suele pasar eso, es por ello que hay que darle mantenimiento regularmente más aún en verano, lo ideal hubiese sido que hubiese empleado un lubricante de calidad diseñado para ese tipo de ventiladores pero bueno a veces no queda de otra que usar lo que tenemos a mano, también era conveniente que hubiese desarmado la carcasa del motor para limpiar bien el eje y los bujes como le decimos acá en Cuba, así de paso se daba cuenta en qué condiciones están, porque a veces solo es la suciedad y la falta de lubricante la causa de que se bloqueen, pero bueno yo sé que abrir la carcasa exige de un poco más de esfuerzo, cada vez que he tenido que abrir alguno está parte es un poco más complicada. Lo importante es que resolvió el problema, sin embargo le aconsejo que en cuanto tenga la oportunidad lo lubrique con un aceite de mayor calidad. Felicidades y saludos desde Cuba.
Hola, muchas gracias, tu opinión es muy importante. Es un refuerzo a lo que ya había venido viendo. Aunque no hubiera sabido diferenciar si las bobinas están buenas o dañadas, me hubiera gustado poder darle una vista a ese motor para aprender mucho más. La próxima vez buscaré a alguien con más fuerzas que yo para que me ayude. Gracias por tu comentario. Saludos.