Design and manufacture of a V-neck blouse with crossed V-neckline and peaks on the front piece/Diseño y confección de una blusa con escote en V cruzado y picos en la pieza delantera (ENG/ESP)
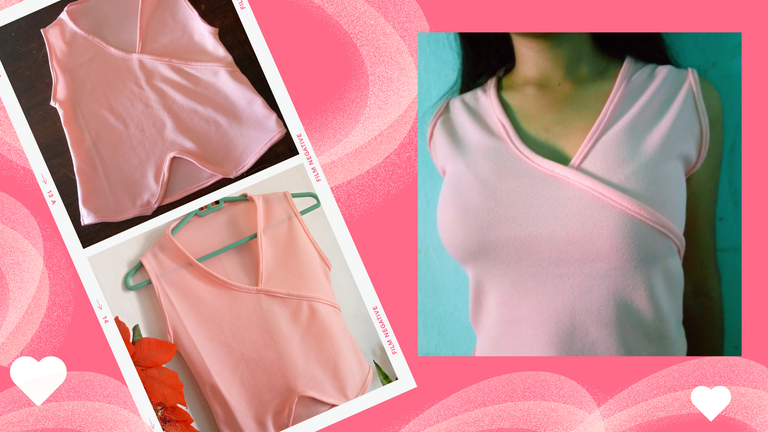
Greetings to all dear crafters sewing lovers of this dear NeedleeWorkMonday community, I hope that today you are very well, as I told you a few days ago I was able to buy some Liverpool fabrics, a fairly inexpensive fabric that has been easy to manipulate when making my beautiful blouses, for now I have 2, one that I made for myself and this time I want to show you the one I made for my daughter.
The design of this blouse was from a memory of a blouse that my mom made me when I was 12 years old and that brought me a lot of nostalgia, because time flies by, I liked that blouse a lot, I was telling my daughter about this design and she asked me to make her one like this, that moment brought me so beautiful memories that I could not hold back my tears remembering when my mom made me those beautiful clothes.
I love this art, I am not an expert, but every garment I manage to make makes me happy and fills me with emotion, especially to be able to carry a little bit of what I learned from my mom.
Now I am pleased to invite you to join me in my confection of the day.
The pictures you will see below were taken with my phone model TECNO SPARK GO 2024.
Saludos para todos queridos artesanos amantes de las costuras de esta querida comunidad NeedleeWorkMonday espero que el día de hoy se encuentren muy bien, como les había comentado hace unos días pude comprar algunas telas Liverpool una tela bastante económica y que me ha resultado fácil de manipular a la hora de confeccionar mis hermosas blusas, que por ahora llevo 2 una que confeccione para mí y en esta oportunidad quiero mostrarles la que hice para mi hija.
El diseño de esta blusa fue de un recuerdo de una blusa que me hizo mi mamá cuando yo tenía 12 años y que me trajo mucha nostalgia, pues el tiempo pasa volando, esa blusa me había gustado mucho, le estuve comentando a mi hija sobre este diseño y me pidió que le hiciera una así, ese momento me trajo tan bonitos recuerdos que no pude contener mis lágrimas recordar cuando mi mamá me hacía aquellas hermosas ropas.
Amo este arte no soy una experta, pero cada prenda que logro hacer me hace feliz y me llena de emoción, sobre todo el poder llevar un poquito de lo que logre aprender de mi mamá.
Ahora me complace invitarlos a que me acompañen en mi confección del día.
Las fotografías que verán a continuación, fueron tomadas con mi teléfono modelo TECNO SPARK GO 2024.

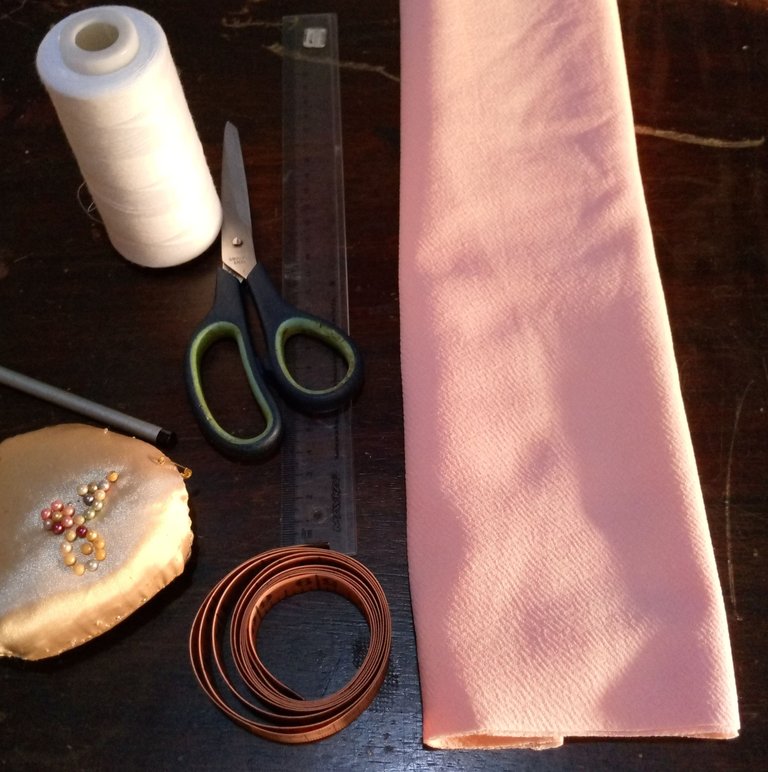
Materials for making the blouse.
- 1/2 meter of Liverpool fabric
- White thread
- Charcoal pencil
- Scissors
- Pins
- Tape measure
- Ruler
- Sewing machine
Materiales para la confección de la blusa.
1/2 metro de tela Liverpool
Hilo de color blanco
Lápiz de carbón
Tijera
Alfileres
Cinta métrica
Regla
Máquina de coser
 |  |
|---|---|
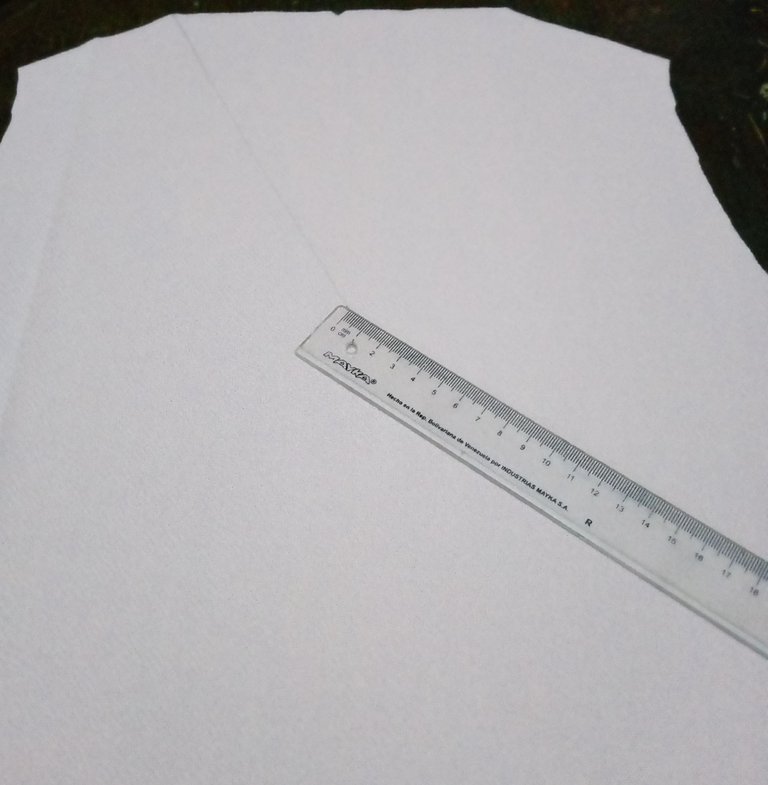 |  |
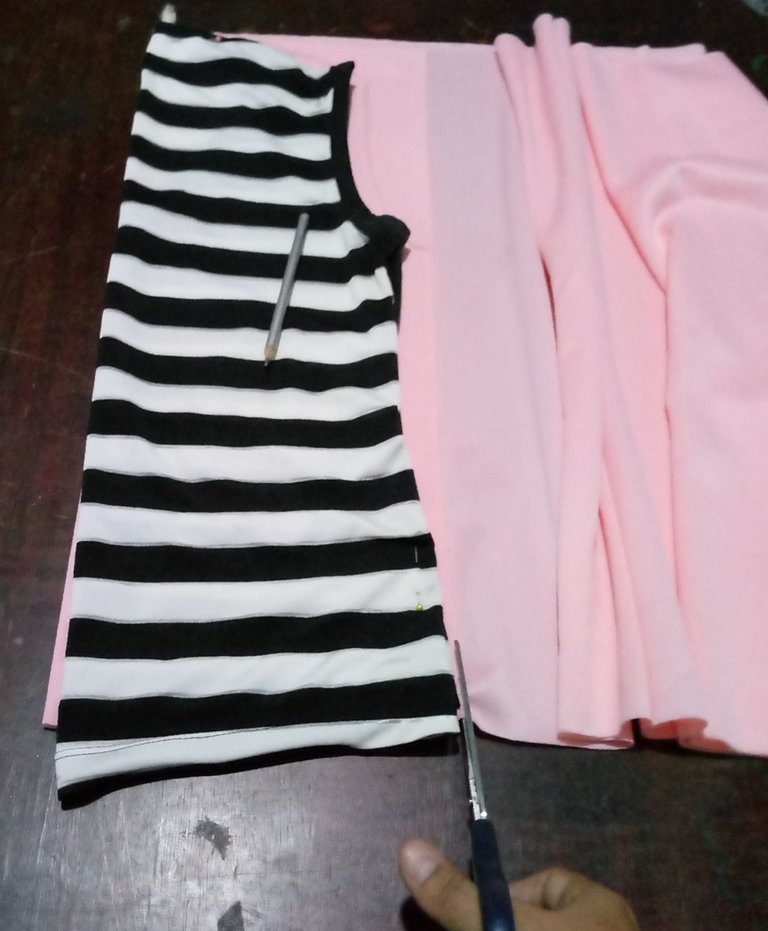
I started by folding a part of the fabric to measure the length and width of the blouse, then with a blouse that I used for the pattern I folded in half the back side of the blouse, I used this to calculate the size where I wanted to take it, it is important to notice if the fabric is flexible to measure the width on the side that stretches the most.
The first measurements I took were 70 cm wide by 50 cm long for 2 identical pieces, these 2 pieces will be reduced to a size S as I adjust the seams and polishing the hems.
Comencé doblando una parte de la tela para medir largo y el ancho de la blusa, luego con una blusa que utilice para patrón doble por la mitad del lado trasero de la blusa, esta la utilice para calcular la talla a donde quería llevarla, es importante fijarse si la tela es flexible medir el ancho por el lado que más estira.
Las primeras medidas que saque fueron 70 cm de ancho por 50 cm de largo para 2 piezas idénticas, estas 2 piezas irán reduciendo a una talla S a medida que vaya ajustando las costuras y puliendo los ruedos.
 |  |
|---|---|
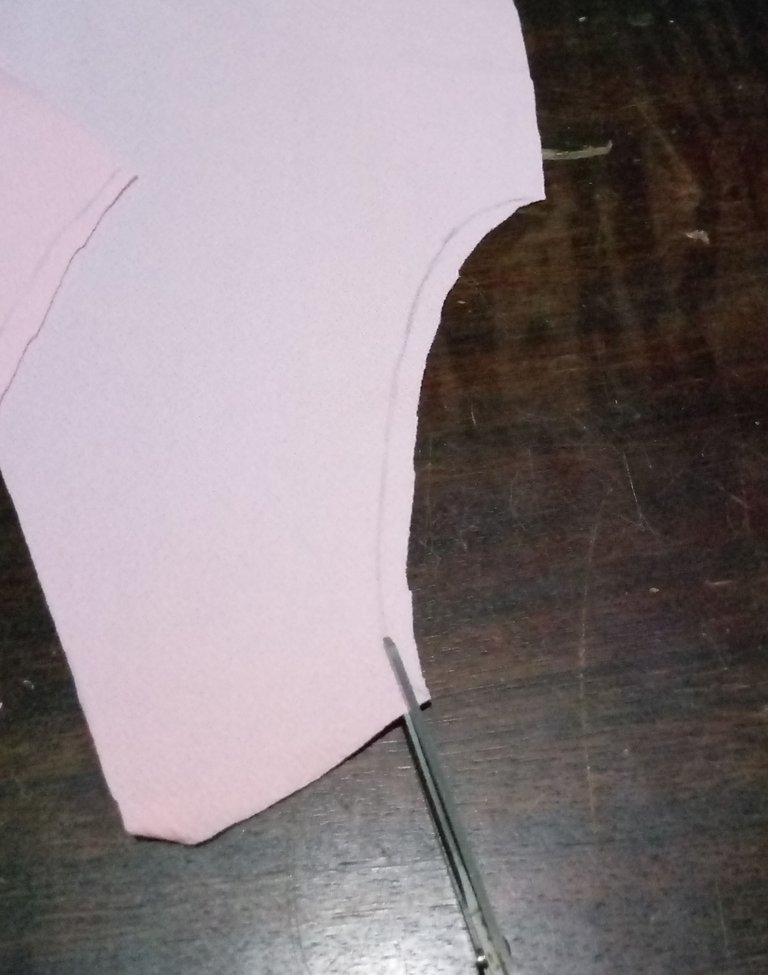 |  |
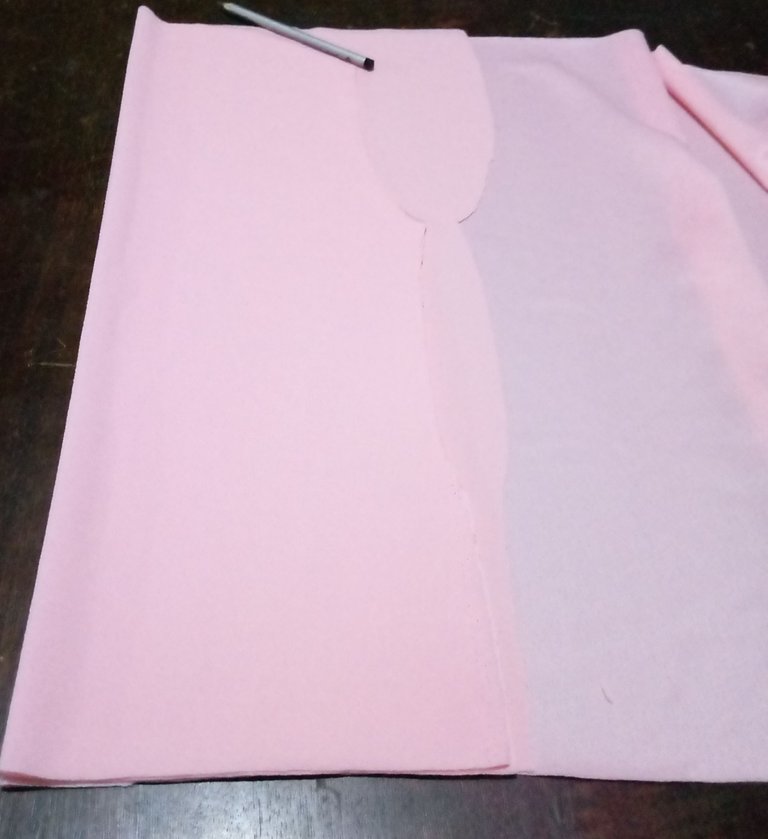
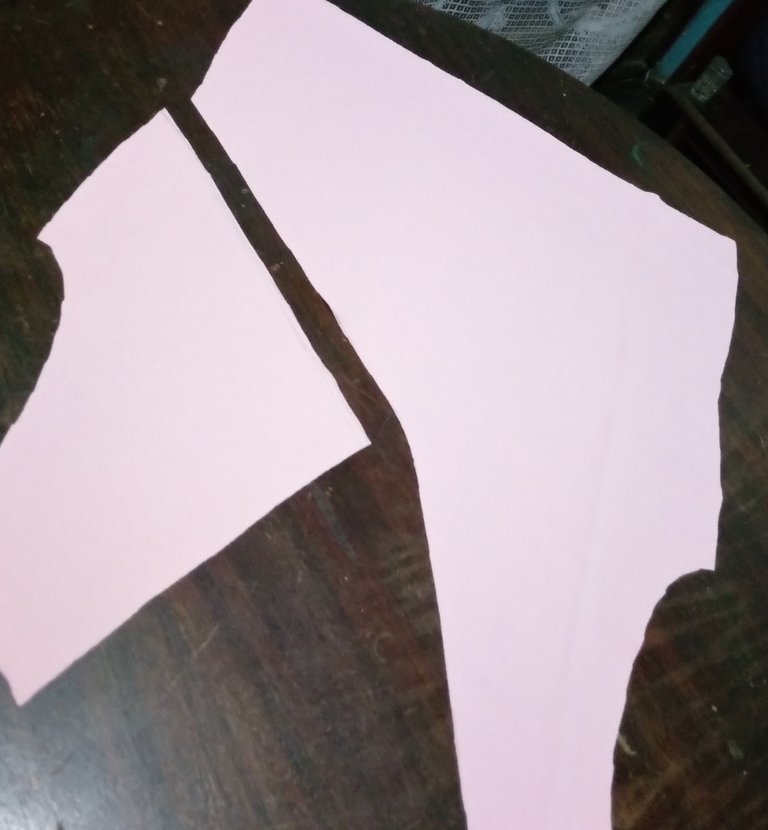
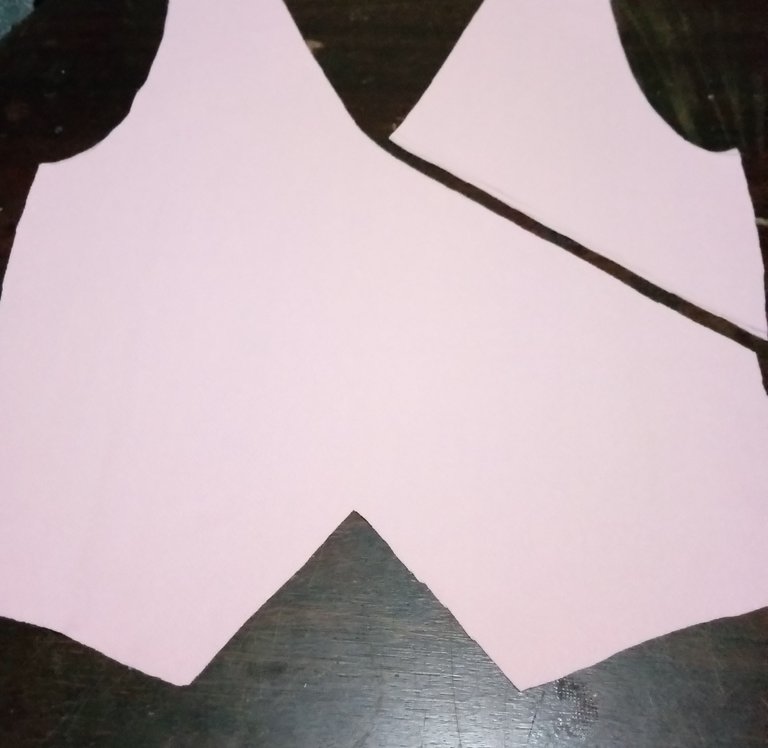
After having cut the two pieces for the blouse, I started making the design for the front piece, here I drew a semi curved line marking with the pencil and then cut, here I started from the line of the right shoulder to the left side 15 cm below the armhole of the left sleeve, in the case of the width of the V-neck this width comes from the shoulders and the length is to choose, the more you lower the V-neck will be more pronounced neckline.
In this case, as my daughter did not want a very pronounced neckline, I measured from the shoulders to the center of the blouse 22 cm long that with the seams I took it to 20 cm.
To have the center of the blouse we must fold and mark with a scissors the center of the neck, to guide us, before making the cutting lines.
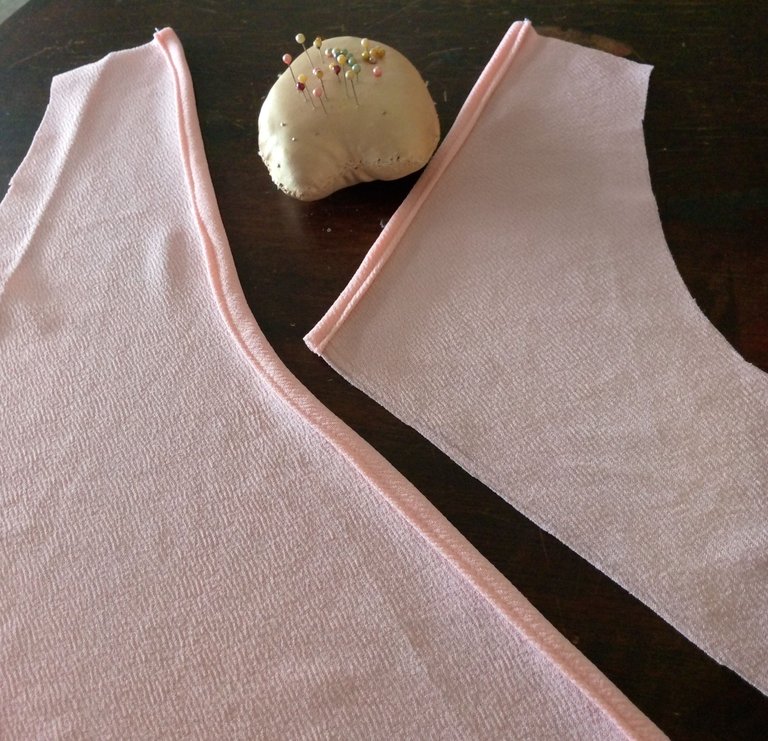
At this point I already have one side of the neckline, the right side, and I started with the left side of the neckline, on this side the semi curved line does not cross completely, the side of the right side only crosses 2 cm for the seam at the time of joining the 2 front pieces.
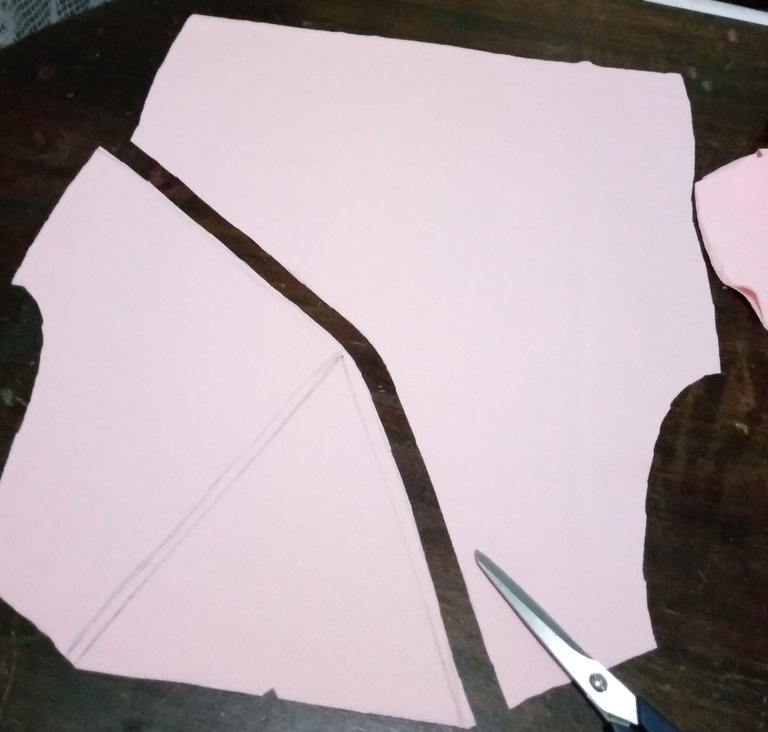
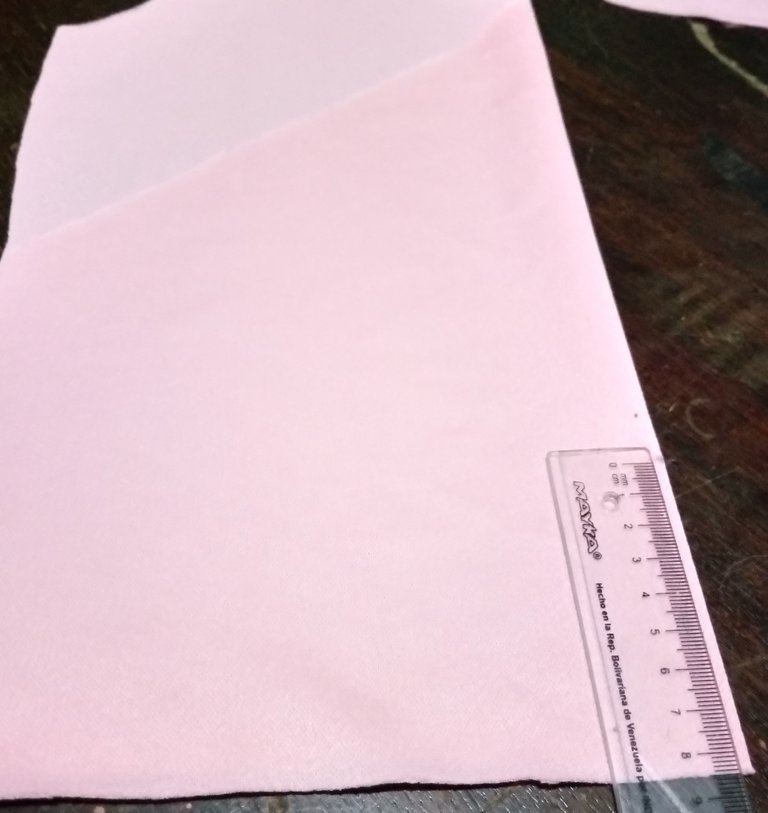
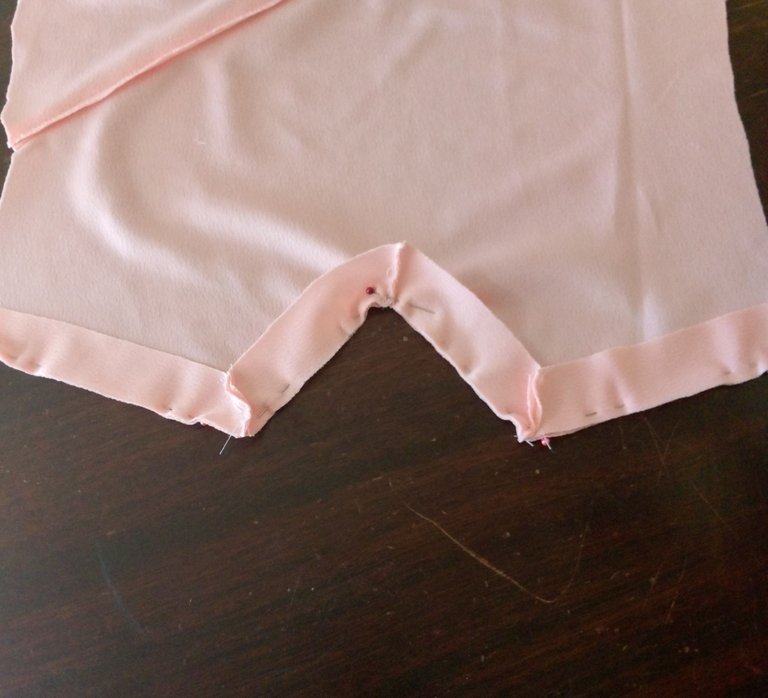
With the front pieces ready I begin to design the lower part of the blouse, folding the right piece on either side it doesn't matter if we mark on the right or the back, what matters is that it is in the middle, and with the use of the ruler and pencil we will mark some peaks like those of a vest.
Luego de haber cortado las dos piezas para la blusa, comencé hacer el diseño para la pieza delantera, aquí trace una línea semi curva marcando con el lápiz para luego cortar, aquí partí desde la línea del hombro derecho al costado izquierdo a 15 cm por debajo de la sisa de la manga izquierda, en el caso del ancho del cuello en V este ancho sale desde los hombros y el largo es a elección, mientras más bajes el cuello en V te quedara más pronunciado el escote.
En este caso, como mi hija no quería un escote muy pronunciado, medí desde los hombros al centro de la blusa 22 cm de largo que con las costuras lo lleve a 20 cm.
Para tener el centro de la blusa debemos doblar y marcar con un punto o piquete con la tijera el centro del cuello, para guiarnos, antes de hacer las líneas de corte.
En este punto ya tengo un lado del escote, el derecho, y comencé con el lado del escote izquierdo, en este lado la línea semi curva no cruza del todo, el costado del lado derecho solo cruza 2 cm para la costura al momento de unir las 2 piezas delantera.
Con las piezas delanteras listas comienzo a diseñar la parte baja de la blusa, doblando la pieza derecha por cualquiera de los lados no importa si marcamos por el derecho o el revés, lo que importa es que sea por la mitad, y con el uso de la regla y el lápiz marcaremos unos picos como los de un chaleco.
 |  |
|---|---|
 |  |
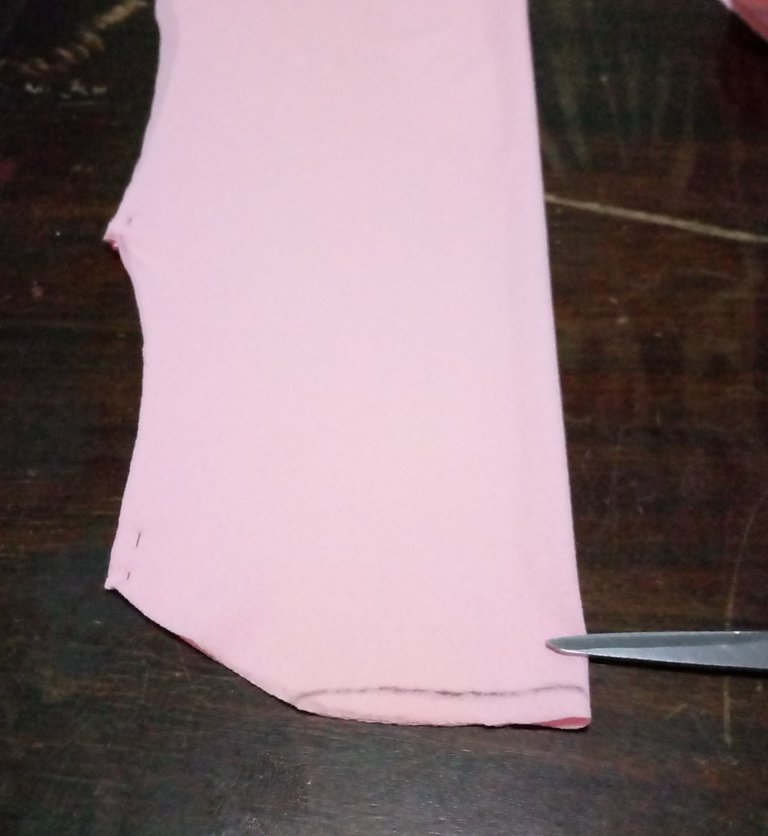
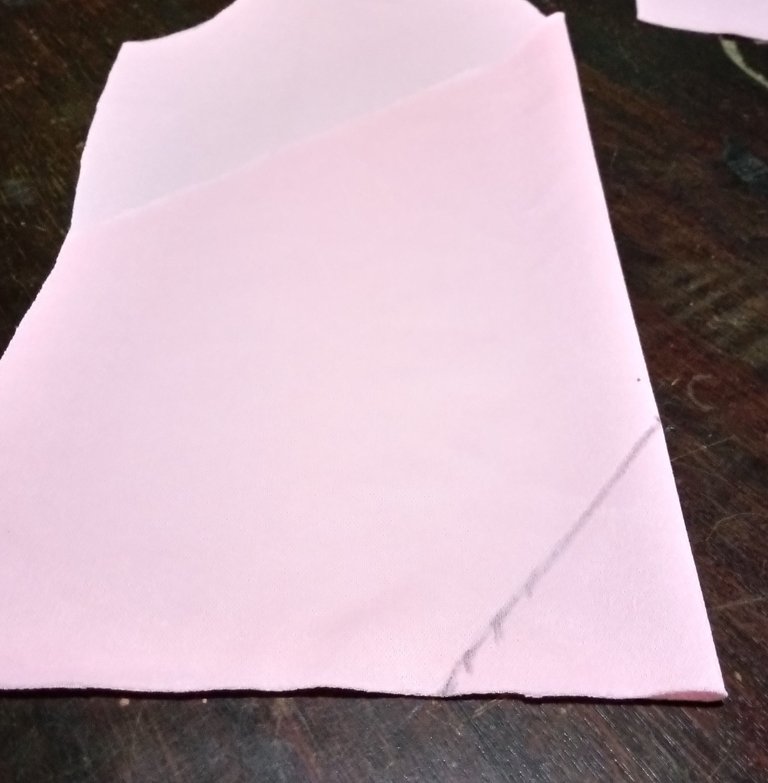
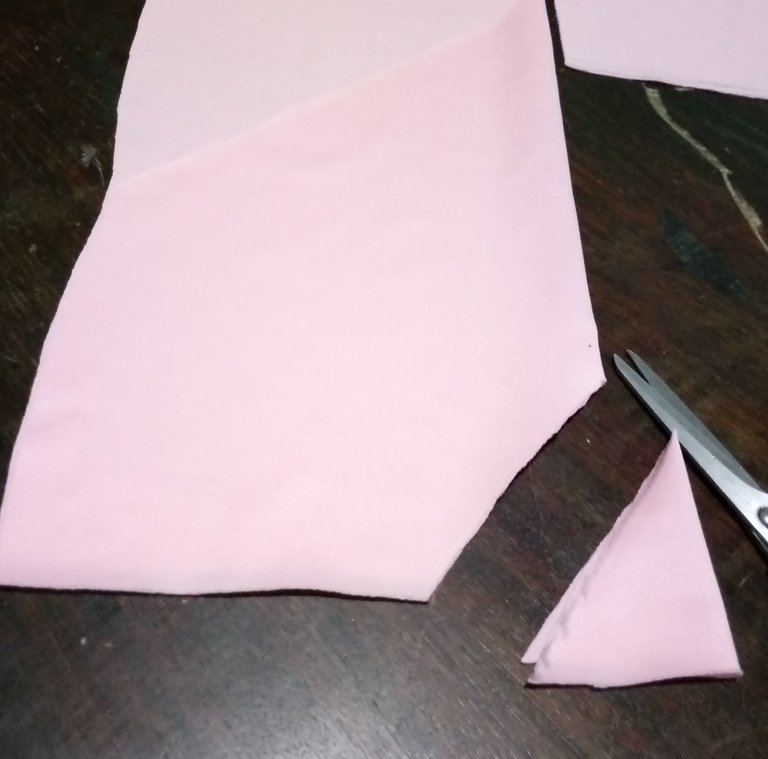
The triangular cut I made in this case is 11 cm from the center.
Then I cut and measured the sides to 17.5 cm semi curve without unfolding the piece, what I did was to fix it with pins to prevent it from moving when I cut it.
At this point I almost have the pieces ready to start joining with the straight seam.
El corte triangular que hice en este caso es a 11 cm del centro.
Luego corté y medí los lados a 17,5 cm semicurvo sin desdoblar la pieza, lo que hice fue fijarla con alfileres para evitar que se moviera al cortarla.
En este punto ya casi tengo las piezas listas para empezar a unirlas con la costura recta.
 |  |
|---|---|
 |  |
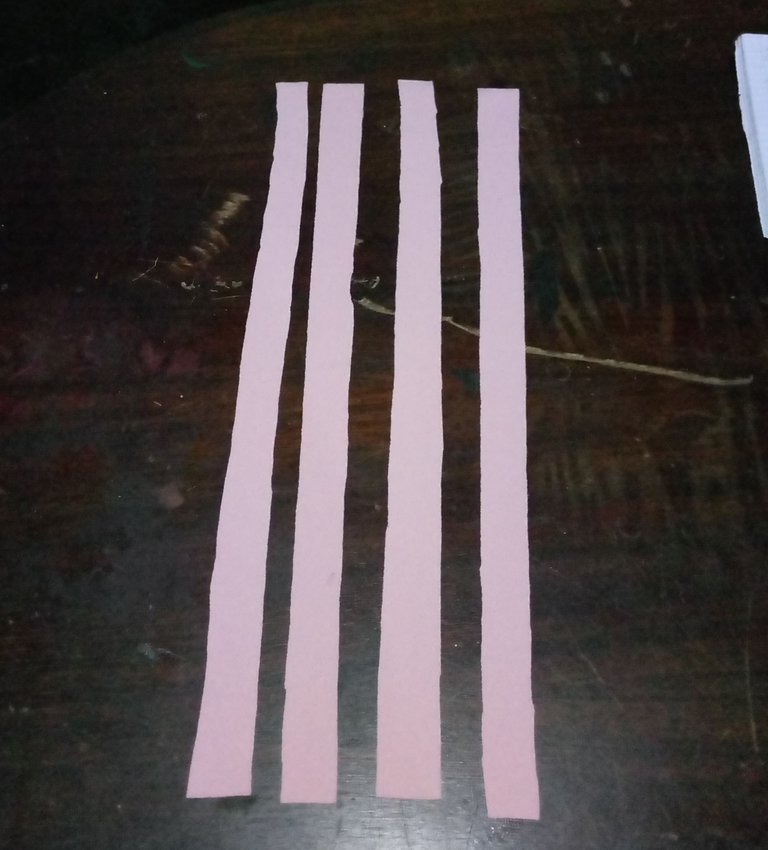
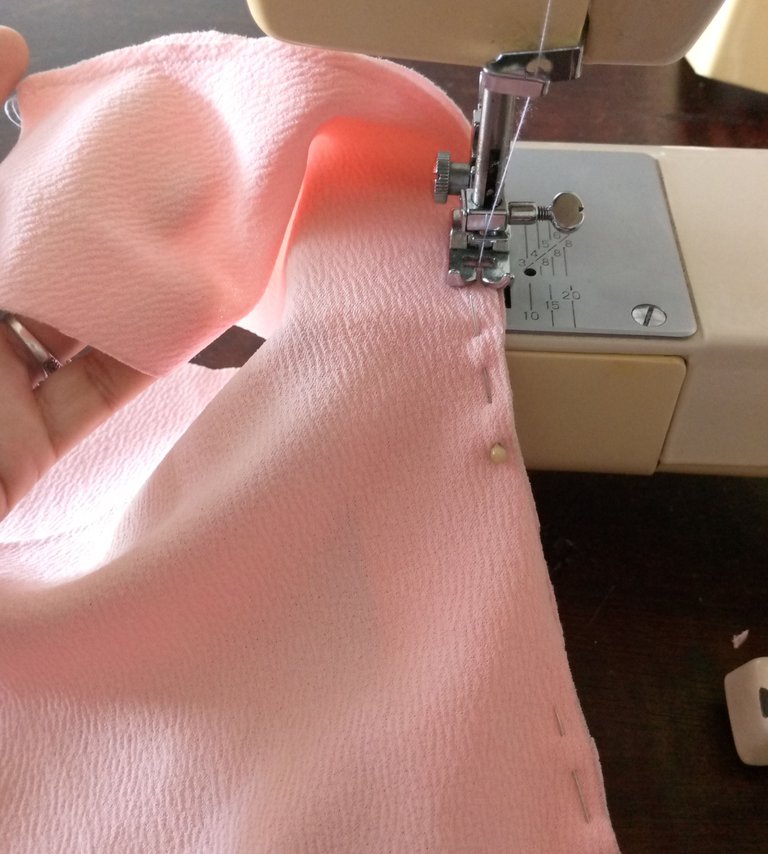
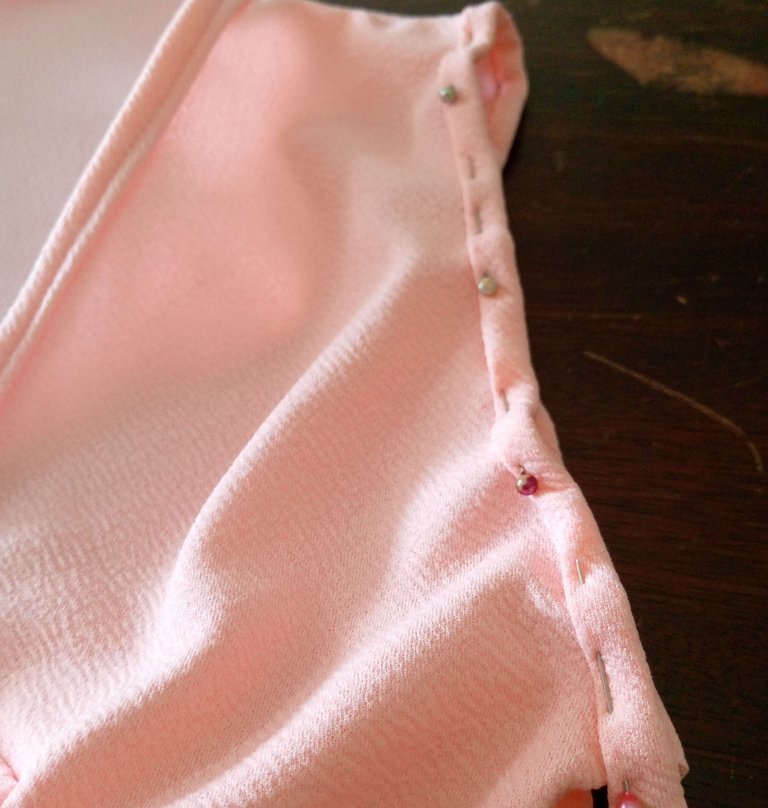
Before starting to close the pieces, cut several 3.5 cm ribbons to polish the neckline and armholes, these ribbons are cut taking into account the side that stretches the most for the width.
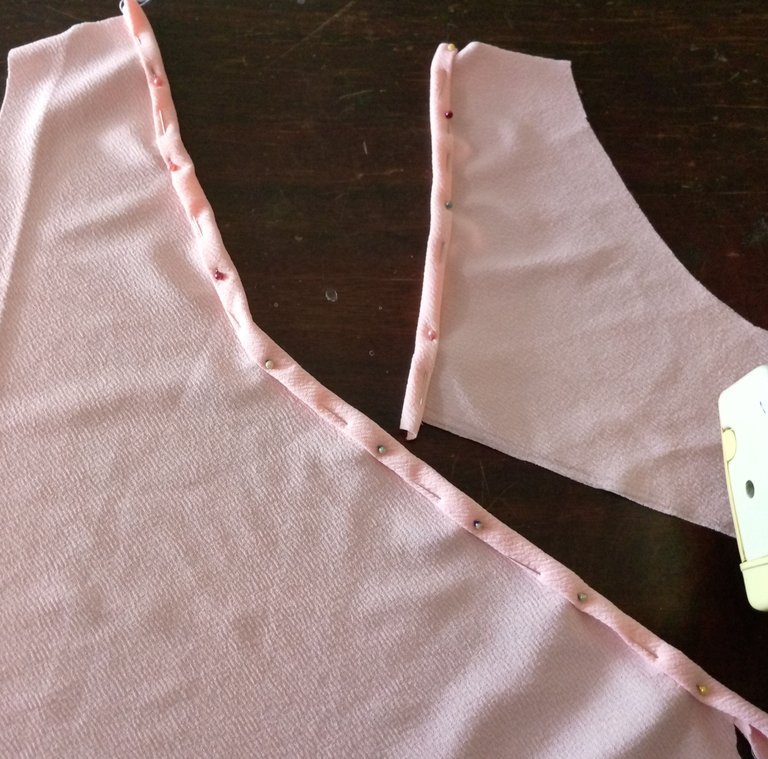
Continue by placing some pins to sew on the back of the blouse and on the right side of the ribbon, starting first at the neckline.
Antes de empezar a cerrar las piezas, corte varias cintas de 3.5 cm para pulir el escote y las sisas, estas cintas se cortan teniendo en cuenta el lado que más se estira por el ancho.
Continúe colocando unos alfileres para luego coser, en la parte del revés de la blusa y del lado derecho de la cinta, comenzando primero por el escote.
 |  |
|---|---|
 |  |
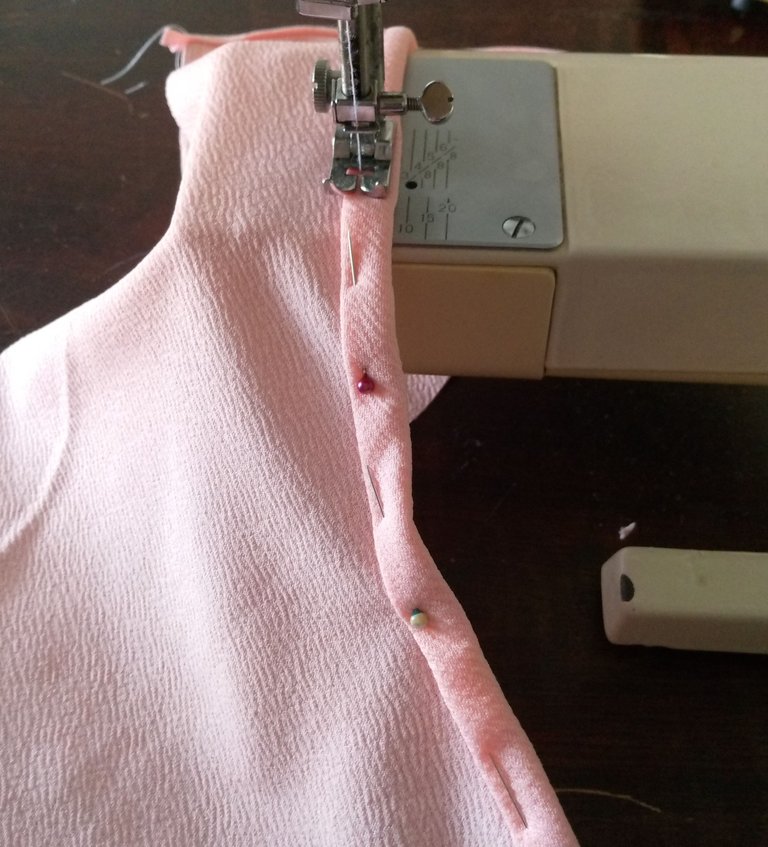
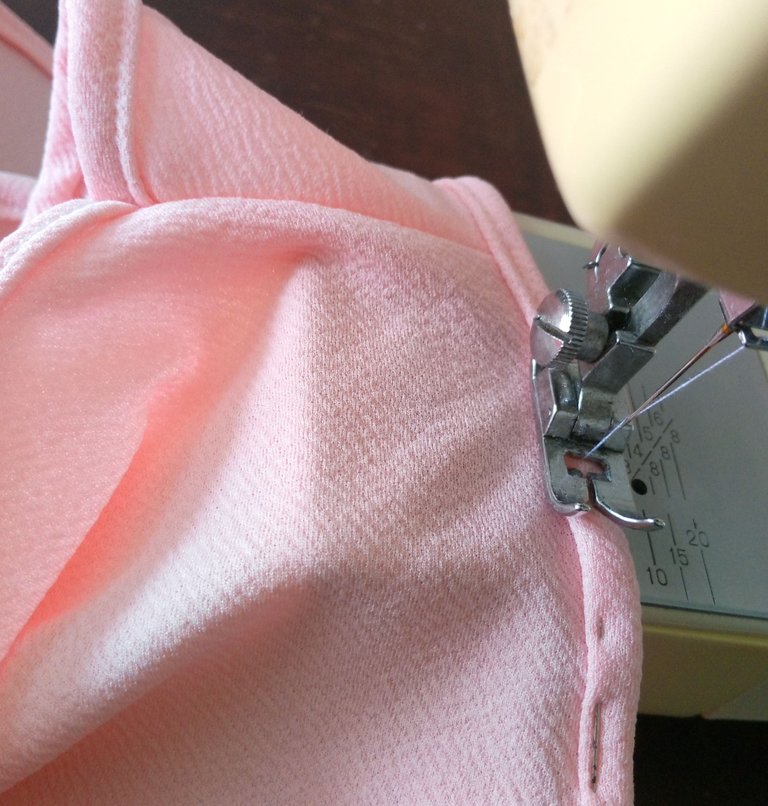
I went to the machine and started stitching with a straight stitch, then brought the ribbon to the right side and folded it over 1 cm, pinned it together and stitched with a straight stitch.
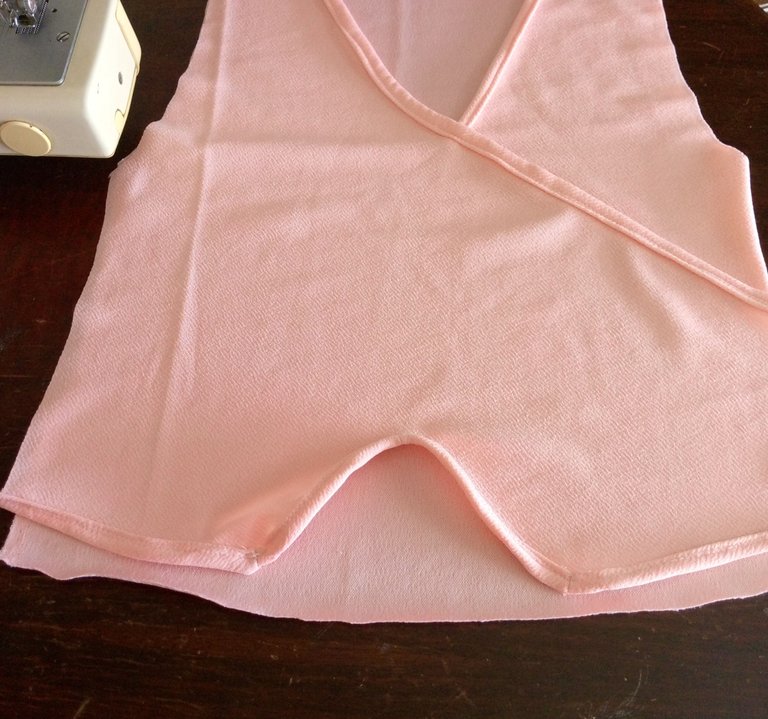
At this point I joined the front pieces together to see how my design was almost ready.
Fui a la máquina y empecé a coser con puntada recta, luego llevé la cinta al lado derecho y la doblé 1 cm, la uni con alfileres y cosí con puntada recta.
En este punto uní las piezas delanteras para ver como mi diseño estaba casi listo.
 |  |
|---|---|
 | 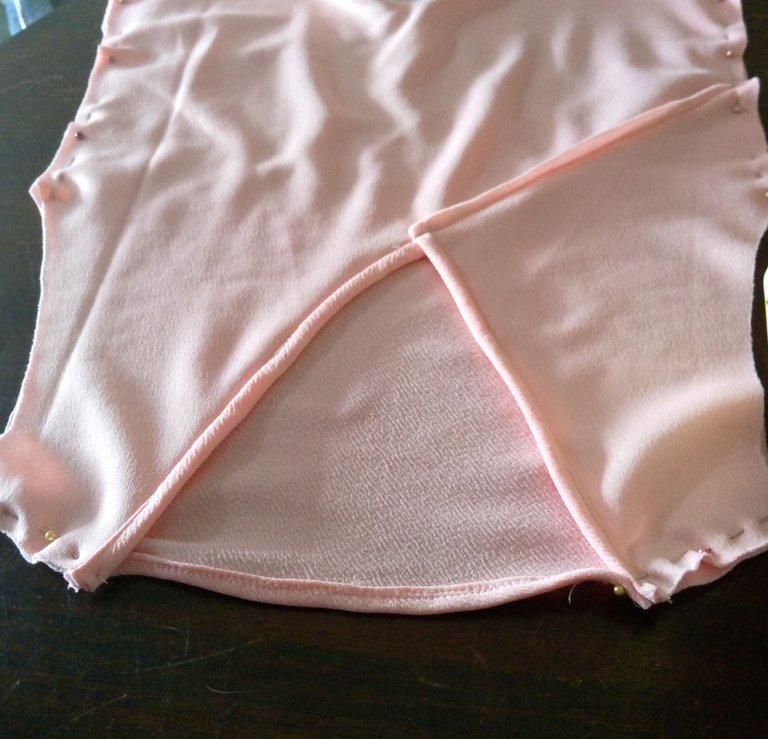 |
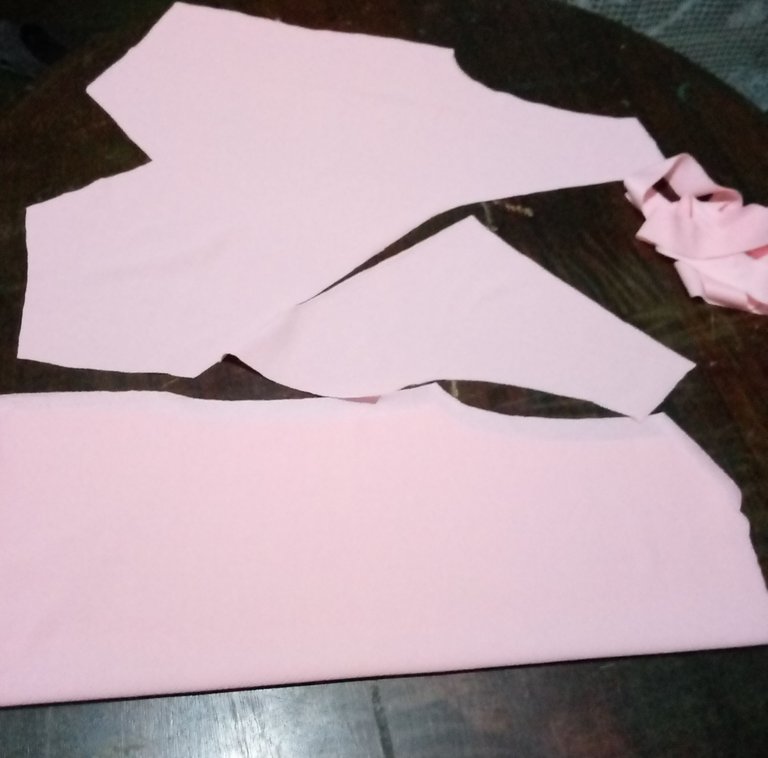
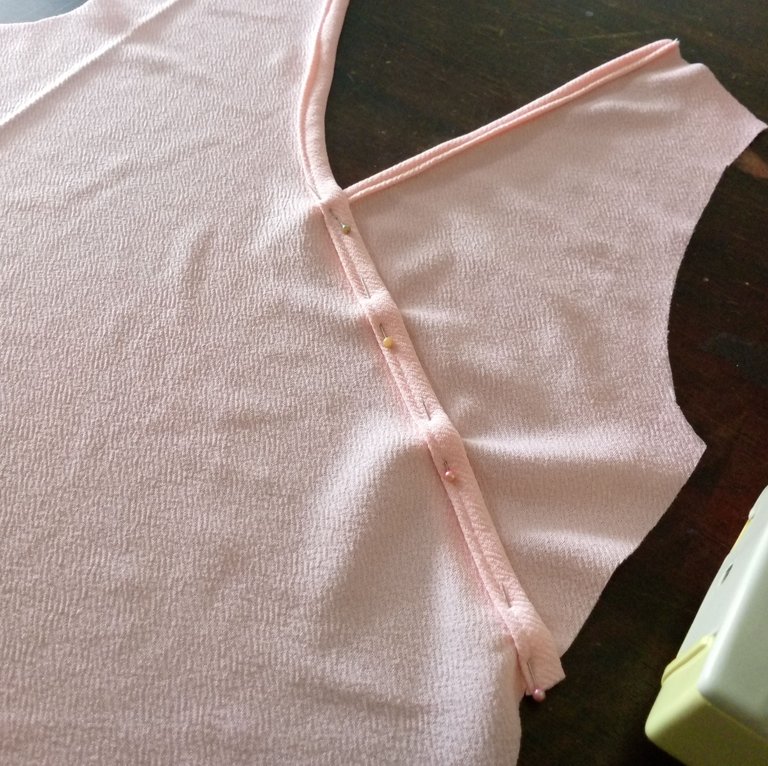
I continued making the ends of the ruffles, and here is where I had a difficulty and it was to make the ends of the peaks, at this time I did not know how to make the ruffle because at the time of making the double to flip the tape to the right it looked wrinkled and deformed in this step I had to unpick and sew again, but this time I measured several pieces of tape that I cut and sewed by parts until I managed to give a better look and finish.
Finally I finished this step and continued joining the 2 pieces right sides together and sewed shoulders and sides.
Continúe haciendo las terminaciones de los ruedos, y es aquí donde se me presento una dificultad y fue para hacer las terminaciones de los picos, en este momento no supe como hacer el ruedo porque al momento de hacer el doble para voltear la cinta al derecho esta se veía con un aspecto arrugado y deforme en este paso tuve que descoser y volver a coser, pero esta vez medí varios trozos de cinta que corte y fui cosiendo por partes hasta que logre darle un mejor aspecto y terminación.
Por fin terminé este paso y continué uniendo las 2 piezas por los lados derechos y cosí hombros y costados.
 |  |
|---|---|
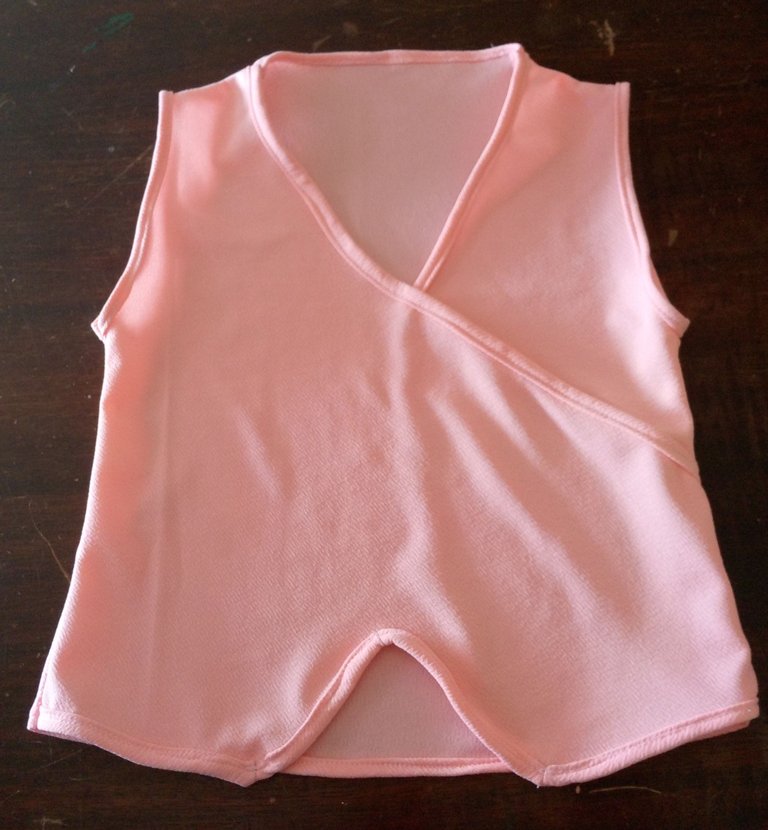 | 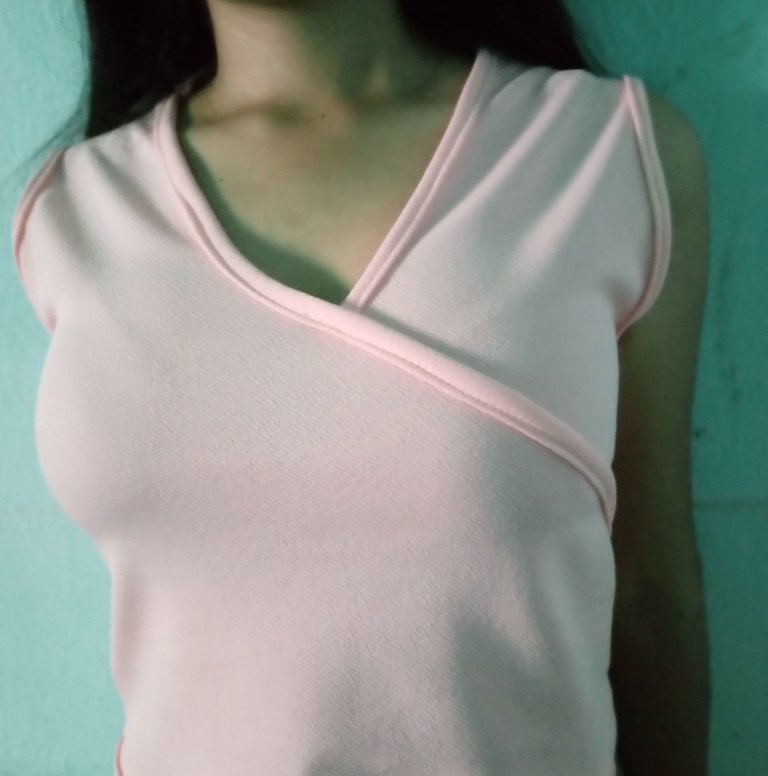 |
To finish I just need the hem of the sleeves, this hem I did with part of the ribbons of the same fabric securing everything with pins and then with the straight seam, at this point this beautiful blouse is ready for my daughter to use it with pride and affection as she let me know, which motivates me every day to improve my skills in this art.
Thank you for coming here and reading my publication, I hope you liked it, I encourage you to create your favorite designs.
It fills me with joy and gratitude that you can leave me a nice comment, I hope you are well wherever you are now.
Para terminar solo me falta el ruedo de las mangas, este ruedo lo hice con parte de las cintas de la misma tela asegurando todo con alfileres y luego con la costura recta, en este punto esta hermosa blusa está lista para que mi hija la use con mucho orgullo y cariño como me lo hizo saber, lo cual me motiva cada día a mejorar mis habilidades en este arte.
Gracias por llegar hasta aquí y leer mi publicación, espero les haya gustado los animo a crear sus diseños favoritos.
Me llena de alegría y gratitud que puedas dejarme un lindo comentario, espero que estés bien donde quiera que te encuentres ahora.
social networks / redes sociales
![]()
![]()
Traductor Deepl
Translated Deepl
Ediciones Canva
Editions Canva


Qué genialidad! Aprendí algunas cosas hoy, me gusta la manera ordenada que trabajas y cómo unes las partes primero con las agujas. El color es muy hermoso y el modelo me ha encantado.
¡Muchas gracias amiga que bueno que haya gustado, amo el color rosado, en cuanto al orden siempre trato de ser lo más ordenada posible para que puedan seguir las ideas con mayor claridad y no se pierdan en los pasos, también me alegra que hayas aprendido algo nuevo hoy, me alagas!, tú que sabes hacer mil cosas.😊 un fuerte abrazo gracias por estar atenta a mi publicación!.💖
Muy buen trabajo, lindo color y diseño. Saludos @lauracraft🌻
Gracias querida @multifacetas qué honor saber que haya sido de tu agrado, gracias por visitar mi publicación aprecio mucho tu valioso comentario.😘
😃👏Gracias @edwing357
Holaa feliz día 😊🤗
Que bueno hacer ropa para tu hija, el diseño quedo lindo, se ve muy fresca esta blusa, feliz noche.
Hola querida lis a mi hija le encantó esta blusa, además le queda genial ahora quiere otros diseños jajaja cree que soy un hada. Un abrazote lis gracias por tu hermoso comentario.❣️
El diseño me parece hermoso; el color es muy tierno!
Gran trabajo amiga!
Saludos!
¡Felicidades! Esta publicación obtuvo upvote y fue compartido por @la-colmena, un proyecto de Curación Manual para la comunidad hispana de Hive que cuenta con el respaldo de @curie.
Si te gusta el trabajo que hacemos, te invitamos a darle tu voto a este comentario y a votar como testigo por La Colmena.
Si quieres saber más sobre nuestro proyecto, te invitamos a acompañarnos en nuestro servidor de Discord.
Está muy bonita esa blusa, me gustó el diseño sería algo que me pondría.
¡Enhorabuena!
✅ Has hecho un buen trabajo, por lo cual tu publicación ha sido valorada y ha recibido el apoyo de parte de CHESS BROTHERS ♔ 💪
♟ Te invitamos a usar nuestra etiqueta #chessbrothers y a que aprendas más sobre nosotros.
♟♟ También puedes contactarnos en nuestro servidor de Discord y promocionar allí tus publicaciones.
♟♟♟ Considera unirte a nuestro trail de curación para que trabajemos en equipo y recibas recompensas automáticamente.
♞♟ Echa un vistazo a nuestra cuenta @chessbrotherspro para que te informes sobre el proceso de curación llevado a diario por nuestro equipo.
🥇 Si quieres obtener ganancias con tu delegacion de HP y apoyar a nuestro proyecto, te invitamos a unirte al plan Master Investor. Aquí puedes aprender cómo hacerlo.
Cordialmente
El equipo de CHESS BROTHERS
I genuinely don’t even understand anything in the post especially the cutting
But I really like the result
It’s so pretty and the color makes it more nice