Rada Quest Art Contest! / Elisya / FanArt
Arte Digital | Digital Art
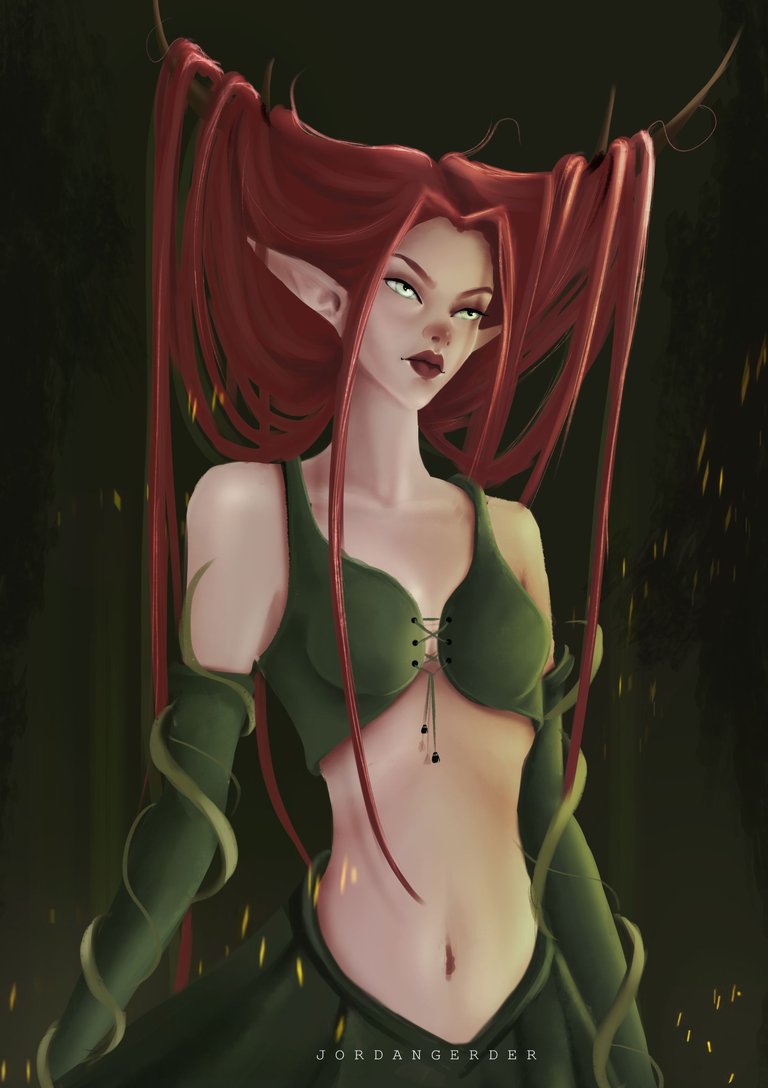
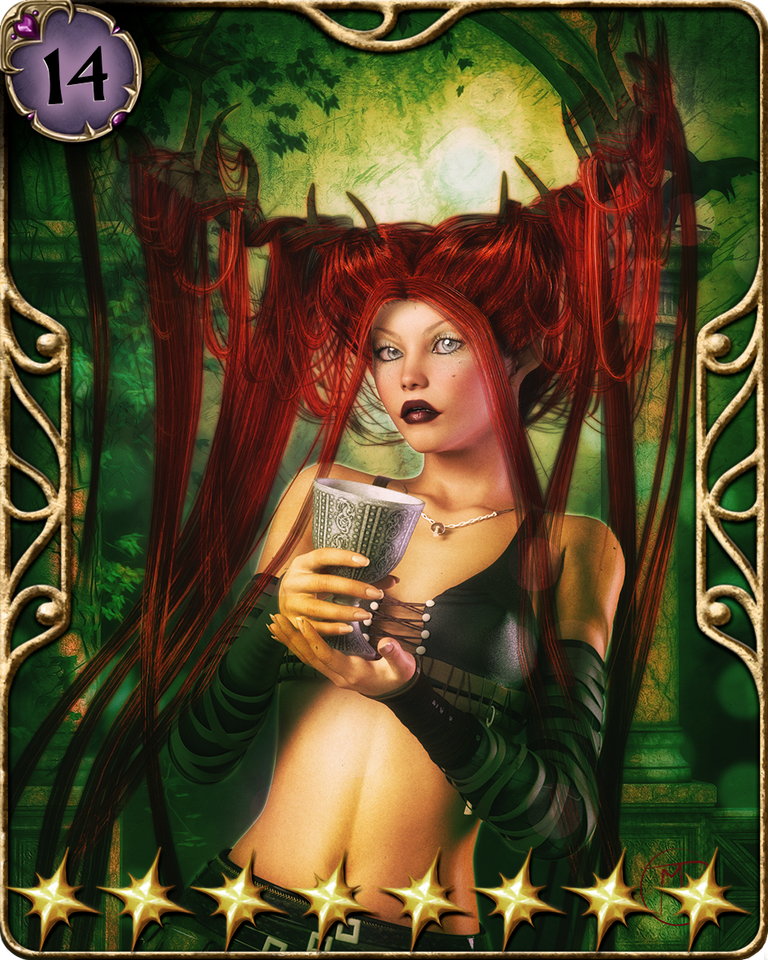
Hello people. How are you doing today? a new week for the art contest created by @radaquest I almost can't get there on time these power outages will drive me crazy one day, my entry this week is inspired by the beautiful singer of destiny Elisya, I love how these games have Lots of art to inspire you. I love recreating each of these characters in my style, I am in love with this one in particular, his tangled hair is what will attract the viewer the most.
Let's see a little about the creation process, it's always good to see what's behind each art, come with me⏩⏩⏩...
Materiales | Materials
- Desktop computer
- Tableta Huion H950P
- Programa Adobe Photoshop 2019
- Ordenador de mesa
- Huion H950P tablet
- Adobe Photoshop 2019 program
Proceso | Process
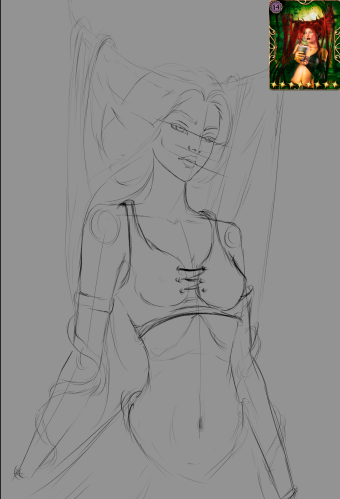
Paso 1
- Inciamos con un bosquejo de lo que sería el personaje agregué al personaje orginal en un extremo para captar todas las partes y no perder ningun detalle, asi es como resulta mas facil su creación:
Step 1
- We start with a sketch of what the character would be, I added the original character at one end to capture all the parts and not lose any details, this is how its creation is easier:

Paso 2
- Una ves que conseguimos un bosquejo mas claro, o donde se aprecie el personaje al cual agregaremos color, es momento de pasar a la siguiente etapa donde se seleccionan tres tonos de color no muy saturados para empezar a crear volumen en su piel:
Step 2
- Once we get a clearer sketch, or where we can see the character to which we will add color, it is time to move on to the next stage where three not very saturated color tones are selected to start creating volume in their skin:
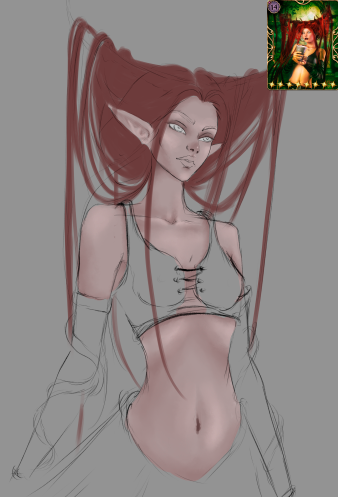
Paso 3
- Es momento de mezclar los parches de color que agregué anteriormente (este paso lo hago con la herramienta dedo), para luego suavizar un poco con un pincel difuso, y asi es como conseguimos una piel mas trabajada:
Step 3
- It's time to mix the color patches that I added previously (I do this step with the finger tool), and then soften a little with a diffuse brush, and this is how we get a more polished skin:
Paso 4
- Dupliqué su cabello para crear algo de profundida agregando un tono mas oscuro a alguna de las capas, luego fue detallando para dejar vacios o entradas entre hebras, continué detallando sus ojos verdes y sus labios llamativos rojos, para luego enfocarme en lo que sería su vestuario y seguidamente la luces que lo harán resaltar aun mas...
Step 4
- I duplicated her hair to create some depth by adding a darker tone to some of the layers, then I detailed to leave gaps or entrances between strands, I continued detailing her green eyes and her striking red lips, and then I focused on what her wardrobe would be. and then the lights that will make it stand out even more...
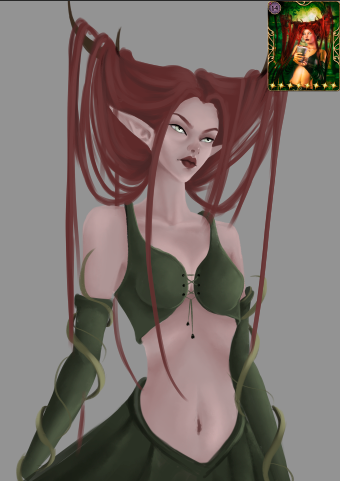
Paso final
- Para finalizar todo el proceso de creación agregué detalles finales como brillos, mas luces y ajustes totales de color.
Final step
- To finalize the entire creation process, I added final details such as highlights, more highlights and total color adjustments.
Name WAX: juboy.c.wam
We got an incredible result, I really enjoyed the creation process. I hope you liked it, I have elaborated it with love for all the viewers who visit this publication, see you in the next one 😍
𝑮𝒓𝒂𝒄𝒊𝒂𝒔 𝒑𝒐𝒓 𝒗𝒊𝒔𝒊𝒕𝒂𝒓 𝒎𝒊 𝒃𝒍𝒐𝒈, 𝒂𝒑𝒓𝒆𝒄𝒊𝒐 𝒎𝒖𝒄𝒉𝒐 𝒕𝒖 𝒂𝒑𝒐𝒚𝒐 / 𝑻𝒉𝒂𝒏𝒌 𝒚𝒐𝒖 𝒇𝒐𝒓 𝒗𝒊𝒔𝒊𝒕𝒊𝒏𝒈 𝒎𝒚 𝒃𝒍𝒐𝒈, 𝑰 𝒓𝒆𝒂𝒍𝒍𝒚 𝒂𝒑𝒑𝒓𝒆𝒄𝒊𝒂𝒕𝒆 𝒚𝒐𝒖𝒓 𝒔𝒖𝒑𝒑𝒐𝒓𝒕.
▶ 


 ◀
◀
TWITTER ⚪ NFT SHOWROOM ⚪ INSTAGRAM ⚪ DISCORD

Very cool.
!BBH !PIZZA !PGM
@jordangerder! Your Content Is Awesome so I just sent 1 $BBH (Bitcoin Backed Hive) to your account on behalf of @dotwin1981. (15/50)
BUY AND STAKE THE PGM TO SEND A LOT OF TOKENS!
The tokens that the command sends are: 0.1 PGM-0.1 LVL-0.1 THGAMING-0.05 DEC-15 SBT-1 STARBITS-[0.00000001 BTC (SWAP.BTC) only if you have 2500 PGM in stake or more ]
5000 PGM IN STAKE = 2x rewards!
Discord
Support the curation account @ pgm-curator with a delegation 10 HP - 50 HP - 100 HP - 500 HP - 1000 HP
Get potential votes from @ pgm-curator by paying in PGM, here is a guide
I'm a bot, if you want a hand ask @ zottone444
Thank you so much🥰
$PIZZA slices delivered:
@dotwin1981(15/15) tipped @jordangerder
Nice one
Thank you✨
You are welcome man
https://twitter.com/AlienArtHive/status/1772370371473498381