Bronze TOP BATTLES studies #3
Watching great players
If you want to make the most out of your Splinterlands collection, you have to play it yourself and win! That's what's going to make the most bang for your buck. But if you want to win, you have to study the game, otherwise you'll do nothing but waste your time, all while not earning as much as you could.
That's what we're doing in Bronze TOP BATTLES Studies: we analyze three battles from the highest MMR players, learn their strategies and try improving upon them. That's how we're going to become great players that make more money. Let's begin.

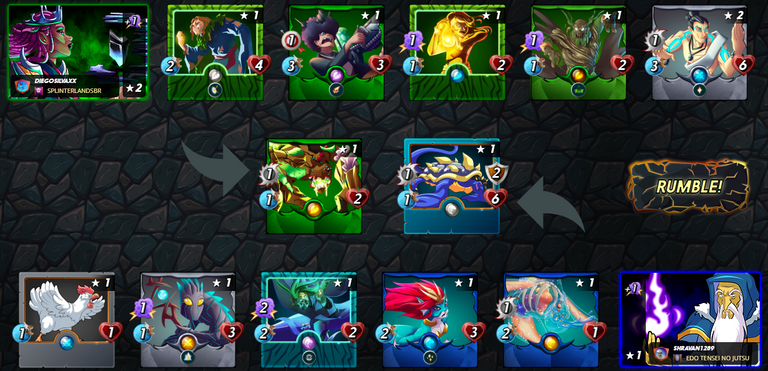

@diegosilvaxx vs @shravan1289 (link)
In this battle filled with 1 BCX cards, the only higher BCX card present made all the difference. Xenith Monk gets heal at level 2, which makes an astounding difference in how you can use it.
In this scenario, @diegosilva chose to place their Xenith Monk at the back, acting as a defender versus sneak attacks. It worked surprisingly well, since the mighty Coral Wraith couldn't kill him, preventing its magic attack from decimating the of the diego's team.
Both players used stallers at the front: Spineback Turtle against Fungus Fiend and Failed Summoner. Since bot side's strategy relied heavily on Coral Wraith, it ended up not being able to wipe out pretty much anything beyond the stallers.
Coral Wraith is really strong, but it still needs back up. You can never rely on a single card to do all the dirty work.
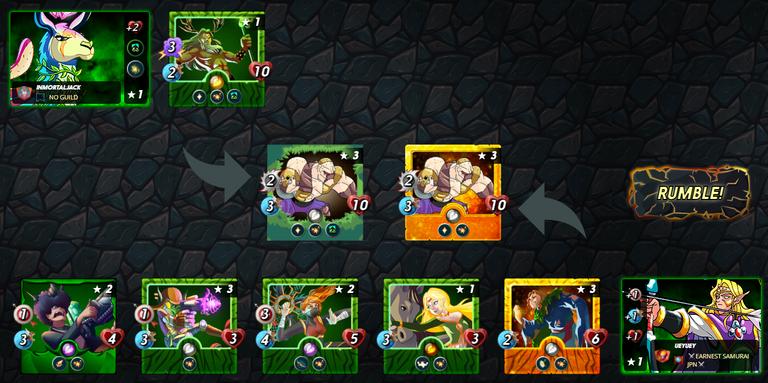

@inmortaljack vs @ueyuey (link)
Jack thought to himself, "hey, if I use flesh golem and Kron, which are two super strong monsters when they get Last Stand, I'll surely achieve the Last Stand strategy". The problem is, you're supposed to strategize so that only one card gets Last Stand.
If you don't, you get healers but no damage. Comparing both teams, it's obvious one of them deal so much more damage than the other, that even when Last Stand is finally triggered, @ueyuey's team vastly outdamages both Kron's and Flesh Golem's self-healing.
Not to mention this battle has the blast rule, so both Flesh Golem and Kron are taking serious blast damage - so they're gravely injured before they get their Last Stand. Even if the enemy team dealt less damage to them, they'd already barely be alive after getting blown up.
Think of a complete strategy, don't be lazy.
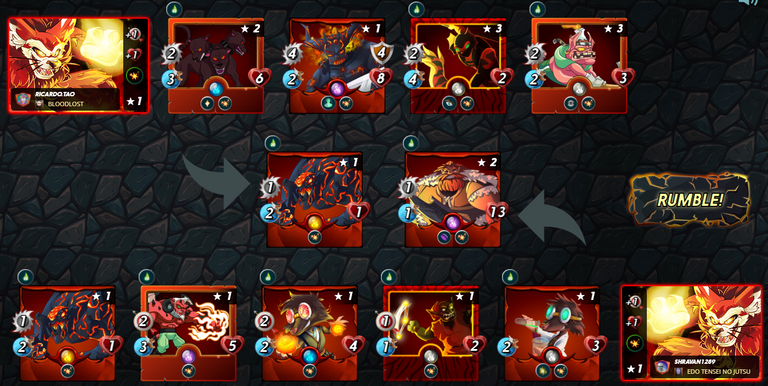

@ricardo.tao vs @shravan1289 (link)
Two Yodin Zaku duke it out under the Noxious Fumes rule. Both teams are very even until we realize how cheaty Forgotten One becomes as rounds go by. You'd think Cerberus would have a lot more say in it, but he was actually quickly killed off.
Tusk the Wide almost saved the battle for @shravan1289, but he dealt too little damage to Forgotten One while never being missed since they're both very slow. @ricardo.tao did a very nice job spreading damage all over the place using Cerberus and Sneak Attackers.
Because of splash damage, poison from Noxious Fumes killed everything nearly everything from both sides as early as round 2. You could say he sacrificed their own team so that Forgotten One would persevere. Risky and very strategic. This was a great battle.
Image sources: https://splinterlands.com/ and https://ecency.com/post/@nane-qts/free-splinterlands-graphic-resources-20
!1UP good work!
You have received a 1UP from @marianaemilia!
@monster-curator, @oneup-curator, @thg-curator, @vyb-curator, @pob-curator, @neoxag-curator, @pal-curatorAnd they will bring !PIZZA 🍕
Learn more about our delegation service to earn daily rewards. Join the family on Discord.
I do the same thing and study the top players as I would like to think I am part of the pack. Perhaps you might do a break down of some of my games one time.
I would like that. I'll give it a try tomorrow. <3
Yay! 🤗
Your content has been boosted with Ecency Points, by @felipejoys.
Use Ecency daily to boost your growth on platform!
Support Ecency
Vote for new Proposal
Delegate HP and earn more
Thanks for sharing! - @marianaemilia

Nice Work! Congrats.