Diseña, recicla y organiza un lindo cotillón hecho con Cartón de papel sanitario.

Como siempre me es grato mostrarles como con simples materiales puedes crear y diseñar manualidades de una manera fácil y económico, en este caso te enseñaré a realizar un Cotillón u organizador con tubo de papel higiénico.
Entonces si llegaste hasta aquí, te invito a que me acompañes a ver y aprender.
Necesitarás:

| Tubo de cartón | Cartulina verde |
|---|---|
| Recortes de foami de colores | Dibujo |
| Pinturas y pinceles | Tijera |
| Lápiz | Tirro y silicón |
| Tiza |
Paso 1:

- Remarca el dibujo con lápiz de mina blanda para que te sea fácil transferir, después coloca el dibujo sobre el foami y frota con la tijera, levanta sin despegar el papel del foami y asegúrate que se vea bien la imagen en el foami..
- Repite este paso con todas las piezas a sacar y recorta por todo el contorno o borde.
- Ahora aplica silicón por toda la orilla del tubo de cartón y pega el círculo de cartón, luego recorta el sobrante y pega tirro o type en la orilla para reforzar y evitar se despegue por debajo.
- Recorta un círculo en cartulina y pega para forrar el tubo, igual recorta un rectángulo a la medida del tubo, aplica silicón y pega.
Paso 2:

- Haz presión sobre la unión hasta que pegue bien.
- Ahora comienza a pintar todo el contorno de las piezas
con pintura color naranja, luego aplica pintura blanca en la parte de arriba de la cabeza para darle brillo a la pieza, rellena los ojos con pintura blanca y luego pasa el pincel y pinta la barriga y pecho de la jirafa. - Luego rellena los ojos con pintura marrón claro y pinta lunares en la cara de la jirafa.
Paso 3:

- Delinea los ojos, nariz y boca con marcador punta fina o pincel y pon tus toques personales.
- Pinta con tiza las orejas y cachetes y por último pon puntos de luz en los ojos y deja secar.
- En foami verde recorta una tira y dale forma de hierba.
- Luego delinea y difumina las palmeras.
Paso 4:

- Arma y pega la palmera y deja secar, aplica silicón y pega la hierba al tubo forrado, luego pega la palmera dentro del cilindro y haz presión hasta que pegue bien y listo, así quedará listo este bonito cotillón, que también puedes hacer con el animalito de tu preferencia.
Fuente:https://www.pinterest.es/pin/476255729361105868/
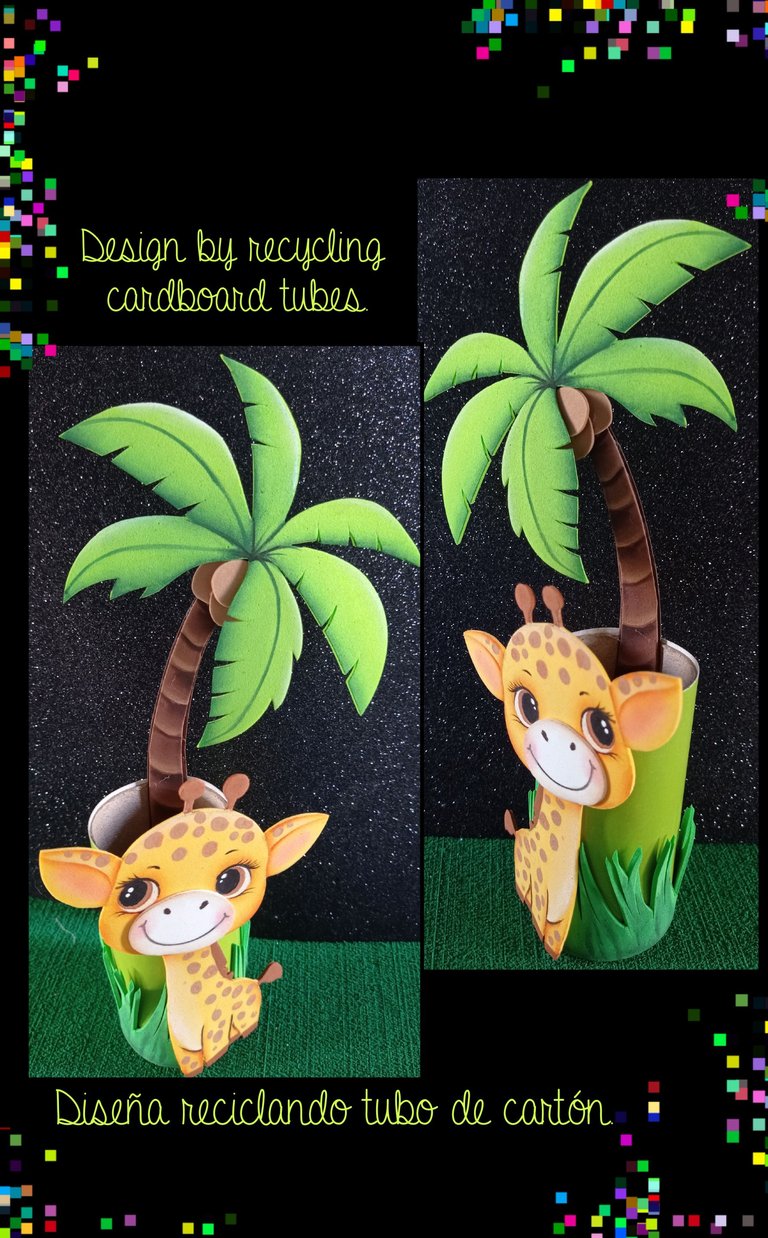
Ahora te comparto unas fotos del trabajo terminado.
Mira lo coqueta que se ve con unos lindos lentes!


Etiquetas HTML
Telf. Redmi Note 9
Editor de fotos GridArt.
Y llegó la hora de despedirme no sin antes decirles que reciclando podemos ayudar a nuestro medio ambiente y a la vez crear cosas bonitas, decorativas y sobre todo útiles.
Así que Recicla!
Gracias por tu visita, apoyo y comentario.
Saludos.
English:
You will need:
| Cardboard tube | Green cardboard |
|---|---|
| Colored foami cut-outs | Drawing |
| Paints and brushes | Scissors |
| Pencil | Styrofoam and silicone |
| Chalk |
Step 1:
- Outline the drawing with a soft lead pencil to make it easy to transfer, then place the drawing on the foami and rub with the scissors, lift without peeling the paper off the foami and make sure that the image is well visible on the foami.
- Repeat this step with all the pieces to be removed and cut all around the edge.
- Now apply silicone all around the edge of the cardboard tube and glue the cardboard circle, then cut off the excess and glue the tape or type on the edge to reinforce and prevent it from peeling off from underneath.
- Cut out a circle in cardboard and glue to line the tube, cut out a rectangle to the size of the tube, apply silicone and glue.
Step 2:
- Put pressure on the joint until it sticks well.
- Now start painting all around the pieces with orange paint.
with orange paint, then apply white paint on the top of the head to brighten up the piece, fill in the eyes with white paint and then pass the brush and paint the giraffe's belly and chest. - Then fill in the eyes with light brown paint and paint polka dots on the giraffe's face.
Step 3:
- Outline the eyes, nose and mouth with a fine tip marker or brush and add your personal touches.
- Paint the ears and cheeks with chalk and finally put light dots on the eyes and let dry.
- Cut out a strip of green foami and shape it like grass.
- Then outline and blend the palm trees.
Step 4:
- Assemble and glue the palm tree and let it dry, apply silicone and glue the grass to the lined tube, then glue the palm tree inside the cylinder and press until it sticks well and that's it, this beautiful cotillion will be ready, you can also make it with the animal of your choice.
Fuente:https://www.pinterest.es/pin/476255729361105868/
Now I share with you some pictures of the finished work.
Look how cute she looks with some nice glasses!
HTML tags
Redmi Note 9 phone
GridArt.
And it's time to say goodbye but not before telling you that by recycling we can help our environment and at the same time create beautiful, decorative and above all useful things.
So Recycle!
Thanks for your visit, support and comments.
Greetings
Excelente trabajo amiga, como cada cosa que nos traes y compartes. Eres espectacular en el trabajo con foami. Dios bendiga esas manos @elmundodebetty ✨
!LADY
!DIY
View or trade
LOHtokens.@dayadam, you successfully shared 0.1000 LOH with @elmundodebetty and you earned 0.1000 LOH as tips. (1/3 calls)
Use !LADY command to share LOH! More details available in this post.
Muchas gracias amiga por tus palabras y amén a tus bendiciones, de verdad me satisface saber que mi trabajo te gusta.
Nuevamente mil gracias por tu apoyo.
Beautiful work. Tender, so full of details and very neat. Thanks for sharing your step by step
Gracias @diyhub por siempre brindar apoyo a mis tutoriales.
You can query your personal balance by
!DIYSTATSAgradecida por tu apoyo.
Saludos.
a community encouraging first-hand content, and each individual living their best life.
Gracias @innerblocks y @dayadam por el apoyo a mi publicación.
¡¡¡Buen trabajo!!! Gracias por publicar tu excelente contenido en Hive Diy, Asombroso trabajo y técnicas con el foami, te quedo muy coqueto.
Tu comunidad artesana ahora es testigo

Muchas gracias @hive-130560 por el comentario y apoyo que me brindan.
Excelente trabajo, sin embargo, la invitamos agregar una foto de perfil en su cuenta para poder optar con más valoración a la hora de ser curada con cualquier comunidad.
Muchas gracias @lenessaturbix por tu comentario y sugerencia.
Soy muy fan de tus proyectos querida. los amo, son siempre perfectos y profesionales, gracias por llenar nuestra comunidad de cosas hermosas hechas por ti.
Considera colocarte una imagen de perfil, dado que la necesitamos para cuando promovemos a los artistas en nuestras distintas redes sociales.
Es un halago para mi @equipodelta su comentario, ya que sus trabajos y talento son muy valiosos en esta comunidad.
Gracias amiga por su sugerencia, eso haré.
quedó bien hermoso, un diseño bien creativo
Hola amigo, muchas gracias por comentar y que bueno que te gustó.
https://twitter.com/hivediy47901/status/1776847139156394410
Gracias @hive-130560
Super cute!!
Te quedo lindísimo!
Muchas gracias @maru2007
Saludos.