How To Make Pusheen The Kawaii Kitten🐱💗🌺 Cómo Elaborar A Pusheen La Gatita Kawaii ✨🍃🐱By Danhyelita24
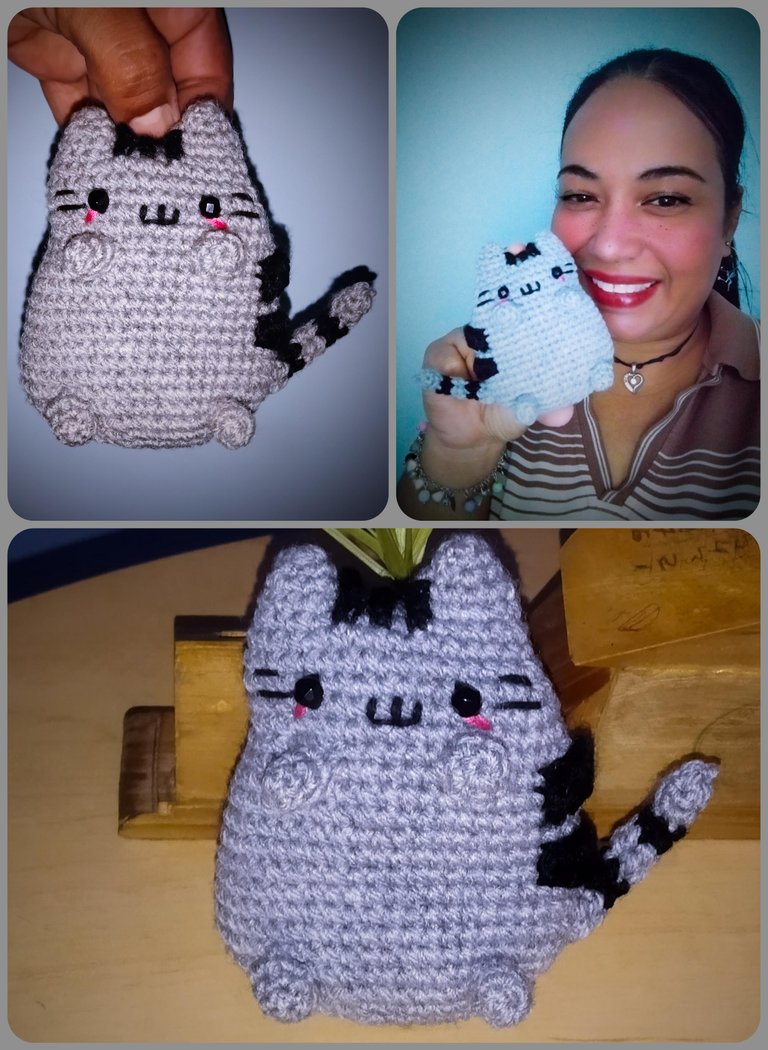
¿Eres amante de los gatos? Yo no soy muy aficionada a ellos, pero la verdad que provocan ternura y mucho más cuando son pequeñitos, mi hermana los adora y en casa aya es común tener más de uno ya que vive adoptándolos o buscándole hogares sanos. En esta oportunidad quise tejer un amigurumi del gatito Kawaii Pusheen, ya que todo lo relacionado a la tendencia cute japonés me encanta y me llaman muchísimo la atención, Y el hacer patrones de amigurimu de estos lindos animalitos si que me gusta. Es difícil no amar a estas pequeñas bolas de pelo esponjosas con grandes y adorables ojos.
Aquí les muestro un patrón de amigurumi para hacer esta adorable gatita, Pusheen una gata que ha alcanzado mucha fama en internet. Su nombre viene de la palabra irlandesa “Puisín” que significa gatito en irlandés aunque como mencioné antes la tendencia Kawaii la adoptó como propia.
Su patrón es bastante simple y corto. Es un patrón bastante bueno para principiantes ya que lo vamos a trabajar en rondas continuas, y por esta razón les recomiendo que usen un marcador de ganchillo al principio de cada ronda para no perderse.
Los materiales utilizados fueron : lana en tonos gris y negro, relleno hipoalergénico, hilo de bordar en tonos negro y fucsia,dos ojitos negros de 3 mm, crochet de 0mm y aguja lanera.
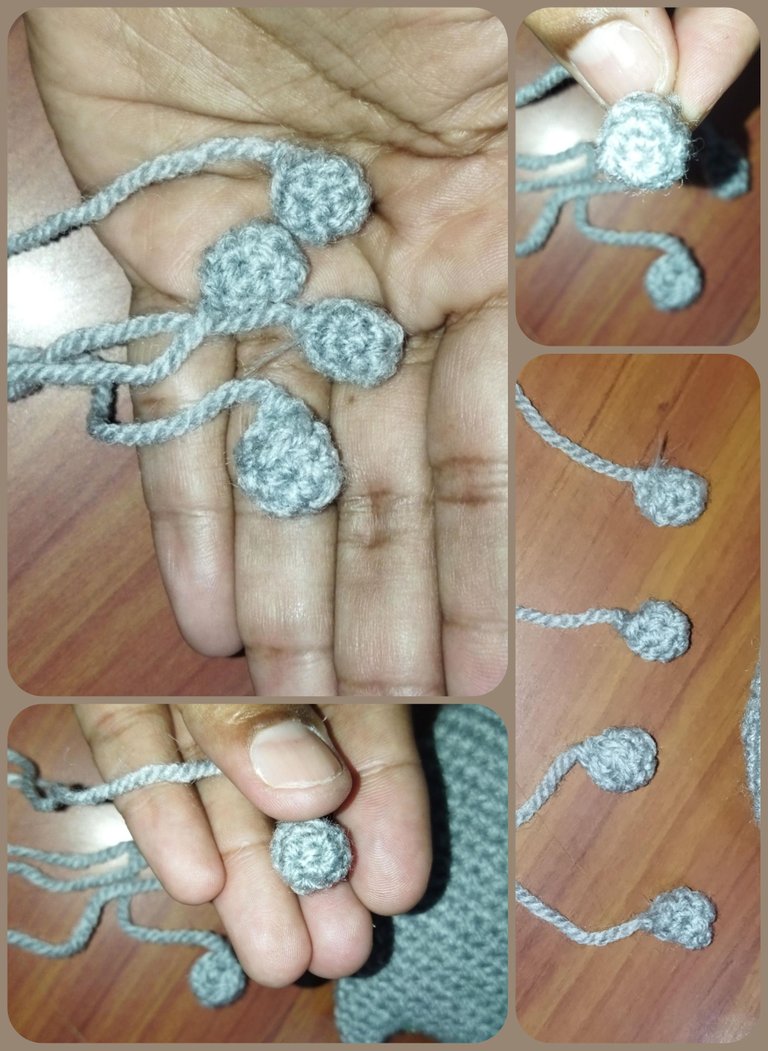
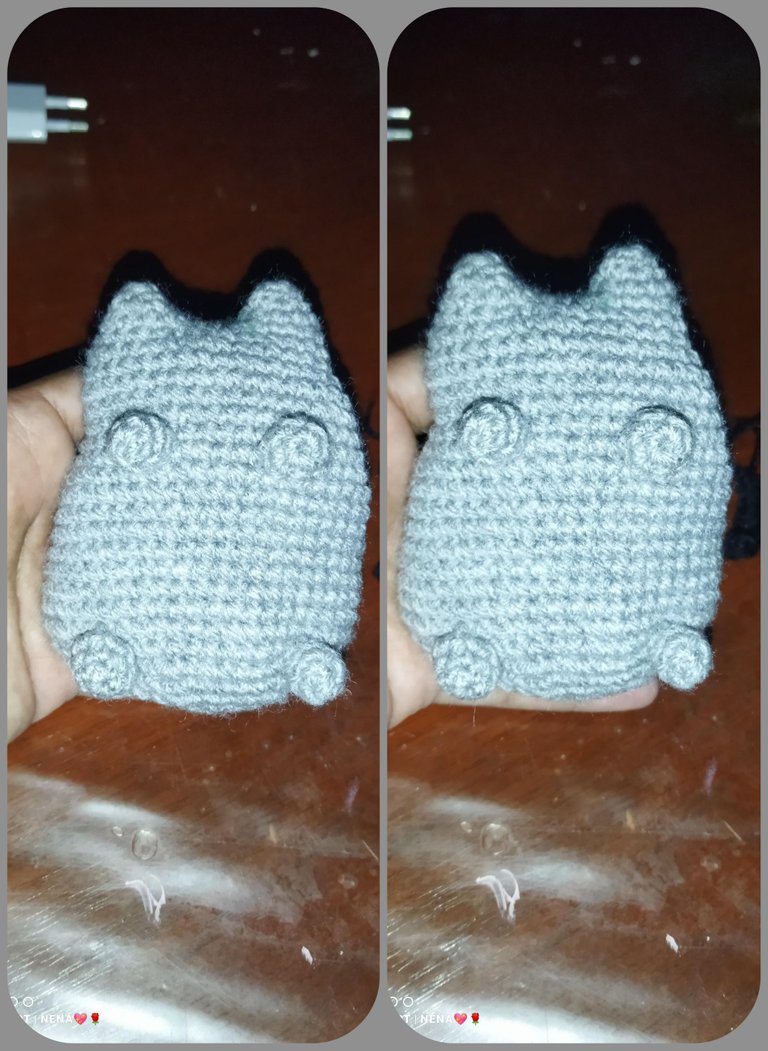
Para comenzar vamos a realizar las dos orejitas por separado, haciendo esta secuencia:
6 pb en anillo mágico,la siguiente vuelta relaizmaos un aumento por cada punto bajo y dos vueltas de un punto en cada punto.
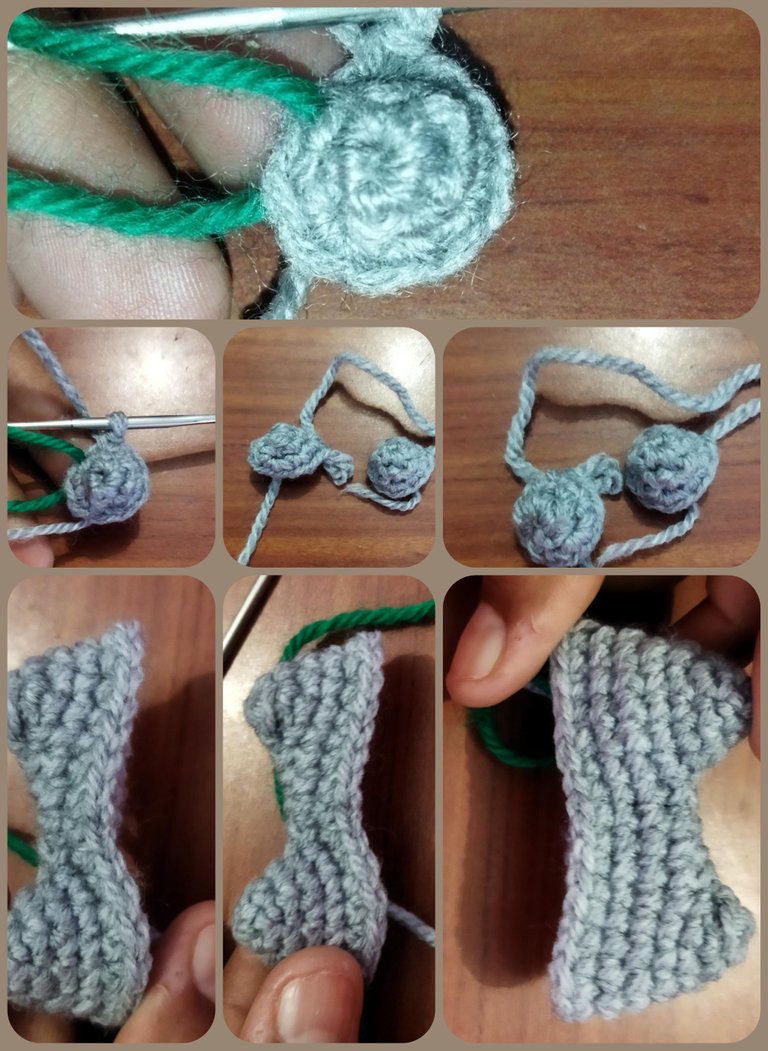
6 stitches in the magic ring, knit two equal rows of six single crochet stitches.
Close the ring.
Patas (Hacer 4) 6 pb en anillo mágico, relaizmaos dos vueltas iguales de seis puntos bajos. Cerramos el anillo.
We are going to take one of the ears and pick up 5 chains in the air, hook to the second ear and relax twelve low stitches, then the five low stitches of the chain and the twelve low stitches of the other ear for a total of 29 low stitches.
Cuerpo: Vamos a tomar una de las orejas y levantamos 5 cadenas al aire, enganchamos a la segundo oreja y relaizmaos doce puntos bajos, luego los cinco puntos bajos del cadena y los doce puntos bajos de la otra oreja para un total de 29 puntos bajos.
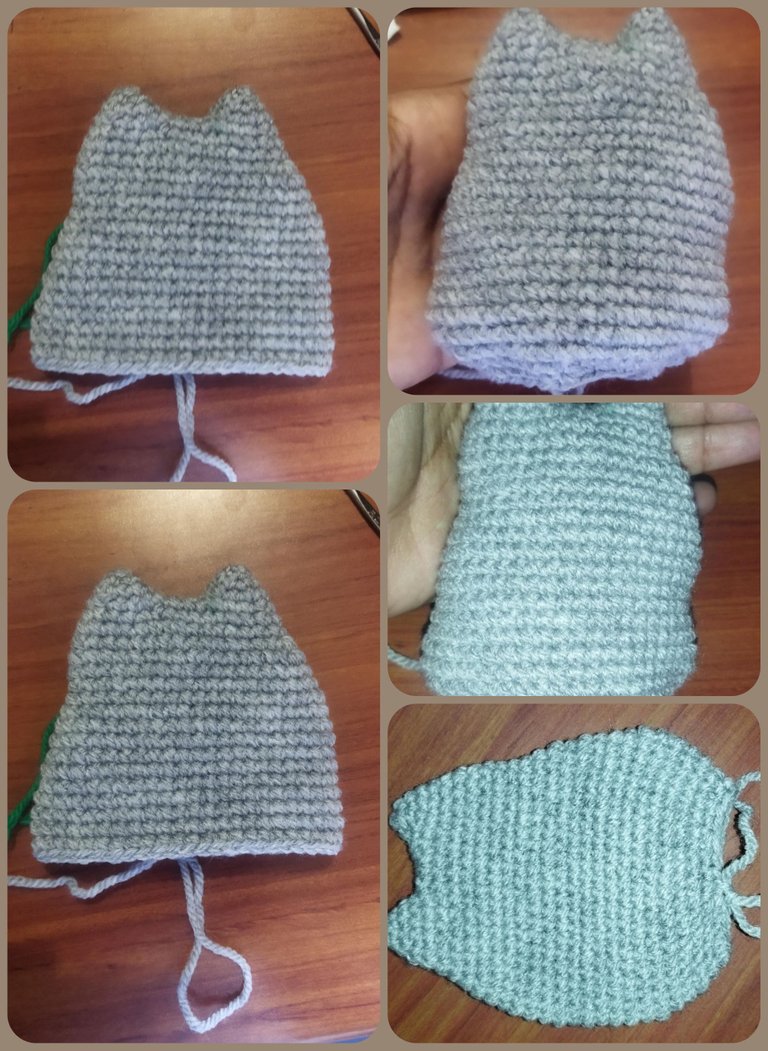
Fill in and close completely.
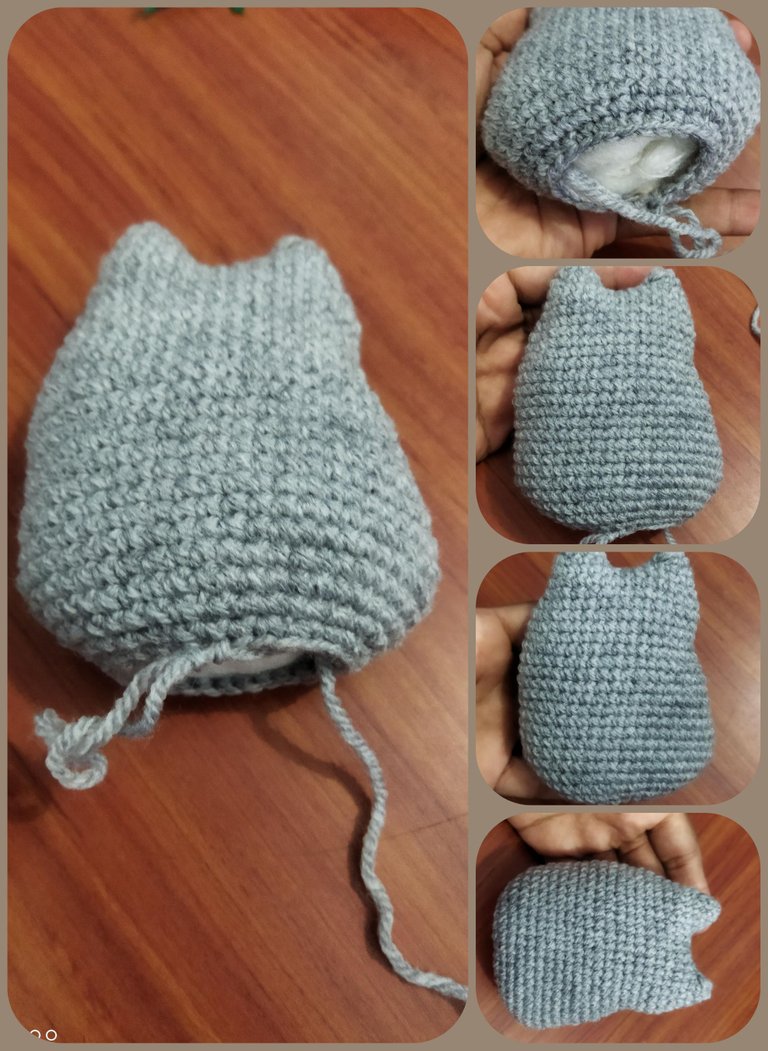
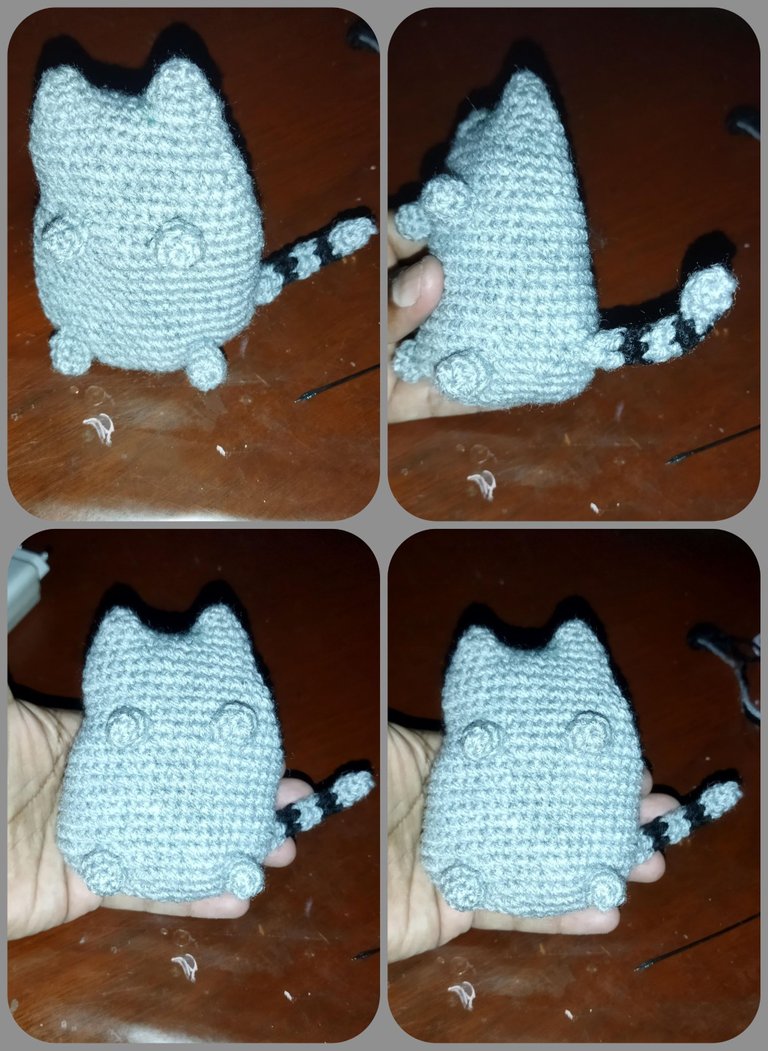
A partir de la siguiente vuelta vamos a hacer aumentos solo en las esquinas (ambas) par aire dandole amplitud a la gatita, al llegar a la vuelta 6 vamos a realizar solo aumento en la parte derecha de la gata, por dos vueltas más y luego tejemos 5 vuelta de unun punto en cada punto, luego procedemos a realizar las disminuciones. Rellenamos y cerramos completamente.
The tail we start with the gray color with a magic ring of six low stitches for three rows, then we change. Black color for two rounds, we retake the gray for two rounds and the black for two equal rounds and close with a slipped stitch, how it is so narrow we are not going to fill it.
Cola La cola la iniciamos con el color gris con un anillo mágico de seis puntos bajos por tres vueltas, luego cambiamos. Color negro por dos vueltas,retomamos el gris por dos vueltas y el negros por dos vueltas iguales y cerramos con un punto deslizado, cómo es tan angosta no la vamos a rellenar.
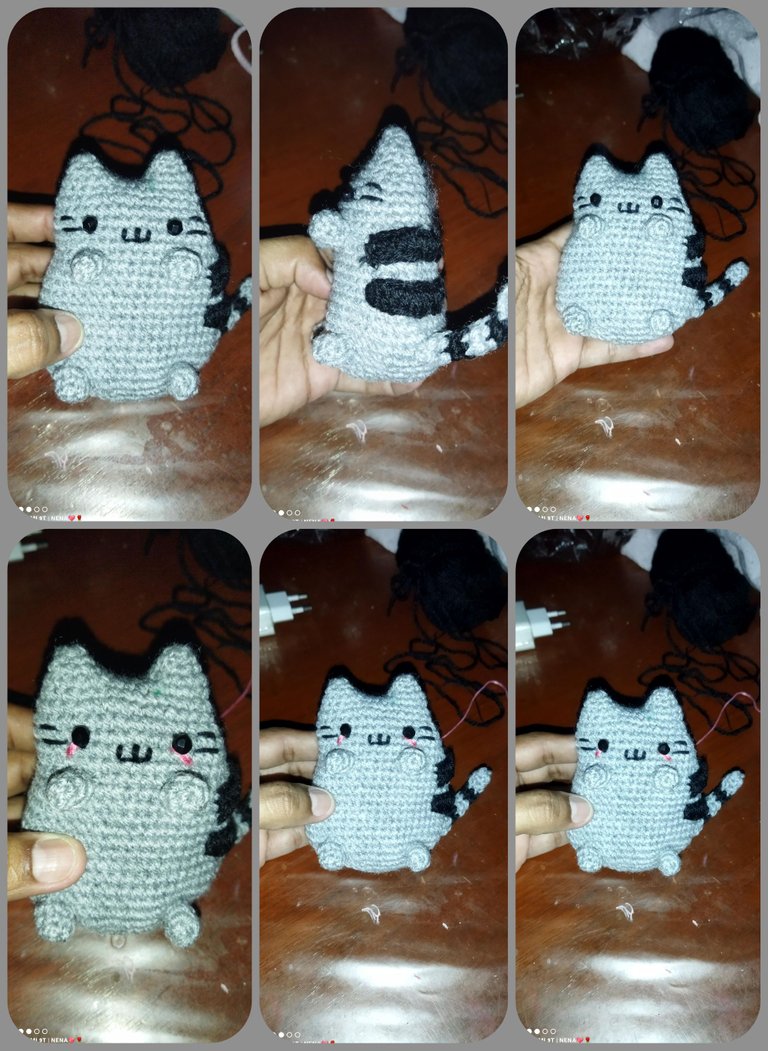
We are going to make them in black color making a chain of 13 stitches, returning in the chain number 11 with high half stitches through all the sequence until we reach the end where we are going to make two chains in the air and a slipped stitch. We knit two equal pieces.
Rayitas: Las vamos a realizar en color negro haciendo una cadena de 13 puntos, devolviendonos en las cadena número 11 con medios puntos altos por todas la secuencia hasta llegar al final donde vamos a realizar dos cadenas al aire y un punto deslizado. Tejemos dos piezas iguales.
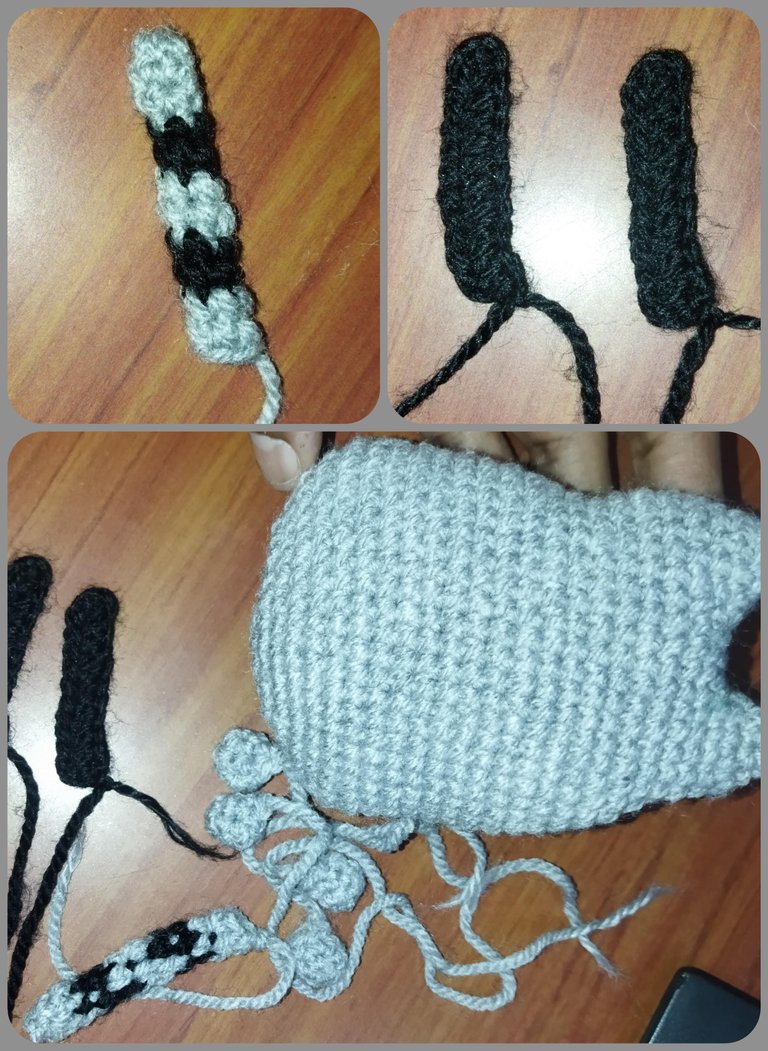
We sew the four legs to the body,
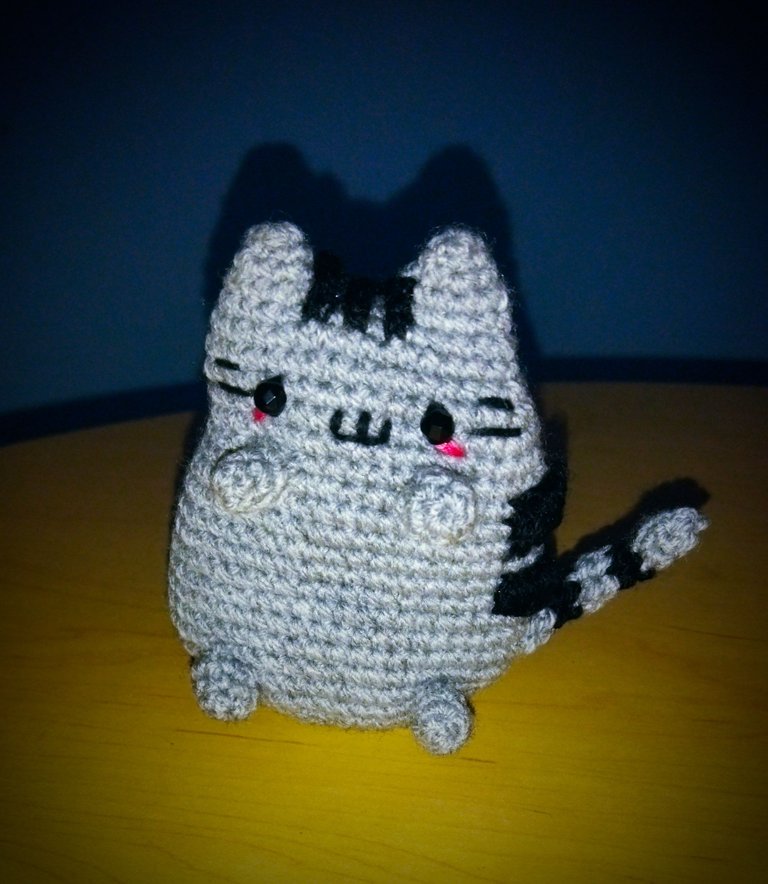
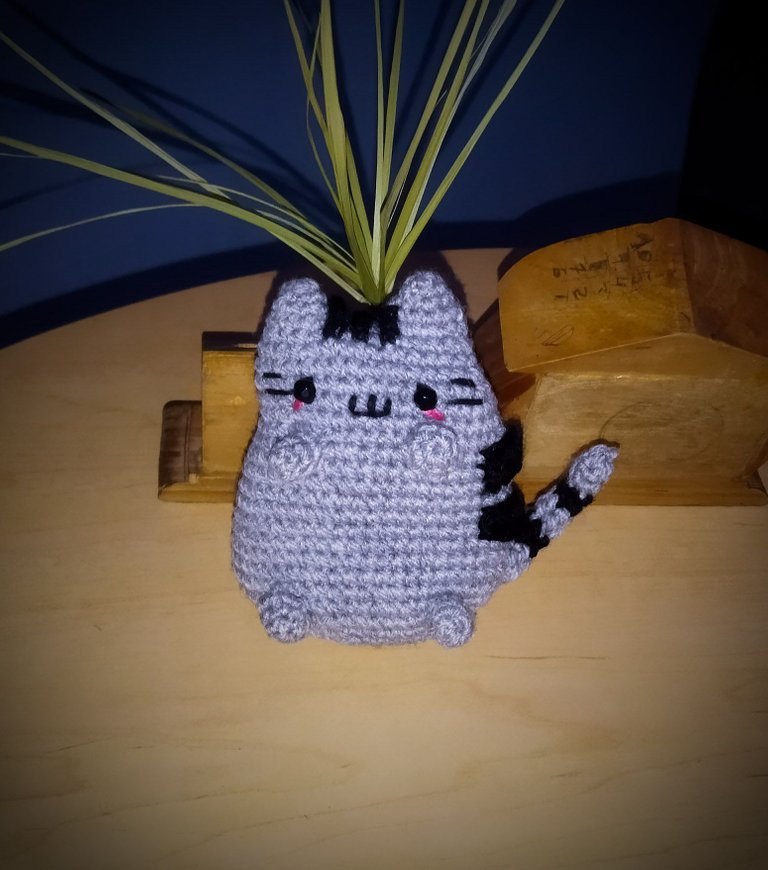
Embroider the mouth and whiskers. For the mouth, embroider a W shape. Separate the whiskers by one stitch on the side of the eyes and a fuchsia line under the eyes. We sew the side stripes on the right side which is the widest part to simulate the cat's back and finally, we sew the tail on the back. On the top of the head in the middle of both ears we will knit three lines of five slipped stitches to give the effect of fur.
Montaje: Cosemos las cuatro patas en el cuerpo, Bordamos la boca y los bigotes. Para la boca borda una forma de W. los bigotes separados una puntada del lado de los ojos y una línea fucsia debajo de los ojos. Cosemos las rayitas laterales en la parte derechas que es la más ancha para simular el lomo de la gata y finalmente, cosemos la cola en la parte posterior. En la parte superior de la cabeza en el medio de ambas orejas vamos a tejer tres líneas de cinco puntos deslizados para dar el efecto del pelaje.
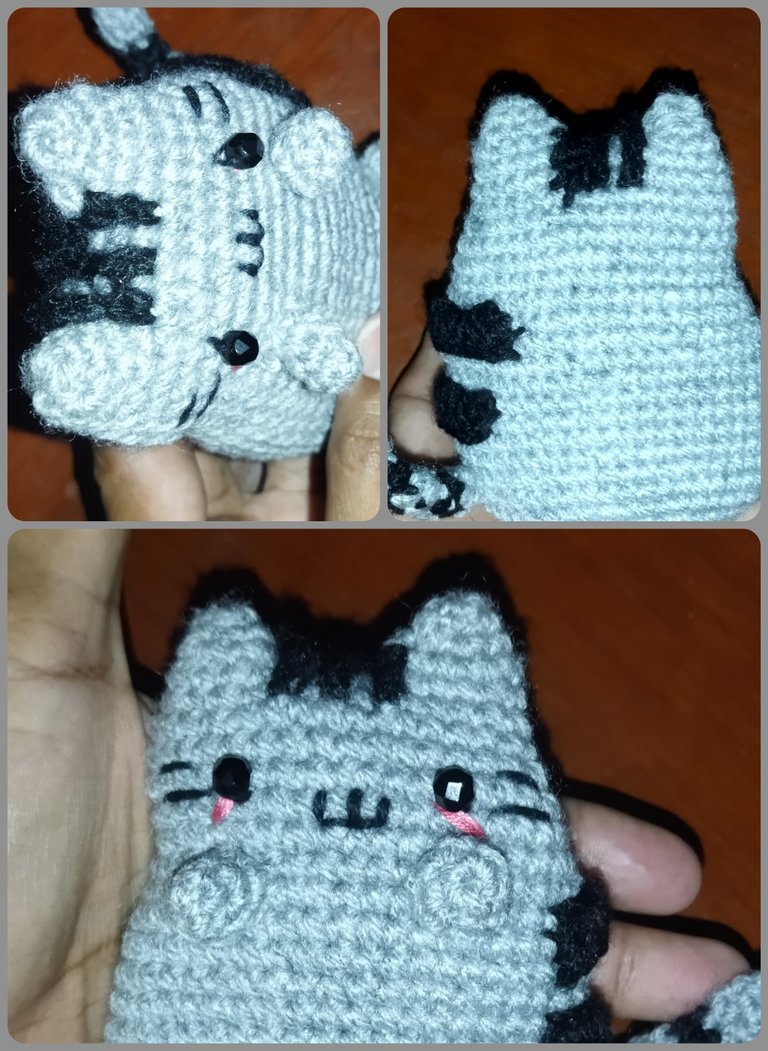
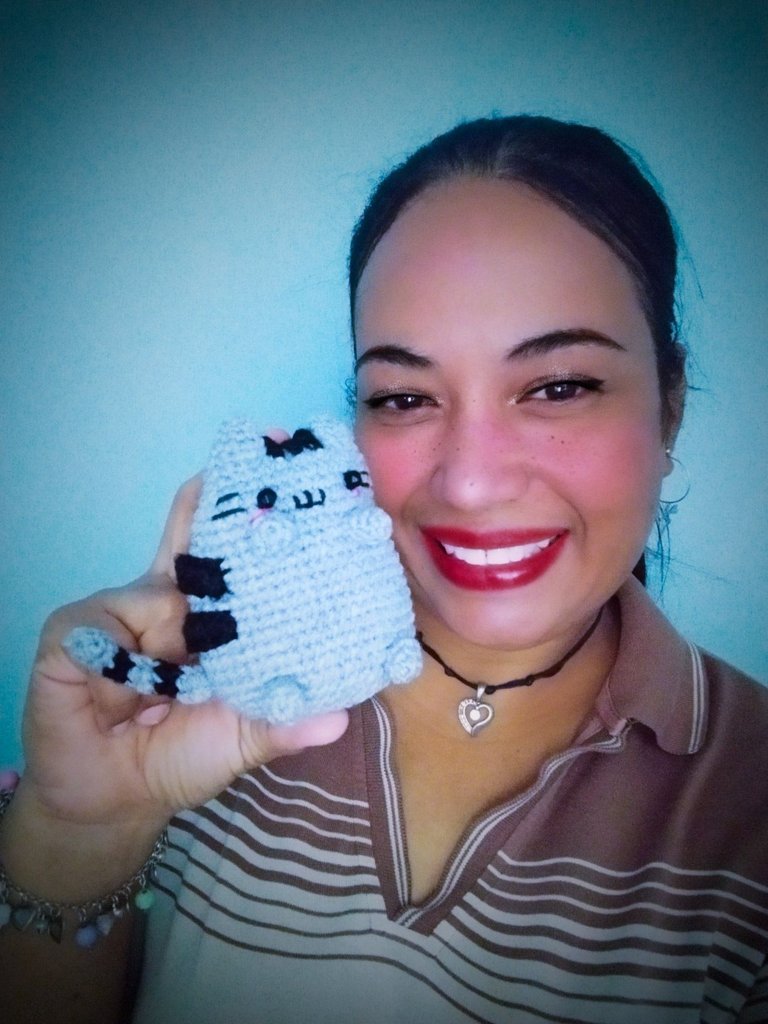
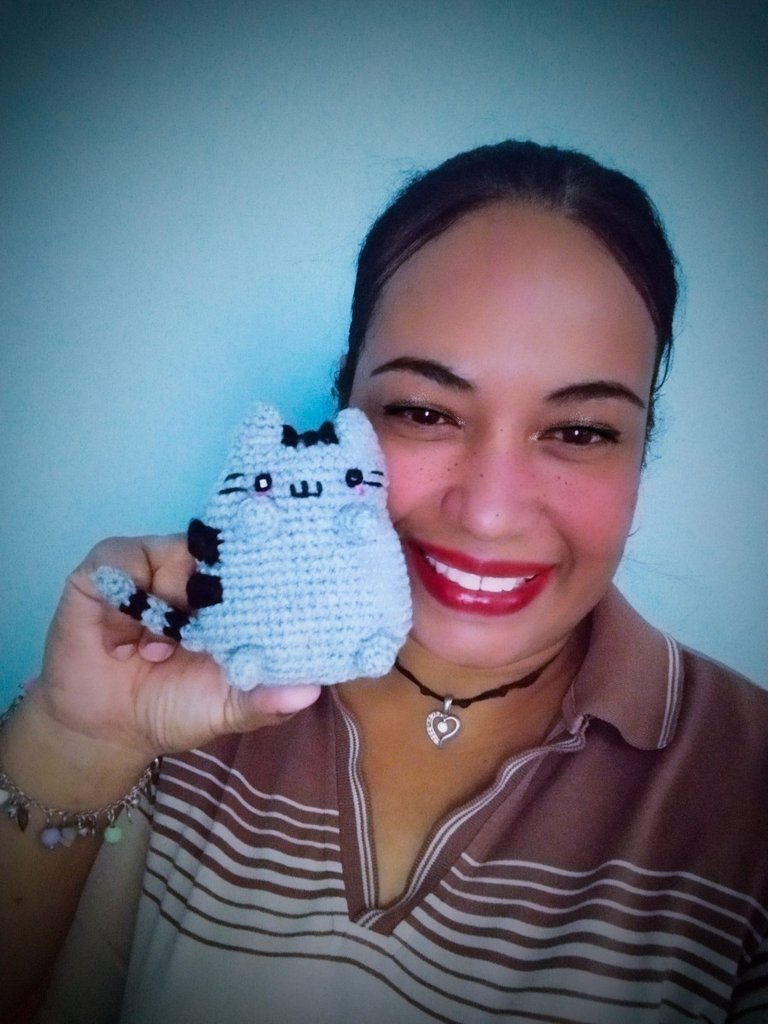
Y de esta manera tenemos culminada a esta hermosa gatita Pusheen Kawaii!! Este resultado me encantó, quedó muy bonita y tierna ideal para llavero o simplemente como figura de decoración.
Deseo de corazón les haya gustado tanto como a mi y me despido enviándoles un beso y un fuerte abrazo, muchas gracias por leer mi post!!! Saludos!!!
Todas las imágenes son de mi propiedad tomadas con redmi 9t y editadas con la aplicación Photoshop Express para Android.
Si tus creaciones me encantan, imagínate está que es lo que me gusta,este gato queso hermoso me encantó.
!discovery 35
Gracias por el apoyo brindado saludos!!😊😊
This post was shared and voted inside the discord by the curators team of discovery-it
Join our community! hive-193212
Discovery-it is also a Witness, vote for us here
Delegate to us for passive income. Check our 80% fee-back Program
Thanks @discovery-it 🙏😘😘
Gracias @mayvileros por el apoyo saludos 😃😃
A su orden amiga saludos 🤗
👍
¡Felicidades! Esta publicación obtuvo upvote y fue compartido por @la-colmena, un proyecto de Curación Manual para la comunidad hispana de Hive que cuenta con el respaldo de @curie.
Si te gusta el trabajo que hacemos, te invitamos a darle tu voto a este comentario y a votar como testigo por La Colmena.
Si quieres saber más sobre nuestro proyecto, te invitamos a acompañarnos en nuestro servidor de Discord.
Gracias @la-colmena @curie por todo el apoyo incondicional saludos!!😘😘
Nice!/very creative I like crocheting but I haven't try finishing one craft.I hope I can try if I have time!
Thanks ❣️☺️☺️
https://twitter.com/1422413915275812864/status/1619143560447803393
The rewards earned on this comment will go directly to the people( @mariajcastro28 ) sharing the post on Twitter as long as they are registered with @poshtoken. Sign up at https://hiveposh.com.
Que bella te quedó esa gatita amiga, super tierna y adorable, amé el resultado ♥️♥️
Gracias que alegría ☺️☺️☺️
Ha quedado muy lindo este amigurumi! yo no tengo gatitos pero hay que admitir que son muy tiernos, sobre todo los dibujos, peluches y caricaturas 😊 Gracias por compartirlo! te felicito por este trabajo!! 🌸🌸🌸
Gracias 😊😊😊
buena entrepierna
?
¡Enhorabuena!
✅ Has hecho un buen trabajo, por lo cual tu publicación ha sido valorada y ha recibido el apoyo de parte de CHESS BROTHERS ♔ 💪
♟ Te invitamos a usar nuestra etiqueta #chessbrothers y a que aprendas más sobre nosotros.
♟♟ También puedes contactarnos en nuestro servidor de Discord y promocionar allí tus publicaciones.
♟♟♟ Considera unirte a nuestro trail de curación para que trabajemos en equipo y recibas recompensas automáticamente.
♞♟ Echa un vistazo a nuestra cuenta @chessbrotherspro para que te informes sobre el proceso de curación llevado a diario por nuestro equipo.
Cordialmente
El equipo de CHESS BROTHERS