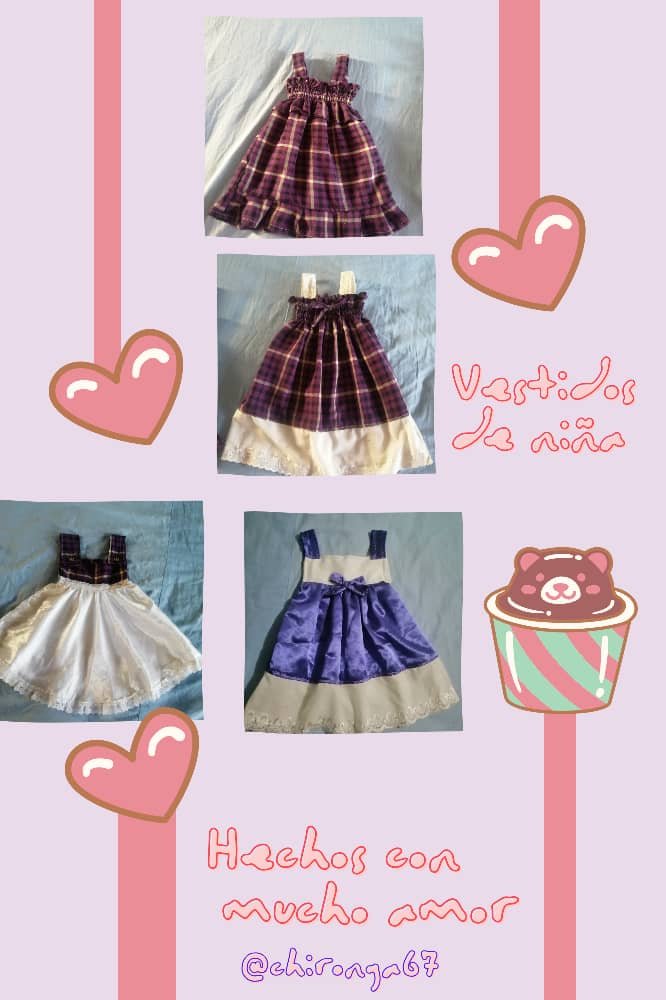
Vestidos de niña hechos con mucho amor💖[Esp-Eng]
🧵🧵🧵🧵🧵🧵🧵🧵🧵🧵🧵🧵🧵🧵
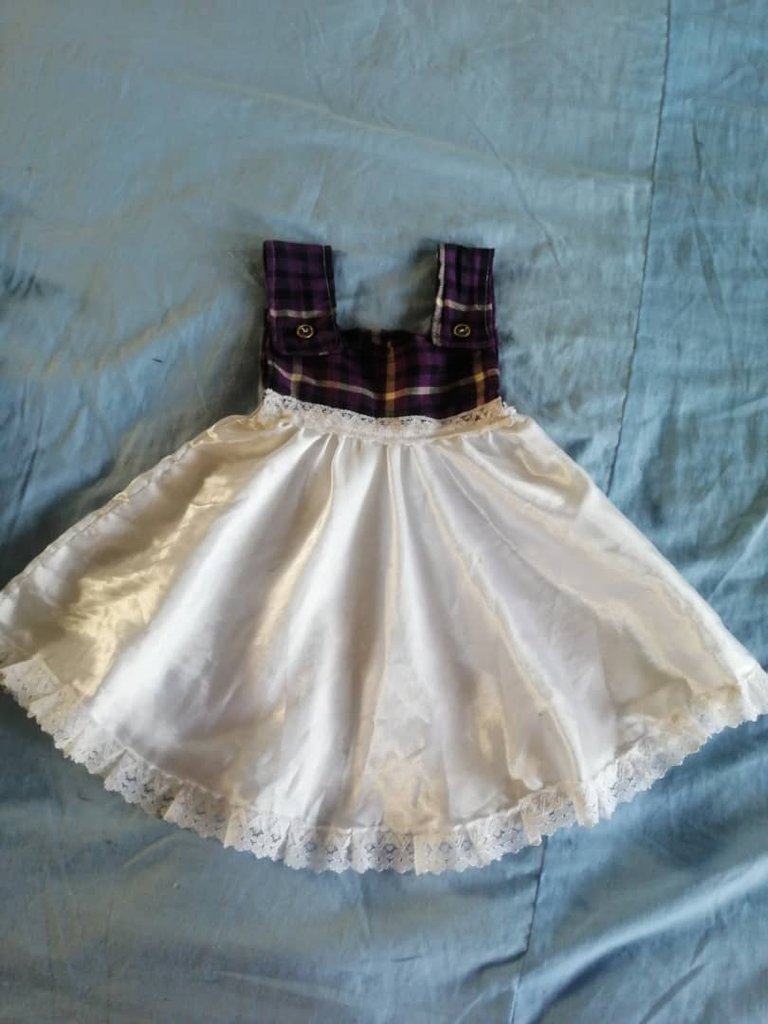
Bendecida noche hive amigos, hoy fue un día muy provechoso para mi, feliz noche amigos de esta linda comunidad de Hive diy, cuando hice la bata para mi tía sobro un pedazo de tela y yo se lo devolví, pero ella me dijo lo agarrara para mi e inmediatamente pense en un vestido para la ahijada de mi hija que ya casi no tiene que ponerse porque esta creciendo y su mamá es de escasos recursos así que recorde un lindo vestido sencillo y fácil de hacer y vi que tenia todo lo necesario para hacerlo menos la elástica pero eso tampoco fue ningún impedimento para mi la sustituí por hilo elástico y así que me puse manos a la obra y termine haciendo 4 lindos vestidos.
Blessed night hive friends, today was a very profitable day for me, happy night friends of this beautiful community of Hive diy, when I made the robe for my aunt there was a piece of fabric left over and I returned it to her, but She told me to grab it for myself and I immediately thought of a dress for my daughter's goddaughter that she almost doesn't have to wear anymore because she is growing up and her mother is of limited means so I remembered a nice simple dress that was easy to make and I saw that I had everything I needed to make it except the elastic but that wasn't an impediment for me either. I replaced it with elastic thread and so I got to work and ended up making 4 pretty dresses.
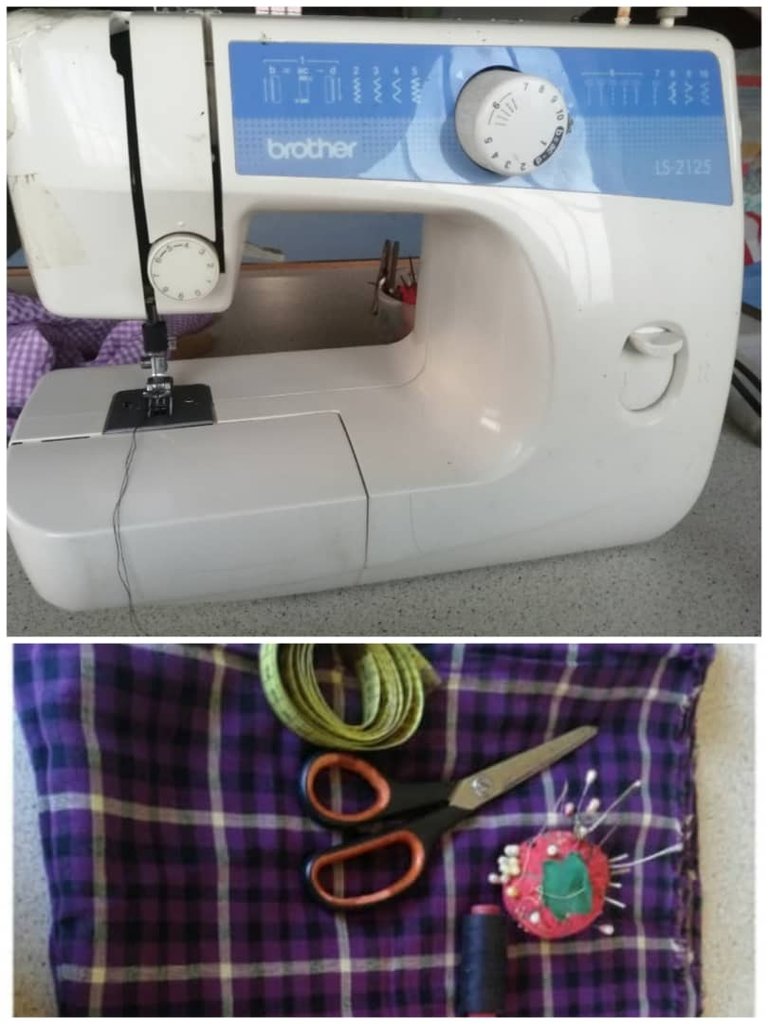
Materiales.
Retazos de tela
Hilo elastico
Hilo
Aguja
Tijera
Tira bordada
Cinta metrica
Maquina de coser
Materials.
Pieces of cloth Elastic thread Thread Needle Scissors Embroidered strip Measuring tape Sewing machine
Paso a paso
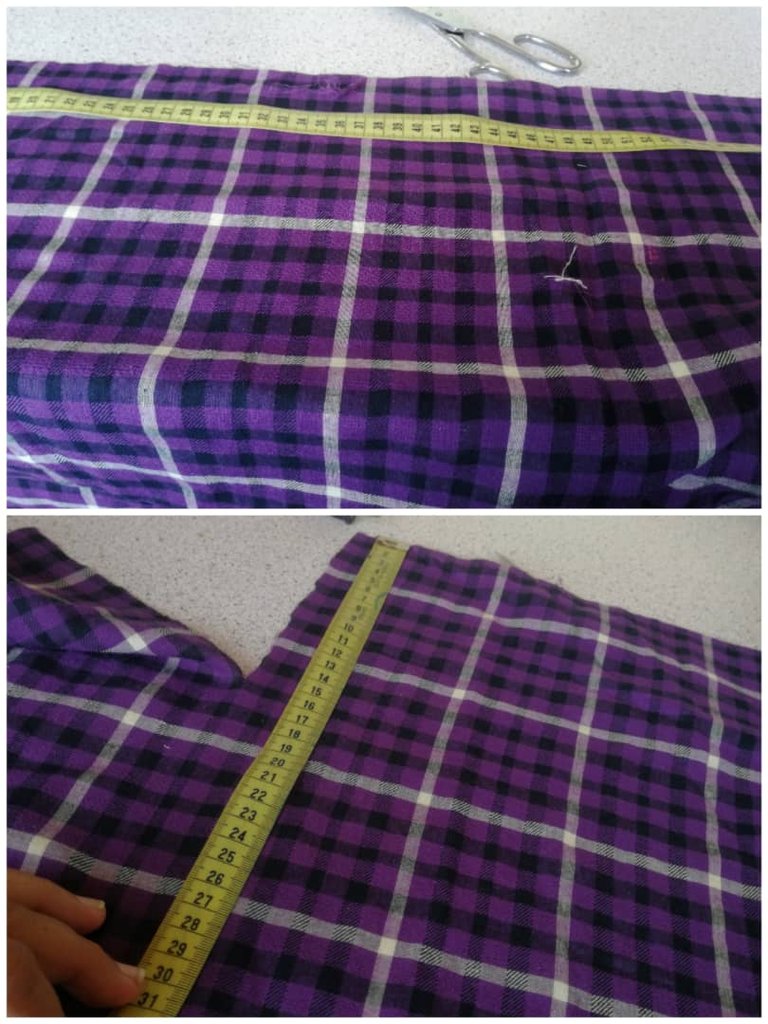
Con la cinta métrica medí un rectángulo de un metro de ancho por 35 cm de largo y lo recorte.
Step by Step
With the measuring tape I measured a rectangle one meter wide by 35 cm long and cut it out.
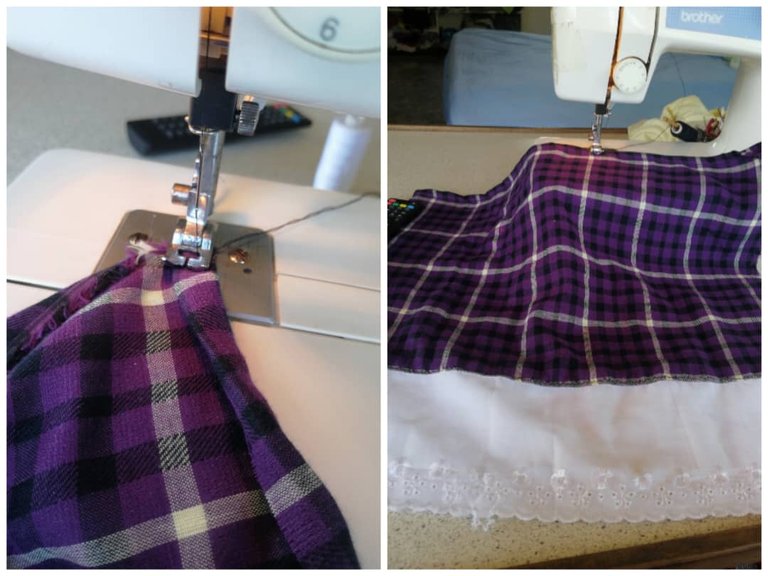
Luego medí la tira bordada y la corte de un metro de ancho y tiene 12 cm de largo, la cosí por la parte de abajo con costura recta y luego la remate con zig zag.
Then I measured the embroidered strip and cut it one meter wide and 12 cm long, I sewed it on the bottom with a straight seam and then finished it with a zig zag.
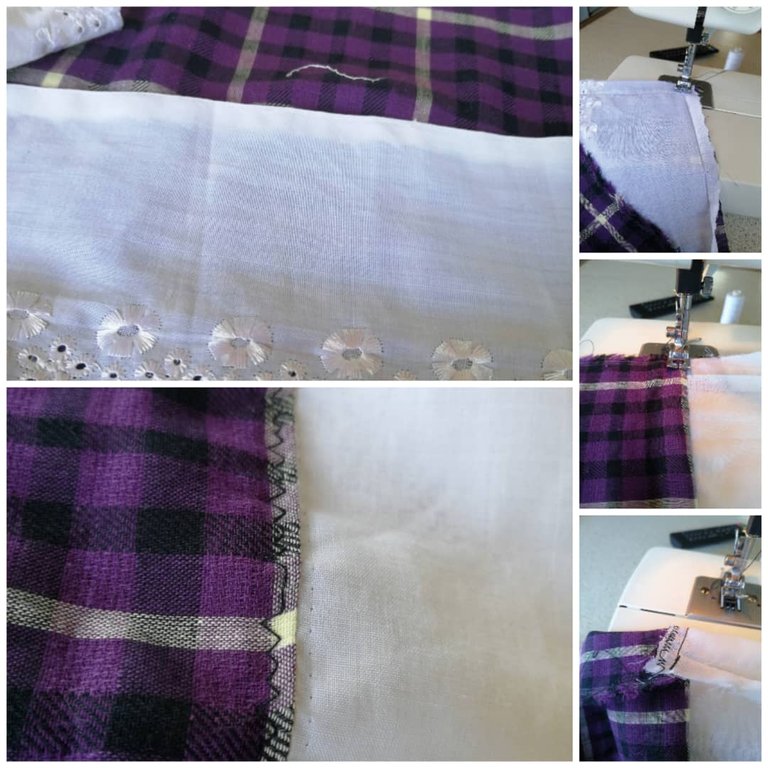
Luego le hice un dobladillo de un cm a la parte de arriba con costura recta.
Then I hemmed the top 1 cm with a straight seam.
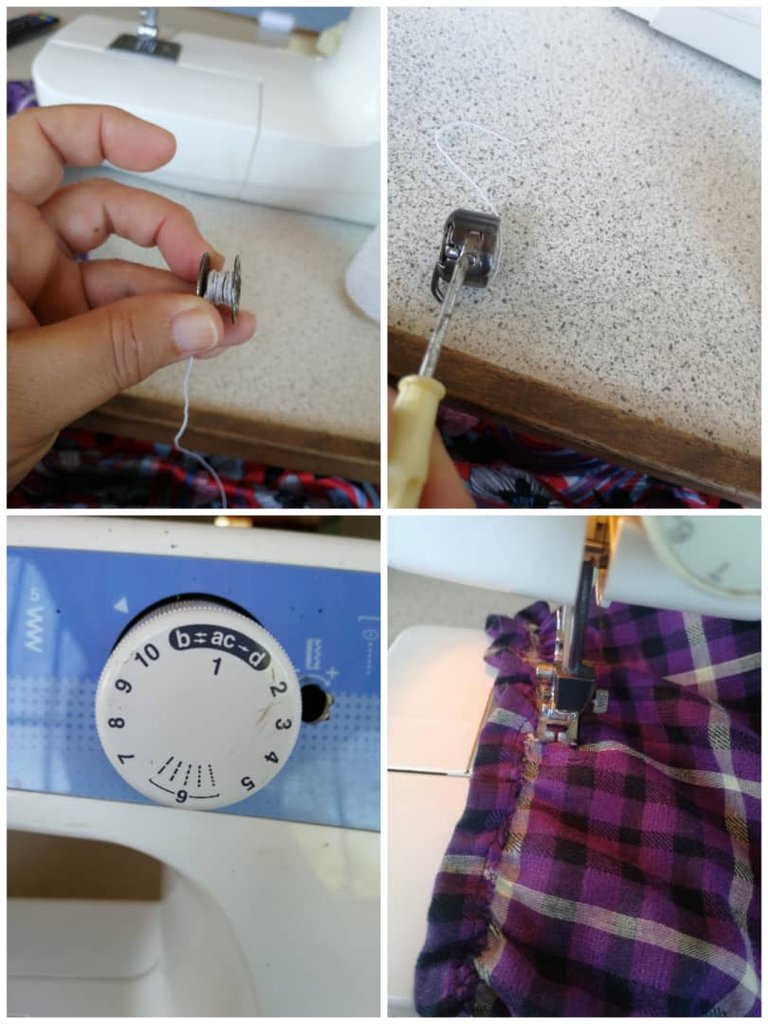
Para llenar la bobina con el hilo elástico se debe hacer a mano porque si se hace en la maquina no queda bien, esto es algo que hay que tomar muy en cuenta, y aflojar el tornillo del porta bobina para que el hilo elástico salga sin ningún problema, echo esto se pone la bobina en el porta bobina y se le pone a la maquina,se pone la tensión del hilo en 3 y la maquina donde se cose elástica,echo esto se procede a coser por el lado derecho para que la elástica quede por el revés.
To fill the bobbin with the elastic thread it must be done by hand because if it is done in the machine it will not look good, this is something that must be taken into account, and loosen the screw on the bobbin holder so that the elastic thread comes out without any problem. problem, do this, put the bobbin in the bobbin holder and put it on the machine, set the thread tension to 3 and the machine where the elastic is sewn, do this, proceed to sew on the right side so that the elastic left upside down.
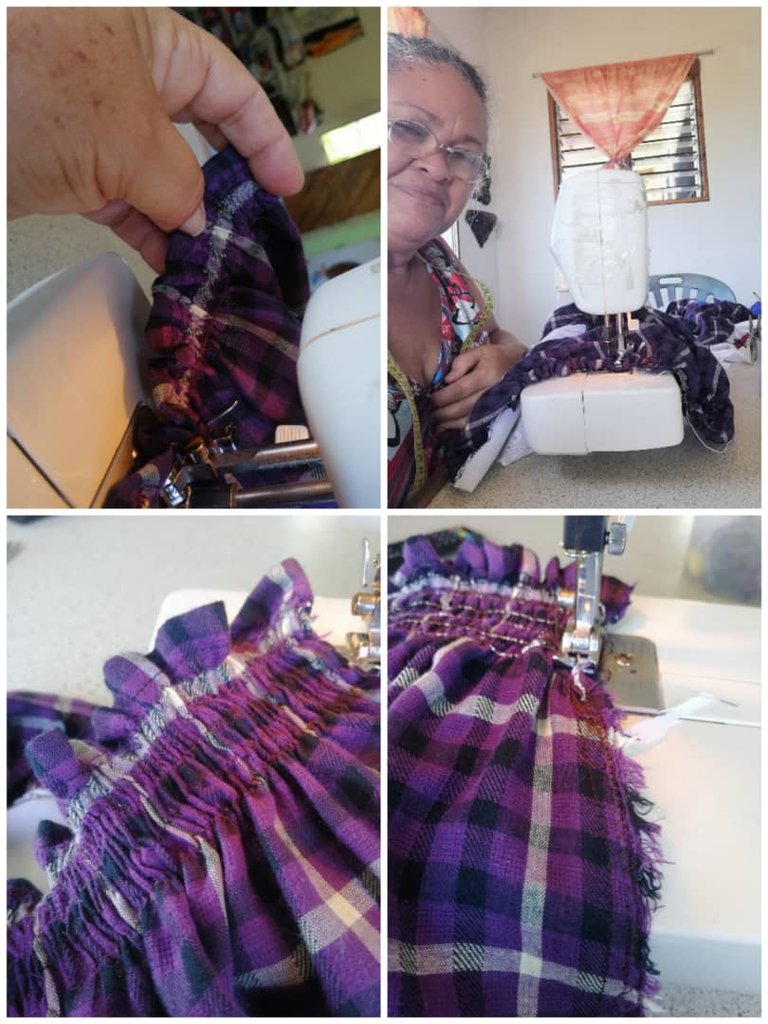
A medida que vamos cosiendo la tela se va frunciendo, le hice 5 vueltas remate y cambie el hilo elástico de abajo por hilo normal, cerre el vestido uniendo los dos lados y remate con zig zag, ya el vestido esta casi listo.
As we sew, the fabric begins to gather, I made 5 rounds of finishing and changed the elastic thread at the bottom with normal thread, closed the dress by joining the two sides and finished with a zig zag, the dress is almost ready.
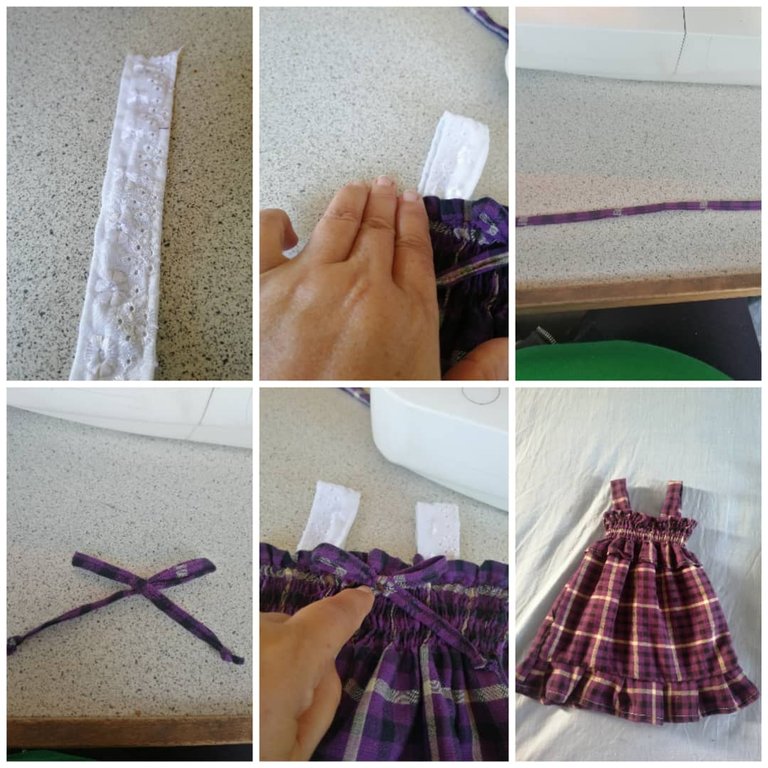
Como me sobro un pedazo de tira bordada corte 2 rectángulos de 20 cm de largo por 8 cm de ancho los cosí por el revés los voltee y esos son los tiros, medi 2 dedos de cada lado y pegue los tiros adelante y atrás, luego corte una tira la cosí e hice un lazo, busque el medio y lo pegue, luego hice el otro vestido igual pero le puse una tela al frente para que quedara como un faralao y corte una tira de 2 mts por 12 cms de ancho lo arruche y lo pegue en la parte de abajo y listo.
Since I had a piece of embroidered strip left over, I cut 2 rectangles 20 cm long by 8 cm wide, I sewed them on the wrong side, I turned them over and those are the shots, I measured 2 fingers on each side and glued the shots in front and back, then cut I sewed one strip and made a bow, I found the middle and glued it, then I made the other dress the same but I put a fabric in front so that it would look like a faralao and I cut a strip of 2 meters by 12 cm wide, I bunched it up and I glued it to the bottom and that's it.
Los otros 2 corte 2 rectángulos de 60 cm de ancho por 45 cm de largo para la parte de arriba 2 rectángulos con la tela doblada de 20cm de ancho por 8 cm de largo, cosí y pegue, los tiro corte 2 rectángulos de 20 cm de largo por 12 cm de ancho, me entusiasme tanto con lo que hacía que no tome fotos del paso a paso. Espero les gusten mis vestidos, mi mayor pago fue ver la sonrisa de la mamá de la niña por el regalo y saber que la linda Salome tiene 4 vestidos que la harán lucir muy hermosa, no le tome fotos por que estaba dormida cuando se los lleve.
The other 2 I cut 2 rectangles 60 cm wide by 45 cm long for the top part 2 rectangles with the folded fabric 20 cm wide by 8 cm long, sewed and glued, I cut them 2 rectangles 20 cm wide long by 12 cm wide, I was so excited about what I was doing that I didn't take photos of the step by step. I hope you like my dresses, my biggest payment was seeing the smile of the girl's mother for the gift and knowing that the beautiful Salome has 4 dresses that will make her look very beautiful, I did not take photos of her because she was asleep when I took them .

Las fotos aquí utilizadas fueron tomadas por mi con mi celular huawei mate lite20 use google traductor y edite en canva.
The photos used here were taken by me with my Huawei Mate Lite20 cell phone, use Google Translate and edit in Canva.

Beautiful results! It Will be nice gift for a little girl 😍
Yes, tank you🤗💖
Congratulations @chironga67! You have completed the following achievement on the Hive blockchain And have been rewarded with New badge(s)
Your next target is to reach 70 posts.
You can view your badges on your board and compare yourself to others in the Ranking
If you no longer want to receive notifications, reply to this comment with the word
STOPTo support your work, I also upvoted your post!
Check out our last posts:
Thank you HiveBuzz ❤️
You're welcome @chironga67! Have a nice day 😊👍
Thank you HiveBuzz 💖🤗
Ainsss niomio, pero esos vestidos si que quedaron preciosos, me trajeron tantos recuerdos de mi bebe cuando estaba pequeña, me encantaba ponerle ese estilo de vestidos tipo batita y con arruchaditos.
Gracias por regalarnos este proceso creativo. Bendiciones @chironga67 ✨
!DIY
Gracias, a mi me encanta hacerlos y más si son para regalarlos y hacer feliz a alguien, gracias por tu comentario y tu visita, abrazos 💖
You can query your personal balance by
!DIYSTATSTank you💖
Quedaron super lindos😉
Gracias 💖
Me encantaron los vestidos de niña..sabes yo tengo 3 princesas que han llenado de alegría mi vida, aunque ya están creciendo siempre las veré como mis bebes....los colores se destacan cada uno por si solo.
Gracias, que bueno que te gustaron, así es los hijos siempre se quedan pequeños para nosotros, Dios cuide a tus princesas, gracias por tu visita 💖
Quedaron muy lindos los vestidos!
Lo bueno de cuando son pequeños, es que cualquier retazo sirve solo o combinado, para hacerles ropita.
Gracias, así mismo es💖