🎨 [Step by Step] Tutorial: ✨ 🐦 👛 Blue Canvas Fabric Bag with Brooch (long post!) 👛 🐦 ✨ - By: @Tesmoforia.
“Do not ask yourself what the world needs. Ask yourself what makes you feel alive and do it. What people need is to live.”
• Photos by @Tesmoforia, with a Lumix/Panasonic DMC-FH2. Gif by @Vanuzza •
At the beginning of 2010, part of my family emigrated to Colombia. Among them was one of my favorite cousins (her name was Nora, but we lovingly call her "Norita"), the only Crafter on the family besides me.
Before leaving, Norita gifted her supplies’ box to me, a small treasure chest full of beautiful threads, imported embroidery fabrics and orphaned pieces of unfinished projects.
I like to frequently sit down on the floor of my bedroom and take a look inside the box, touch each piece of fabric and think on the possibilities.
• D O • I T • Y O U R S E L F •
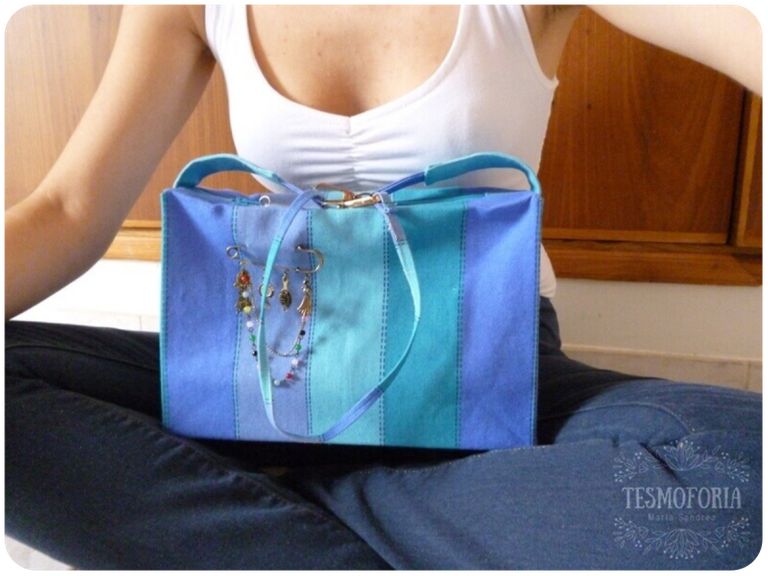
« Blue Canvas Fabric Bag with Brooch »
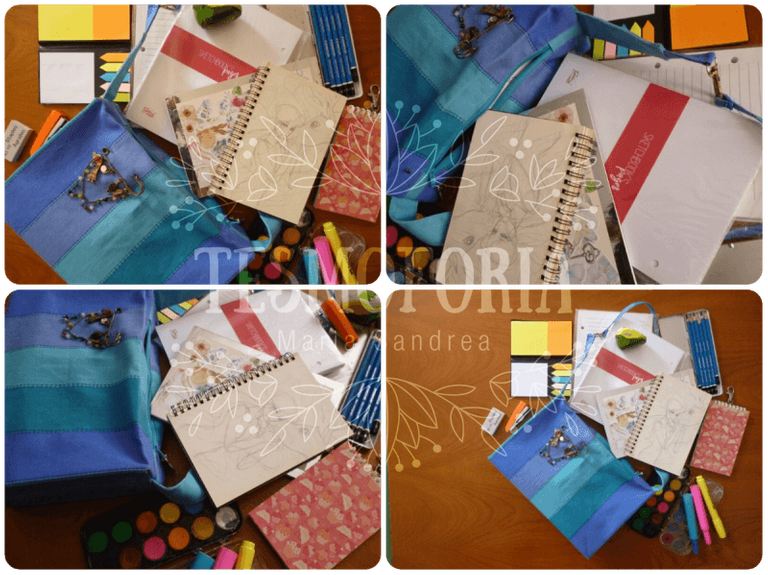
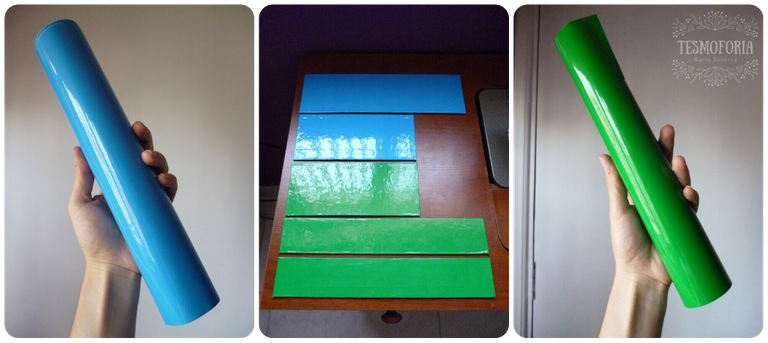
• "A bag with the exact measures to carry 4 little/medium sketchbooks, and some tools." - Photos by @Tesmoforia, with a Lumix/Panasonic DMC-FH2.On this occasion, I found 2 pieces of a thick and rough fabric; when touching the most rectangular-shaped one, I knew it was going to be perfect to make a case, a small one (the other pieces was used to restore the lining of a new album that deteriorated because it was on storage for a very long time).
• "I admit that the subliminal message wasn’t on purpose... UNLESS ~ " - Photos by @Tesmoforia, with a Lumix/Panasonic DMC-FH2.Examining it well, its measures were enough to make a bag of not insignificant dimensions (at least, try to make one). Of course, I prepared myself to use every part of this piece without wasting anything, hoping I won't make a mistake (because I only had 1 chance).
« T O O L S
&
M A T E R I A L S »

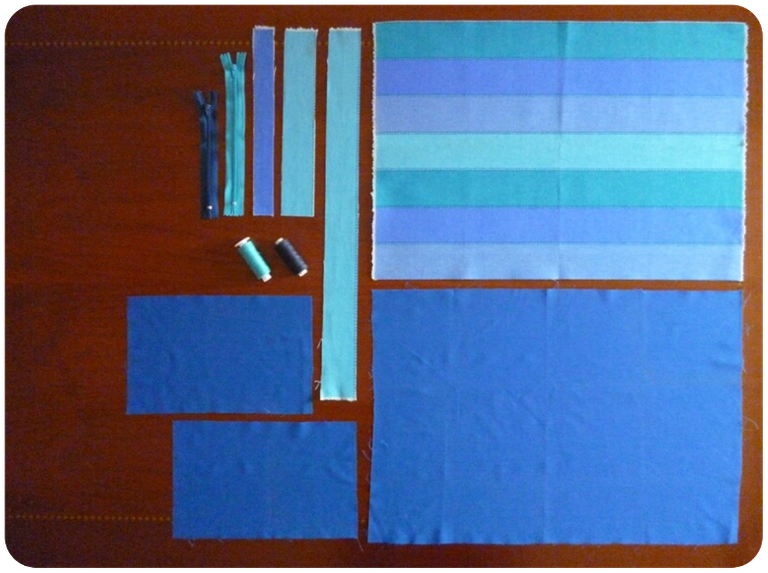
• "The Chosen Fabric Piece, lining already cut to size, zippers and a pair of threads." - Photos by @Tesmoforia, with a Lumix/Panasonic DMC-FH2.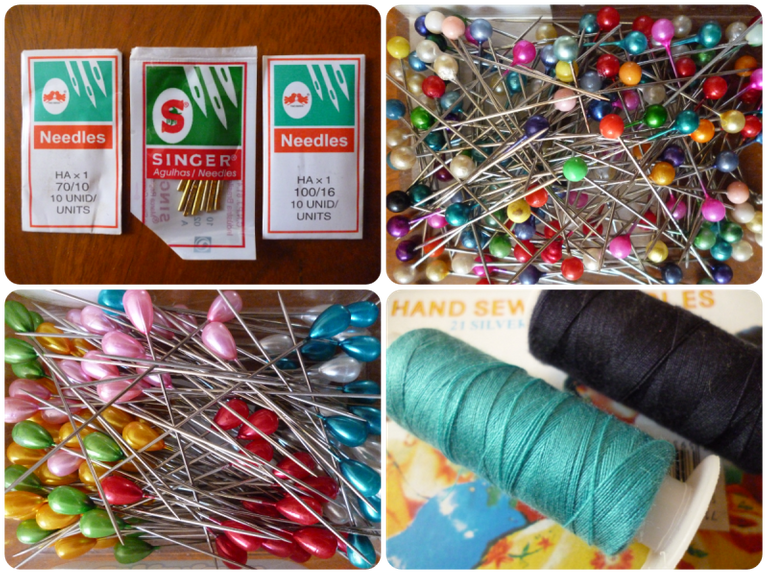
• "3 different needle sizes, and 2 different pin sizes." - Photos by @Tesmoforia, with a Lumix/Panasonic DMC-FH2.
| ✨ Pins. | ✨ Royal Blue Thread. |
|---|---|
| ✨ Big Ruler. | ✨ Decorative Brooch. |
| ✨ Measuring tape. | ✨ Self-adhesive vinyl. |
| ✨ Thick cardboard. | ✨ Gold Brooches. |
| ✨ Scissors and Cutter. | ✨ Aquamarine Thread. |
| ✨ Clothes iron. | ✨ Royal Blue Zipper. |
| ✨ UHU Glue. | ✨ Strips of paper and soft cardboard. |
| ✨ Pencil and Eraser. | ✨ Aquamarine Zipper. |
| ✨ Clothes pins. | ✨ Sewing machine needle N° 16. |
| ✨ Sewing machine. | ✨ Sewing machine needle N° 14. |
| ✨ Pendant for the Zipper. | ✨ Sewing machine needle N° 10. |
« STEP N° 1 »
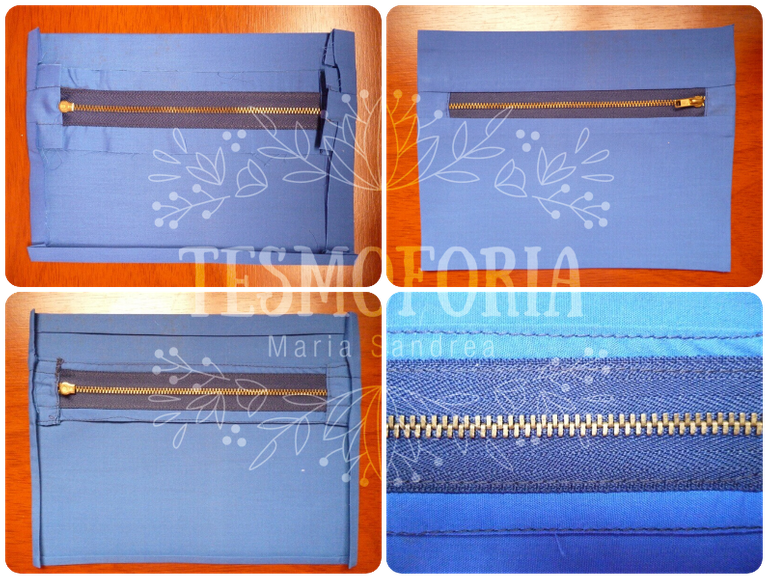
• Installing the Main Zipper •
The first thing to do, after making sure that all sides of the fabric rectangle are clean and correspond to their measurements, is installing the main zipper of the bag.
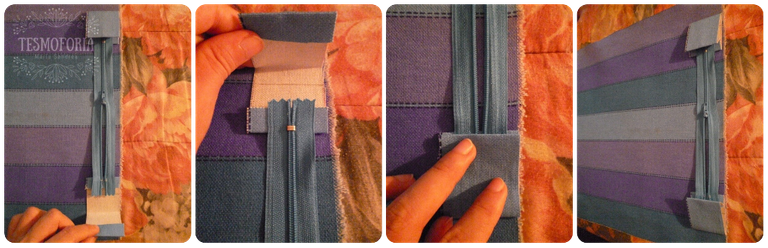
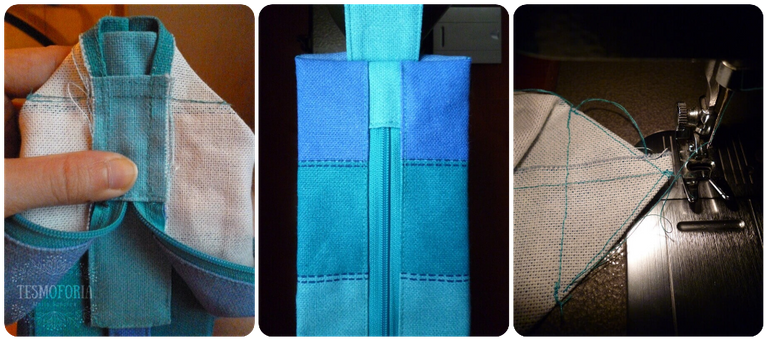
• "Each tab measures approximately 4x4 cm, not including 1.5 cm internal folds." - Photos by @Tesmoforia, with a Lumix/Panasonic DMC-FH2.For that, we will prepare 2 fabric tabs that we'll sew at each end of the zipper; the reason for these tabs isn't only aesthetic, their function is to complete the space between the end of the zipper and the limit of the sides of the bag.
• "After ironing each piece, the tabs are sewn with a small stitch, using needle No. 14 and the aquamarine thread." - Photos by @Tesmoforia, with a Lumix/Panasonic DMC-FH2.Once the tabs are fixed and ironed, we place the zipper on the edge of the main piece of fabric that is less wide, in its center, and we will sew the zipper with a basic seam using the royal blue thread.
• "The change of thread in several steps of the process can be somewhat annoying, but it's necessary, because it'll give us a cleaner and visually pleasing result." - Photos by @Tesmoforia, with a Lumix/Panasonic DMC-FH2.We will repeat the process with the opposite side of the piece of fabric, taking special care that the seam is as straight as possible.

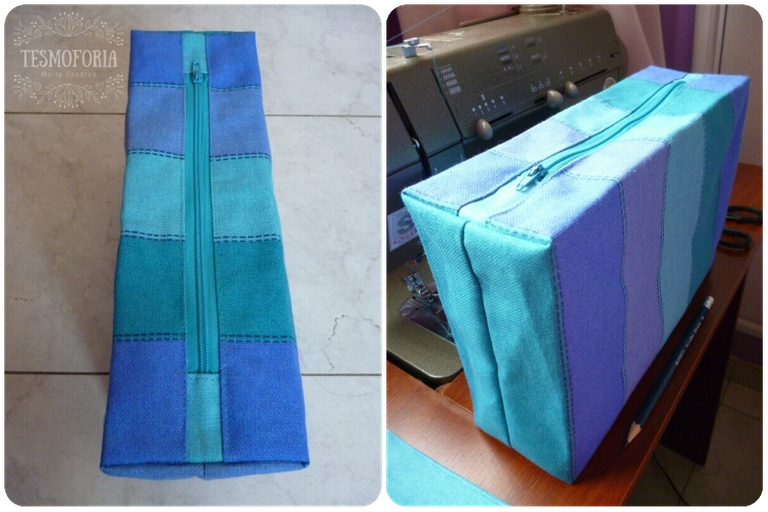
• "The zipper should look like this after installed, right and backwards." - Photos by @Tesmoforia, with a Lumix/Panasonic DMC-FH2.We will turn the piece inside out and iron it at high temperature on its 2 sides. It's advisable to beat wrinkles from this step of the process because it would be very difficult later.
« STEP N° 2 »
• Sewing the Body •
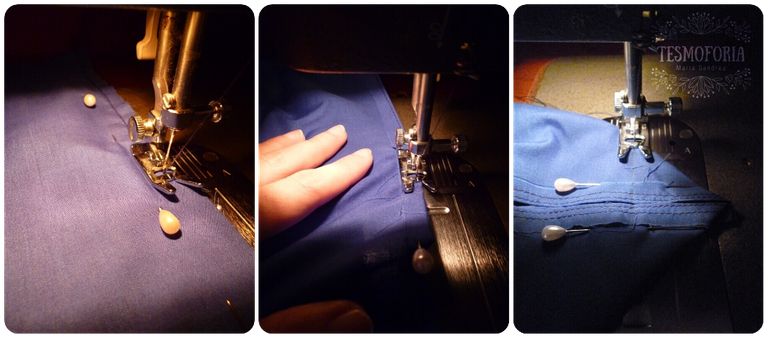
The next sewing line will determine the width of the bag, so, before returning to the sewing machine, we will mark a straight line with the thick pins of about 5 centimeters away from the edge.

• "This part is very intuitive." - Photos by @Tesmoforia, with a Lumix/Panasonic DMC-FH2.When we've sewn both sides, that seam will consume 1 centimeter of each side, leaving 4 centimeters between the margin and the line of pins. This means that the bag will be 8 centimeters wide.
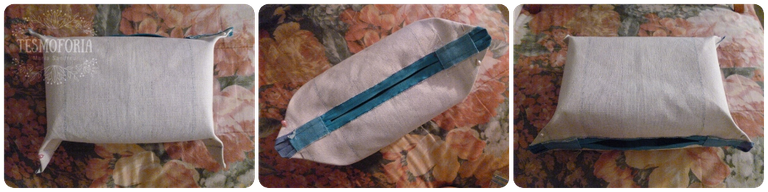
• "We will gently prick the corners until we get an air pillow." - Photos by @Tesmoforia, with a Lumix/Panasonic DMC-FH2.The distance marked by the thick pins to keep this "little air pillow" shape will help to keep the width distance in no more than 4 centimeters from each side; it is advisable to make a line with the pencil before taking it to the sewing machine.
• "And just like a pillow, we will turn it over and help it with our fingers so it takes its right shape." - Photos by @Tesmoforia, with a Lumix/Panasonic DMC-FH2.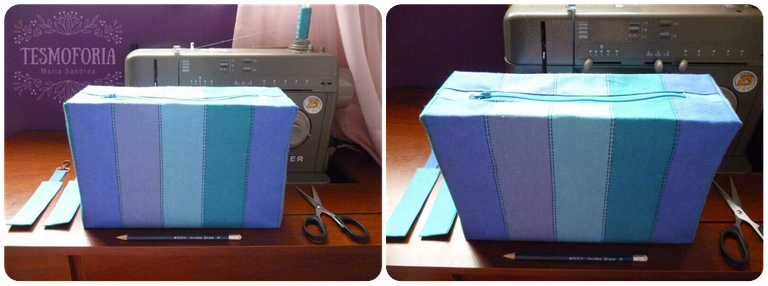
• "Yes, it’s beautiful, I know ;u; ~ " - Photos by @Tesmoforia, with a Lumix/Panasonic DMC-FH2.The selection of the fabric is crucial to obtain this result, only those like "canvas" and "jean" stay still in this way without needing previous starch treatment.
« STEP N° 3 »
• Suspenders •
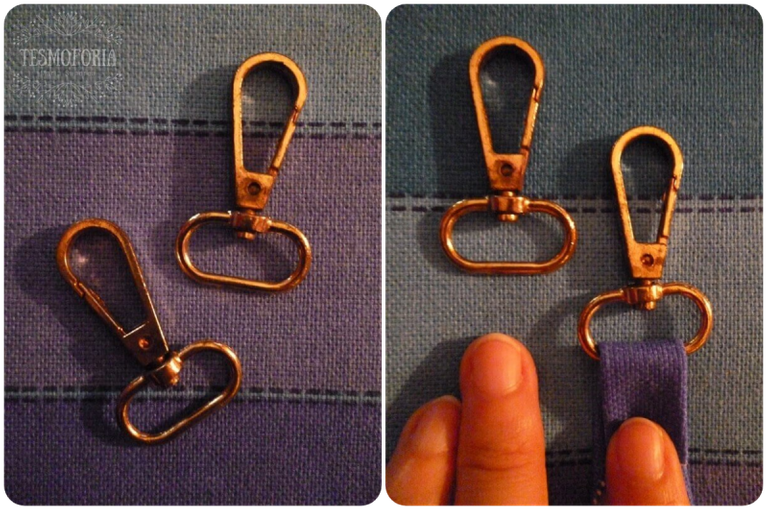
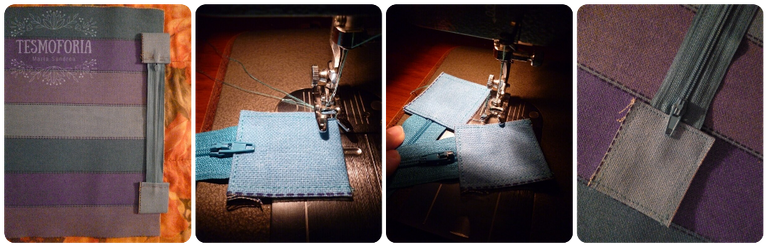
• "With a minimum space of 2 centimeters in the buckle, the brooch will be suitable." - Photos by @Tesmoforia, with a Lumix/Panasonic DMC-FH2.There are always belts and wallets that are damaged by use and age at home. Before discarding them, I always recommend removing buckles and brooches of this type.
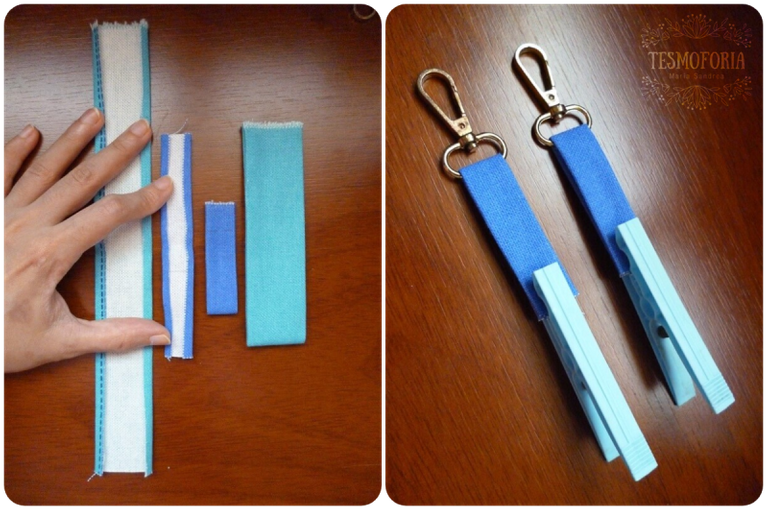
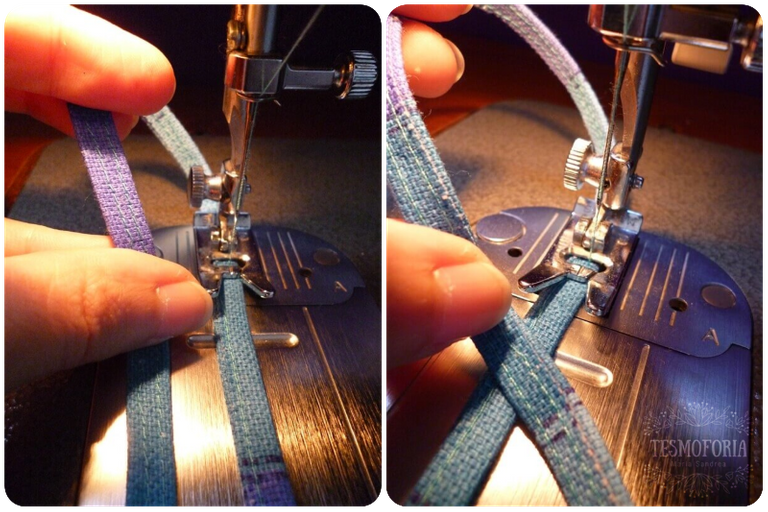
• "Each suspender is composed of 3 parts, 2 fabric + the brooch." - Photos by @Tesmoforia, with a Lumix/Panasonic DMC-FH2.As the image shows, we will iron the pieces and fold a small 0.5 cm margin inwards, then, we will hold it in place with a pair of clothes pins.
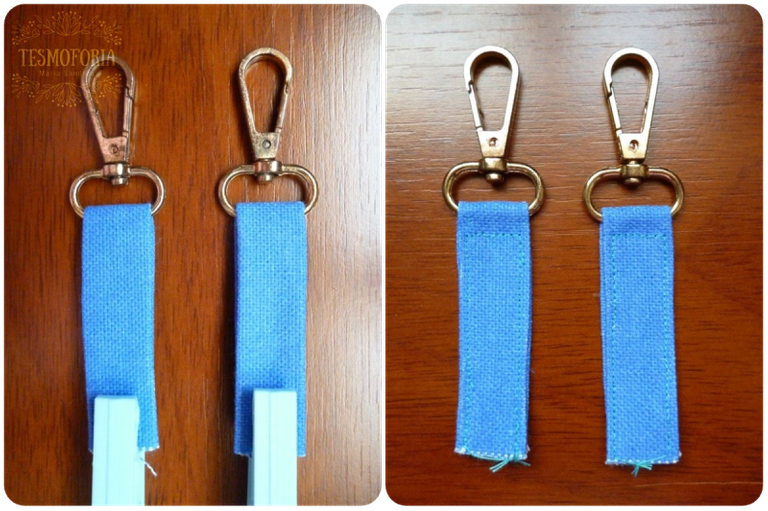
• "We will place the brooch this way before sewing, to get the result of the second photo." - Photos by @Tesmoforia, with a Lumix/Panasonic DMC-FH2.We will sew as close as possible to the edge with the royal blue thread, without tightening the space left for the brooch, it should move loosely.
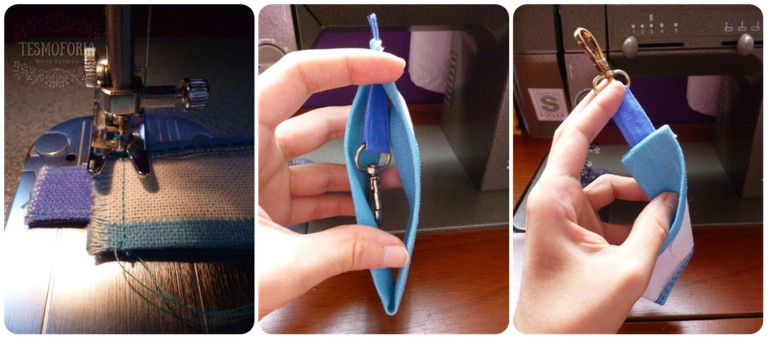
• "Thread Change!" - Photos by @Tesmoforia, with a Lumix/Panasonic DMC-FH2.We will now place the piece of blue fabric as indicated by the images, inside the widest piece of aquamarine fabric, and then we'll sew them with a small and tight stitch.
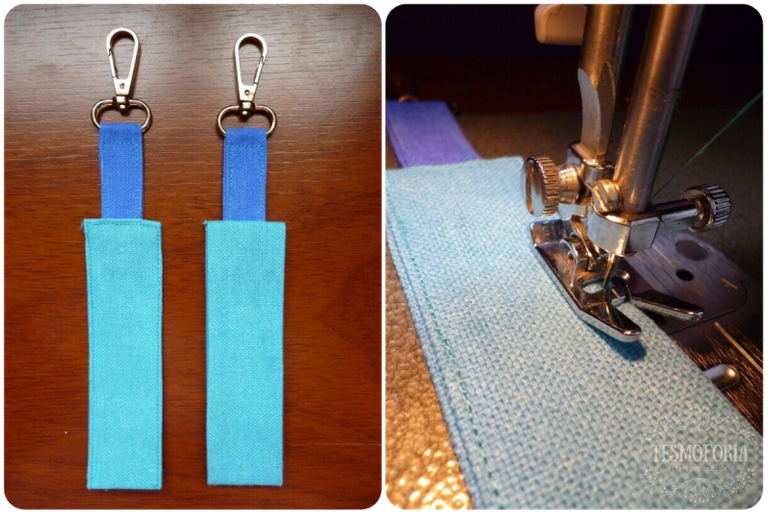
• "On the left, you can see the piece turned over before and after being sewn." - Photos by @Tesmoforia, with a Lumix/Panasonic DMC-FH2.« STEP N° 4 »
• Placing the Suspenders •
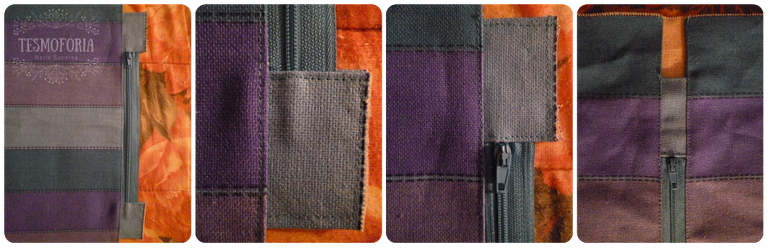
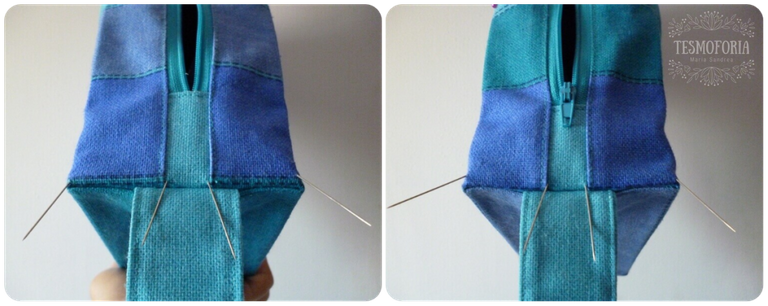
To install the suspenders, we will turn over our main piece and in the upper/lateral corners; we will undo the seam in front of the end of each zipper, as seen in the first photo.
• "When the seam is open, we’ll get the suspender in just a little bit, and we’ll pass over it with a narrow seam." - Photos by @Tesmoforia, with a Lumix/Panasonic DMC-FH2.In this step, taking advantage of the fact that the bag is turned over, we'll pass over all the remaining internal "triangles" of the corners with the sewing machine, as seen in the third photo.
• Note: IT’S IMPORTANT NOT TO CUT THESE TRIANGLES •
« STEP N° 5 »
• Internal structure •
Metal Hoop Folders, used to file invoices or office documents, are a very good choice. Its type of cardboard is especially strong and resistant; yes, the folders we choose at the end cannot be folded.
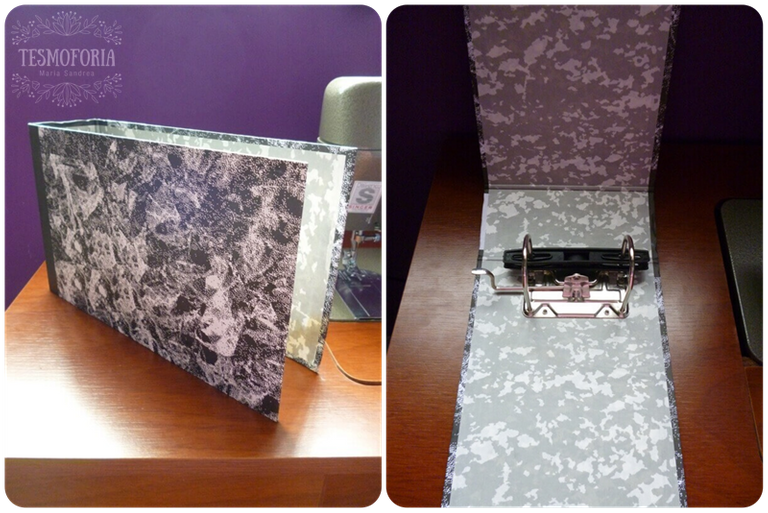
• "I got these folders in the laundry room of @Vanuzza :3c" - Photos by @Tesmoforia, with a Lumix/Panasonic DMC-FH2.We need to extract 5 pieces from those folders (4 for the sides of the bag, and 1 for the "floor"), in order to do this, we will use the ruler and the cutter very carefully. This part may take some time.
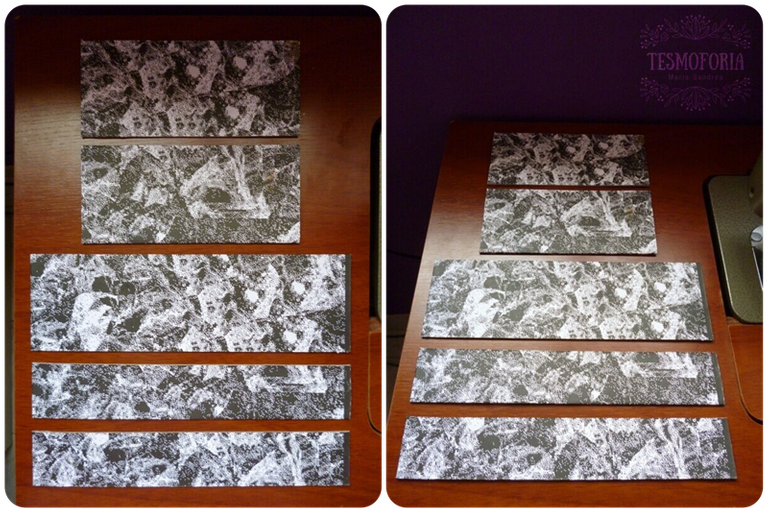
• "The cleaner the cuts, the better the result when we install them on the inner side of the bag." - Photos by @Tesmoforia, with a Lumix/Panasonic DMC-FH2.If the pieces have the right measurements and have been cut correctly, they should be placed inside the bag as follows (and held between themselves by making pressure against the canvas walls).
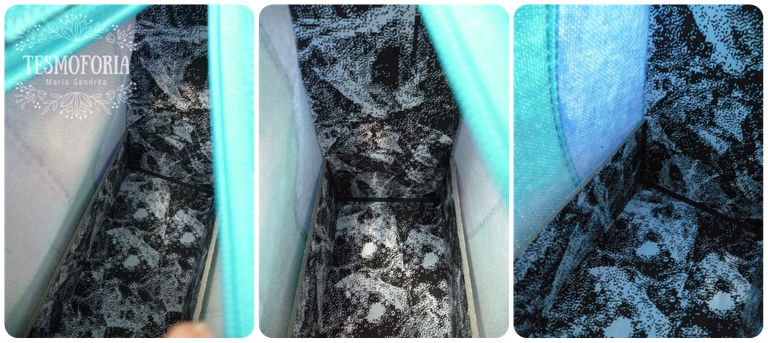
• "This is how they shall look like when placed inside." - Photos by @Tesmoforia, with a Lumix/Panasonic DMC-FH2.To give a boost of resistance, and make waterproof the internal structure of the bag, we will cover each of these pieces individually with self-adhesive vinyl.
• "The color of the vinyl should be equal to or close to the color of the fabric of the bag. Colors like red or black in this case would not work." - Photos by @Tesmoforia, with a Lumix/Panasonic DMC-FH2.After the inner walls are lined, if the bag gets wet by accident (or there is the need to wash it), the cardboard interior won't suffer.
• "It's advisable to be cautious with the amount of UHU, too much can stain the fabric and even trespass it." - Photos by @Tesmoforia, with a Lumix/Panasonic DMC-FH2.We will apply a generous amount (but not too much) of UHU in all the pieces, especially in the "floor" and the higher walls (of the side that has contact with the fabric), and we'll carefully getting them inside the bag.

• "The clothes pins will keep the entrance of the bag open, it's very important that the air circulates inside it so that the glue dries, and the fabric does not absorb its strong smell." - Photos by @Tesmoforia, with a Lumix/Panasonic DMC-FH2.Now, with a weaker cardboard, we will make fine tabs to reinforce the interior (with precision) between the joints that form the joined walls.
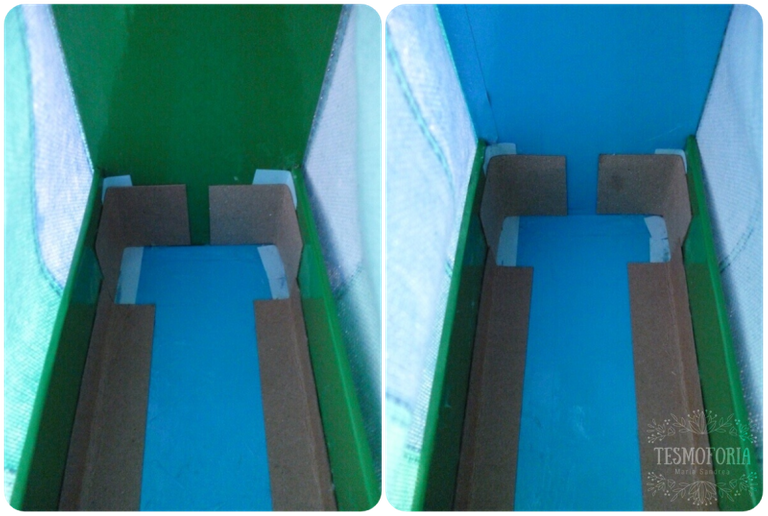
• "These tabs will ensure that the joints don’t detach over time." - Photos by @Tesmoforia, with a Lumix/Panasonic DMC-FH2.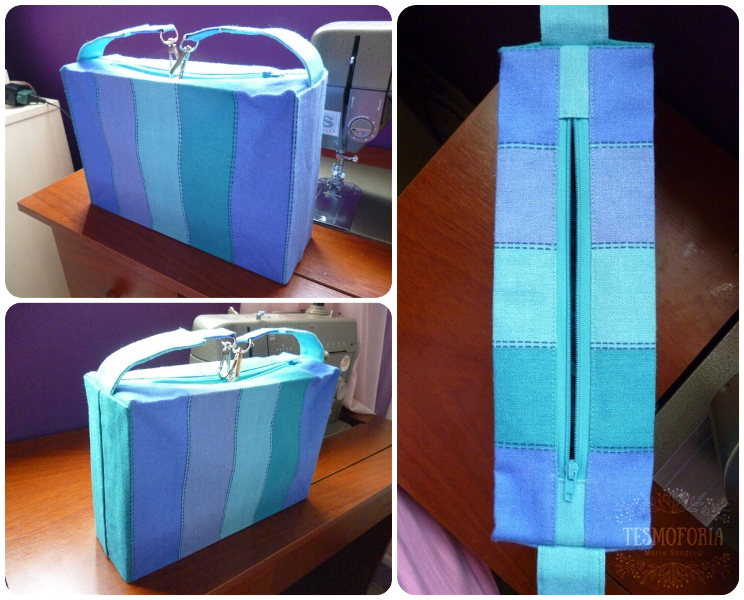
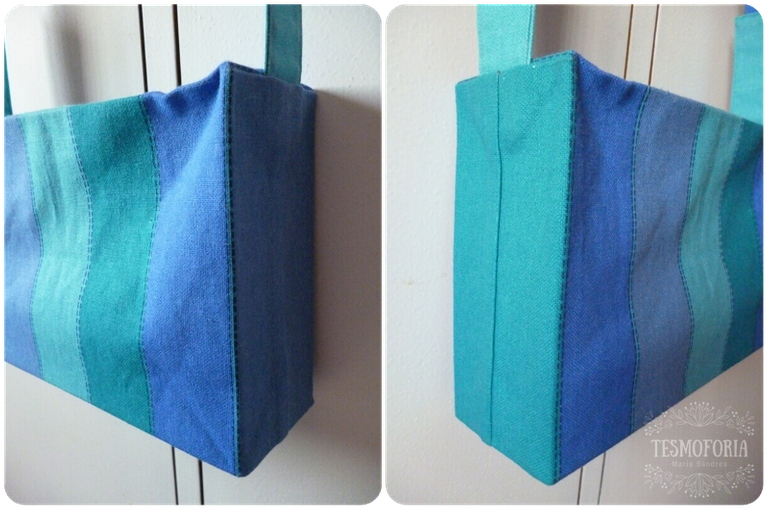
• "Inner Body Successfully Installed!" - Photos by @Tesmoforia, with a Lumix/Panasonic DMC-FH2.At this stage, the shape of the bag must hold itself perfectly, keeping its beautiful and neat rectangular figure without disfiguring itself when resting.
« STEP N° 6 »
• 24hrs Drying and Preview •
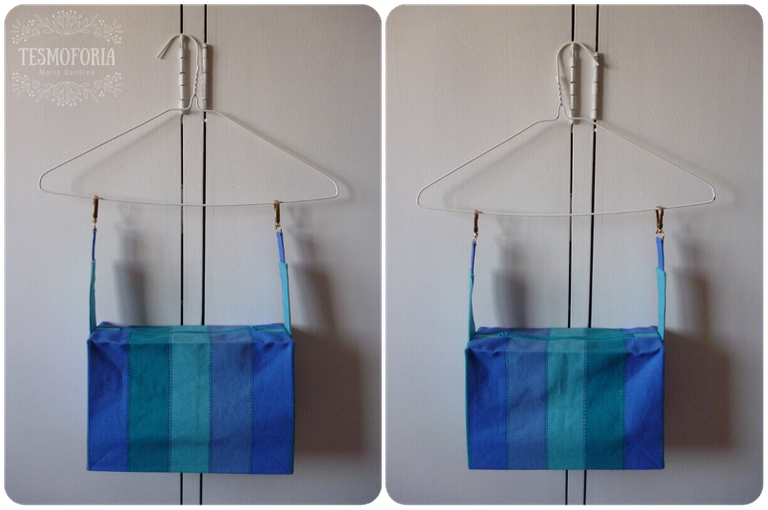
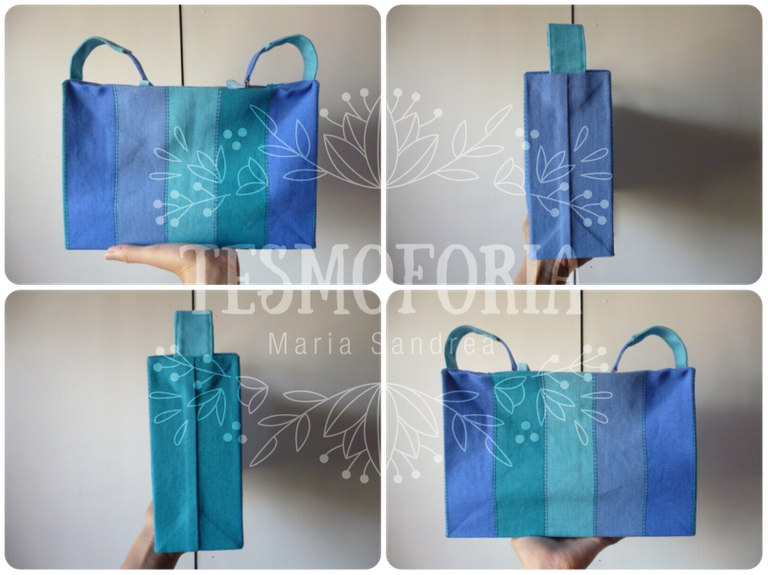
• "Front and Back Side are almost Identical." - Photos by @Tesmoforia, with a Lumix/Panasonic DMC-FH2.To facilitate the drying of all its parts, we will hang it on a hook for common clothes, in a place with good ventilation and moderate entry of sunlight.
• "Left side, and right side." - Photos by @Tesmoforia, with a Lumix/Panasonic DMC-FH2.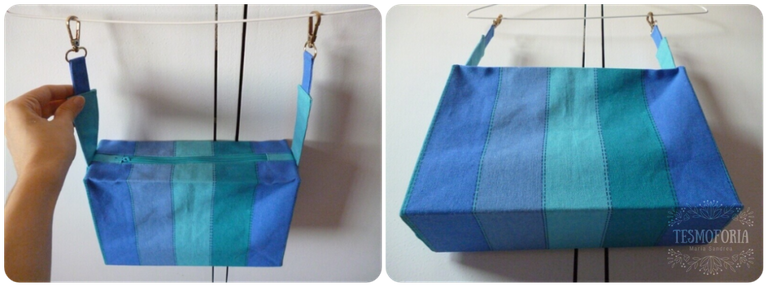
• "Keep it away from the ground and surfaces that accumulate dust is recommended." - Photos by @Tesmoforia, with a Lumix/Panasonic DMC-FH2.If after time has elapsed, the bag has a strange aroma or the structure feels somewhat weak, let's wait another 24 hours before handling it.
« STEP N° 7 »
• Making the Lining •
To elaborate the inner lining of the bag, we'll repeat exactly the same steps that we used with the main piece of fabric, with the difference that we won't add a zipper. We’ll use a N° 10 Sewing Needle.
• "The measures we'll use are exactly the same as those used for each one of the faces of the first piece of canvas." - Photos by @Tesmoforia, with a Lumix/Panasonic DMC-FH2.
• "If it looks this way, or a little tighter, it's well done. If it looks too baggy, we should reduce half a centimeter to both height and width." - Photos by @Tesmoforia, with a Lumix/Panasonic DMC-FH2.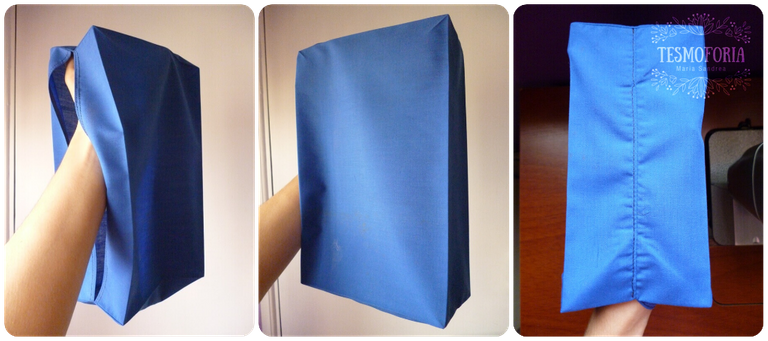
• "This is how the lining shall look after ironed." - Photos by @Tesmoforia, with a Lumix/Panasonic DMC-FH2.« STEP N° 8 »
• Making the Internal Pocket •
For the internal pocket, we will cut 1 piece of fabric with the exact measurements of one of the wide sides of the lining, but with an extra of approximately 2 to 3 centimeters in its dimensions.

• "We will cut this piece into 4 parts as seen in the image." - Photos by @Tesmoforia, with a Lumix/Panasonic DMC-FH2.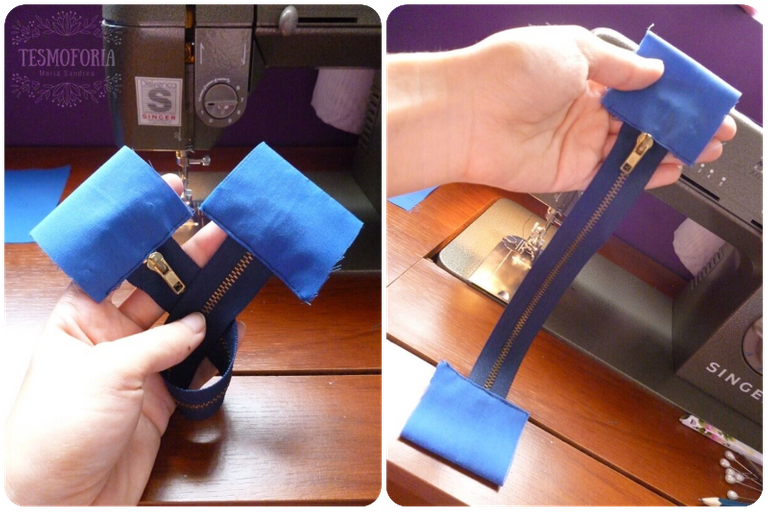
• "Those tabs are just a little bit wider." - Photos by @Tesmoforia, with a Lumix/Panasonic DMC-FH2.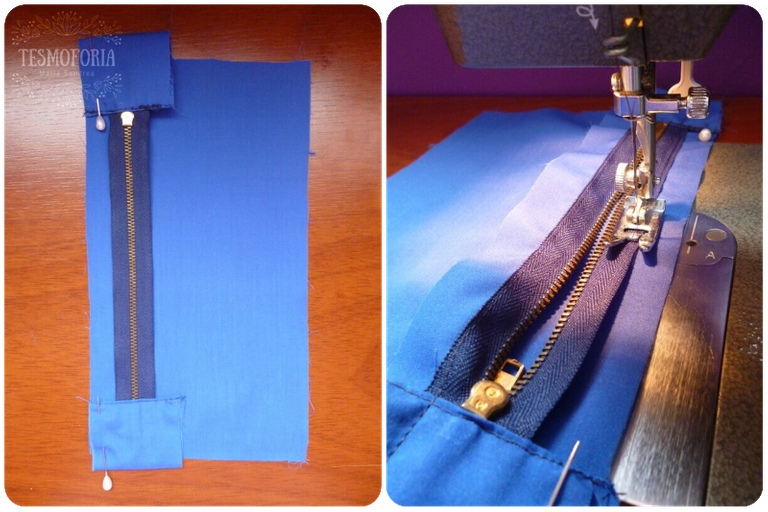
• "To install this zipper we don't need to change the foot of the machine, the regular foot will work well." - Photos by @Tesmoforia, with a Lumix/Panasonic DMC-FH2.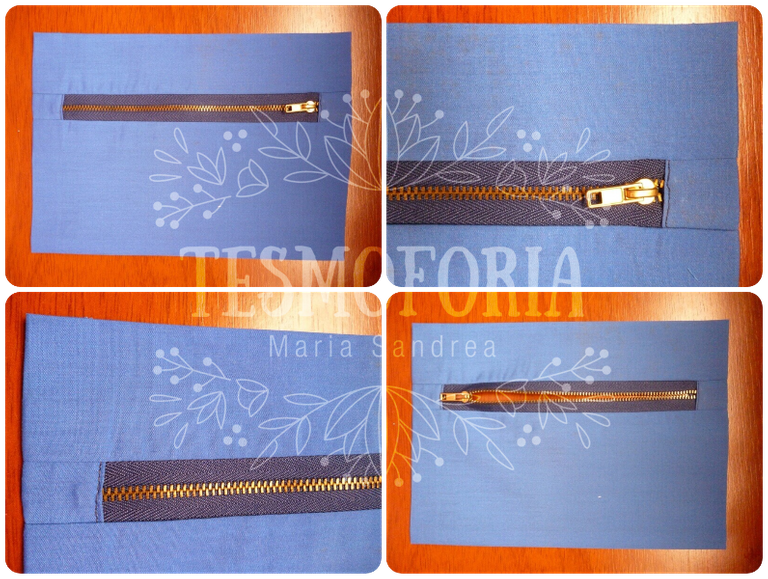
• "Clean, neat and functional." - Photos by @Tesmoforia, with a Lumix/Panasonic DMC-FH2.When ironing the hem on each side, it's normal for remains to be irregular; detail that is easily resolved by trimming them a little or rolling them inside themselves (but with a maximum of 3 folds).
• "Top: before cutting the excess material. Bot: hems ready and ironed." - Photos by @Tesmoforia, with a Lumix/Panasonic DMC-FH2.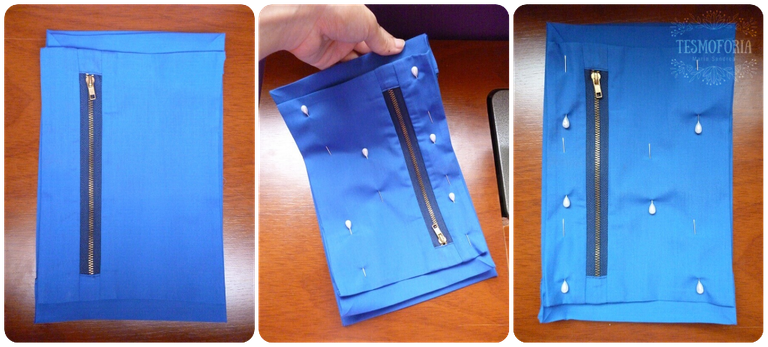
• "The size of the pocket is at will and discretion of the crafter. In my case, I left it high so that the weight of things inside the pocket does not deform the rectangular shape of the bag." - Photos by @Tesmoforia, with a Lumix/Panasonic DMC-FH2.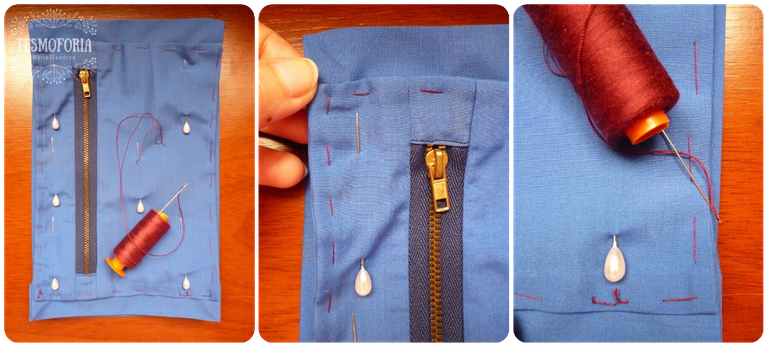
• "When we loosely sew a guide, the color of the thread should be striking and contrast with both the fabric of the material and the thread that will definitely be used." - Photos by @Tesmoforia, with a Lumix/Panasonic DMC-FH2.As the fabric of the lining is soft and less rigid than the canvas, we'll loosely sew the pocket with a large and baggy stitch; just hold it more firmly in position.

• "We’ll sew as close to the edge as possible." - Photos by @Tesmoforia, with a Lumix/Panasonic DMC-FH2.• Why loosely sewing a guide instead of directly sewing? •
Many people don’t like to sew this loose guide since they consider it a "more work", but this ensures that the final seam will be far more straight and perfect in comparison to just using pins to keep parts on their places. For example, tailors and professional designers always do this with all their creations.
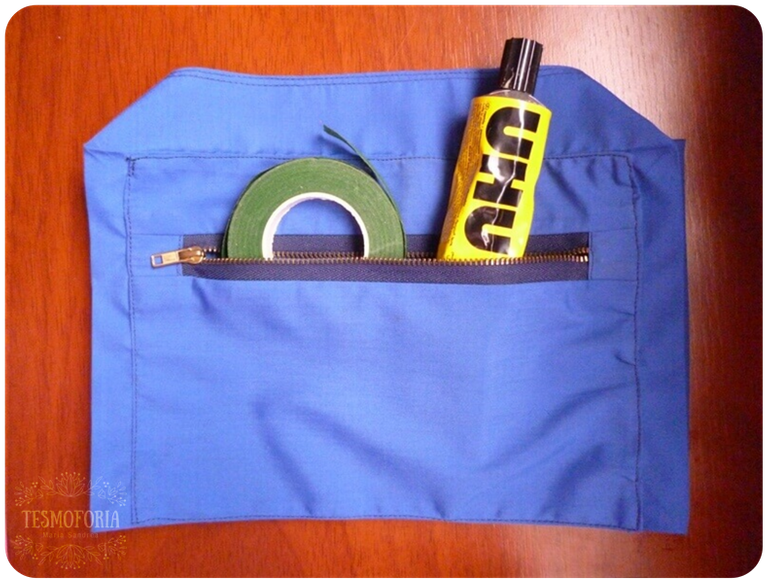
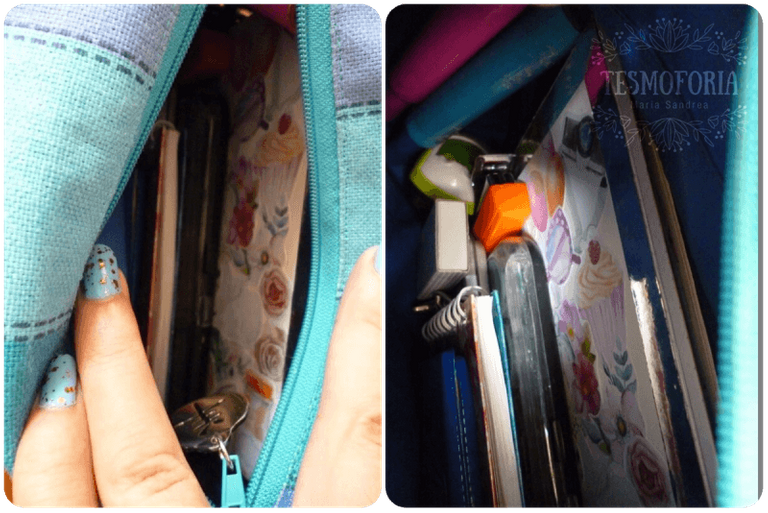
• "Here you can see the capacity of the pocket." - Photos by @Tesmoforia, with a Lumix/Panasonic DMC-FH2.In order for the zipper to smoothly open and without locking, we will open it and rub a white candle against both lines of its "teeth" before moving to the next step.
« STEP N° 9 »
• Lining Installation •
• "This looks a little dangerous, and it is!." - Photos by @Tesmoforia, with a Lumix/Panasonic DMC-FH2.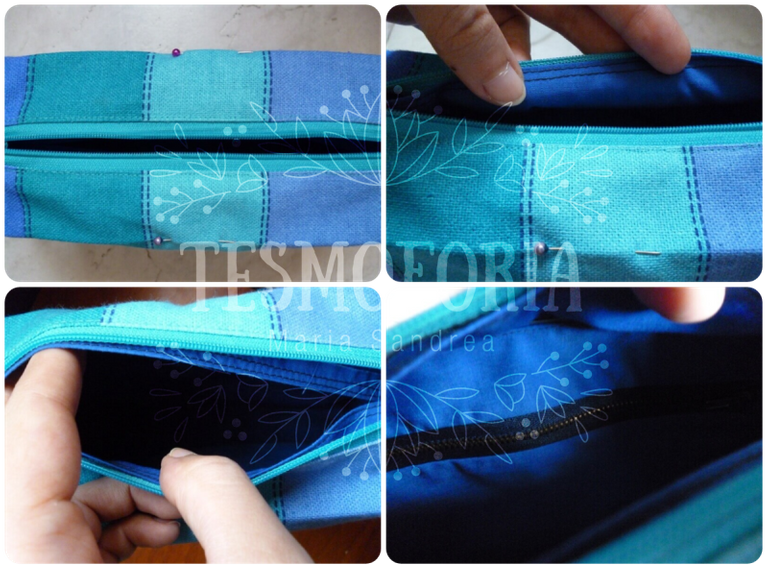
• "We’ll also need pins at the corners." - Photos by @Tesmoforia, with a Lumix/Panasonic DMC-FH2.At this part, the lining borders and the main piece must match perfectly. If it does look this, then every step until now has been completed correctly.
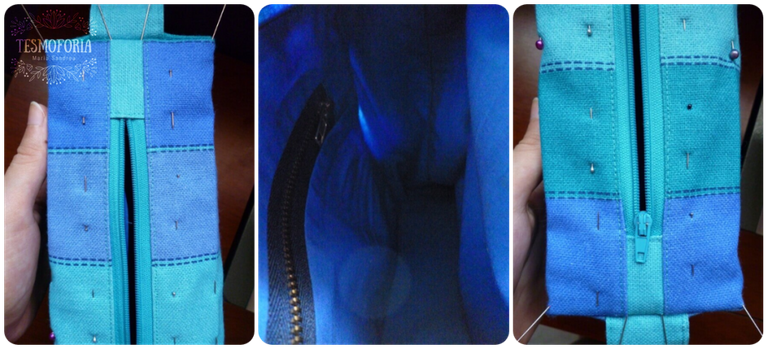
• "That’s how the lining looks inside." - Photos by @Tesmoforia, with a Lumix/Panasonic DMC-FH2.
• "We will load 1 traditional needle with royal blue thread." - Photos by @Tesmoforia, with a Lumix/Panasonic DMC-FH2.To fix the lining to the main piece of canvas, we'll use a basic stitch of °1, and we will cross only one layer of the canvas, between the zipper and the fabric in a vertical direction; the stitch won't be noticeable on the outside.
« STEP N° 10 »
• Strap •
For the handle of the bag, we will take a long piece of the fabric remaining from the main canvas piece cutout, we'll fold it three times its width, and sew with a medium stitch.
• "This is a basic but functional handle." - Photos by @Tesmoforia, with a Lumix/Panasonic DMC-FH2.If we don't like this strap, it can be replaced by a golden metal chain, which is much more elegant (although I think that chains for medium bags are uncomfortable, because they get buried in your shoulder if you carry too much weight).
« STEP N° 11 »
• Pendant •
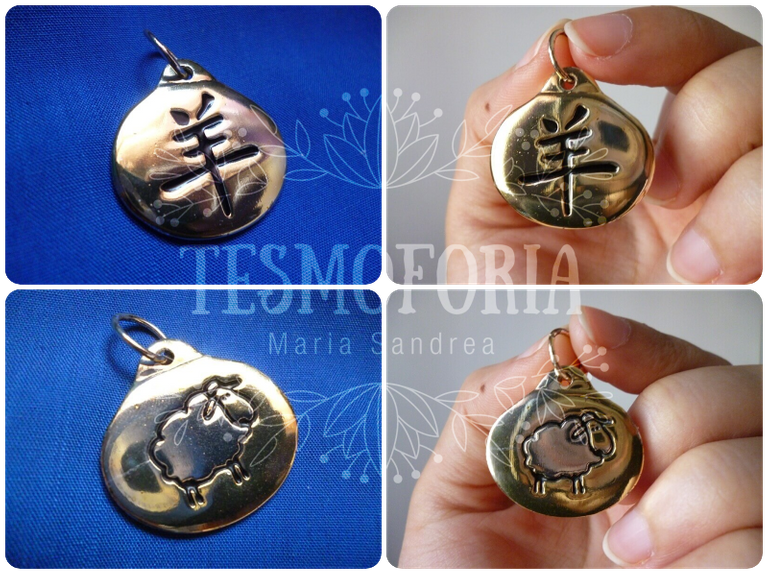
• "This pendant is also recycled, it's made of a solid and heavy pale golden metal." - Photos by @Tesmoforia, with a Lumix/Panasonic DMC-FH2.« STEP N° 12 »
• Installing Pendant •
To install the pendant, we’ll need to open the ring it has with the help of pincers. The reel of the zipper is very small and so the pendant is both functional and decorative.

• "It's advisable always choosing metal charms, plastic ones tend to burst with use." - Photos by @Tesmoforia, with a Lumix/Panasonic DMC-FH2.« STEP N° 13 »
• Balú Brooch •

• "This Brooch belongs to one of my favorite brands for accessories. Originally it’s a brooch for jean jacket." - Photos by @Tesmoforia, with a Lumix/Panasonic DMC-FH2.To give it a more feminine touch, or make this bag more chic, I added a metal "rusted golden" pin, with multiple small and adorable charms.
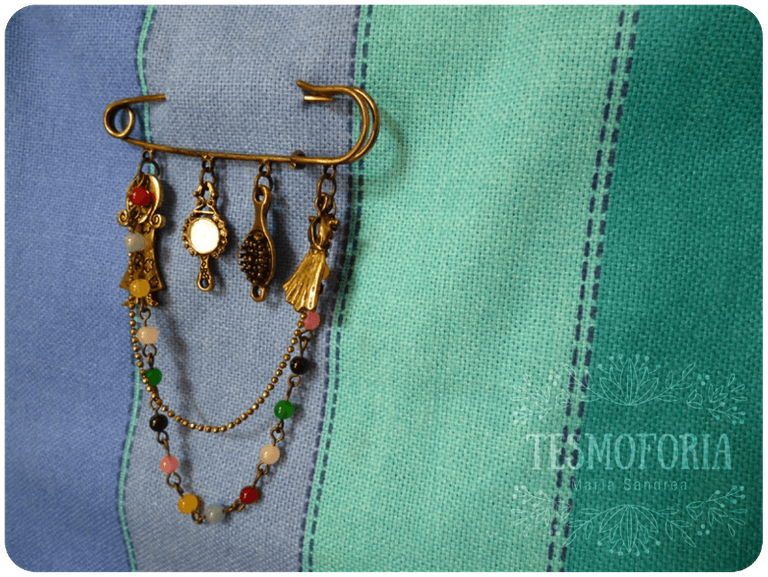
• "With this detail, the bag comes to life." - Photos by @Tesmoforia, with a Lumix/Panasonic DMC-FH2.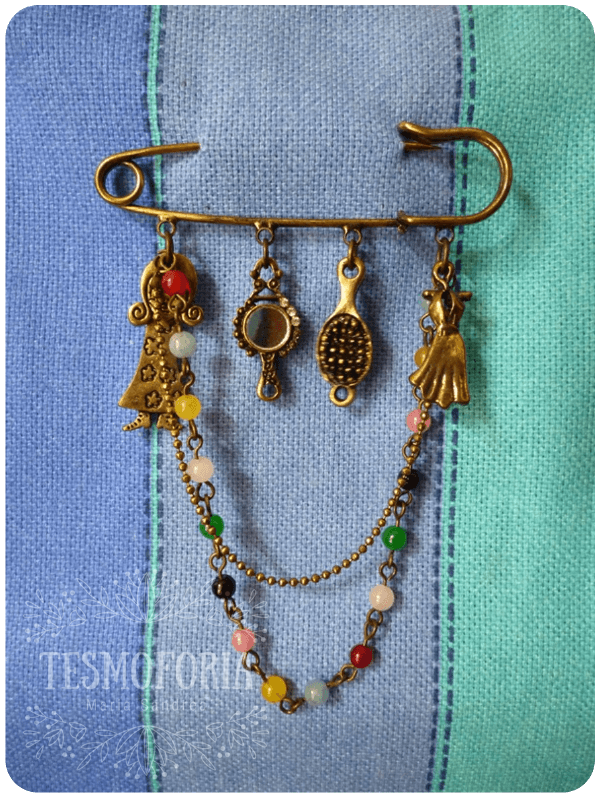
• "Custom Made." - Photos by @Tesmoforia, with a Lumix/Panasonic DMC-FH2.Usually, this kind of brooches is quite economical, because they are mass produced, and can be accompanied or replaced by metal pins, which are currently so fashionable.
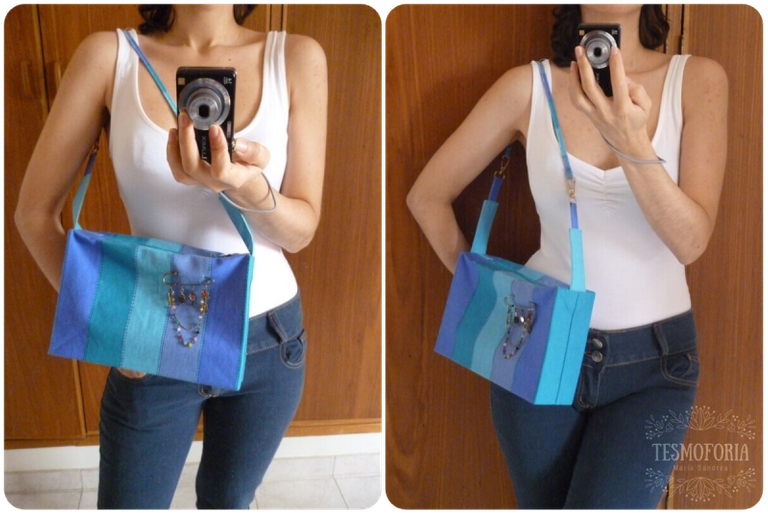
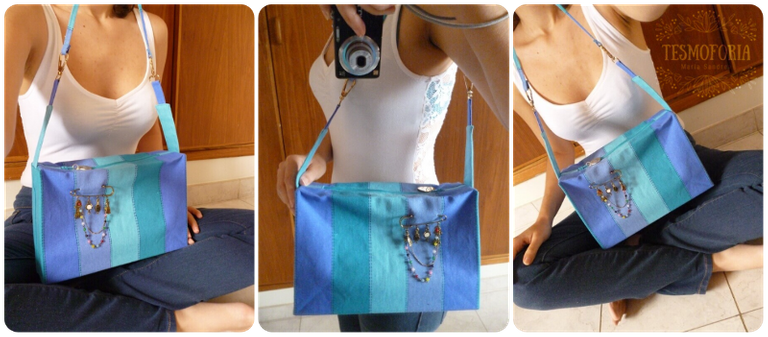
« R E S U L T »
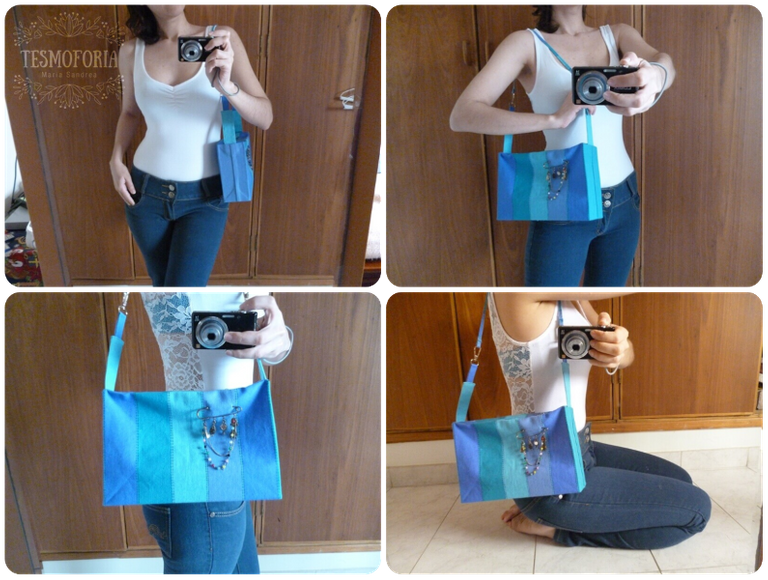
• Model/Bag/Photos by @Tesmoforia, with a Lumix/Panasonic DMC-FH2 •
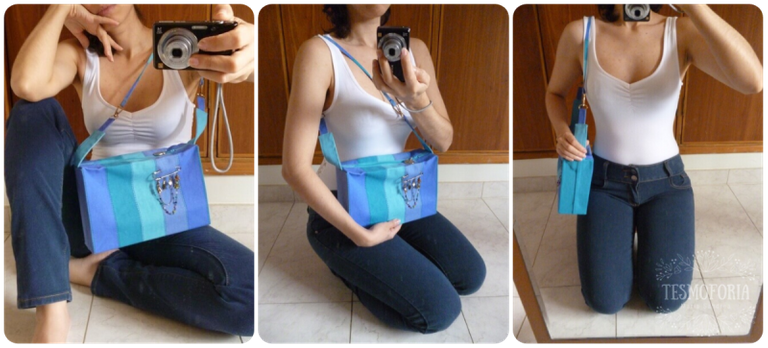
• Model/Bag/Photos by @Tesmoforia, with a Lumix/Panasonic DMC-FH2 •
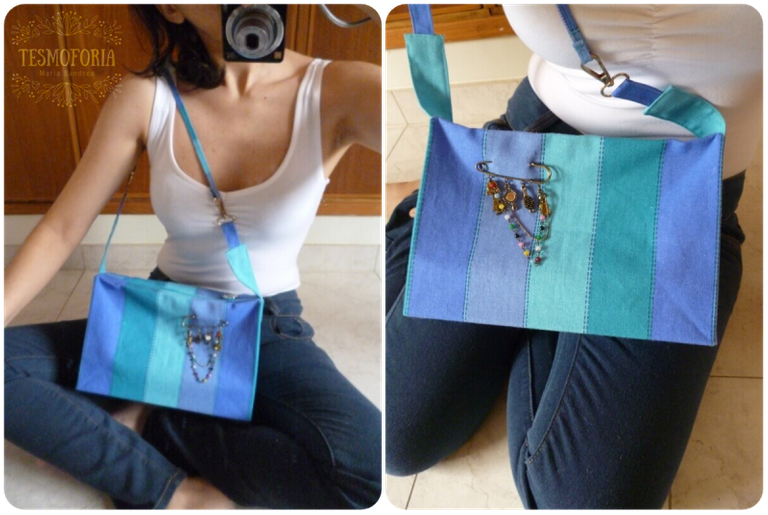
• Model/Bag/Photos by @Tesmoforia, with a Lumix/Panasonic DMC-FH2 •
• Model/Bag/Photos by @Tesmoforia, with a Lumix/Panasonic DMC-FH2 •
• Model/Bag/Photos by @Tesmoforia, with a Lumix/Panasonic DMC-FH2 •
• Model/Bag/Photos by @Tesmoforia, with a Lumix/Panasonic DMC-FH2 •
I'm obviously not the most competent model (I TRY, OK?) to showcase this bag, but the best way to appreciate it is to see it in a person, especially if you wear clothes with a style and color according to the boho trend of the bag.
✨ 👜 Final Measures 👜 ✨
« These last weeks have been very exciting for me on Steemit »

• Me on my Road to Happiness •🍓 FIRST: Against wind and tide, and despite the satanic chaos of the electric service in the country, I was able to participate in "Archdruid Gaming Contest | Gaming Decades: The 90's", and I won the first place! (STILL NOT OVER THE HAPPINESS); this is the 2nd contest in which I participate at this platform (and in the previous one, which was about drawing, I also won 1st Place).
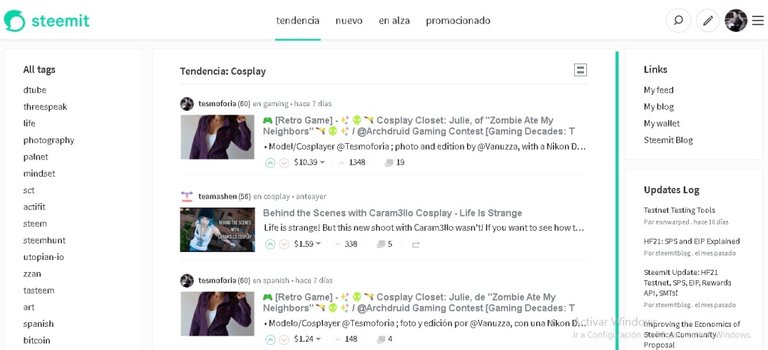
Also, the post I made for the contest was N° 1 in trending with the hashtag: #Cosplay, and 6th place at the hashtag #Gaming
🍓 🍓 🍓
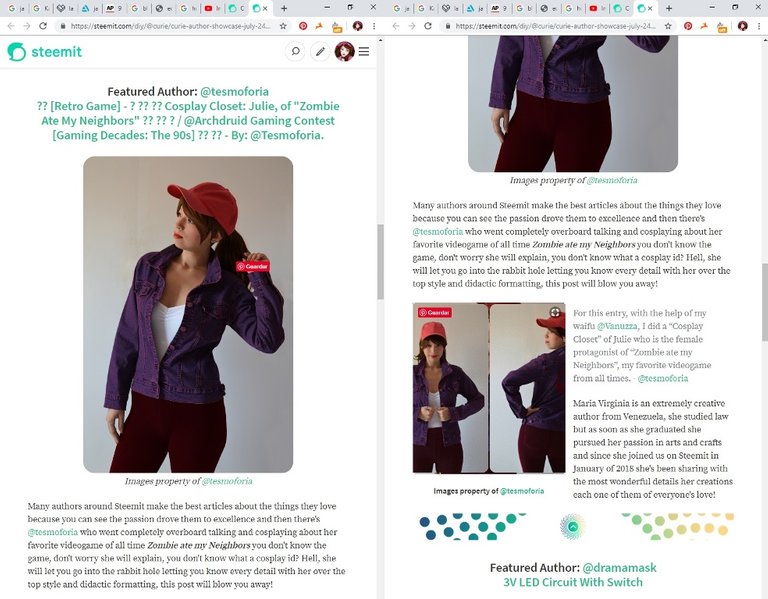
✨ 🏆 AND RECEIVED A VOTE AND MENTION OF @CURIE 🏆 ✨
🎊 Curie Author Showcase (July 24, 2019) 🎊
🍓
I seriously invite you all to paya lot ofattention to @Elfranz, @Veryspider and @Archdruid to receive super valuable information about this fantastic initiative to celebrate every videogaming decade until the present. The last contest was about the 2000´s.
🍓 SECOND: Although I spent several days sick with fever and a lot of body pain, I was able to keep abreast of the new initiatives and tokens that began to circulate in the Steem ecosystem: #Palcoin, #Neoxian, #CreativeCoin, #SteemLeo, # SteemGeeks and others. I feel a bit sad that I couldn't find out about what was happening much sooner.

🍓 THIRD: I started playing DrugWars , and I feel like I'm late for the party, but I'm really entertained with its "lore" and with all the little descriptions of the buildings, characters, and gangs. My brother @Orleanz is playing too and we are trying to understand it together.
Thank you so much for Reading!
🍓 Translation: @Vanuzza 🍓
🚨 Please don’t take, edit or re-post my content without my permission! 🚨
💌 Would you like to get in contact with me? [email protected] 💌
✨ Separators: @Vanuzza • Gif´s: Giphy.com ~ ✨


This post was shared in the Curation Collective Discord community for curators, and upvoted and resteemed by the @c-squared community account after manual review.
@c-squared runs a community witness. Please consider using one of your witness votes on us here
Everything was just too much finesse and classical piece of Art.
This post has been appreciated and featured in daily quality content rewards. Keep up the good work.
Hello!
This post has been manually curated, resteemed
and gifted with some virtually delicious cake
from the @helpiecake curation team!
Much love to you from all of us at @helpie!
Keep up the great work!
Manually curated by @veryspider.
@helpie is a Community Witness.
For more information about our project,
please visit this month’s UPDATE post.