Treat Yo Self Sheath Build 3/15/20
Just a few weeks ago, I talked Stacie D (@freedomtowrite) into letting me build a custom knife for myself. I was in between orders, and I had some material that I thought would make a pretty sweet handle, so I went for it. The only issue is that since it was for myself, I would also need to build a sheath to go with it. I sell my blades without a sheath because I don't feel like the two qualities match. I would hate to pair an amazing blade with some leather that looks like a kindergartener stitched it together haha.
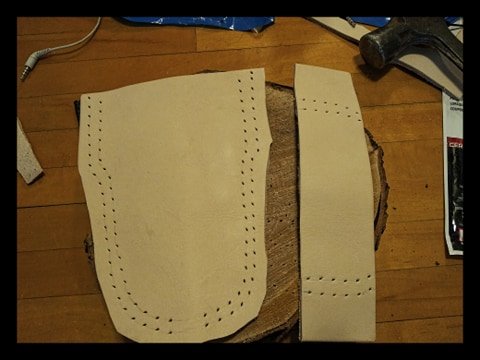
I found a great deal on a piece of 8.5" x 11" 9/10 ounce leather from Springfield leather. I was able to order it quickly and get it shipped in. The only issue with getting such a small pieces is you only get one shot. So if I messed up then I would have to order a whole new piece.
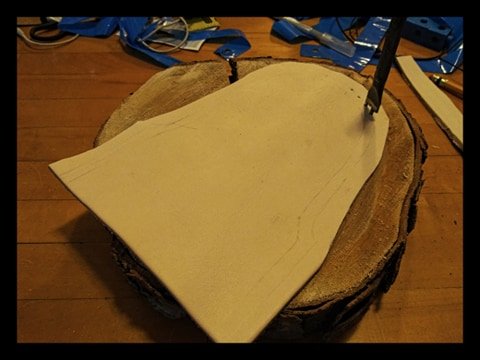
I started by laying the knife on the leather and tracing it, while rolling the knife over. That gave me a nice idea of how it would actually come together. The shape of each knife is different, so when you are cutting out the leather it will always be different.
I got it all laid out and then drew two lines that would act as a guide for my stitches. I used a two hole diamond punch to make the holes evenly spaced all the way up the side, and then did the opposite side and made sure to keep the count the same.
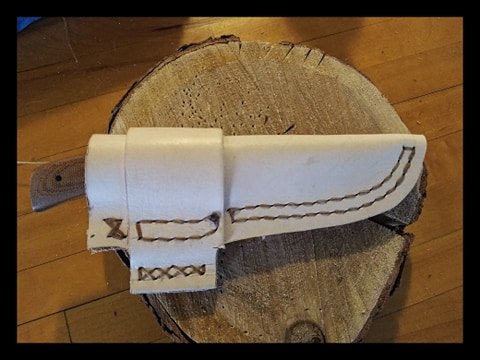
There is a little strip of leather that goes right up the middle that you stitch in between. It is called the weld, and it protects the stitches while you are moving the knife in and out. So you don't cut your stitches. I matched those holes with the ones on the sheath and I was ready to go!
Well not exactly ready to go. I also cut a straight strip of leather that would act as the belt loop. I intend this to be a horizontal carry, so doing it like this will make it able to be carried in a couple of different places easily.
I use some imitation sinew to stitch it all together with leather needles. I do something called a saddle stitch. It is a back and forth stitch that takes both needles through the same hole but in opposite directions. You do this all the way to the end and then back 4 spaces and tie it off, and burn it.
I stitched it in 3 different parts. I stitched the blade area. Then I stitched the belt loop. Then the piece at the opening. Once it was all stitched together I used the belt sander to make all of the rough edges the same so it would look better. I finished up by doing the cross stitches on the belt loop and then soaking it.
When you are shaping a piece of leather to a belt, I start by wrapping the knife in plastic wrap to help prevent rust. I then get the leather all wet and use my fingers to push it into a molded shape. In this case though I used coffee. I think @c0ff33 would appreciate the alternative use of coffee and grounds. I poured it on the outside and rubbed it all in. It will help to give the leather a nice mild stain. What do you think @galenkp? Love it?
I am pretty excited about how this turned out. I currently have it drying in the sunshine, and I will be ready to wear it tomorrow! I love any time that I get to craft something fun. I'd love to hear what you think.
Be well
~The Yeti
Join me on Discord https://discord.gg/zyqFjJ3
https://steemit.com/@freedompoint


Very nice! I love how it looks rustic, like it would have in the old days. People are losing the art of self-creation, of using hands and bring to solve problems and provide for themselves. People want perfection when all we really need is serviceable.
Nice work mate...And good use of the coffee grounds! ✅
That is a great point...serviceable. This should hold up fo a long time. The leather is thick! Haha
It's a good job mate, and good to see you got to make yourself a little gift!
Hello my friend! :D
That looks fantastic, is that the color it will end at or slightly darker? :D
God bless you and your wonderful family. :D Have an awesome day my fabulous friend! :D
Thanks for sharing your creative and inspirational post!
This post got curated by our fellow curator @tibfox and you received a 100% upvote from our non-profit curation service!
Join the official DIYHub community on steem and show us more of your amazing work!
Thank you for using the recommended tag/s. This post has been manually rewarded with BUILD tokens in the form of an upvote. You can buy, stake, and exchange our "BUILD" tokens for steem on steem engine or SteemLeo
Build-it is a central hub for DIY and How-To projects. It's an opportunity to find and share the latest in DIY, and How-To tutorials. The recommended tags required when creating a DIY article are #diy, #build-it. #how-to, or #doityourself. Please subscribe to our community here
Chat with us on our discord and telegram channels Discord, Telegram.