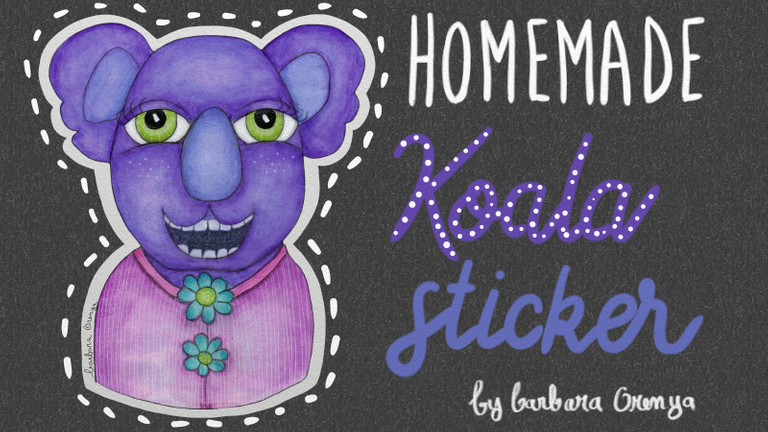
Homemade koala sticker tutorial [ENG-FR]
ENGLISH
Today I will stick with Koala by doing a koala sticker 😄
And I will show you the steps, this tutorial being my participation to the Build-it X Neoxag tribe CONTEST
(rules here if you want to participate) run by @neoxian and @build-it

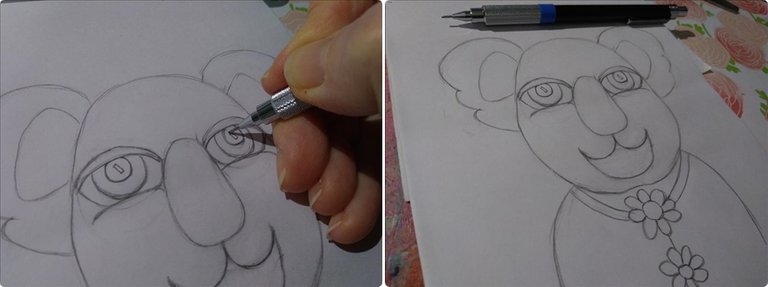
Here is first the creation of the character from the very beginning,
since it started with a drawing made simply in pencil on a sheet of white paper
Before starting the colorization, I spend a layer of white gesso on my drawing to make my support non-porous
then I use Neocolor II wax pastels which are aquasoluble and whose contrasting colors I LOVE,
as you may have noticed in my paintings and numerous tutorials 😉
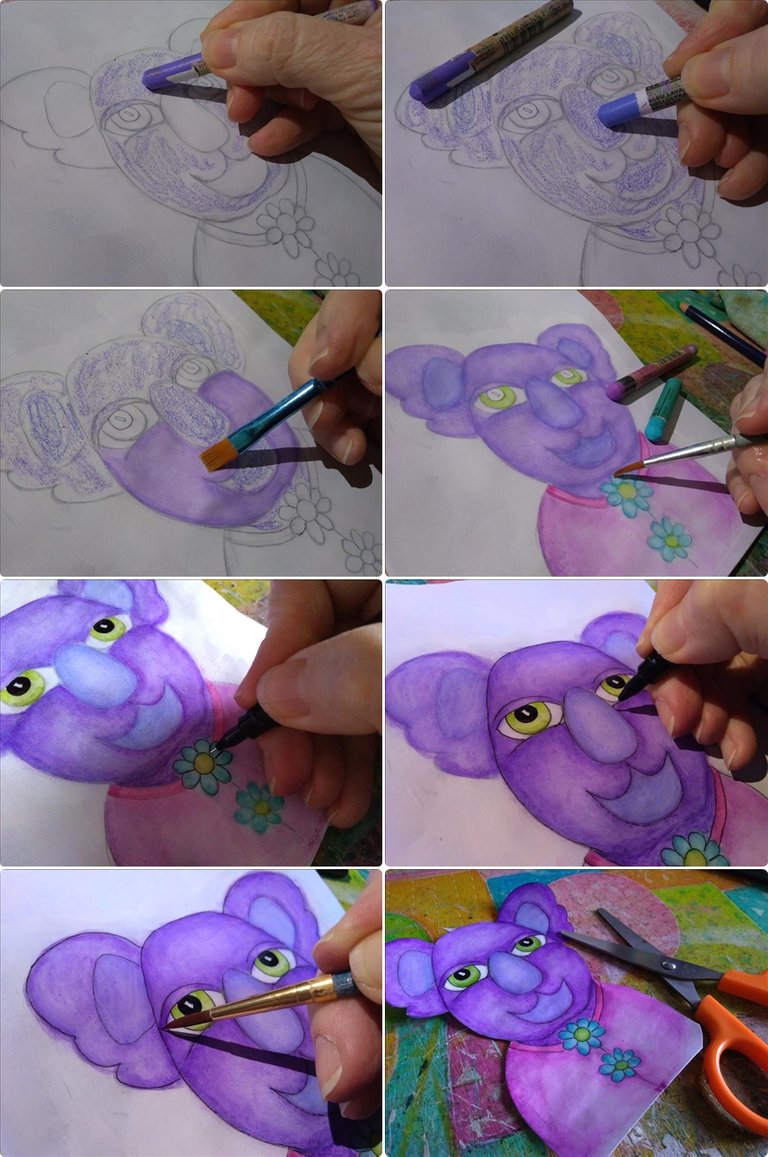
Once my character is finished, I cut it and scan it
Cutting is not a necessary step since I will delete the background again on my computer, but hey ... I love cutting, like I still be in kindergarten 😄
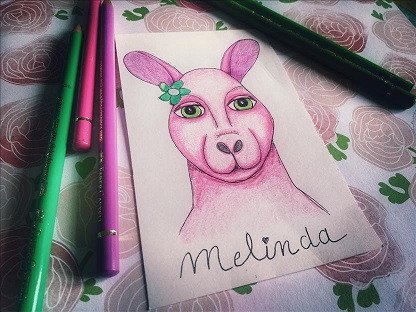
When my Koala is scanned and I have perfectly cut it using my digital eraser, I add details such as the patterns on the costume, the eyelashes, the freckles ... and the teeth also ! ^_^
I made all this stuff with the help of two precious tools :
- My Wacom Cintiq
- Artrage (painting software)
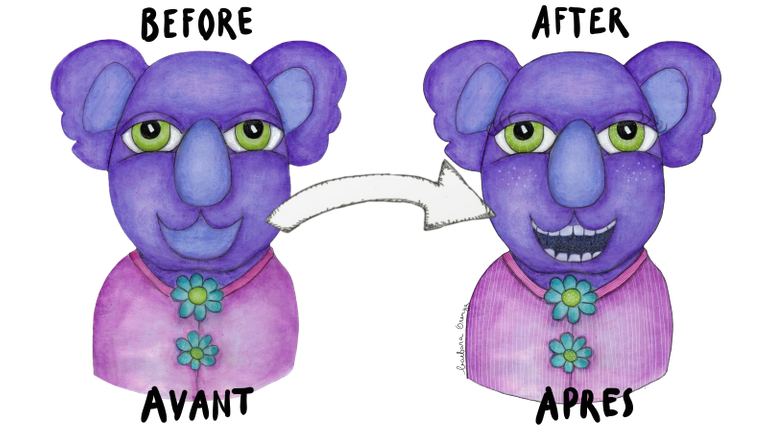
So here is my character who transforms a little more with the addition of the mentioned details :
You may be wondering why I don't directly create my characters using my Artage painting software,
saving myself the manual traditional phase of drawing and coloring ..?
Well it is precisely because I like this manual phase on the one hand, I like to use watersoluble pastels and I like to spread their pigments with my brush.
and on the other hand, I don't have as much fun handing my stylus on the very smooth surface of the tablet.
a real sheet with a real brush and a real material are for me much more interesting in terms of sensations.
By cons for what is the finishing work such as the addition of details, I love using the digital tool for its practical and magical functions of layers, modes of blending and un-do in case of error or if the result doesn't please me ... 😉
Taking the advantages and pleasures of each technique is my way of working in all areas I must say 😄
So here we are now with this pretty digital marsupial:

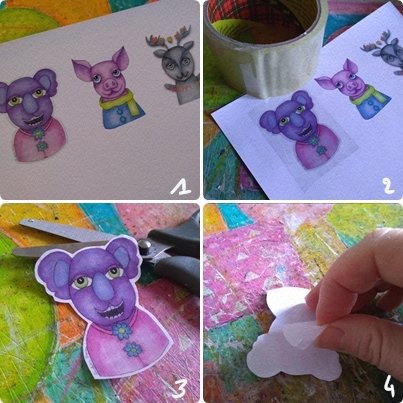
1/ I print my Koala on a special adhesive paper, the same paper used to print labels
I take this opportunity to print two other characters 😊
2/ I cover my design with a piece of transparent tape, using a roll of large width which I usually use for packaging.
this allows me to have a plasticized and beautiful glossy effect on my sticker ... in addition it protects it and makes it even more resistant 😉
3/ I carefully cut around leaving a white band, but I could just as easily cut as close to the koala if I wanted it of course.
4/ Now I just have to peel the back when I want to use it ^_^
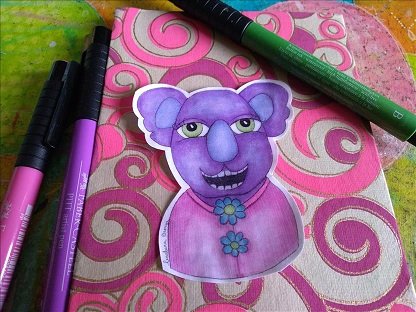

Here is the creation of my Koala sticker, I can stick it wherever I want,
I think I will put one on my smartphone 😄
Je vous souhaite une belle soirée les amis !
FRANCAIS
Aujourd'hui je vous présente un sticker koala fait maison
Et je vais vous en montrer les étapes, ce tutoriel étant ma participation au Build-it X Neoxag tribe CONTEST (article original et règlement ici si vous voulez participer)
Voici d'abord la création du personnage depuis le tout début,
puisque celui-ci a commencé par un dessin réalisé simplement au crayon sur une feuille
Avant de commencer la colorisation, je passe une couche de gesso blanc pour rendre mon support non poreux
puis j'utilise les pastels à la cire Neocolor II qui sont aquarellables et dont j'adore les couleurs contrastées,
comme vous aurez pu le remarqué au fil de mes peintures et nombreux tutos 😉
Une fois mon personnage terminé, je le découpe et le scanne
La découpe n'est pas une étape nécessaire puisque je vais supprimer le fond à nouveau sur mon ordinateur, mais que voulez-vous...j'adore découper, comme à l'école maternelle 😄
Lorsque mon Koala est scanné et que je l'ai parfaitement détouré à l'aide de ma gomme digitale, je lui rajoute des détails tels que les motifs sur le costume, les cils, les taches de rousseur...et les dents aussi ! 😄
J'ai fait tout cela avec l'aide de deux précieux outils:
- Ma tablette Cintiq Wacom
- Artrage (logiciel de peinture)
Donc voici mon personnage qui se transforme encore un peu avec l'addition des détails mentionnés :
Vous vous demandez peut-être pourquoi je ne crée pas directement mes personnages à l'aide de mon logiciel de peinture Artage, m'épargnant ainsi la phase manuelle de dessin et colorisation..?
Eh bien c'est justement parce que j'aime cette phase manuelle d'une part, j'aime utiliser les pastels et j'aime étaler leur pigments avec mon pinceau.
et d'autre part, je n'ai pas autant de plaisir au contact de mon stylet sur la surface très lisse de la tablette..
une vraie feuille avec un vrai pinceau et une vraie matière sont pour moi beaucoup plus intéressants au niveau des sensations.
Par contre pour ce qui est du travail de finition tel que le rajout de détails, j'adore utiliser l'outil numérique pour ses pratiques et magiques fonctions de calques, de modes de fusion et de retour en arrière en cas d'erreur ou si le résultat ne me convient pas...😉
Prendre les avantages et les plaisirs de chaque technique, c'est ma façon de fonctionner dans tous les domaines je dois dire 😄
Nous en sommes donc à présent à ce joli marsupial digital :
1/ J'imprime mon Koala sur un papier spécial pour autocollants, le même papier qui sert à imprimer des étiquettes
J'en profite pour imprimer deux autres personnages 😊
2/ Je recouvre mon motif d'un morceau de ruban adhésif transparent, grace à un rouleau de bonne largeur dont je me sers habituellement pour l'emballage.
ceci me permet d'avoir un bel effet plastifié et brillant sur mon sticker...en plus cela le protège et le rend encore plus résistant.
3/ Je découpe soigneusement autour en laissant une bande blanche, mais je pourrais tout aussi bien découpé au plus près du koala si je le désirais bien sûr.
4/ Je n'ai plus qu'à décoller l'arrière lorsque je veux m'en servir 😉
Voila la création de mon sticker Koala, je peux en coller partout où je veux, je crois que je vais en mettre sur mon smartphone 😄
Je vous souhaite une belle soirée les amis !
My last posts


Posted via neoxian.city | The City of Neoxian
#posh on twitter https://twitter.com/BarbaraOrenya/status/1220435595572535297
Posted via neoxian.city | The City of Neoxian
Congratulations @pixresteemer, you successfuly trended the post shared by @barbara-orenya!
@barbara-orenya will receive 0.46258088 TRDO & @pixresteemer will get 0.30838725 TRDO curation in 3 Days from Post Created Date!
"Call TRDO, Your Comment Worth Something!"
To view or trade TRDO go to steem-engine.com
Join TRDO Discord Channel or Join TRDO Web Site
Hi @barbara-orenya!
Your post was upvoted by @steem-ua, new Steem dApp, using UserAuthority for algorithmic post curation!
Your UA account score is currently 4.749 which ranks you at #1568 across all Steem accounts.
Your rank has not changed in the last three days.
In our last Algorithmic Curation Round, consisting of 86 contributions, your post is ranked at #33.
Evaluation of your UA score:
Feel free to join our @steem-ua Discord server
Congratulations @barbara-orenya!
Your post was featured on our daily build newsletter! We've sent 100 liquid BUILD tokens to your wallet upon which you can sell, trade or buy on steem engine or SteemLeo. We've also shared your work on our Instagram, and Facebook pages for more exposure.
Keep sharing your awesome DIY and How-to tutorials together with the recommended tags #diy, #build-it, #how-to, #doityourself, #build as well as posting from our website
Congratulations @barbara-orenya, your post successfully recieved 0.46258088 TRDO from below listed TRENDO callers:
To view or trade TRDO go to steem-engine.com
Join TRDO Discord Channel or Join TRDO Web Site