Exchanging my Hive tokens in Ionomy
For all my English speaking friends and also everyone who wants to know how to convert Hive tokens to STEEM, I have decided to translate this tutorial into English.
Step 1.- Create an account in Ionomy
You can use the following link to create your account if you wish, and want to become my referral (my referee?)
https://ionomy.com/en/aff/fc18fce8e6ca964d27ddd9908a2c5fe0
It doesn't really require many steps to register, I didn't fill out any KYCs and everything went quickly. Of course, if you are someone who wants to exchange 10 million Hives, certainly, you must fulfill some requirements first.
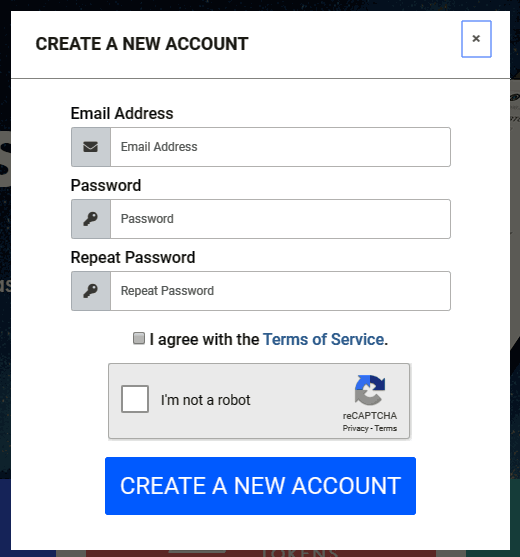
Remember to use the SIGNUP option to create your account. As you will see in the next image, it only requires an email and a password; agreeing with the terms of service and verify that you are not a robot.
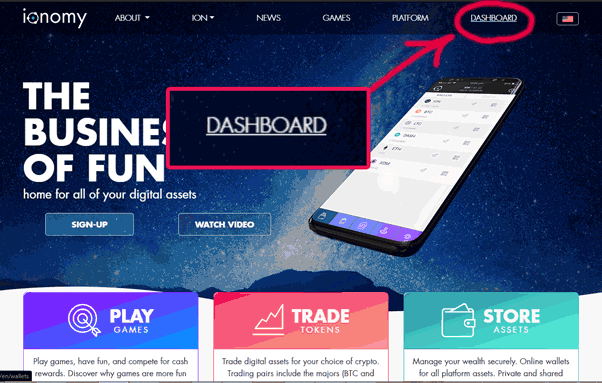
Once you have registered and verified your account through your email, you will need to go to DASHBOARD
Step 2.- Send your HIVE tokens from your Hive wallet to the Ionomy exchange
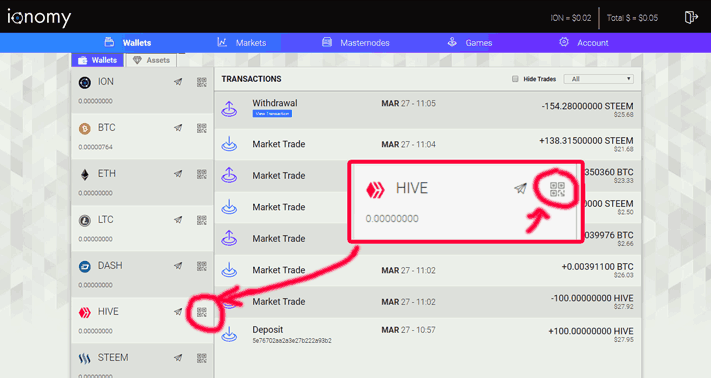
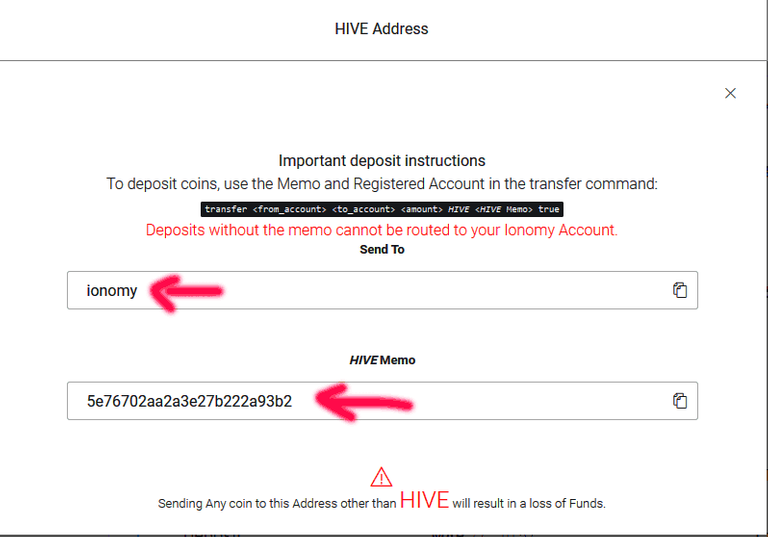
Click on Wallets and click on the square icon next to the HIVE tokens, as shown in the image below. This will show us to which address or "user" we should send our HIVE tokens
A pop-up will then appear indicating that you must send your tokens to the user ionomy and the memo you must use.
It is very important to use the memo provided by the platform because if you forget it you can lose all your tokens
In the following image, we see the user and the memo that "I" must use. You will get a different memo.
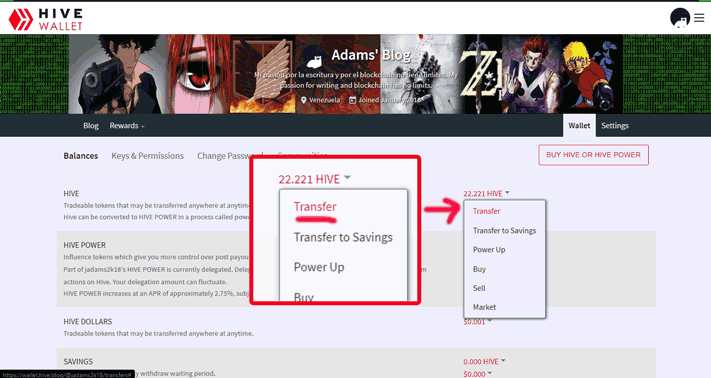
All right, with the above information, I'm off to my Hive wallet
I select the option Transfer, as shown in the following image
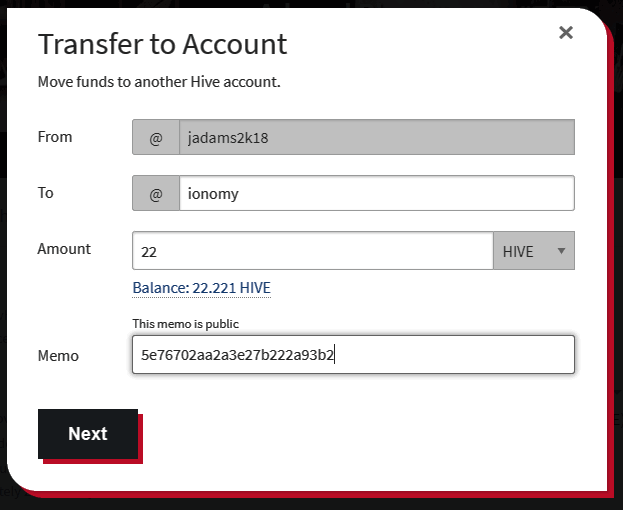
And then the form "Transfer to Account" will appear, where I must place the user ionomy, the amount of Hive tokens I am going to transfer (in this case 22) and the memo indicated in the exchange.
When you click on Next, the transfer confirmation dialog will appear, Confirm Transfer.
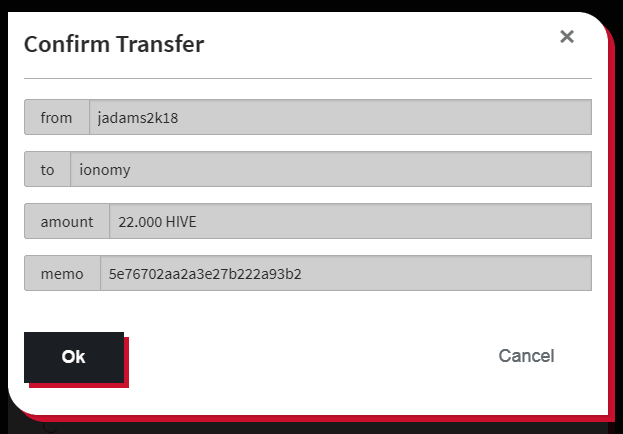
I check that everything is correct and click on the OK button and then enter my HIVE password to make the transfer. This is a very common process, which we all have done at all times when we want to transfer tokens to any user.
Step 3. Exchanging HIVE tokens to STEEM tokens within the exchange Ionomy
We go to Ionomy's wallet and notice that a message now appears indicating that a deposit has been made and it is required to wait for 10 confirmations. In the following image, you can see that only 6 of the 10 have been confirmed. This process can take a couple of minutes.

Once the transaction is confirmed, it will appear as shown in the following image

We already have our Hive tokens inside the exchange, now we go to the option of Markets and click on the word HIVE, on the left side as shown in the next image
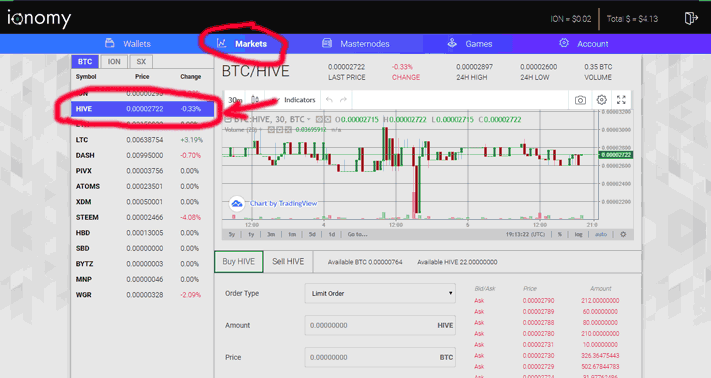
The token's behavior graph will appear in relation to the Bitcoin value (BTC), below we can see the buy and sell option of Hive (Buy HIVE and Sell Hive)
We must sell our HIVE tokens (Sell Hive) to get BTC, which we will then use to "buy" STEEM tokens.
We click on Sell Hive (step 1), as shown in the following image. Then we click on the first green line (step 2) and finally we place the amount of HIVE tokens we want to sell (step 3), in this case, 22.
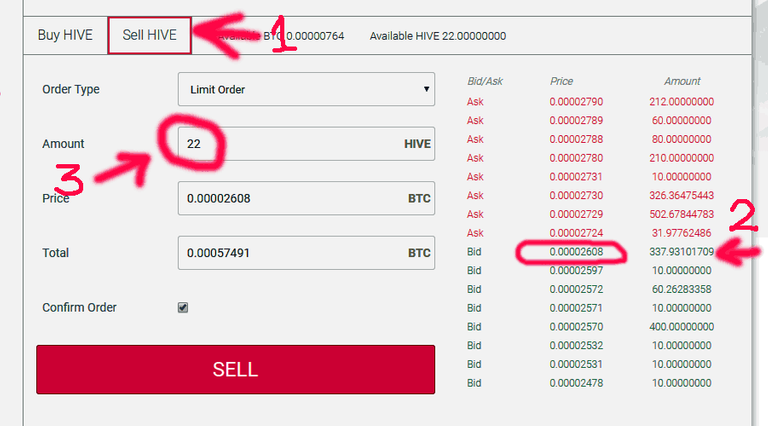
By clicking on the first green line, we are indicating the fastest (lowest) price to sell.
Finally, we click on the red button SELL to perform the operation
Let's go back to the Wallet option to check if the amount of BTC we requested has already been delivered to us. As we can see in the following image
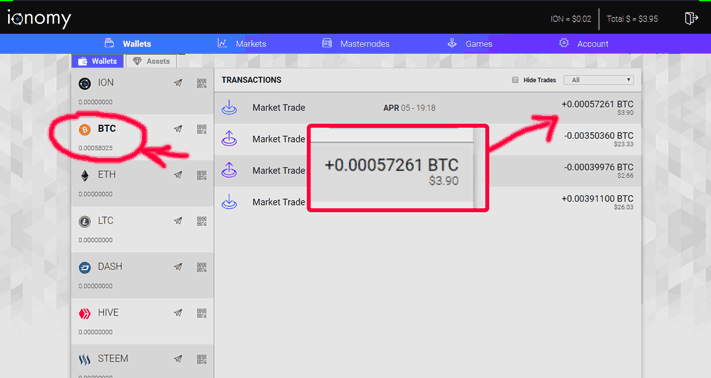
We see that we have now lost about 18 cents, initially, we had $4.08 in HIVE tokens and now we have $3.90 in BTC. Well, this is inevitable. Money will always be lost in the exchange. In the end, we will realize that it has not been much, even for us, Venezuelans.
We click again on Markets and then click STEEM on the left side.

As we can see in the previous image, a graph will appear with the behavior of the STEEM price in BTC value.
Let's then sell the BTCs we have by clicking on Buy STEEM section.
We follow the steps shown in the following image

Obviously click on Buy STEEM (step 1) first, then click on the last red line (step 2). With this we select the purchase price, then we click on the word Available BTC so that the amount of BTC we have is automatically selected (step 3), we can see the amount of STEEM I will receive 22.28133191. And finally, we click on the green button BUY (step 4) to make the purchase.
If everything went well, we will have our 22,281 STEEM in our Ionomy's wallet.
But unfortunately, when I do this kind of tutorials, I must be copying the screens and editing them which prevents me from doing the operations immediately and as we can see in the next image, the price changed (the price fluctuates constantly, it's something totally normal). Therefore, I could only get 3.43627134 STEEM. This usually happens when you are late in making the purchase.
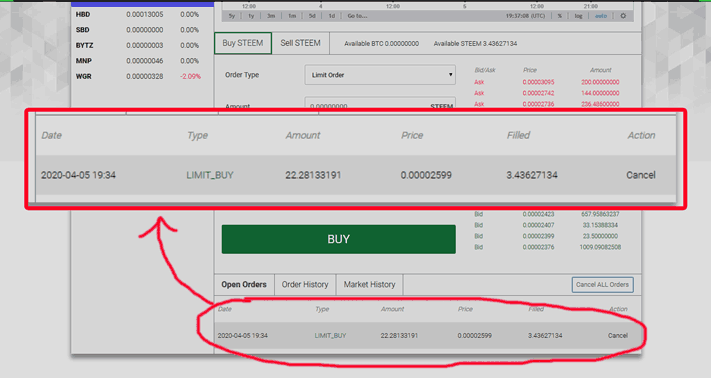
If I am not in a hurry, I could wait for the operation to take place, this could take some time but I usually need the money quickly. As you can see in the image above, at the bottom is the operation waiting to be performed, but as I want my money fast I simply click on Cancel to cancel the operation and release the money to me. Finally, I repeat again the operation, as you can see in the next image
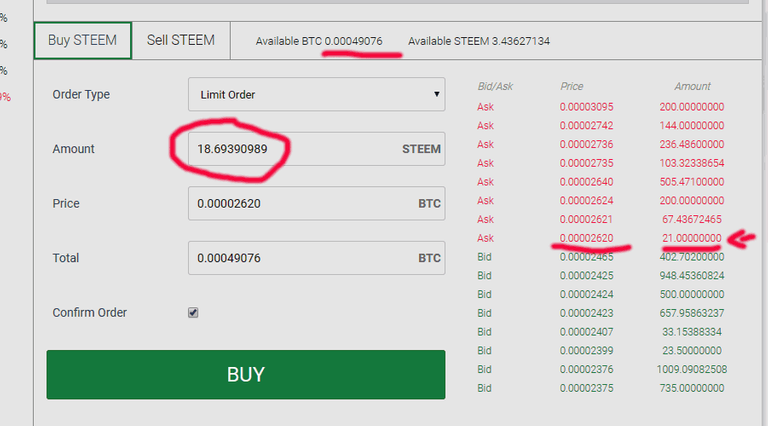
We can see that this time I will only get 18,69390989 STEEM, however, I already had the 3 STEEMs I received before.
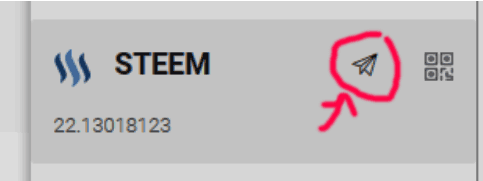
After clicking on the button BUY, I go again to the section Wallets and as you can see in the next image, I have been able to get 22.13018123 STEEM

Step 4.- Send STEEM tokens to Steemit's wallet
To perform this operation we click on the small icon that looks like a paper plane to send the STEEMs to my Steemit wallet.
A form will then appear that will allow me to send the STEEMs to my wallet, as you can see in the following image.
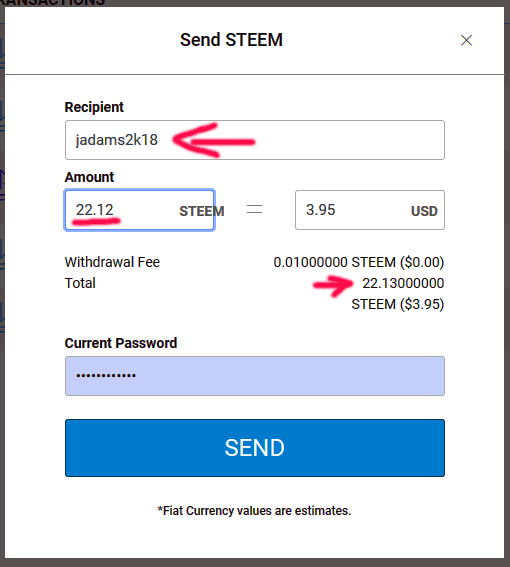
We have to type the user of our Steemit account into Recipient textbox. In Amount we must put the amount we want to send.
Here it is important to note that Ionomy's withdrawal fee is 0.01 STEEM . So if I have a total of 22.13 in my wallet, I should type 22.12 in the Amount box.
Once you are satisfied with everything, click the SEND button to send the tokens.
In the wallet Ionomy will appear our transaction in gray, indicating that a verification of the operation must be done via email. This is done as a security measure.

You will immediately receive an email similar to the following

When you open the email, you will see something like the following image
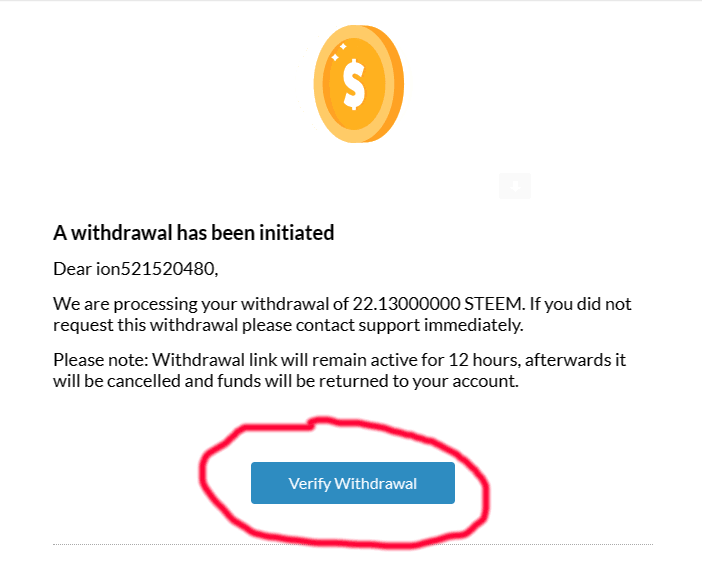
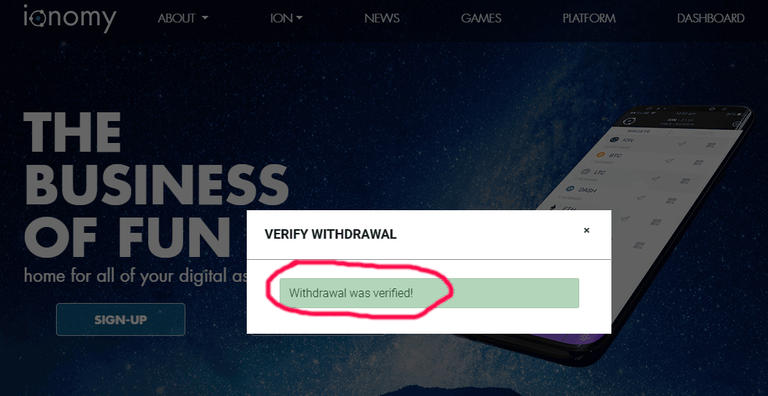
We click the Verify Withdrawal button to allow the tokens to be sent to our Steemit account.
A message will appear indicating that the withdrawal has been verified
After this, we can check our Steemit wallet and see the operation performed by Ionomy.
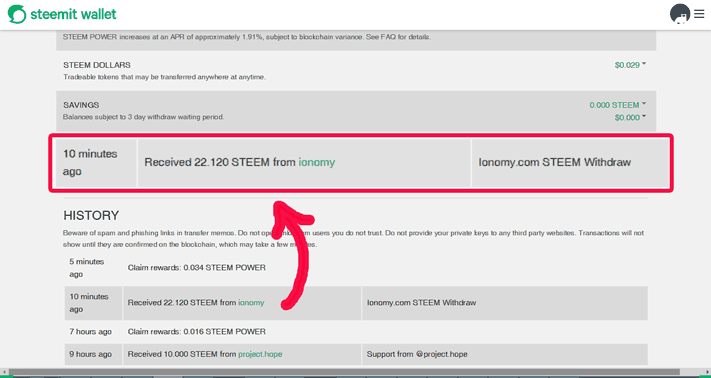
As we could see, we have managed to exchange our HIVE tokens into STEEMs tokens. In my opinion, we haven't lost much. Initially, I wanted to change 22 HIVE and I got 22.12 STEEM. At this moment there is not much difference between the prices of HIVE and STEEM.
I really appreciate your patience and hope this tutorial has been helpful.
I would like to include a small video of everything done in this tutorial for those who do not wish to read.
Remember to stay home and stay safe
Take care of yourselves and your loved ones

Let's keep spreading love through the community 
Gracias por tan valiosa información!
Es un placer para mi ^_^
Gracias por comentar :D
@tipu curate
Upvoted 👌 (Mana: 14/28)
Looks like a helpful tutorial... happy can trade HIVe for BTC... something better than nothing...steem no way!!
"Transaction Broadcast Error" (in step 2):
Not sure if you are still checking this page, but I got a "Transaction Broadcast Error" in Step 2 when trying to send some Hive to @ionomy even though I sign-in with my password. Do you know why? I think it could be an issue from my migration from Steem. I can post and do pretty much everything else with my Hive account, but this seems a no go for now. Also, when I go to my wallet's "permissions", I cannot reveal my 'Private Active Owner Key' nor my 'Owner Key'. Suggestions?