LMAC School - How to create GIFs
Hi Hivian 🖖
What would the internet be without GIFs?
Some would say it would just be another boring place. People who suffer from epileptic seizures, on the other hand, would probably always have enjoyed the internet a lot more.
In fact, over the years since the internet has been around, GIFs have even become part of the language and communicative expression in the cyber world. Entire metaphors can be expressed using a simple GIF.
Animated memes, jokes, movie scenes, the range of use cases for this old file format from 1987 is still huge. It has even become indispensable in digital art.
In LMAC, for example, we often see animated collages.
In this brief tutorial of our LMAC School blog series, I would like to show you how to create your own GIFs and some popular ways of creating GIFs.
1. Introduction
Under the hood of a GIF, there is no witchcraft!
Basically, it is just a stack of images and contains, among other data, information about the looping behavior, delays between images and whether the currently displayed image should be resolved before the next image is displayed by the software (browser, media player...).
Unfortunately, the image compression of GIFs is quite lossy. The compression algorithm is not as good as JPEG, for example.
We should get sure the images we want to include are not too big. Otherwise our GIF could easily become very fat in megabytes, it would load long over the internet and cost a lot of CPU power just to display it. Roughly, 600-800 pixels are fine for a square image.
Best thing about GIFs, however, is that they are very easy to create and can be used in a blog article without having to embed them in a player, as they are displayed by a browser as a normal image.
1.1. Requirements
You may need the GIMP software to understand the GIMP part of this tutorial. GIMP is a free, open source tool for image processing of all kinds. Lots of people say GIMP is the open source Photoshop. I agree with this statement at least for the functionality I personally need.
You can download GIMP here: Click
I made the GIMP part for version 2.10.36 (and higher).
We will work there with layers. If you do not know how to work with layers, just take a look into the LMAC School - How to work with layers post.
A modern web browser is essential for following this tutorial. I hope you haven't visited this blog via text console and can't see all the nice illustrations I have made for you. :-D
2. Solutions
There are a variety of solutions that can help you create GIFs. Which one is best depends on what you want to do, how much time you want to spend on it and your preferred ease of use. Below there are 3 practical and free ways to create GIFs, each with their very own pros and cons.
2.1. Creating GIFs using GIMP
Creating GIFs in GIMP is very easy and when it comes to creating animated art, it is one of the best choices. This is because the sheer possibilities that GIMP offers with its image editing tools along with its animation tools, making it a master chisel among the tools you can use to create GIFs.
2.1.1. Basics
In GIMP, a single frame of the animation is represented by a single image layer. The bottommost layer in the layer list represents the first frame of the animation.
Starting with the first frame layer, all further frame layers must be placed one above the other.
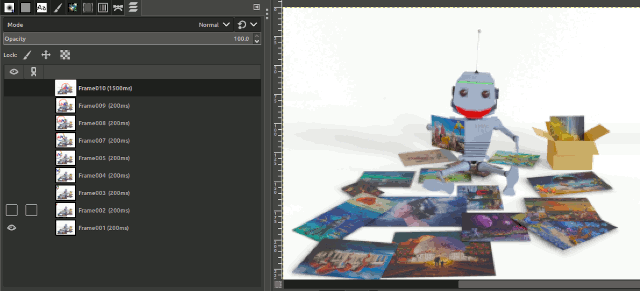
There is also a naming convention in GIMP that allows you to specify the delay for each frame by simply adding this information to the name of its layer.
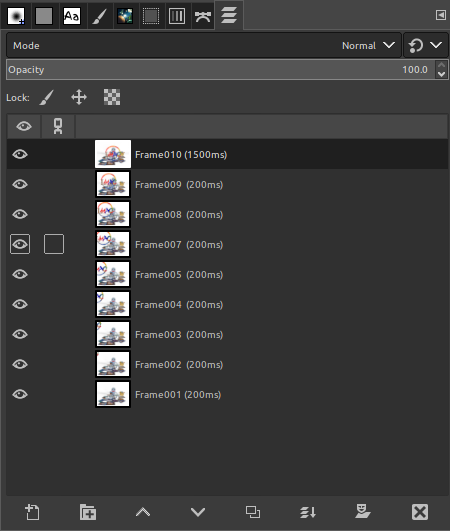
According to the naming convention for the delay information, it must be specified in milliseconds (ms) and enclosed in brackets ().
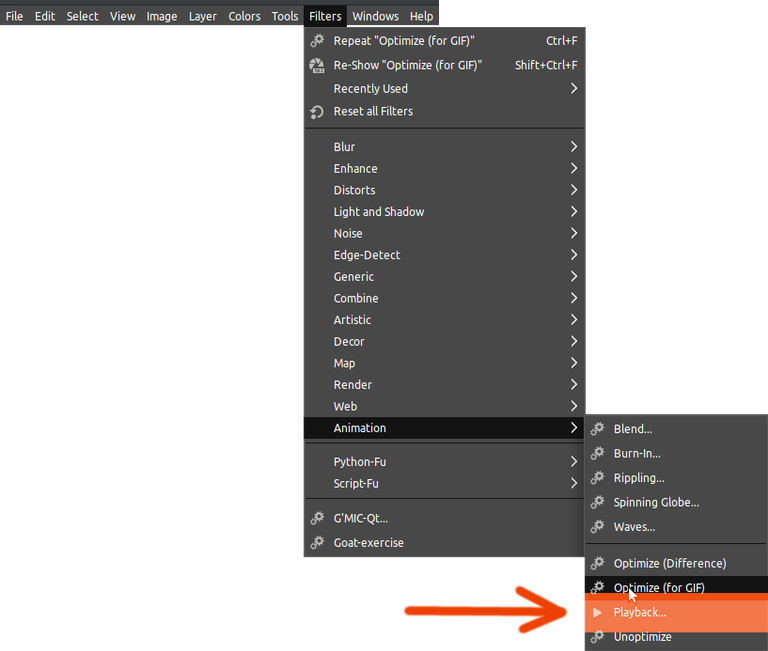
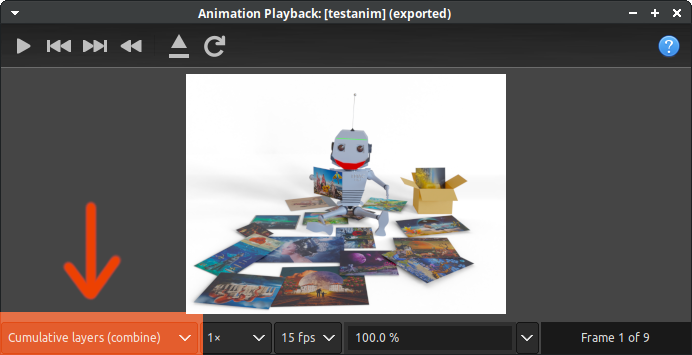
Whenever you want to test your animation, you can use the animation playback tool, which you can find via the menu /Filter/Animation/Player.
The playback tool can be controlled using the usual buttons used in media/animation players.
Another important control element is located in the bottom left corner of the tool window, where you can specify how the player should handle the frames. There are two modes - "One frame per layer", which is the normal use case where one frame is replaced by another, and "Cumulative layers" mode, where each frame played will be combined with the last ones played. The "Cumulative layers" mode is very useful, for example, if the animation is to consist of transparent image parts that are combined to finally form the complete animation.
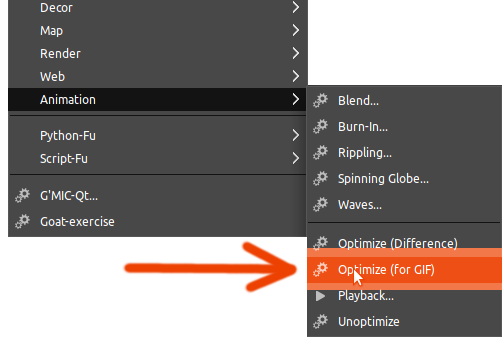
It really is worth taking a closer look at the menu where the playback tool is located. For example, there is also the GIF optimization tool.
This allows you to optimize a GIF created in GIMP so that only the differences for each frame are calculated in a new GIMP image with new layers, which are mainly transparent and only contain the differences found from frame to frame. This is then a cumulative GIF and must also be exported as such. The file sizes of GIFs optimized in this way can be considerably smaller.
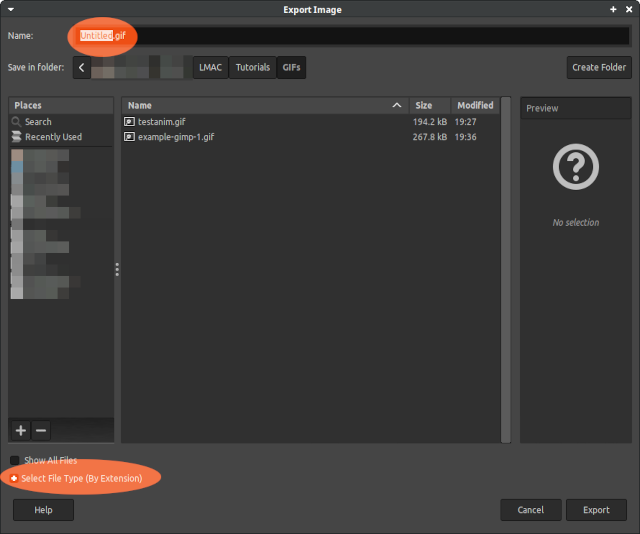
To export a GIF, simply click on the menu item /File/Export as. In the file dialog box, enter a filename with the extension ".gif" if the "Select file type (by extension)" checkbox is activated. Otherwise, simply select the GIF file type from the list of file extensions.
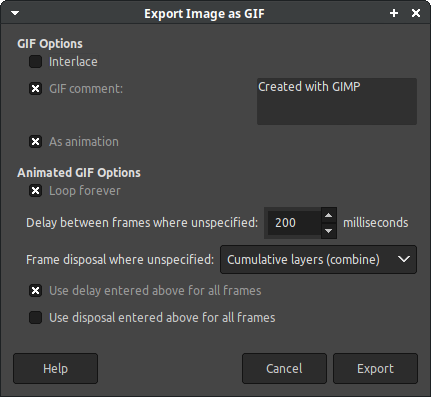
As soon as you have clicked on the "Export" button, another dialog window opens in which you can make the final settings for your GIF. There you can also set the behavior for image disposal, which was explained above.
The checkbox for "As animation" must be activated. Otherwise it would become a still image.
Here you can also set the overall delay value for all images that are missing specific delay information.
2.1.2. Example: Loading indicator
Important! For this animation to work correctly, it must be exported as a GIF with non-cumulative stacking.
- create a new image with a size of 64x64
- add a layer, add an alpha channel to it and delete the background color
- in the vertical center, at the right edge of the image, we add an 8px dot in black on the layer
- let's duplicate our first layer and make it a little brighter (25%). Then we need to rotate it 45°. This layer must be above the previous layer and we must make sure that the layer has not become larger due to the rotation. If it is larger, click on the menu item /Layer/"Layer to image size".
- for this step we repeat step 4. 6 times, each time with the previous layer. But from the 4th layer on we use one and the same color.
- now we should see 4 dots of different colors and 4 dots of the same color. We merge their layers so that we only have one layer.
- from this single layer we have, let's make 7 more duplicates, always from the copy we made before and rotate it by -45°.
- it's time to test our animation by opening the Animation Player tool. ❇️
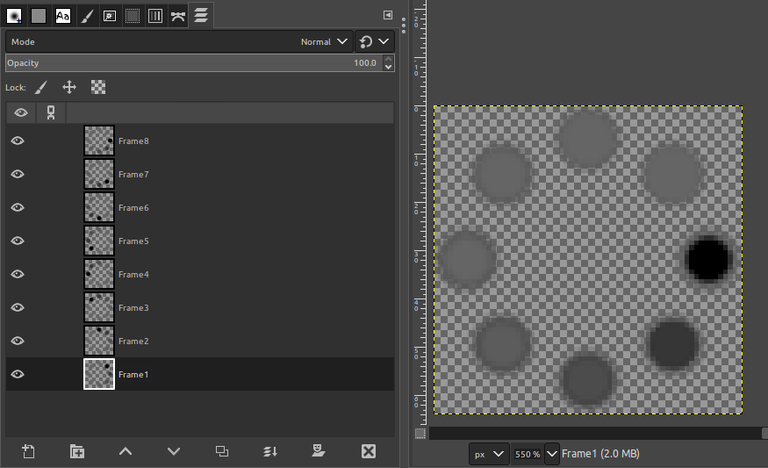
Result:

I hope this information is enough to get you started making GIFs in this great software.
GIMP offers many more ways to creatively design GIFs. Just imagine what one could achieve using the Warp tool, for example. ;-)
2.2. Creating GIF magic from Linux/Unix command lines
Let's use Imagemagick for this purpose. It is widely used on Nix systems and works like a charm.
In case you do not yet have it installed on your hard disk, first install it via the package manager of your choice.
In Ubuntu and Debian, you can simply install it from the standard package sources via APT.
sudo apt-get install imagemagick
Now let's create a folder and copy all the images that we want to insert into our GIF into this folder. Then we need to navigate to this folder.
Imagemagick has a handy tool called "convert" - it's an image converter that converts images from one file format to another. And it's really powerful when used for such tasks.
We can even use it to create complex GIFs.
2.2.1. Simple GIF from all JPGs in a folder
If you wanted all images to be inserted with the same delay, you can simply use the command line below.
convert -delay 100 -loop 0 *.jpg my.gif
The argument "-delay" takes
In this example, the argument "-delay" will set the delay for all frames to 1/100th of a second. The next parameter "-loop 0" means that the animation should be repeated infinitely often. We can set it to a higher positive number to tell imagemagick exactly how many times the animation should be repeated.
The next parameter, the file filter pattern, defines which files imagemagick should load from the current folder. In this case, all files with the filename extension JPG.
The position parameter with "my.gif" defines the output filename of our GIF.
2.2.2. Different delays
However, imagemagick allows you to create much more precisely defined GIFs.
Imagine creating a GIF in which all images are displayed with a different delay.
convert -loop 0 -delay 100 001.jpg -delay 50 002.jpg -delay 180 003.jpg my.gif
A specific delay is set for each image in the command line. Simply repeat this section -delay 100 001.jpg for each image you want to add and replace the filename and 100 with your delay value.
2.2.3. Mixing search patterns and different delay values
It is also possible to use search patterns instead of fixed filenames.
convert -loop 0 -delay 40 {001..003}.png -delay 300 004.png my.gif
For the first delay definition, the search pattern causes the convert tool to use all images from 001.png to 003.png. A different delay value is used specifically for 004.png.
2.2.4. Ensuring the right output size
Up to this point, we only had to rely on the correct size of the input images to obtain a GIF with the desired image size. This does not always work.
With the Imagemagicks convert tool, we can ensure that we get the right size with using just a single extra parameter.
convert -delay 40 {001..003}.png -delay 300 004.png -resize 640x400 my.gif
The resize parameter can be used to resize the output by choice proportionally or by a fixed resolution.
Non-proportionally:
convert -delay 40 {001..003}.png -delay 300 004.png -resize 640x400\! my.gif
Just by adding ! behind the resolution argument of the parameter, you can force "-resize" to ignore the aspect ratio.
Of course, this section of the tutorial can only give a brief overview of the possibilities of creating GIFs with Imagemagick. For more detailed information, please check the official manual of the toolkit.
2.3. Creating GIFs online
The EzGIF maker is a nice tool for quickly creating GIFs via a web interface. However, a major deficit of this tool is that you have to upload your images to a computer (server) that you don't own. If that's okay for you, then EzGIF is a good choice for creating GIFs when you're away from home or from computers where you're not allowed to install software. But even for a quick fix, it's still better than hacking the bits together by hand.
Link: https://ezgif.com/maker
It's pretty self-explanatory, but since my finger muscles are already warm, I'd like to add a few words about it.
2.3.1. First steps
Quick tips! Before uploading your images there, make sure they are numbered correctly (e.g. image001.png) so that the online service can sort the images in the correct order automatically.
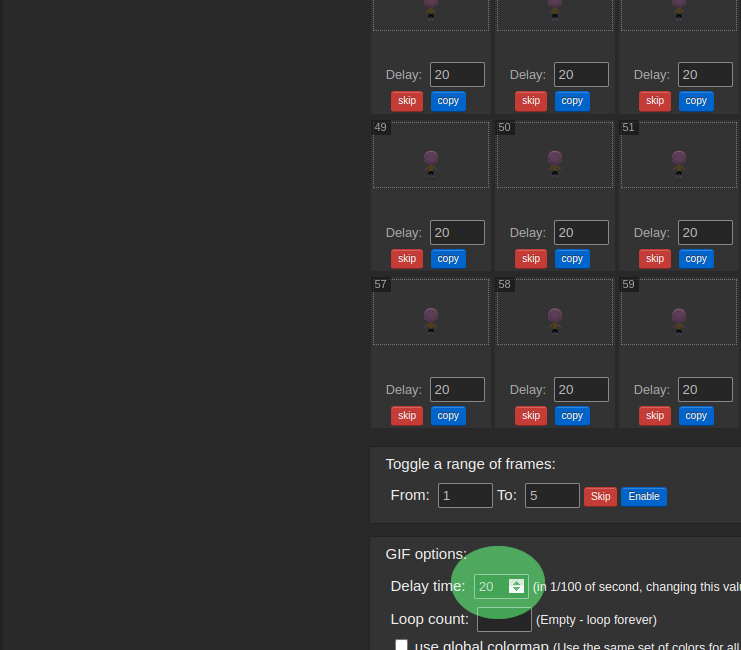
If the upload was successful, EzGIF Maker displays an overview of all uploaded images/frames.
Below each of these frames there is an input field in which you can set the delay specifically for the image.
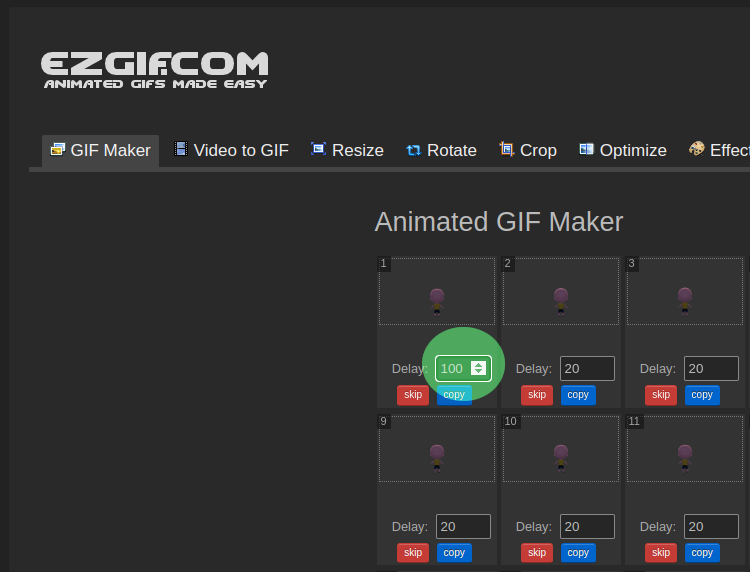
You can also set a general delay value for all frames, but I recommend doing this first and then setting all specific frame delays. This is because setting this value overrides the latter.
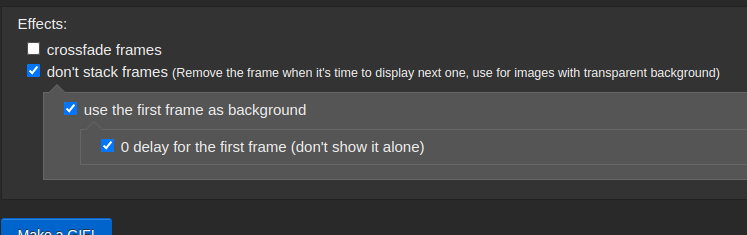
If you don't actually seek to create a GIF using cumulative frame stacking (see GIMP section), you can activate the "Don't stack frames" checkbox.
If it is activated, further checkboxes will be displayed. With the first one, you can specify that the first frame should be the background frame. The second box allows you to set the delay of the image. If you set the value to 0, the GIF will never be displayed as a separate frame.
Once you have made all the configurations you wish on the overview page, you can click on the "Create GIF" button. The newly created GIF will be displayed below this button along with some information.
2.3.2. Optimizing
Maybe, you will notice that it is much too large. If you click on the "Optimize" button below the GIF, you will have the chance to make it smaller. Doing so will open the compression settings for your GIF.
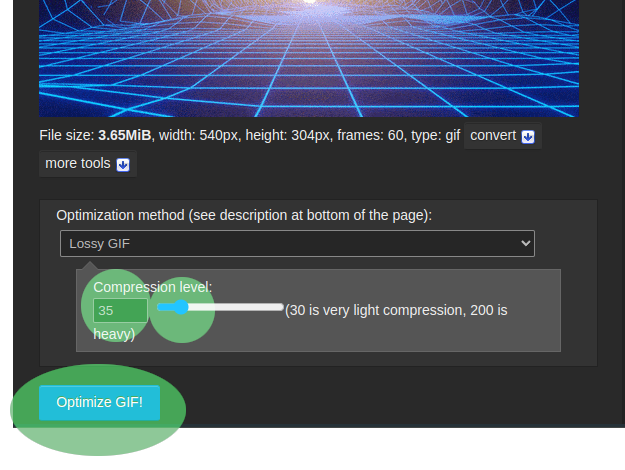
To reduce the size of your GIF, you can set the compression level. Please note that the higher the compression level, the higher the loss of quality.
You can save your GIF from any subpage you are currently on by using your browser's context menu on the GIF image.
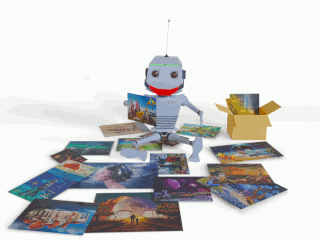
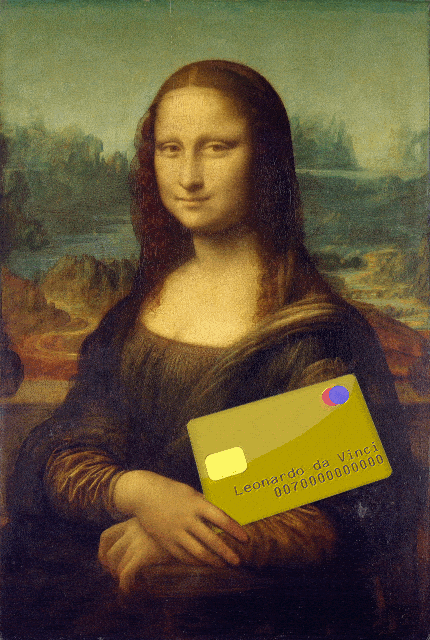
For inspiration: Collage as a GIF
Material sources
https://pixabay.com/de/vectors/film-filmstreifen-negatives-297239/
https://pixabay.com/de/vectors/klappe-film-schneiden-video-311792/
https://pixabay.com/de/photos/kunst-malen-mona-lisa-klassisch-74050/
Best regards
QuantumG
Awesome tutorial!
Glad to read that. Thank you! :-)
I've always had a bad relationship with Gifs, I'm not very good at them and when I try I waste a lot of time trying to upload them to the post and in the end I end up giving up and wasting time. Now I only post photos without movement.
I hope your extensive tutorial will help me to create one that I can upload to my blog!
Thanks my friend for putting so much effort to teach us! 👍