Web Dev Tutorial - Super simple card stack
This tutorial is rather basic, but teaches a few cool things about styling your html content.
What we're building
Nothing fancy, just a stack of cards.
Why are we doing this again?
@cadawg is the main front-end dev of @nftmart and currently when buying or selling cards, it ends up scrolling the page after adding a handful of cards.... In an attempt to describe what I felt would be a better option for displaying cards in the cart, I figured I'd just write out a quick example.. ish... then I dorked around and made it look a "little better".
Let's get to the tutorial..
Ok, so first, since we want to display a stack of cards, lets make a stack of DIV's
<div id="card">A ♣</div>
<div id="card">2 ♣</div>
<div id="card">3 ♣</div>
<div id="card">4 ♣</div>
<div id="card">5 ♣</div>
Now here we have a random looking string, ♣ this is the ♣ character that will be displayed on the cards... If you want to see a list of codes you can use for inspiration for other ideas check here or here. Just make sure to use the HTML Code bits.
and add some card table style to the page with:
<style>
body {
  background: teal
}
</style>
Ok. so viewing this in our browser will show something along the lines of the following with a teal background
A ♣
2 ♣
3 ♣
4 ♣
5 ♣
on the page, lets make it look fancy!
Make them look like cards
To make the DIV's look like some actual cards, lets add some CSS style.
First thing that makes a card a card, is some dimensions, lets go with 175 pixels wide and 300 pixels tall, which would be width: 175px; height: 300px;.
Next up, everything that has a context in relation to other objects has a border, that can be added with border: 2px solid black;
Cards typically have a White face, that can be added with background: white;
Now, not to many cards have square corners, to round them out a bit, you'd want to add a border-radius, that can be accomplished with border-radius: 25px;
At this point, the card is mostly done, just a few finishing touches needed, like moving the text out a bit from the edge of the card, a simple padding can fix this with padding: 25px;
Sweet, our cards look like cards, except they are all on different lines, since we want them all stacked with the card name to be displayed, we'll line them up with display: inline-block;
Here's the CSS so far
#card {
  border: 2px solid black;
  background: white;
  width: 175px;
  height: 300px;
  border-radius: 25px;
  padding: 25px;
  display: inline-block;
}
Ok, so at this point, we have our cards, but they aren't stacked... To do that we need a base card the others will be stacked on, and then another style for the subsequent cards... lets convert our code from a single style for all cards to 2 separate styles.
The first thing you will notice here is that #card has been split into two of the same bits, and renamed to #cardOne & #cardMore, and the difference is the placement of More cards, which will be a little to the right of the prior card, this is accomplished with margin-left: -160px;
#cardOne {
  border: 2px solid black;
  background: white;
  width: 175px;
  height: 300px;
  border-radius: 25px;
  padding: 25px;
  display: inline-block;
}

#cardMore {
  border: 2px solid black;
  background: white;
  width: 175px;
  height: 300px;
  border-radius: 25px;
  padding: 25px;
  display: inline-block;
  margin-left: -160px;
}
At this point, we're back to the boring generic un-styled DIV's, we need to update the named for them as well.... Simply remember that we need a base, and the rest... so the first DIV will be renamed CardOne, and the rest to cardMore as below
<div id='cardOne'>A ♣</div>
<div id='cardMore'>2 ♣</div>
<div id='cardMore'>3 ♣</div>
<div id='cardMore'>4 ♣</div>
<div id='cardMore'>5 ♣</div>
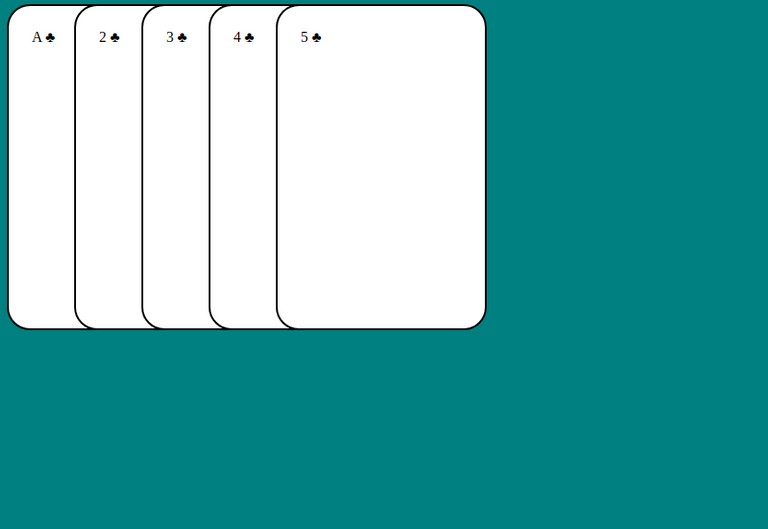
At this point the tutorial is complete, and you should have something that looks like the image above. To view the completed code for this tutorial, check it out on codepen here: https://codepen.io/sn0n/pen/ExgJgra
Thank you for checking out my tutorial, hope you enjoyed it and here's to looking forward to more @nftmart features to come!
Thonks for contributing the codings to Programming
Absolutely. Any topics you'd like to see a tutorial on?
How to write un-bad react so the other react dev doesn't keep flexing on me w/ his actually good react
Why is frontend work so hard?
What ya mean hard? LoL. This is Myspace level stuff! Haha..
What would you like to see more videos about?
Nice one. Thanks for posting.