TUTORIAL: How to illustrate images with Medibang ★ Drawing a sunset ★


Greetings art lovers.
Are you just starting out in design? It's good to start by illustrating while you get to know and learn about the tools offered by the design program you are using.
This tutorial applies not only to Medibang Paint Pro in any of its versions, either Android or PC, it also applies to Ibispaint and Krita, which are very similar.
Making an illustration is like having a reference base on which we make a kind of tracing, we take an image, a real photograph to the digital plane, turning it into digital art.
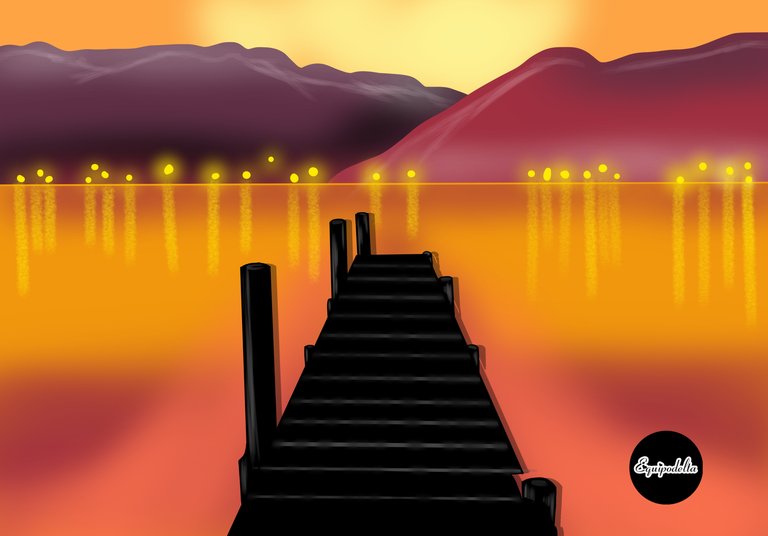
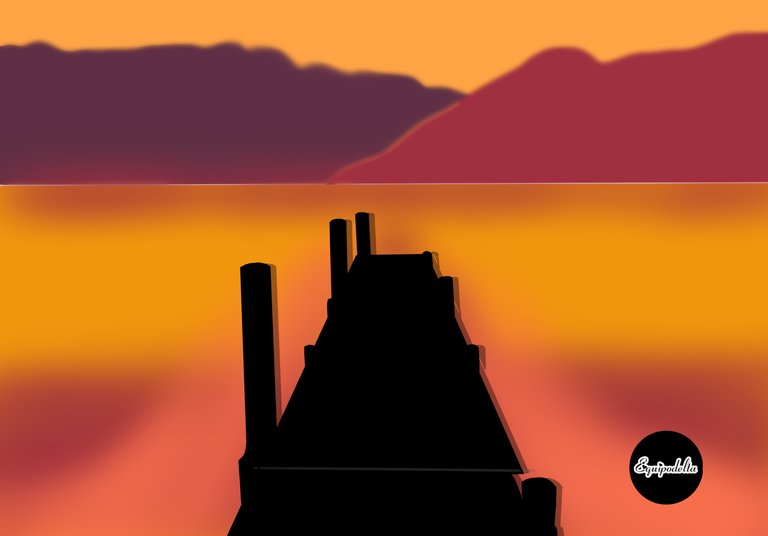
The fun of this is that you can play with the colors, in my case, I have completely changed the scene, turning it into a sunset.
Join me and I'll explain the step by step, at the end you also have a video tutorial I've created in case you want to see it live.

Saludos amantes del arte.
¿Estás comenzando en esto del diseño?. Es bueno empezar por ilustrar mientras vas conociendo y aprendiendo sobre las herramientas que te ofrece el programa de diseño que estás empleando.
Este tutorial aplica no solo a Medibang Paint Pro en cualquiera de sus versiones, sea Android o sea para PC, también aplica para Ibispaint y Krita, que son muy similares.
Hacer una ilustración es como tener una base de referencia en la que hacemos un especie de calco, llevamos una imagen, una fotografía real al plano digital, convirtiéndolo entonces en arte digital.
Lo divertido de esto es que puedes jugar con los colores, en mi caso, he cambiado completamente la escena, convirtiéndola entonces en un atardecer.
Acompáñame y te explico el paso a paso, al final también tienes un video tutorial que he creado por si gustas ver en vivo.

Paso a paso. / Step by Step
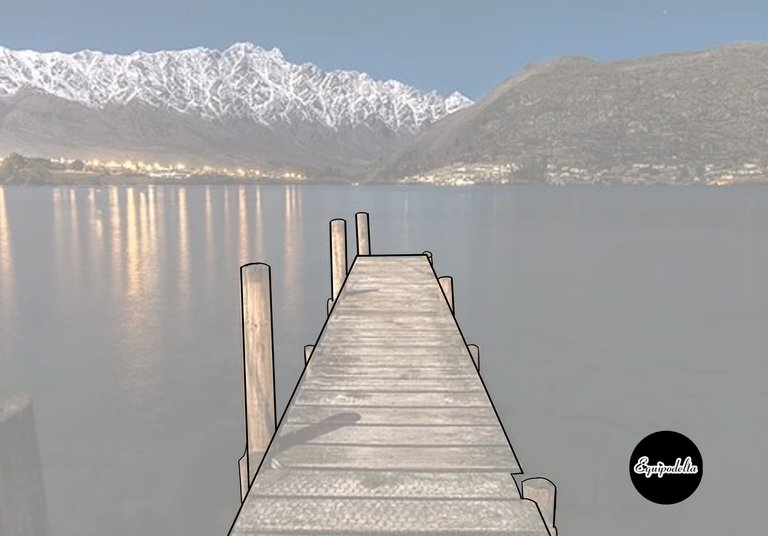
Step 1: Having the reference image or your photograph, open the program and place the image in a new workspace, adjust the opacity of that layer to make it a little transparent, open a new layer and proceed with the tracing.
There are days that my pulse doesn't help me much, the design programs I mentioned have tools that help to create perfect lines, don't hesitate to use them if you need it.
In the case of Medibang, I used the Zig Zag Geometric Figures tool.
Paso 1: Teniendo la imagen de referencia o tu fotografía, abre el programa y coloca la imagen en un nuevo espacio de trabajo, ajusta la opacidad de esa capa, hasta hacerla un poco transparente, abre una nueva capa y procede con el calco.
Hay días que mi pulso no me ayuda mucho, los programas de diseño que mencioné tiene herramientas que ayudan a crear líneas perfectas, no dudes en usarlas si lo necesitas.
En el caso de Medibang, usé la herramienta Figuras Geométricas: Zig Zag.
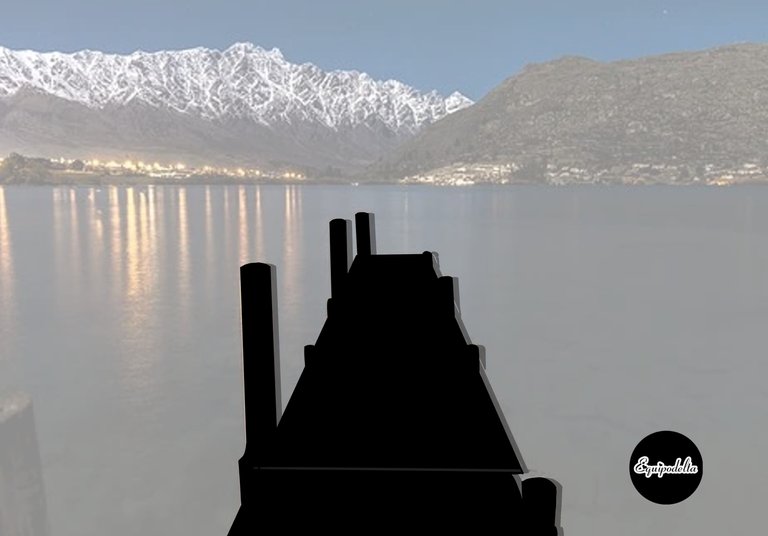
Step 2: Preferably working in separate layers, open a new layer before the line you just made and with the Paint Bucket tool, fill the space.
You will need to hide the image while you do the color fill.
In this step also, I took the opportunity to copy the image twice and create shadows, the image before it, I adjusted the opacity of the layer, you can do it too, if the design you chose deserves it.
Paso 2: Preferiblemente trabaja en capas separadas, abre una nueva capa anterior al lineado que acabas de hacer y con la herramienta: Bote de pintura, rellena el espacio.
Necesitarás ocultar la imagen mientras haces el relleno de color.
En este paso también, aproveché para copiar la imagen dos veces y crear sombras, la imagen anterior a ella, ajusté la opacidad de la capa, tú también puedes hacerlo, si el diseño que elegiste lo amerita.
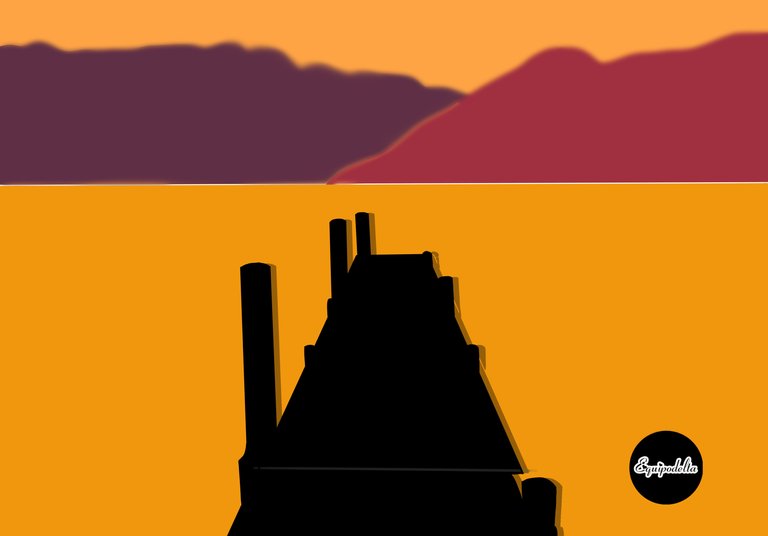

Step 3: Repeat the previous steps, in separate layers, border the outline of each image and then in another layer fill in the color.
If you notice I used an earth color palette, very harmonic, to achieve the orange sunset effect.
Paso 3: Repite los anteriores pasos, en capas separadas, bordea el contorno de cada imagen y luego en otra capa rellena el color.
Si notas empleé una paleta de color tierra, muy armónica, para lograr el efecto atardecer naranja.
Paso 4: Juega con las luces y sombras creando entonces profundidad y que el diseño no se vea tan plano, para ello puedes emplear el pincel Aerógrafo, en una capa nueva superior a todas.
Step 4: Play with the lights and shadows creating then depth and that the design does not look so flat, for this you can use the Airbrush brush, in a new layer on top of all.

Paso 5: Aplica un poco de luz con aerografía, he recreado la luz del sol ocultándose tras las montañas.
Procede entonces a recrear las luces de las casas que harán reflejo en el agua, deja que tu creatividad sea la guía.
Step 5: Apply some light with airbrushing, I have recreated the sunlight hiding behind the mountains.
Then proceed to recreate the lights of the houses that will reflect on the water, let your creativity be the guide.

Paso 6: En una capa nueva con el pincel Chlak, puedes recrear los reflejos de las luces sobre el agua.
En una capa anterior a las luces, debes crear un efecto de iluminación, con un color más claro y el pincel aerógrafo, puedes lograrlo.
Recrea las luces que se forman en los mástiles del puente, así mismo las marcas de las tablillas, este efecto puedes lograrlo con el pincel Pluma Gruesa y luego usas el pincel Borroso para difuminar. Para ayudarte a crear líneas derechas puedes usar la herramienta Curva.
Es todo por hoy amigos, espero que te sea de utilidad este lindo tutorial muy sencillo.
Recuerda que el arte de dibujar debe ser una práctica relajante, estimulante y que disfrutes mientras lo haces, poco a poco y a tu ritmo.
Step 6: On a new layer with the Chlak brush, you can recreate the reflections of the lights on the water.
On a layer before the lights, you must create a lighting effect, with a lighter color and the airbrush, you can achieve it.
Recreate the lights that form on the masts of the bridge, as well as the marks of the slats, this effect can be achieved with the Coarse Feather brush and then use the Blur brush to blur. To help you create straight lines you can use the Curve tool.
That's all for today friends, I hope you find this nice and simple tutorial useful.
Remember that the art of drawing should be a relaxing and stimulating practice that you enjoy while you do it, little by little and at your own pace.
Detalles Técnicos / Technical Details
Program: MediBang Paint Pro.
Graphics tablet: Huion (Usb Pen Tablet). Model 420.
Used Medibang brushes:
- Chalk.
- Aerógrafo.
- Pluma (gruesa)
Used Medibang tools:
- Borrador.
- Figuras geométricas (zig zag)
- Herramienta Curva.
- Bote de pintura.
Corrector de idioma / traductor
––––––––––––––––––––––––––––––
Music vídeo:
Campfire by Roa
Creative Commons — Attribution 3.0 Unported — CC BY 3.0
Music promoted by Audio Library
––––––––––––––––––––––––––––––


Interesante y sencilla! Creo que esta es una buena forma de diseñar imágenes porque es fácil y sin muchas herramientas. Gracias por compartir ;)
Holaaaa!, si es muy sencillo, con efectos relajantes te lo aseguro. Si lo intentas lo lograrás, recuerda, siempre digo: Yo presento ideas, tú las mejoras <3 Un abrazo.
वाह बेहत लाजवाब फोटोज़
আপনাকে অনেক ধন্যবাদ :)
Un excelente y muy completo tutorial acerca de una herramienta digital muy útil. En lenguaje sencillo y didactico, siempre tienes acierto para este tipo de publicaciones pues, te sabes expresar de forma se collar que pueda ser alcanzable a todo público. Cómo siempre, hermoso trabajo, querida @equipodelta. Gracias por compartir tu conocimiento. Mi abrazo y mi cariño! 🤗😙🇻🇪💖🌹🌈
Amiga, gracias por tus lindas palabras, compartir conocimientos siempre es un grato placer. Me gusta explicarlo modo coloquial, simple y comprensible pues me sucede que cuando veo un tutorial y me hablan en lenguaje demasiado técnico no comprendo nada, no es muy bueno para quien inicia en algo, y siempre terminamos viendo el tutorial estresados, yo pretendo sacar sonrisas, tampoco es fácil esto. Muchas gracias amiga por esa fuerza y fuente de motivación, Dios te bendiga.
Congratulations, your post has been upvoted by @dsc-r2cornell, which is the curating account for @R2cornell's Discord Community.
Enhorabuena, su "post" ha sido "up-voted" por @dsc-r2cornell, que es la "cuenta curating" de la Comunidad de la Discordia de @R2cornell.
Linda ilustración, amiga @equipodelta
Haces cosas muy lindas con Medibang.
Felicitaciones
Muchas gracias amiga :( a mi también me encanta tu trabajo.