[ESP | ENG] ✍ Drawing a SKATER 🤟 | ✍ Dibujando un SKATER 🤟
¡Buenas comunidad HIVE!
Observando imágenes en la página pexels me encontré con este personaje, ¡un skater!, Esa pose me encanto, me recuerda a muchos de mis amigos que practicaban este hermoso deporte, así que por ese motivo decidí aplicar esta técnica que tanto me gusta, para poder realzar ese momento en que el fotógrafo lo tomó 😉. La imagen la tomé de referencia para crear un fondo acorde con el diseño, a continuación, les presento el proceso a realizar.
English
English
Good
HIVEcommunity!Looking at images on the pexels page I found this character, a skateboarder, I loved that pose, it reminds me of many of my friends who practiced this beautiful sport, so for that reason I decided to apply this technique that I like so much, to enhance that moment when the photographer took it 😉. I took the image as a reference to create a background in accordance with the design, then I present the process to perform.

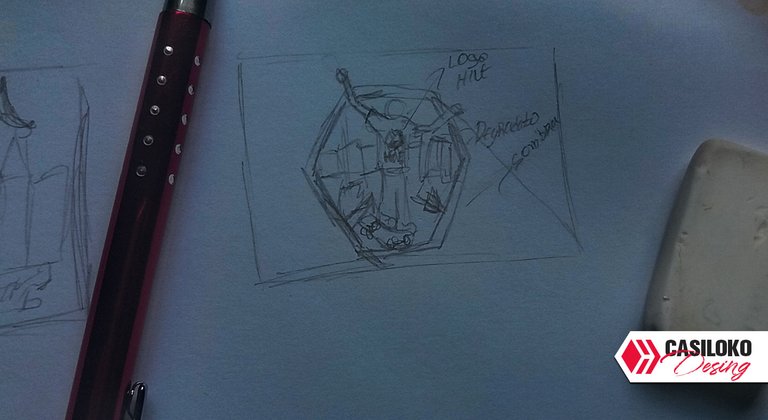
Como de costumbre inicio con la realización de un boceto. En los anteriores post recomiendo hacer siempre un boceto para poder llegar a tener una idea de lo que quiero lograr; en este caso voy a tomar de referencia la imagen y si quiero añadir algunos elementos los plasmo en el boceto, logrando tener una idea general y clara. Para este diseño al igual que los anteriores publicados, no se utilizará muchos recursos, solo tener: papel, lápiz y muchísima imaginación 😊. Miren como me quedó la idea en el boceto que realice.


English
English
As usual, I start with the realization of a sketch. In the previous posts I recommend to always make a sketch in order to get an idea of what I want to achieve; in this case I will take the image as a reference and if I want to add some elements I will capture them in the sketch, getting a general and clear idea. For this design, as well as the previous ones published, I will not use many resources, just have: paper, pencil and a lot of imagination 😊. See how the idea looks in the sketch I made.
Español
|
English
|
|---|---|
|
Programa utilizado:
Illustrator cc2019
Colores:
Negro #100b11Rojo #c11f1fAzul #3a31f4 Azul Claro #daeafeBlanco #ffffffDegradado Azul Oscuro ubicación 0% #387979ubicación 50% #13244aDegradado Azul Claro ubicación 0% #68e0e0ubicación 86% #3f85a1
Dimensiones:
1440px x 900px
Imagen:
pexels-photo-3133688 Fuente
|
|

Paso 1/ Step 1
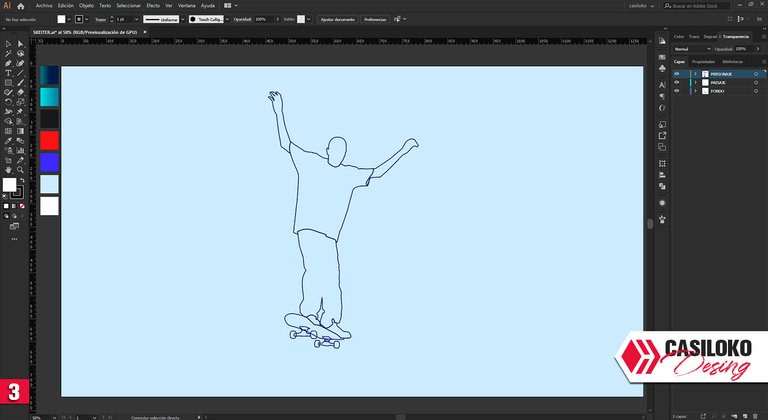
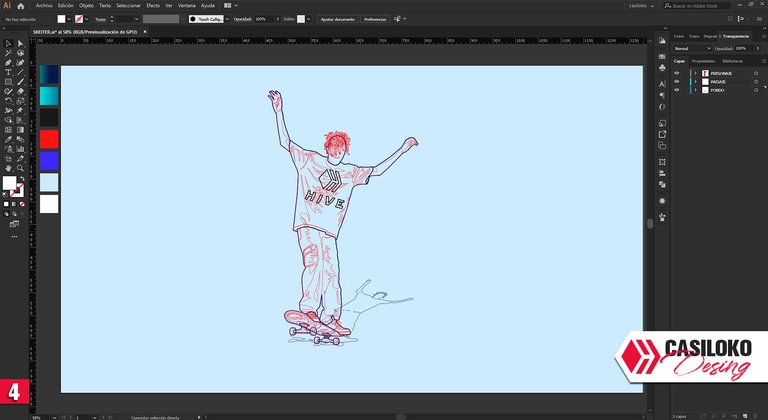
Creamos una nueva composición de dimensiones de 1440px x 900px, colocaremos la foto que vamos a utilizar (img 1), con la herramienta ✒️ pluma (P) empezamos a delinear las partes de variación de color (img 2) tendría que quedar de la siguiente manera (img 3). Muy cuidadosamente vamos a delinear todas las sombras que creamos oportunas y añadiendo los elementos hasta que nos guste el resultado (img 4).
English
English
We create a new composition with dimensions of 1440px x 900px, we place the photo that we are going to use (img 1), with ✒️ the pen tool (P) we begin to delineate the parts of color variation (img 2) should be as follows (img 3). Very carefully we are going to delineate all the shadows that we create and adding the elements until we like the result (img 4).


Paso 2/ Step 2
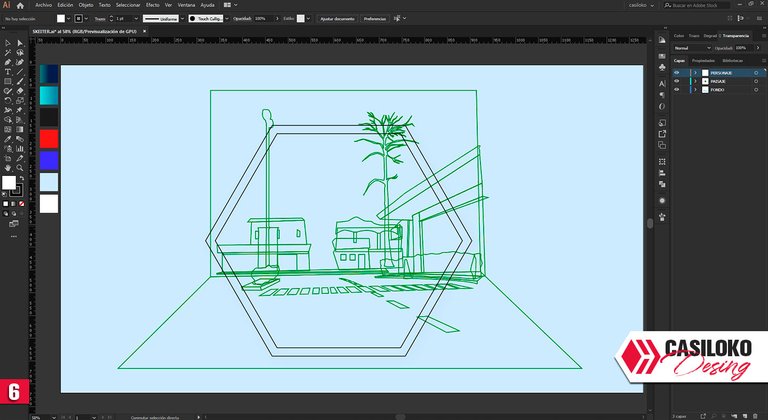
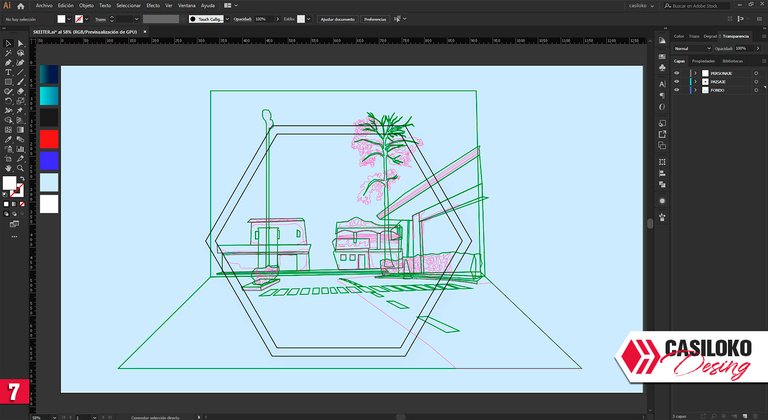
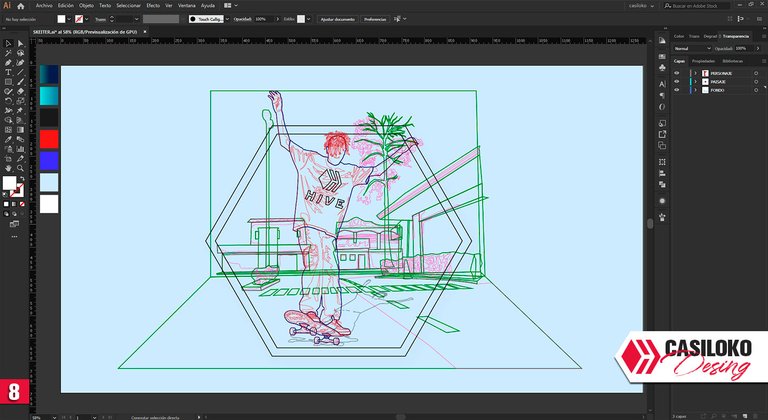
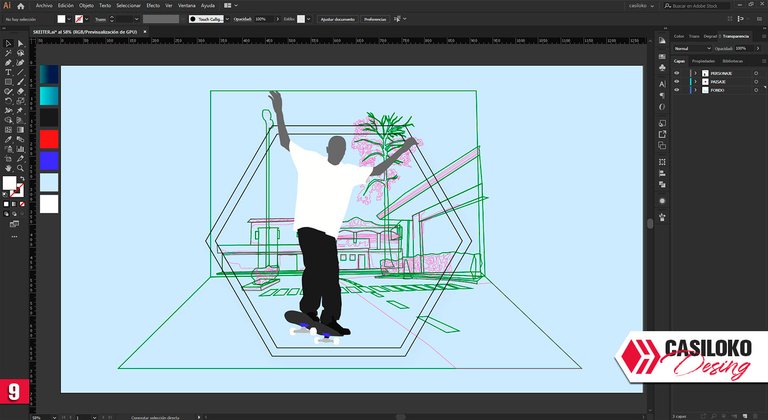
Empezamos a dibujar el fondo, en mi caso, como ya les mencioné, tomaré el fondo de referencia de la imagen, realizamos la silueta de los edificios y delineamos todos los implementos necesarios (img 5). Debería quedar de la siguiente manera (img 6). Cuidadosamente vamos a delinear todas las sombras que creamos oportunas y añadiendo los elementos nos parezcan oportunos (img 7) Colocamos el skater previamente delineado y la ajustamos al fondo (img 8).
English
English
We start drawing the background, in my case, as I already mentioned, I will take the reference background of the image, we make the silhouette of the buildings and we delineate all the necessary implements (img 5). It should look like this (img 6). Carefully we are going to delineate all the shadows that we create and adding the elements that we find appropriate (img 7). We place the skater previously delineated and adjust it to the background (img 8).
Paso 3/ Step 3
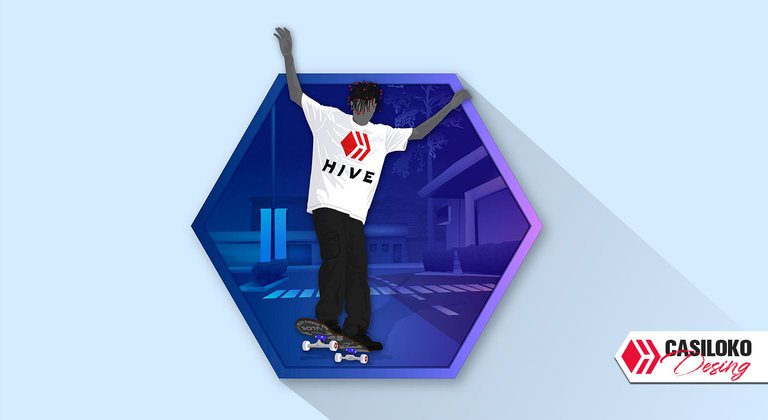
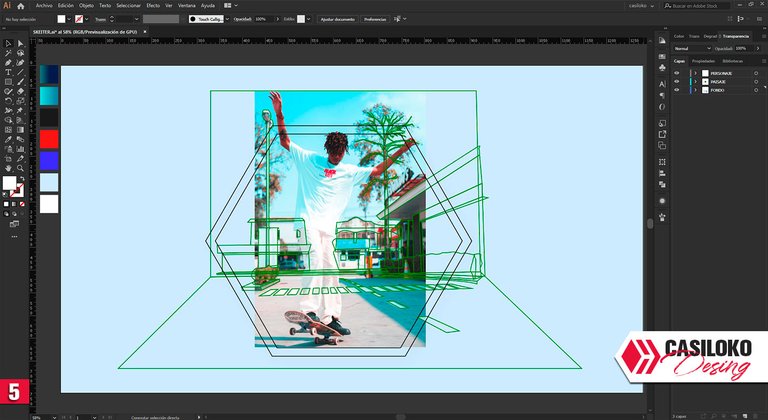
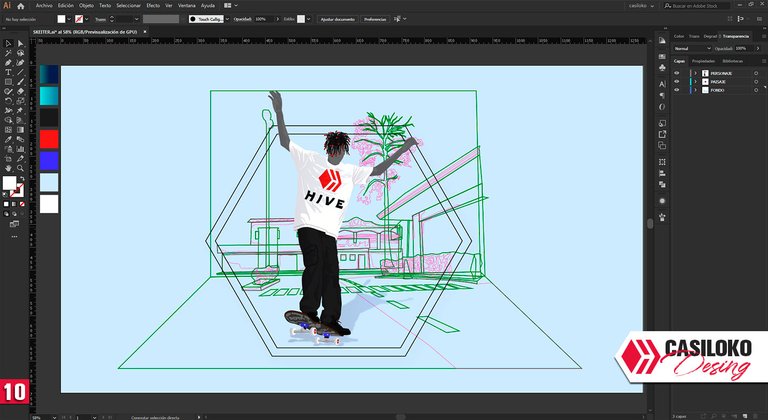
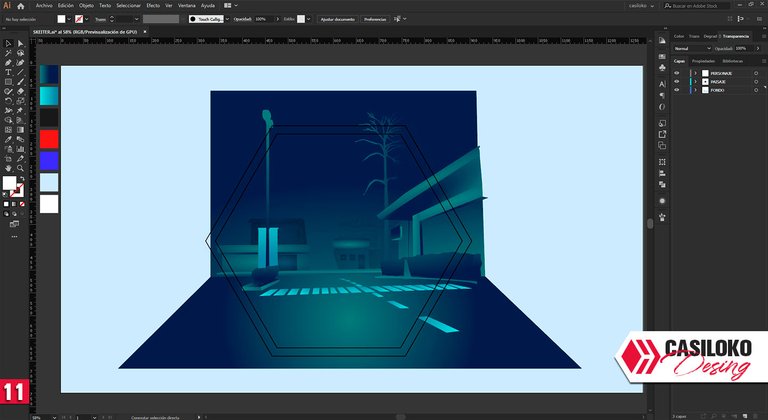
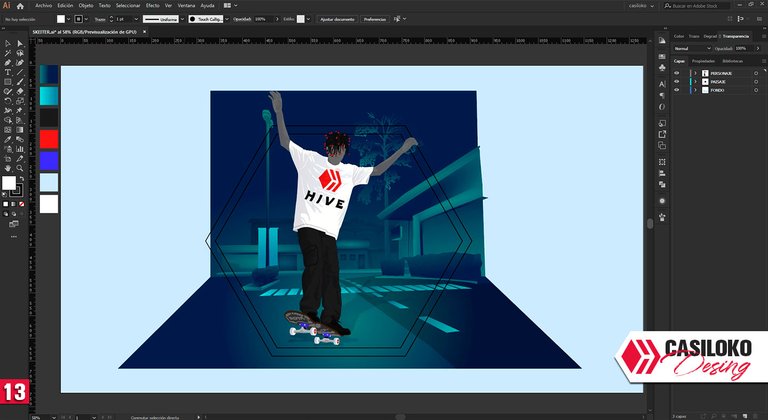
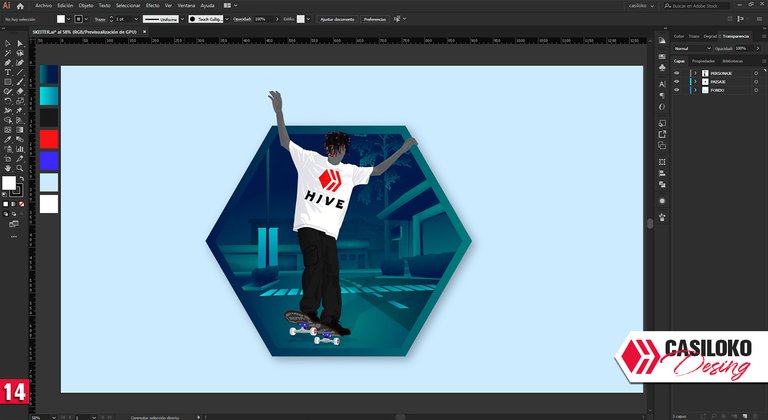
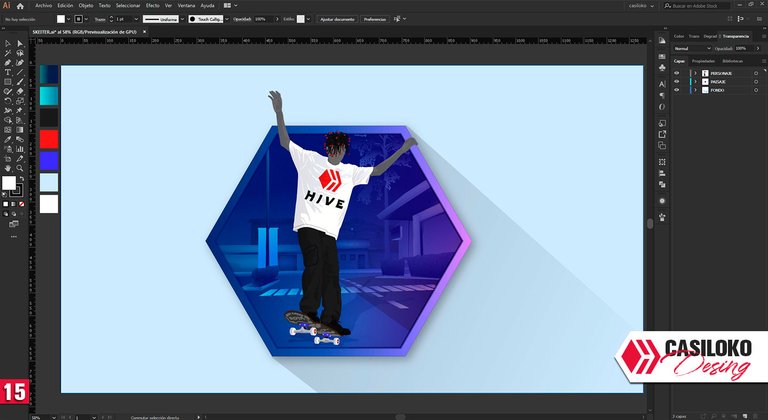
¡A divertirnos coloreando!, colocamos los colores base al skater (img 9), con el color negro en modo multiplicar vamos variando su opacidad según la dureza de la sombra que deseamos que tenga y colocamos al logo HIVE (img 10), le vamos dando color al fondo (img 11), con el color negro en modo multiplicar vamos variando su opacidad según la dureza de la sombra que deseamos que tenga el fondo (img 12) terminamos de ajustar toda la composición (img 13), le aplicamos una máscara de recorte (img 14) colocamos un hexágono al fondo, yo utilicé un color rojo en modo sobre posición para resaltar el color y listo, ya tendríamos el diseño 😉 (img 15).
English
English
Let's have fun coloring! We place the base colors to the skater (img 9), with the black color in multiply mode we vary its opacity according to the hardness of the shadow we want it to have and we place the HIVE logo (img 10), we give it color to the background (img 11), with the black color in multiply mode we are varying its opacity according to the hardness of the shadow we want to have in the background (img 12) we finish adjusting the whole composition (img 13), we apply a clipping mask (img 14) we place a hexagon to the background, I used a red color in over position mode to highlight the color and that's it, we would have the design 😉 (img 15).


Agradecido cada una de las personas que me votó, para mí es muy valiosa su votación. GRACIAS AMIGOS MIOS, por el voto de confianza en el post anterior y por tomar un tiempo para leer mis locuras.
También, quiero mandar un saludo a todos los amigos que me comentaron el post anterior, aprecio cada una de sus comentarios y bueno día a día iré mejorando mis post para traerles contenido de calidad.
GRACIAS HIVE
por esta aventura.
English
English
I am grateful to each and every one of the people who voted for me, for me their vote is very valuable. THANK YOU MY FRIENDS, for the vote of confidence in the previous post and for taking some time to read my crazy stuff. Also, I want to send a greeting to all the friends who commented on the previous post, I appreciate each of your comments and good day by day I will improve my posts to bring you quality content. THANK YOU HIVE for this adventure.
Bueno, ante los problemas y las adversidades solo les puedo aconsejar con todo mi corazón ❤️:

|
English

|
|---|
0
0
0.000
https://twitter.com/casilokodesing/status/1310181092205436928
Congratulations @casilokodesing! You have completed the following achievement on the Hive blockchain and have been rewarded with new badge(s) :
You can view your badges on your board and compare yourself to others in the Ranking
If you no longer want to receive notifications, reply to this comment with the word
STOPDo not miss the last post from @hivebuzz:
Excelente, te quedó sencillamente genial.
Gracias, con un poco de imaginación todo es posible
Así es, la imaginación es la base fundamental de cualquier diseño.
So nice to see all the process so datail, good job!!
Thank you very much
Estás haciendo cosas geniales!!! Súper chévere ir viendo el paso a paso del diseño.
He estado por contactarte para extenderte una invitación a un Concurso que estoy patrocinando con mi hermana para ilustrar la historia del Bosque Rojo, si quieres conocer más detalles ingresa a su blog en la cuenta @lacrucita
Feliz día 🤗