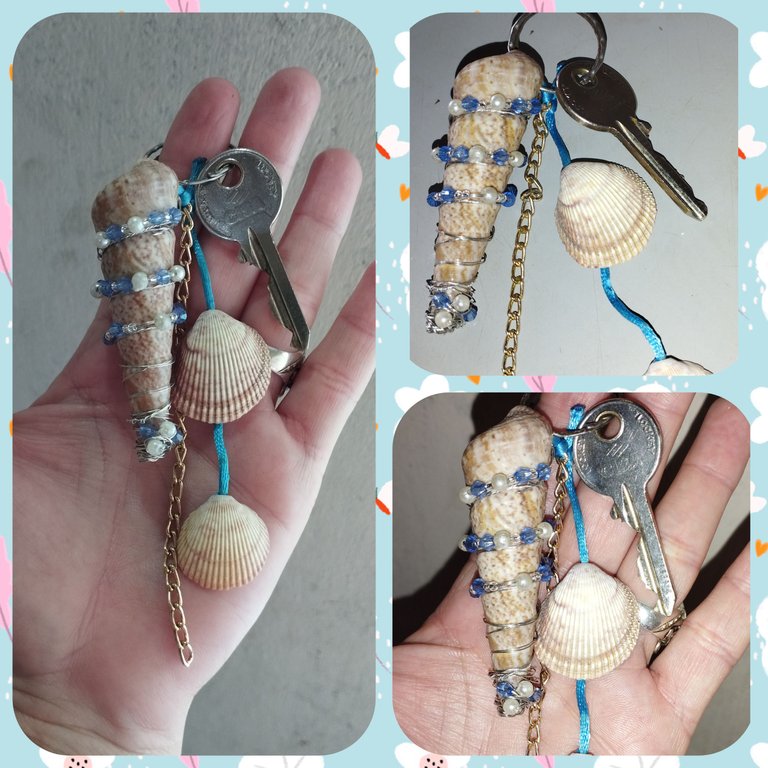
Cute keychain inspired by Healer Oceani. / Lindo llavero inspirado en Healer Oceani.
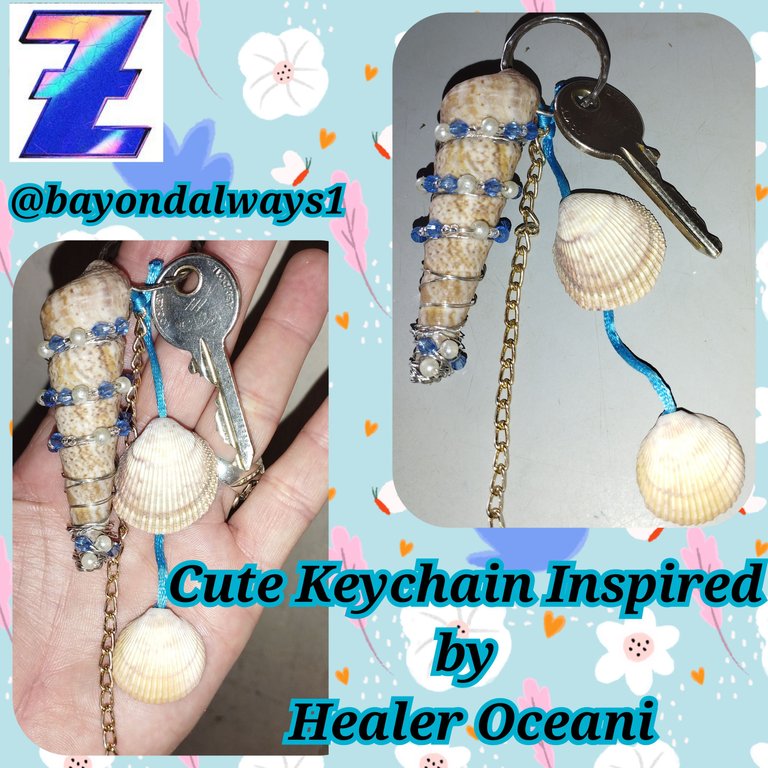
Greetings friends of @holozing it is a pleasure for me to share with you again my creations. This time I bring you a nice and delicate keychain inspired by Healer Oceani, for me it is an honor to show you my procedure. I really liked this decoration.
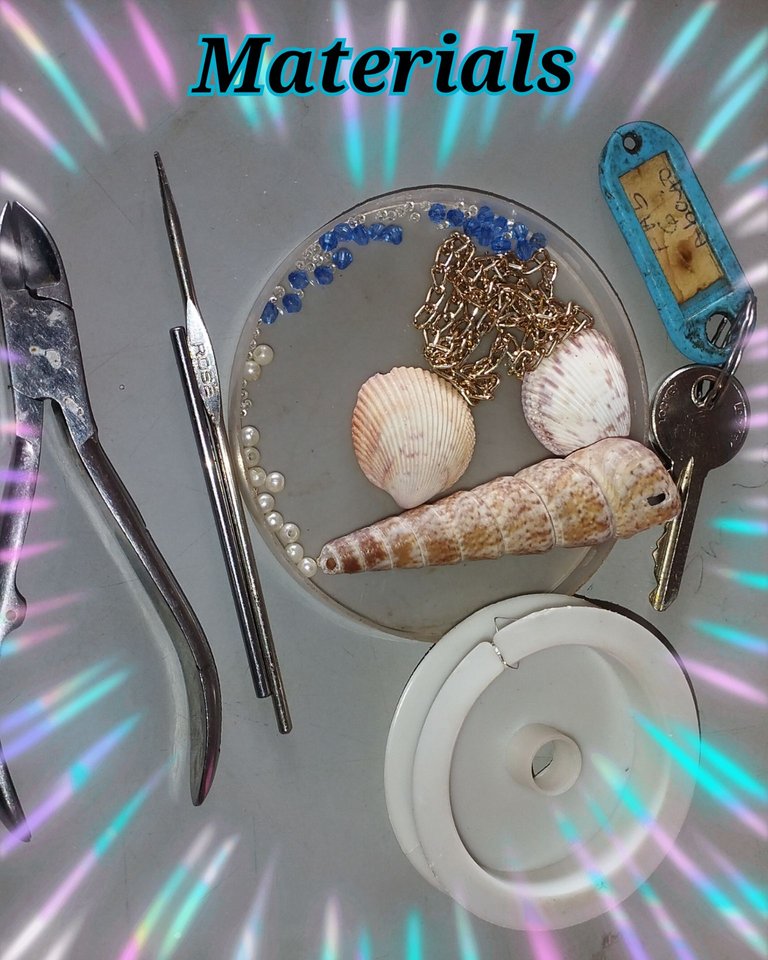
The materials I used were the following:
- Wire number 26.
- Snail.
- Sea shells.
- Sharosky.
- 3 mm. pearls.
- Pearlized white beads.
- Ring for keys.
- Tweezers.
- Metal toothpick.
- Chain.
Procedure for the Elaboration:
Step 1:
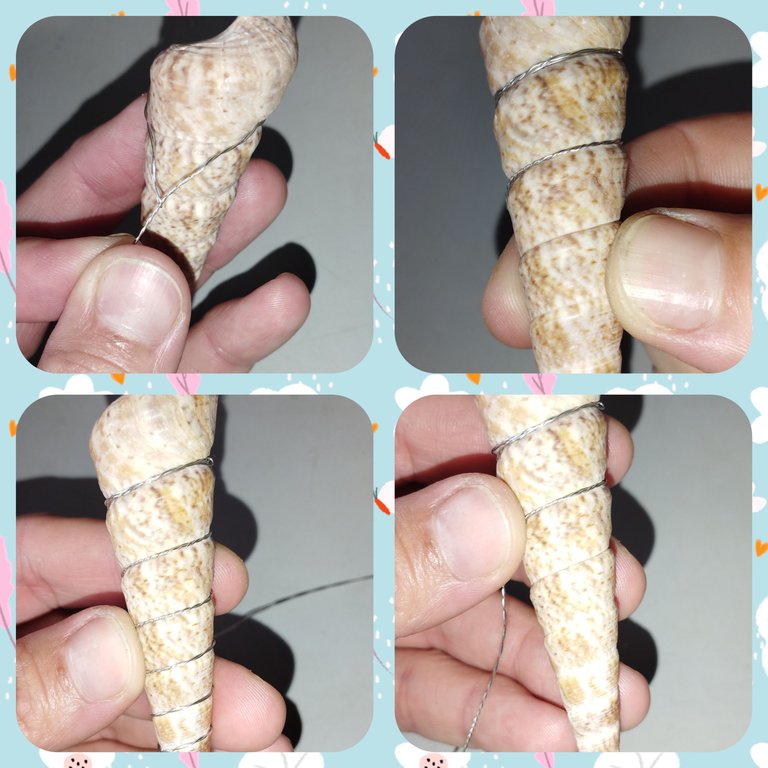
We cut 2 meters of wire number 26, and bend it so that it looks like a braid and two Y have a little more strength at the time of the statement in the snail as we will be turning around it.
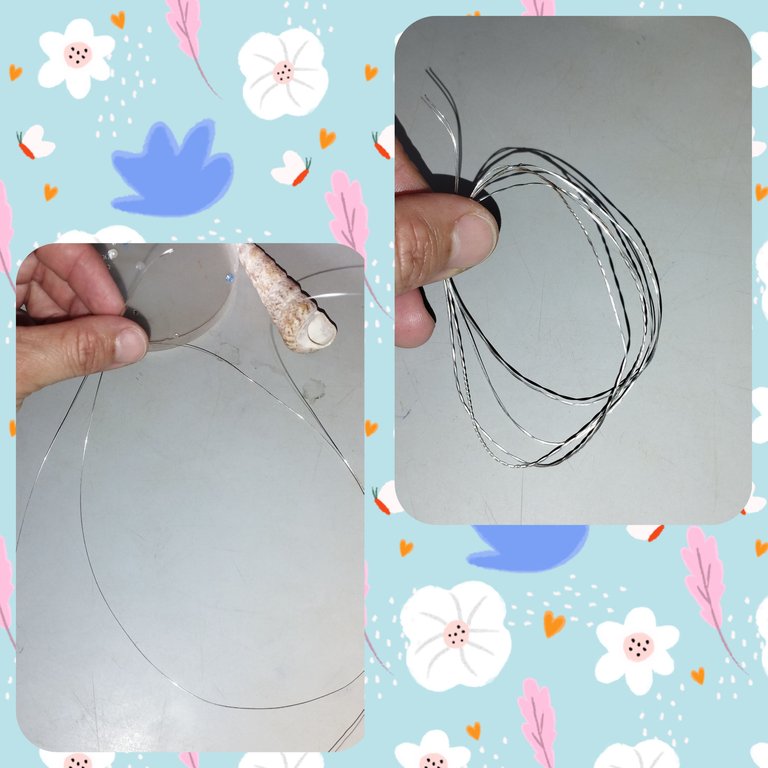
Step 2:
In the upper part with the help of the toothpick we will make a hole so that in the future the ring for the key is introduced.
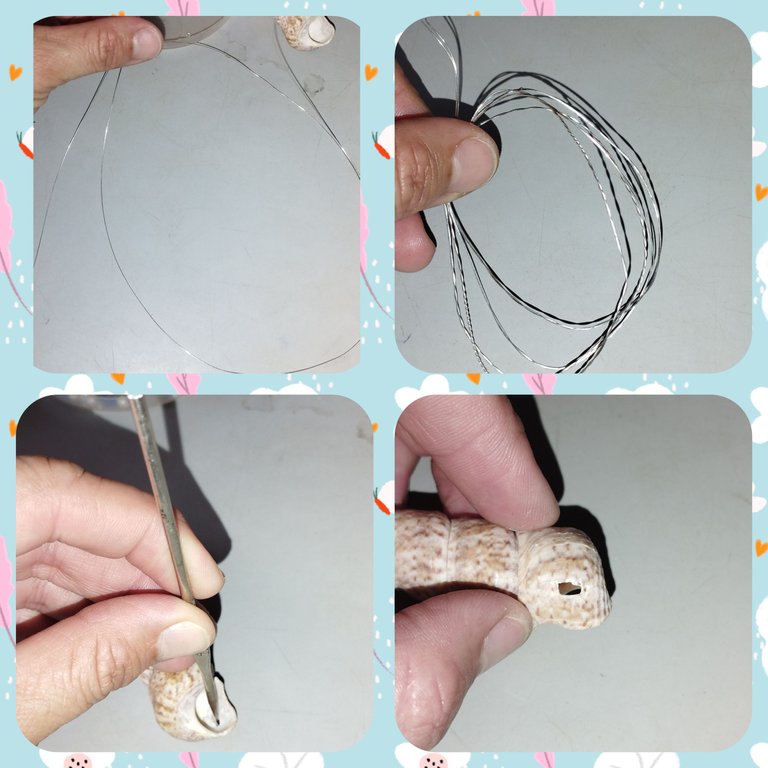
Step 3:
We fix the wire on the upper wall where the hole in the snail is. And we are going to go adjusting it in all the alrrededor of the snail a turn in each line that has naturally the snail.
Step 4:
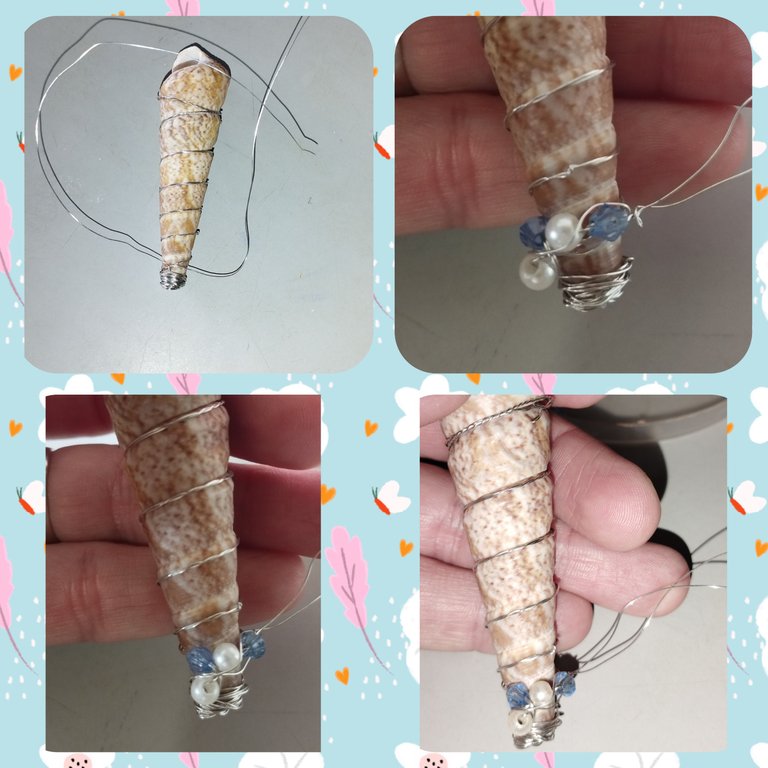
At the bottom we will repair the wires and we will place two pearls and two Sharosky to have an ornament at the bottom tip, we will adjust the tips well so that the stones do not move. This will also serve as a support for the wire so that it does not move and is well adjusted.
Step 5:
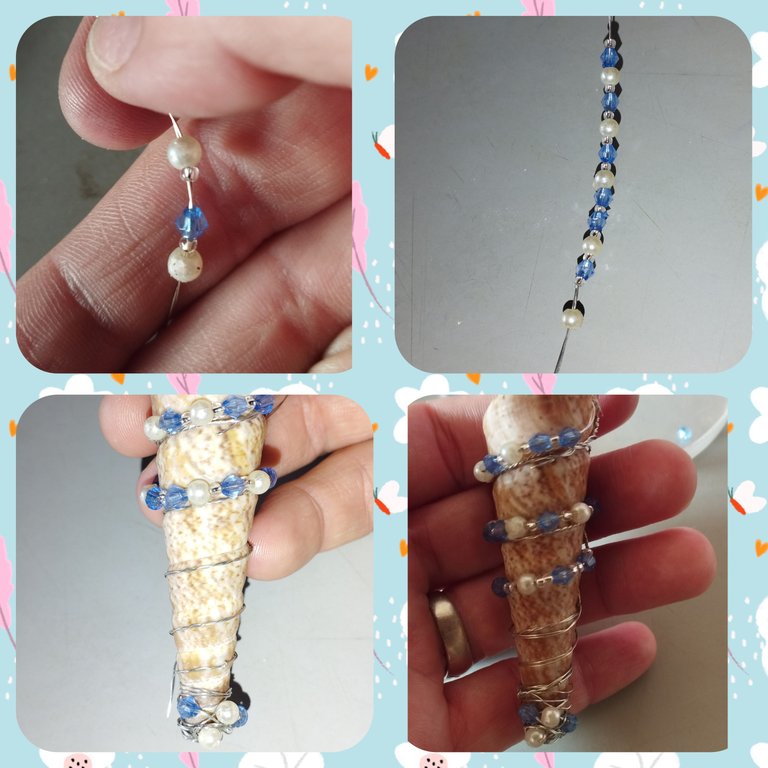
On the wire now we are going to place stones alternating between Sharosky, pearls and beads. We are going to place them on the wire in the order you wish. Once we have the stones ready on the wire we are going to go around the snail again, I only did 3 laps if you want to do it all the way down.
Step 6:
The shells are hollowed out and attached to a blue mouse tail ribbon, this was an afterthought, a chain ribbon is attached for embellishment. This will give the most feminine detail. The ring and key will be placed in the hole that was made in the top of the snail.
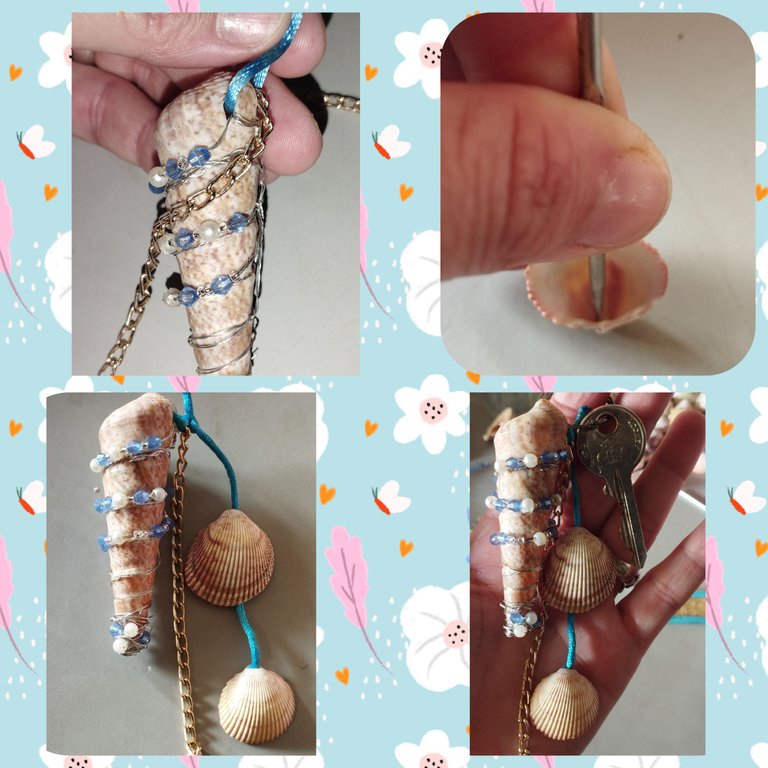
This way our Healer Oceani inspired keychain is ready. Cute and very easy to decorate and elaborate.
I thank you for your attention and support for the comments and I hope you like my creation.
Until next time. We read each other!
Greetings and blessings!
The images belong to me, they were taken from my Redmi Note 11 phone.
Images were edited by Polish photo editor program.
translator: Deepl Traslator.
Saludos amigos de @holozing es un placer para mí volver a compartir con ustedes mis creaciones. En esta oportunidad les traigo un lindo y delicado llavero inspirado en Healer Oceani, para mí es un honor mostrarle mi procedimiento. Ya que está decoración me gustó mucho.
Los materiales que utilice fueron los siguientes:
- Alambre número 26.
- Caracol.
- Conchas del mar.
- Sharosky.
- Perlas 3 milímetros.
- Mostacillas blancas perladas.
- Aro para llaves.
- Pinza.
- Palillo de metal.
- Cadena.
Procedimiento para la Elaboración:
Paso 1:
Cortamos 2 metros de alambre número 26, y lo doblamos esto para que se vea un trenzado y dos Y tenga un poco más de fuerza al momento de la declaración en el caracol ya que vamos a estar girando al rededor del mismo.
Paso 2:
En la parte superior en ayuda del palillo le haremos un hueco para que en el futuro se introduzca el aro para la llave.
Paso 3:
Fijamos el Alambre en la pared superior donde está el hueco en el caracol. Y lo vamos a ir ajustando en todo el alrrededor del caracol una vuelta en cada linea que tiene naturalmente el caracol.
Paso 4:
En la parte de abajo vamos a reparar los alambres y vamos a colocar dos perlas y dos Sharosky para tener un adorno en la punta de abajo, Ajustaremos bien las puntas para que las piedras no se muevan. Esto también servira de soporte para el alambre que no se mueva y quede bien ajustado.
Paso 5:
En el alambre ahora vamos a colocar piedras alternadas entre Sharosky,perlas y Mostacillas. Vamos a air colocando en el alambre el orden es como ustedes lo desean. Una vez que tengamos las piedras listas en el alambre vamos a dar vueltas nuevamente al rededor del caracol, yo solo di 3 vueltas si ustedes quieren lo hacen completos hasta abajo.
Paso 6:
Se le abren un hueco a las conchas y se fijan en un listón de rabo de ratón azul este fue una idea de última hora, se le coloca un liston de cadena para adorno. Este le dará el detalle más femenino. Se le colocará el aro y la llave en el hueco que se le realizó en la parte superior del caracol.
De esta manera ya nuestro llavero inspirado en Healer Oceani ya está listo. Lindo y muy fácil de decorar y elaborar.
Agradezco por su atención y por el apoyo por los comentarios y espero les guste mi creación.
Hasta la próxima. Nos leemos!
Saludos y bendiciones!
Las imagenes me pertenecen, fueron tomadas de mi teléfono Redmi Note 11.
Las imágenes fueron editadas por programa de editor de fotos Polish.
traductor: Deepl Traslator.
Buen trabajo, bien realizado me gusto
Gracias amiga.. que bueno que te halla gustado, saludos 🤗🫂🎉🎉, gracias por tu apoyo.
Para eso estamos para ayudarnos y apoyarnos, saludos
Amiga está súper lindo me gustó mucho cómo hiciste la decoración buen post saludos y bendiciones, ya quiero hacer uno para tenerlo 😊🙏🏻🫂
Gracias amiga por tu apoyo que bueno que te ha gustado ñ.. 🫂❤️❤️
Congratulations @bayondalways1! You have completed the following achievement on the Hive blockchain And have been rewarded with New badge(s)
Your next target is to reach 100 posts.
You can view your badges on your board and compare yourself to others in the Ranking
If you no longer want to receive notifications, reply to this comment with the word
STOPTo support your work, I also upvoted your post!
Thanks You.
That's great @bayondalways1! We're thrilled with your commitment to Hive! Let's go for this new goal!
Muy lindo llavero! Me encantó que todos los dijes principales, son absolutamente naturales!! Gracias por compartir el paso a paso!
Si me encanta trabajar mucho con objetos naturales.. gracias por el apoyo amiga, saludos
Qué genial amiga, te quedo muy bien, un lindo llavero distinto jijij
Gracias amiga. Esa es la idea crear distintos ❤️🤗