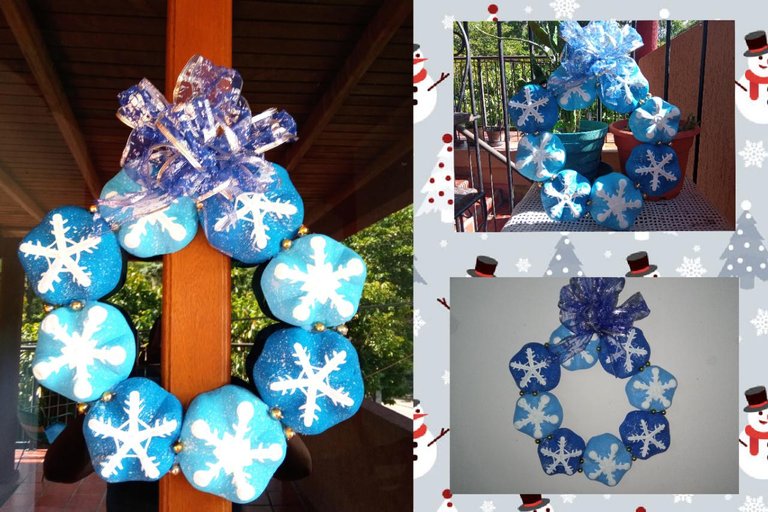
[Eng/Esp] Christmas wreath "snowflakes" Frozen style, made from plastic soda bottles. // Corona navideña "copos de nieve"estilo Frozen, elaborada a partir de botellas plásticas de refrescos. // Tutorial
Hello friends of #HIVEDIY, a pleasure to be able to share with all my fellow artisans on this new day, the year is slowly coming to an end and I wish you infinite blessings full of love, peace and prosperity to receive the new year. But first, I want to share with you the elaboration of a Christmas wreath that I have made from the bottom of eight plastic soda bottles that I have cut previously and I have painted them to recreate the beautiful snowflakes from the movie Frozen, this corana is ideal for place at the front door of your home and welcome your loved ones, Santa and a new year that will come full of bonanzas for your family. Without further ado, I invite you to observe the following tutorial on how I made a Christmas wreath with frozen snowflakes at the time and I hope that you can also make it at home.
Hola amigos de #HIVEDIY, un placer poder compartir con todos mis compañeros artesanos en este nuevo día, el año de a poco va llegando a su final y les deseo que reciban infinitas bendiciones cargadas de amor, paz y prosperidad para recibir el año nuevo. Pero antes, quiero compartirles la elaboración de una corona navideña que he realizado a partir del fondo de ocho botellas plásticas de refrescos que he cortado con anterioridad y las he pintado para recrear los hermosos copos de nieves de la película Frozen, está corana es ideal para colocar en la puerta principal de tu hogar y darle la bienvenida a tus seres amados, a Santa y a un año nuevo que vendrá cargado de bonanzas para tu familia. Sin más que agregar, les invito a observar el siguiente tutorial de como elaboré una corona navideña con copos de nieves al rato estilo Frozen y espero que ustedes también puedan realizarla en sus casas.
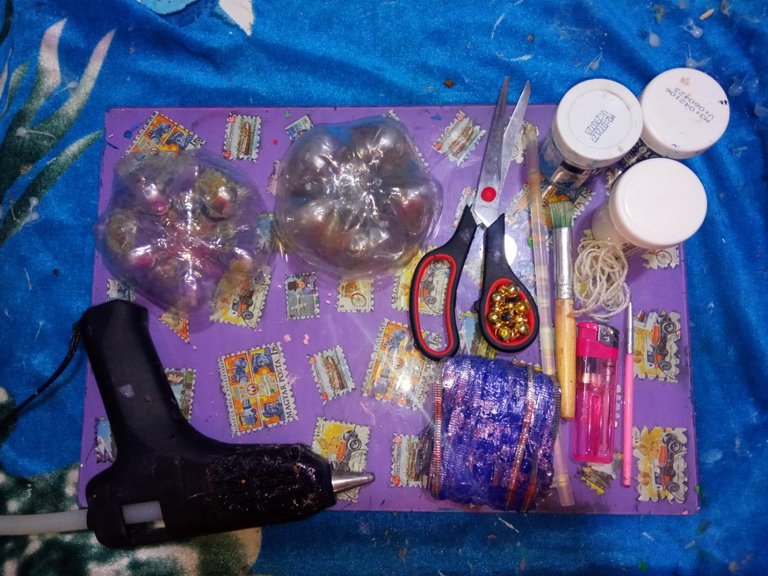
Used materials:
✓ 8 plastic soda bottles previously cut by the grooved part of the base.
✓ Color paints: royal blue, light blue and white.
✓ Christmas ribbon of the kind with wire ends.
✓ Brushes: thick, medium and for lining.
✓ Stick silicone with your gun.
✓ Pearls of the color of your preference.
✓ Cord.
✓ Cigarette lighter.
✓ Pair of scissors.
Materiales utilizados:
✓ 8 botellas plásticas de refresco previamente cortadas por la parte estriada de la base.
✓ Pinturas colores: azúl rey, azúl claro y blanco.
✓ Cinta de navidad de las que tienen los extremos de alambre.
✓ Pinceles: grueso, mediano y para delinear.
✓ Silicón en barra con su pistola.
✓ Perlas del color de tu preferencia.
Cordón.
✓ Encendedor.
✓ Tijeras.
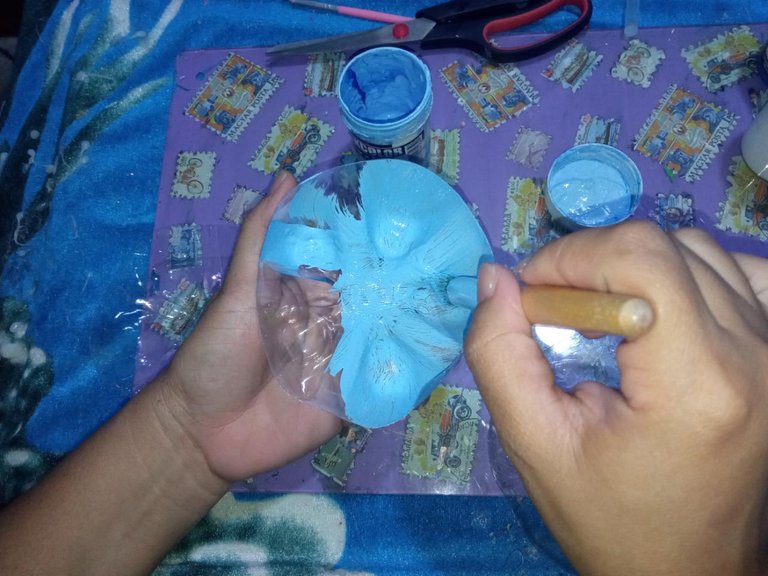
Process of making my crown:
FIRST STEP:
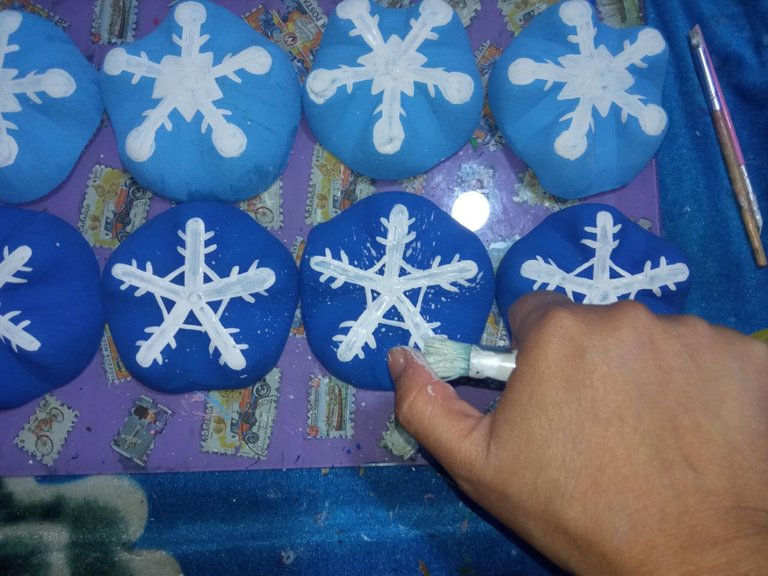
With the thick brush I paint inside and outside four of the bases of my bottles in light blue color, and the other four I paint in royal blue. I hope they dry and eat to paint my first snowflake. With the medium brush and white paint I draw straight lines through each of the striated area of the light blue bottles and at the tip I draw the circular shape of these, I paint the shape of the star in the center of the lines and fill them With the white paint, in the middle of my lines I draw two diagonal lines in a V shape to recreate one of my snowflakes.
Proceso de elaboración de mi corona:
PRIMER PASO:
Con el pincel grueso pinto por dentro y por fuera cuatro de las bases de mis botellas de color azúl claro, y las otras cuatro las pinto de color azúl rey. Espero que sequen y comiendo a pintar mi primer copo de nieve. Con el pincel mediano y la pintura blanca trazo líneas rectas por cada una de la zona estriada de las botellas de azúl claro y en la punta dibujo la forma circular de estás, pinto la forma de la estrella en el centro de las líneas y las relleno con la pintura blanca,en la mitad de mis líneas dibujo dos líneas diagonales en forma de V para recrear uno de mis copos de nieve.
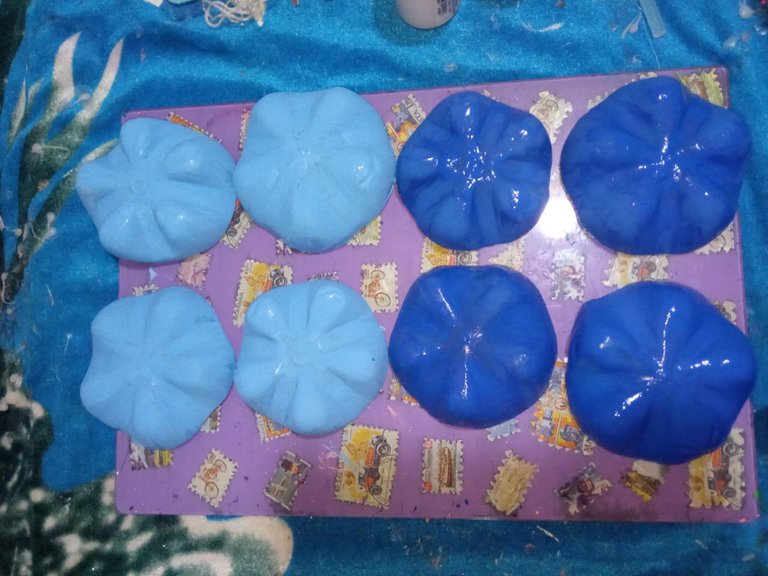

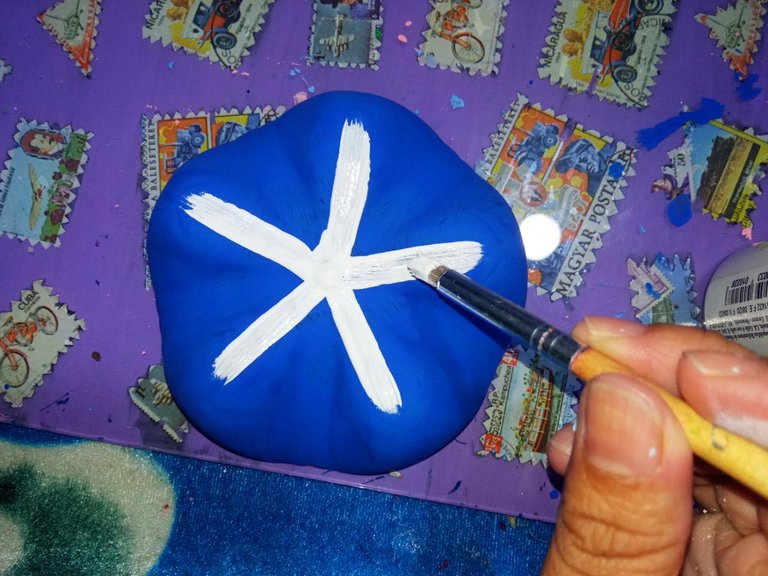
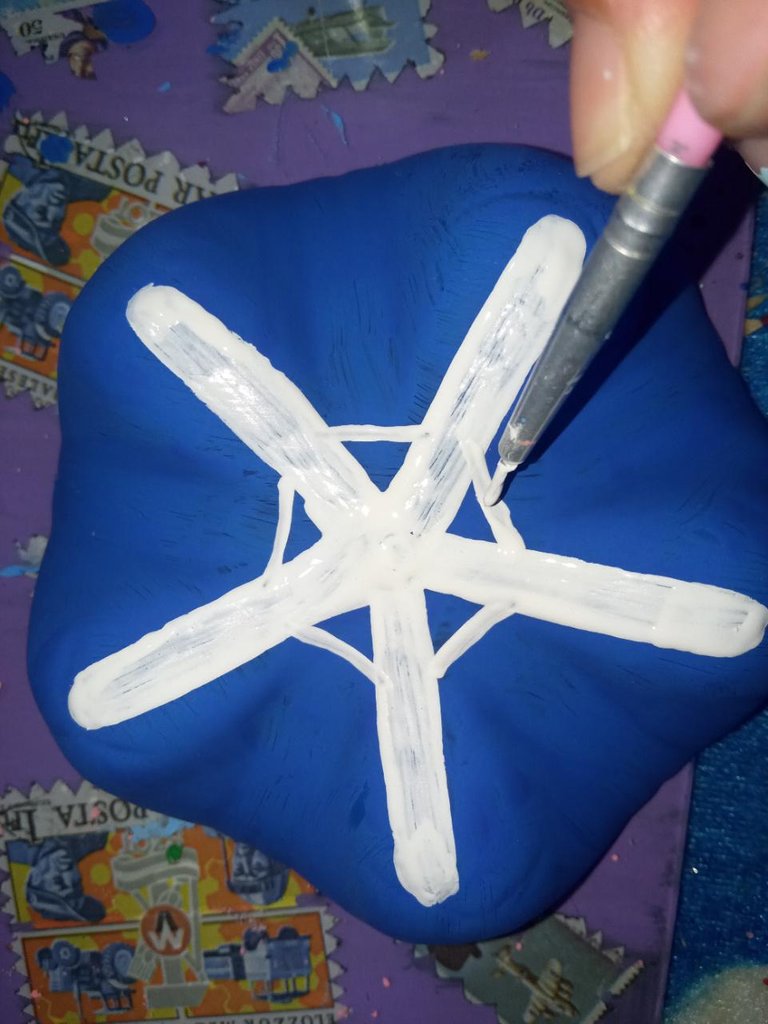
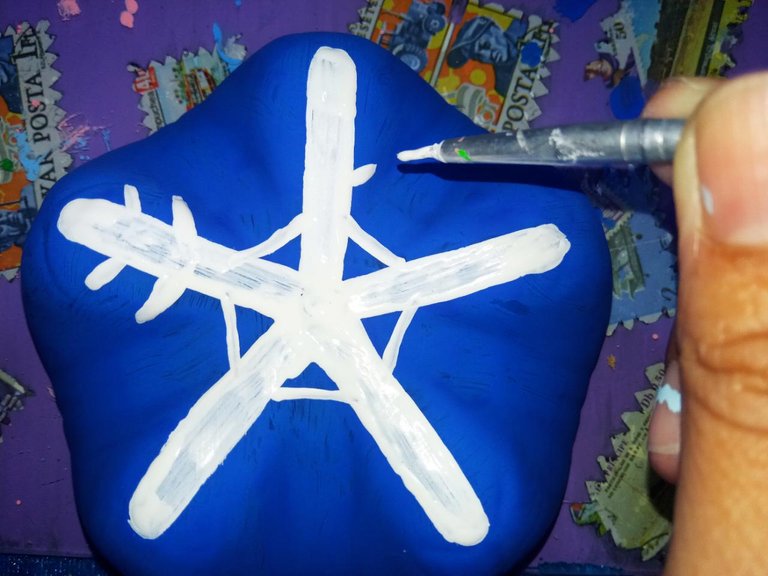
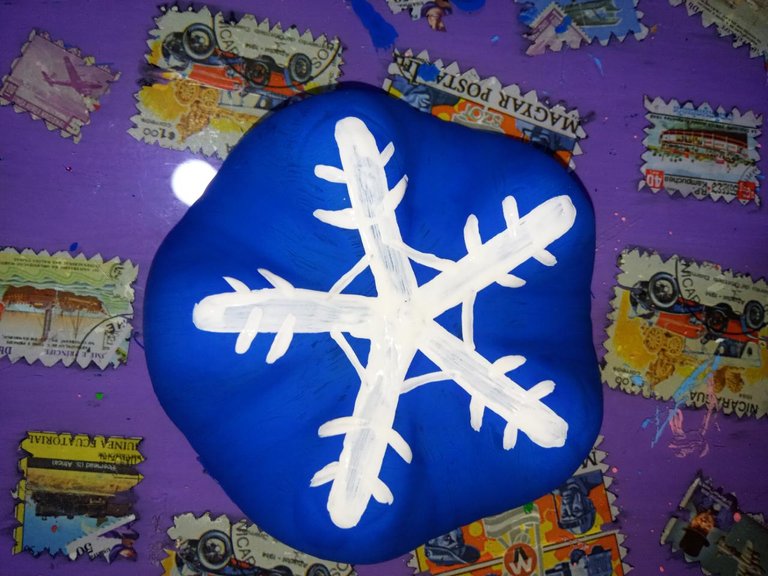
SECOND STEP:
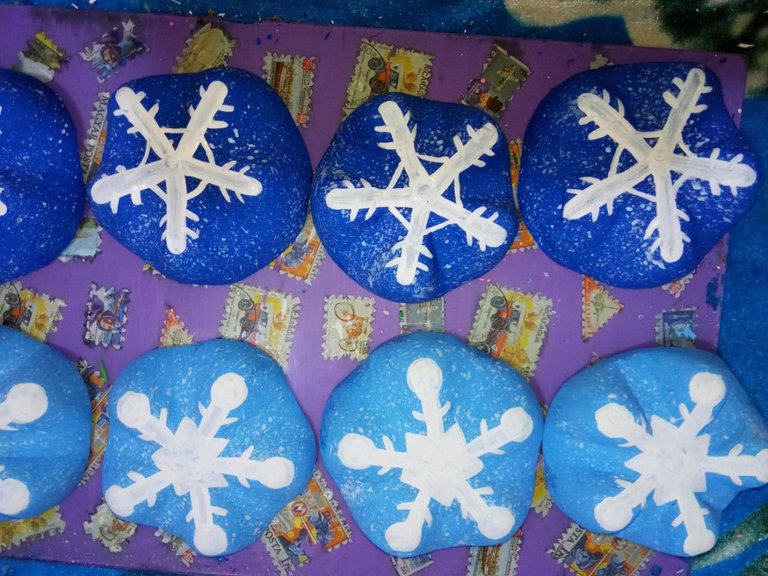
For my second snowflake, I take the bottom of the bottles that I have painted royal blue and with the medium brush I draw straight lines throughout the striated area of the bottle, I made a semicircle at the tips of my lines and in the center I draw a star connected straight lines and not filled with white. Then, I draw in the straight lines of the two V. When I have all my cutouts from the bottom of the bottles painted with the flakes, I take a little white paint and bind it with water, then I put a brush in the white paint water and with My fingers sprinkled the brush on top of my flakes to make it brighter and recreate the snow.
SEGUNDO PASO:
Para mi segundo copo de nieve, tomo el fondo de las botellas que he pintado de azúl rey y con el pincel mediano trazo líneas rectas por toda la zona estriada de la botella, realizó un semicírculo en las puntas de mis líneas y en el centro dibujo una estrella conectado líneas rectas y sin rellenar de blanco. Luego, trazo en lo recto de las líneas dos V. Cuando tenga todos mis recortes del fondo de las botellas pintados con los copos tomo un poco de pintura blanca y la ligo con agua, luego introduzco un pincel en el agua de pintura blanca y con los dedos salpicó el pincel encima de mis copos para darle más luminosidad y recrear la nieve.
THIRD STEP:
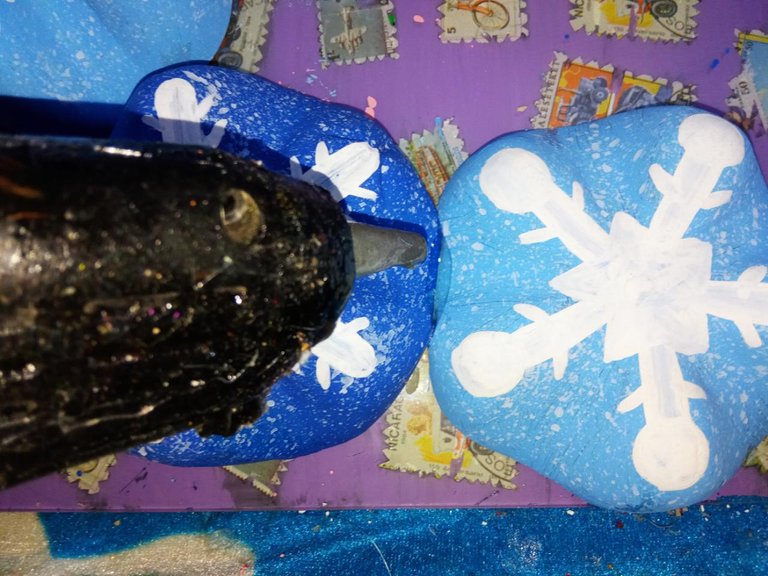
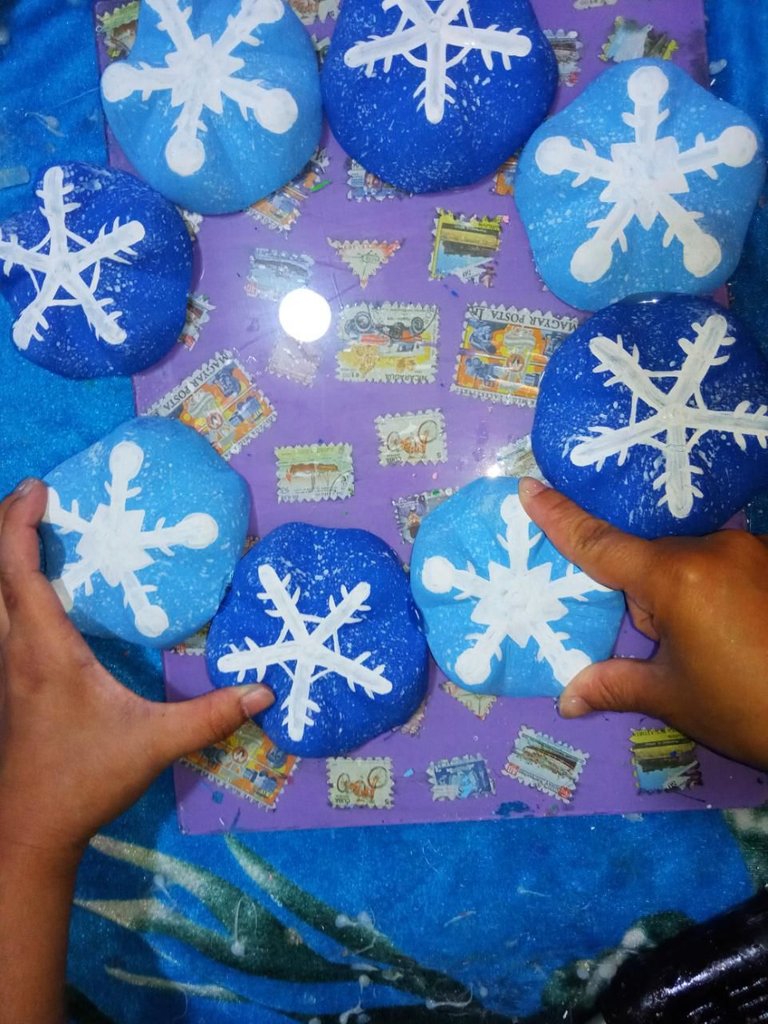
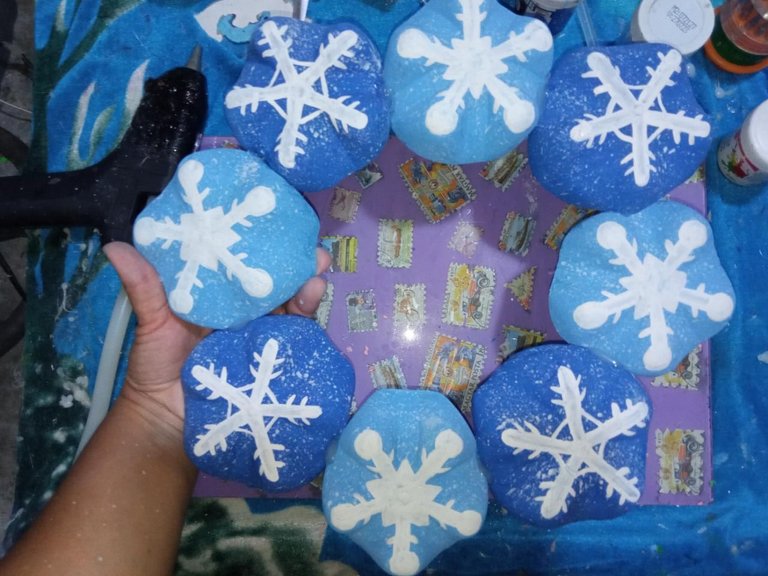
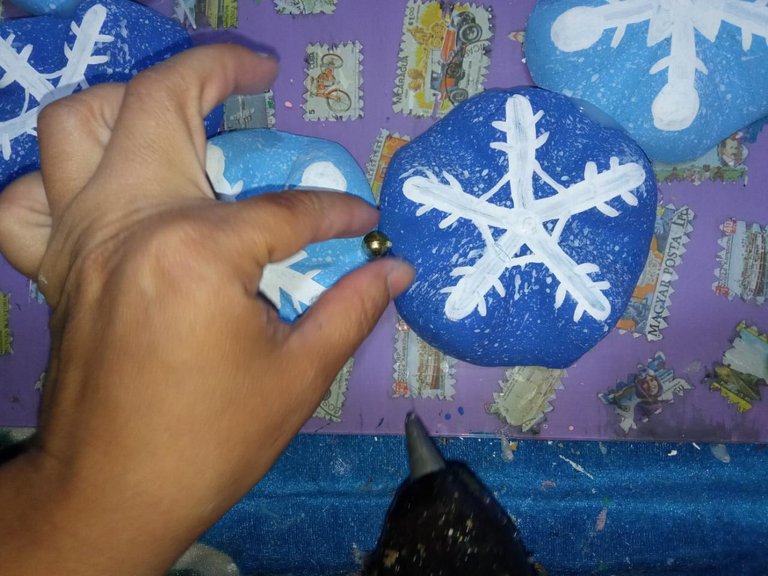
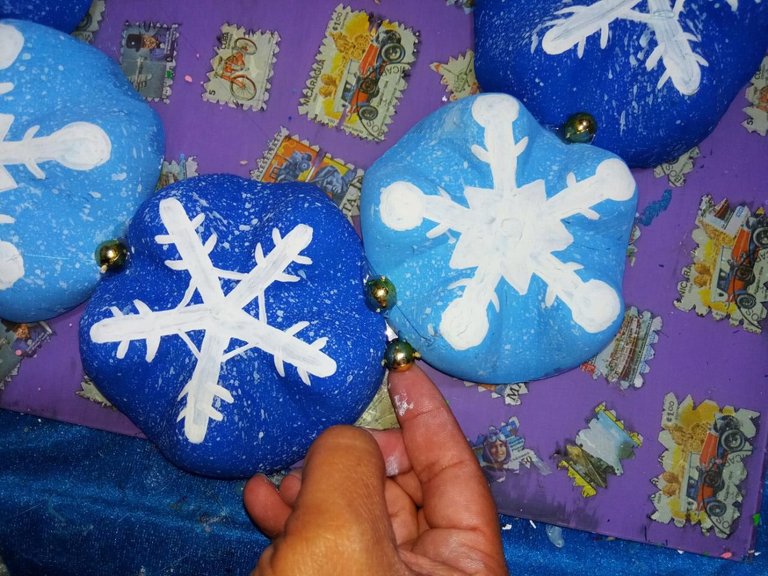
He arranged my snowflakes in the shape of a crown and with the hot silicone and with a lot of patience I began to glue the bases of the bottles alternating the colors light blue and royal blue. In the area of gluing the bottles with the silicone, I glue my pearls, and I also glue the pearls in the unglued space of the bottles to give the crown more strength and not come apart.
TERCER PASO:
Ordenó mis copos de nieve en forma de corona y con el silicón caliente y con mucha paciencia comienzo a pegar las bases de las botellas alternando los colores azúl claro y azúl rey. En la zona del pegado de las botellas con el silicón pego mis perlas, y también pego las perlas en el espacio sin pegar de las botellas para darle más fuerza a la corona y no se desarme.
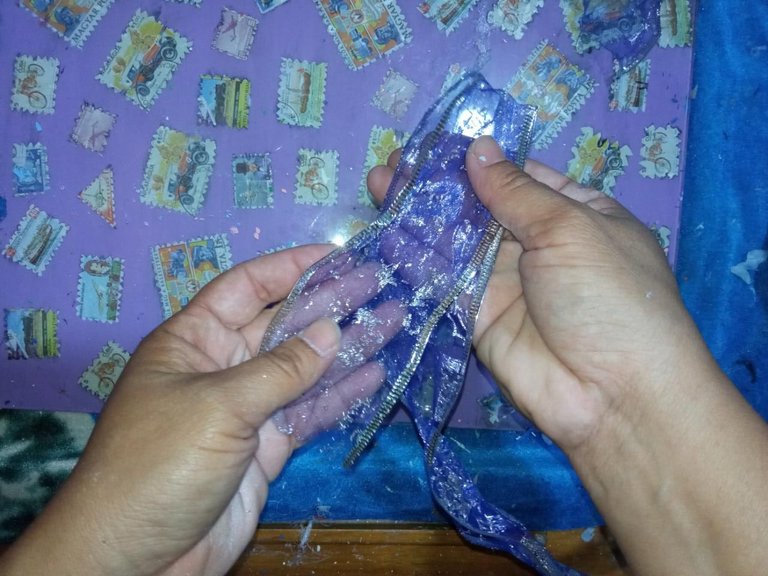
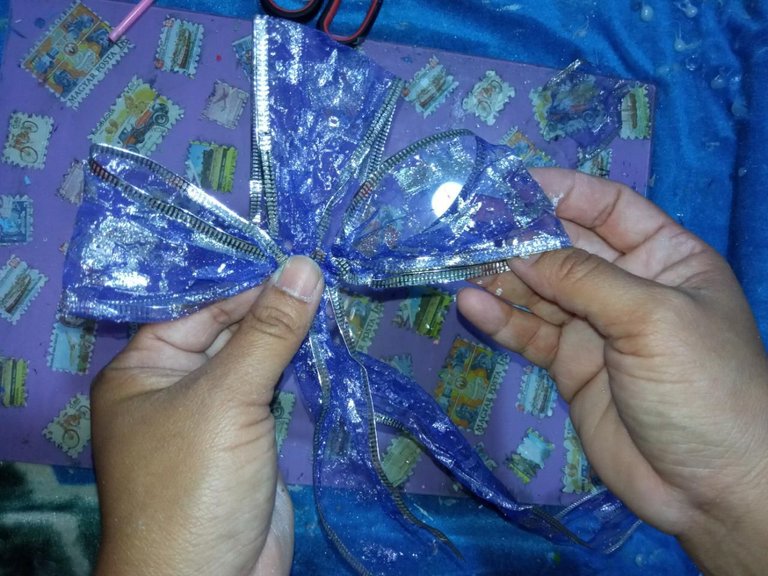
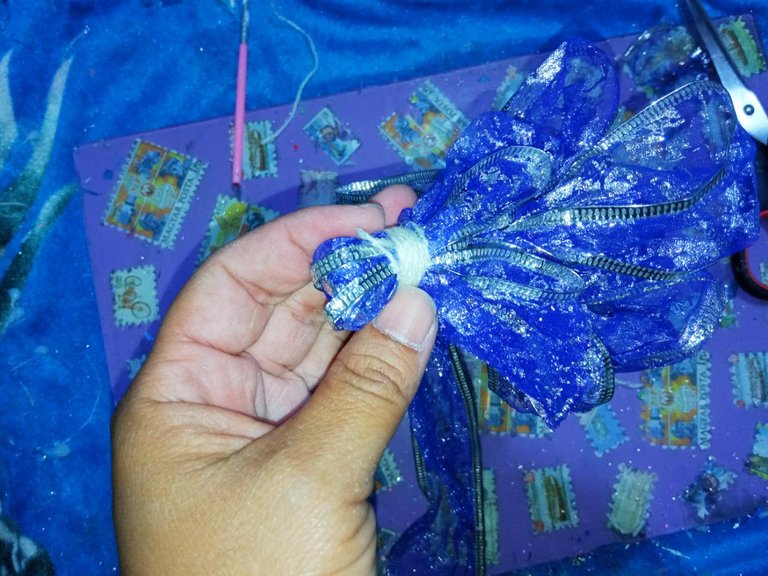
FOURTH STEP:
We make the bow with the Christmas ribbon that has wire at both ends. I confess that I am not good at making this type of bows, so I chose a ribbon that will maintain the shape and the one with wire is ideal. I started by taking a portion of the ribbon that will be the base and then several portions folded in two of about 8 centimeters approximately, bend the wire to keep the shape and make many folds, then tie the base with a piece of string or thread and readjust the bows of my bow (I wish my bow had been a charm, and I know I can do better, it will surely fit you better) and cut the ends of the ends of the ribbon diagonally and with the lighter burn the lint. Lastly, I glued my crown bow with the hot silicone.
CUARTO PASO:
Elaboramos el lazo con la cinta navideña que tiene alambre en ambos extremos. Les confieso que no soy buena haciendo este tipo de moños, por eso escogí una cinta que manturiara la forma y la que tiene alambre es ideal. Comencé tomando una porción de la cinta que será la base y luego varias porciones doblada en dos de unos 8 centímetros aproximadamente, doble el alambre para mantener la forma y realice muchos dobleces, luego la base la ate con un pedazo de cordón o de hilo y reajuste los moños de mi lazo (desearía que me hubiera quedado mi moño todo un encanto, y se que puedo mejor lo, seguro a ustedes le quedará mejor) y corte los extremos de las puntas de la cinta en diagonal y con el encendedor queme las hilachas. Por último, pegue mi moño de la corona con el silicón caliente.

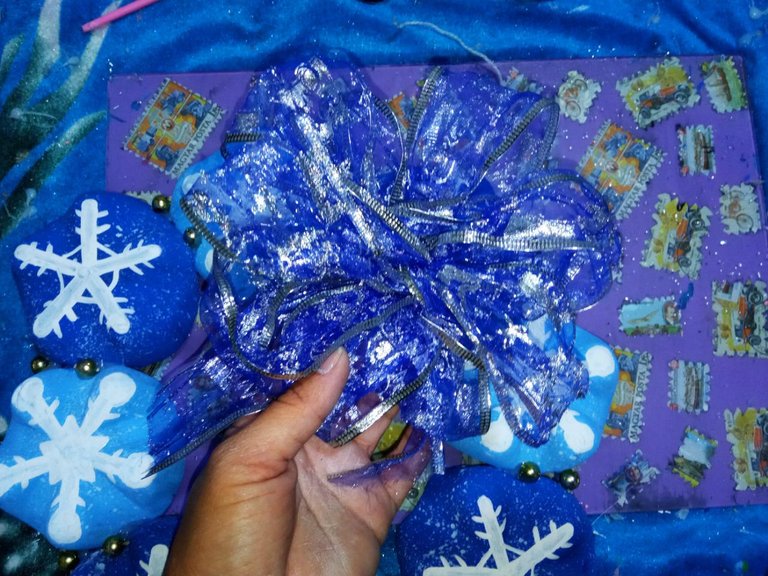
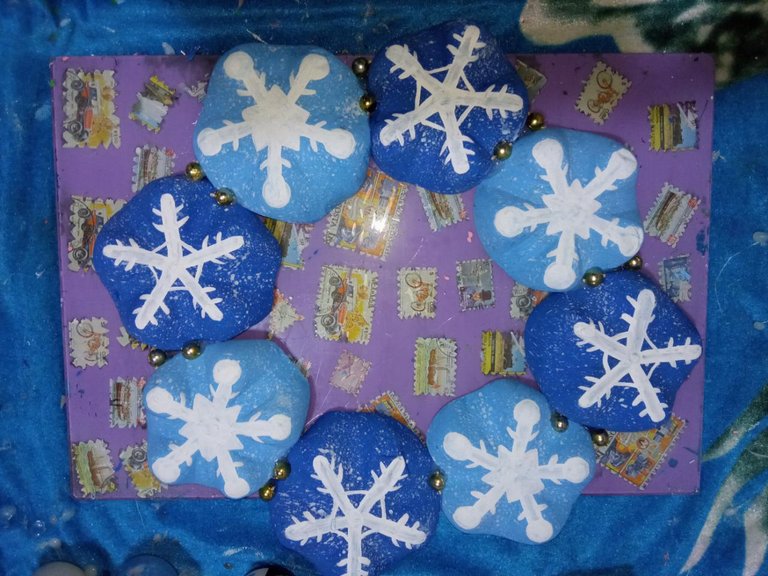
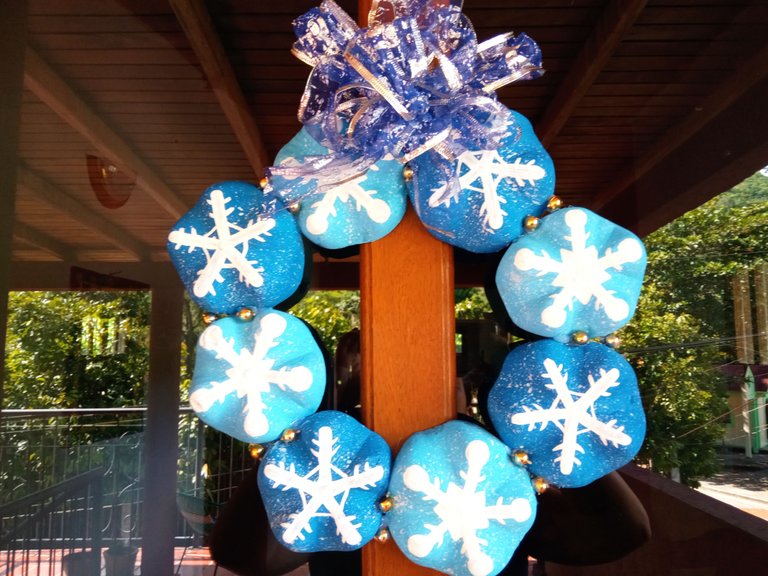
RESULT OF MY CREATIVE CRAFTS:
This has been the final result of my Frozen-style snowflake wreath, made from the grooved bases of plastic soda bottles.
RESULTADO DE MI MANUALIDAD CREATIVA:
Esté ha sido el resultado final de mi corona de copos de nieve al estilo Frozen, elaborada a partir de las bases estriadas de las botellas plásticas de refresco.
THANKS FOR READING ME // GRACIAS POR LEERME.
Translated by: google translator // Traducido por: google traductor.
All photos are my property // Todas las fotos son de mi propiedad.
The collage were made with the collage maker android app // Los collage fueron realizado con la app para android collage maker.
Has sido votado por
PROYECTO ENLACE
'Conectando Ideas y Comunidades'
PROYECTO ENLACE es un proyecto de curación de habla hispana enfocado en recompensar contenido de calidad y apoyar autores en su proceso de crecimiento en HIVE.
Creemos y apostamos por el futuro de esta gran plataforma, y estamos muy emocionados de poder hacerla crecer junto a esta comunidad. Así que te invitamos a usar nuestra etiqueta ENLACE y estar atento a todas las actividades que tenemos preparadas y que estaremos publicando en breve.
¿QUIERES AUTOMATIZAR TUS GANANCIAS DE CURACIÓN? SE PARTE DEL PROYECTO ENLACE APOYANDO A NUESTRO TRAIL EN HIVE.VOTE INGRESA AQUÍ PARA CONOCER LOS DETALLES.
¿QUIERES INVERTIR ENLACE? DESCUBRE COMO HACERLO Y GENERAR INGRESOS DE FORMA SEMANAL MEDIANTE TU DELEGACIÓN DE HP AQUÍ TE EXPLICAMOS COMO.
Te invitamos a participar en nuestro servidor de Discord: https://discord.gg/3S9y7BbWfS
Atentamente
EQUIPO ENLACE 2021
Congratulations @aksurevm89! You have completed the following achievement on the Hive blockchain and have been rewarded with new badge(s):
You can view your badges on your board and compare yourself to others in the Ranking
If you no longer want to receive notifications, reply to this comment with the word
STOPCheck out the last post from @hivebuzz: