Grandpa Gotta DIY—Shower Pressure Balancing Unit Replacement
Months ago, the shower in the master bathroom began to provide only very cold or very hot water, with very little in between.
If my wife or I were lucky, we could get about five to ten minutes worth of reasonably warmed water before it would get very hot. But that was only after different combinations of going straight to the hottest setting, then to the coolest, then turning the handle somewhere in between and hoping for the best.
Needless to say, it was a pain.
A few years ago, a similar thing happened with the other shower we have. There were enough differences with it, though, that I wasn't sure if was exactly the same problem or not. Before, it was either too hot or too cold period. With ours, there would be a change in pressure, followed by a change in temperature.
So, I put it off and put it off, until a couple of weeks ago, when I finally got tired of it. I was starting back to work, and I really didn't have time to outwit the temperature controls. After looking up information on the Internet, I was reasonably sure that it was the exact same issue that the other shower had. After checking the local hardware stores and not finding the parts I needed for our particular shower, I ordered the parts on Amazon and waited a couple of days for them to arrive.
Once they did, I immediately got to work.
The time before took me several hours over the course of two days simply because I didn't know what I was doing. Even though it had been a while since then, I felt reasonably sure I remembered all that I needed to get this done in quick fashion.
The fact of the matter is, it's not a hard job. In our case, it can be done in more or less seven simple steps.
Step No. 1
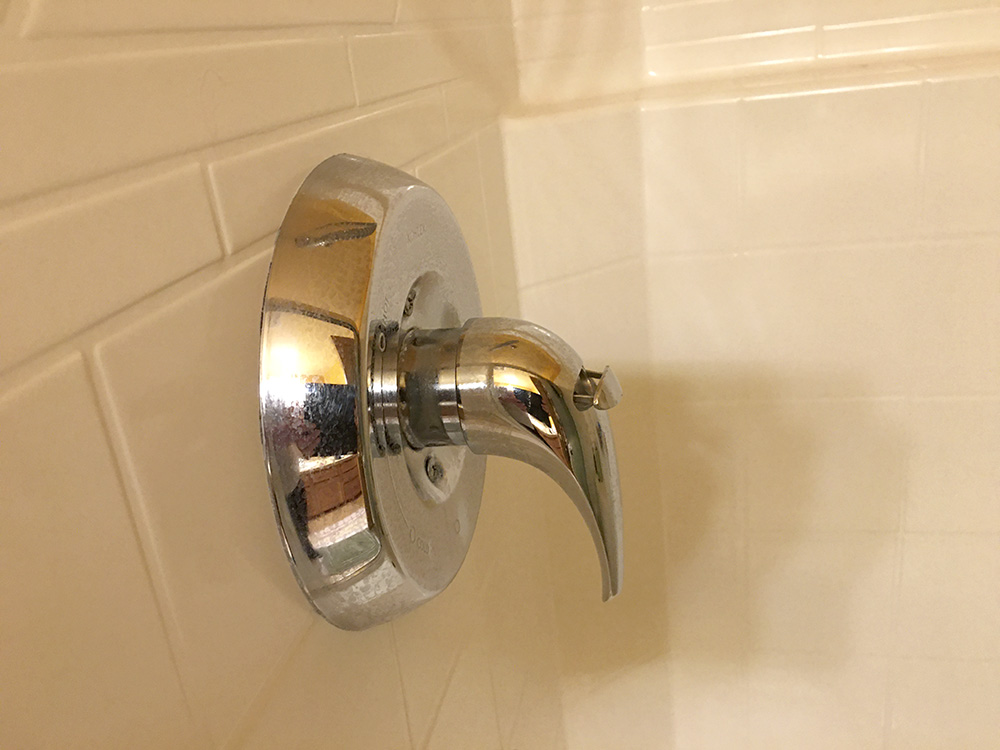
On the handle of our shower, there is a little cover that needs to be removed in order to get to the screw that holds the handle. Without a smaller flathead screwdriver or something of the sort, it can be impossible to get at it with enough force to push it out.
Step No. 2
Once the handle cover is out, off comes the handle. That screw, along with the other ones underneath, are all Phillips head. The flathead will work, again, if it's small enough.
With the handle removed, that exposes a square insert. It fits over the stem of the pressure balancing cap. The stem and the insert rotate when the handle is turned.

Step No. 3
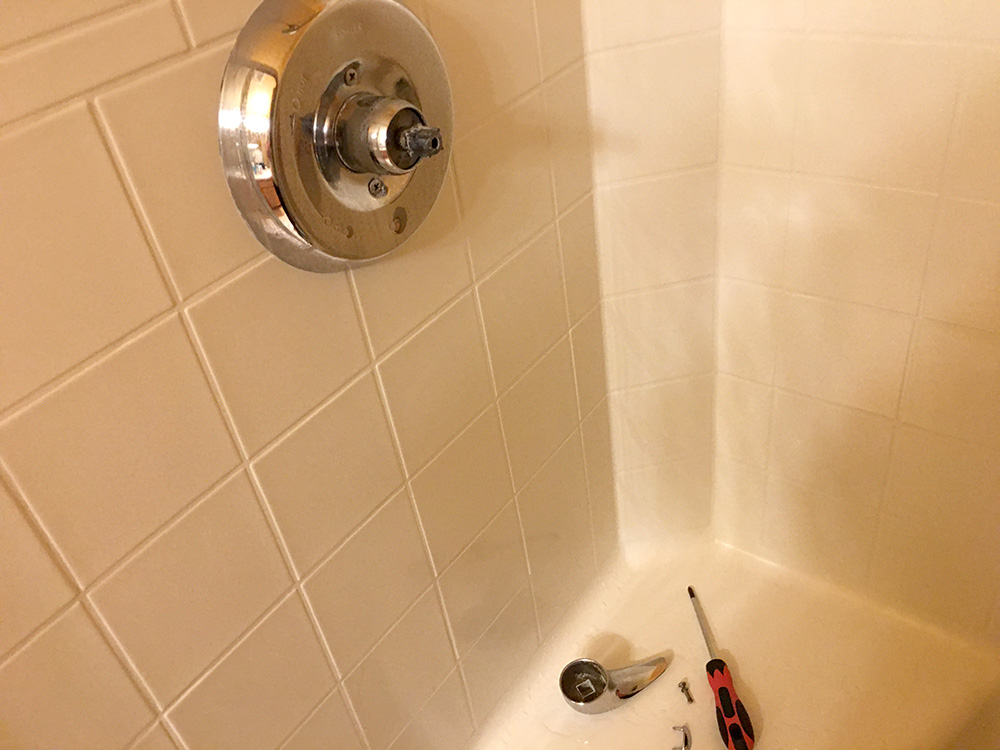
I'm just going to go ahead and lump a few things together. Basically, the rest of the shower fixtures need to come off, which includes a couple of other covers—the large circular one that hides the hole where the water comes in, and a hollow short tube that covers up the cap. The insert also needs to come off.
I thought about updating all of that, but when I saw the cost of fixtures, I decided against it. There isn't much wear and tear on any of it, other than maybe some hard water build up. Some scrubbing generally takes care of that.
Step No. 4
If you've ever done this before, or anything plumbing related, you will note that I haven't mentioned turning off the water to the shower yet. I certainly didn't overlook it, but I waited to do it until just before this particular step. It can happen before anything comes off, but this is basically where it needs to happen without potentially creating a big mess.
Now, I understand that in many homes, there's a cut off valve somewhere near the shower that can be used to just turn off the water to the shower. Sometimes it's in the wall where the shower stuff is. Sometimes it's on the other side of the wall from the shower. I've even read that it could be elsewhere in the house.
Worse comes to worst, you should be able to turn off the water at the water heater.
In our case, apparently, none of those are options. All the sinks in our house have shut off valves. All the toilets, too. All outside spigots, no problem. But for the showers, and apparently the water heater, too, I need to go to the meter out on the street, and shut off the water to the entire house.
This little bit is another reason why I procrastinated doing this for so long. With my younger son and his family here, water can be needed in any part of the house, and while it's not overly inconvenient, despite my confidence to the contrary, I really didn't know how long this was going to take.
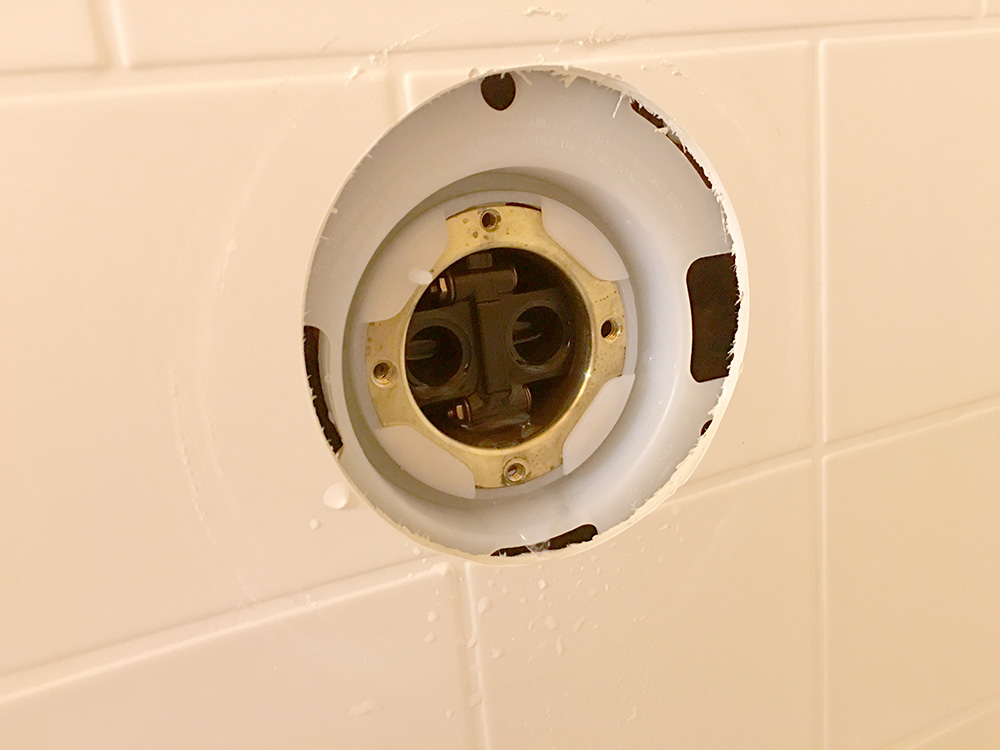
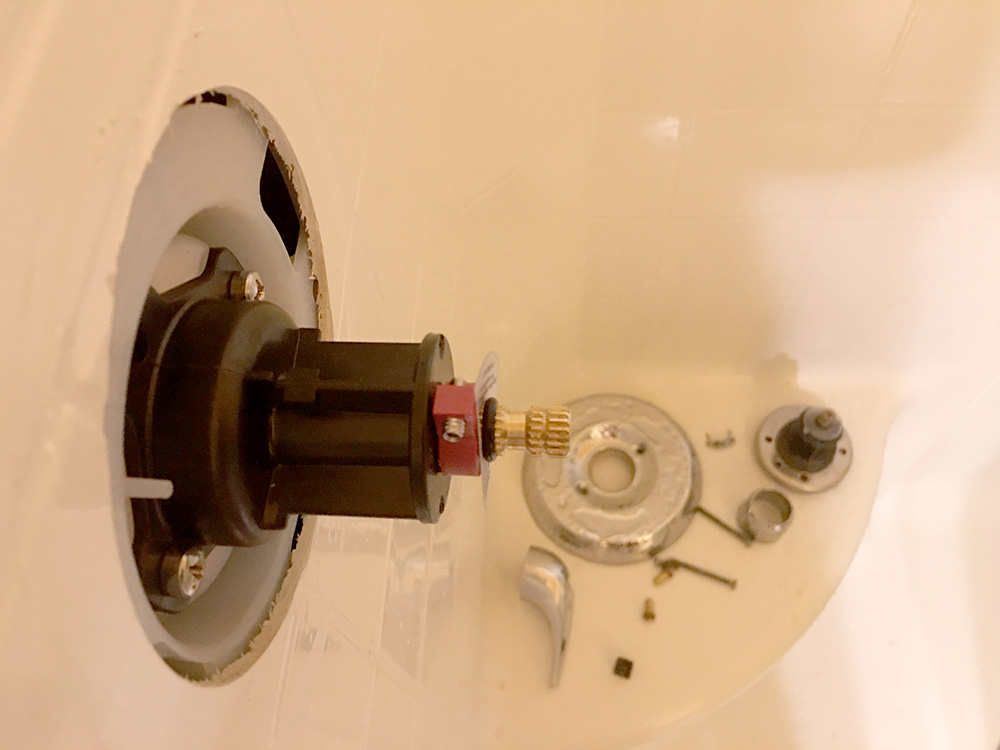
With the water off, the next step is to remove the cap. The dark piece that looks like a pair of eyes is the next step, and the root of the temperature fluctuation problems—the pressure balancing cartridge.
Step No. 5
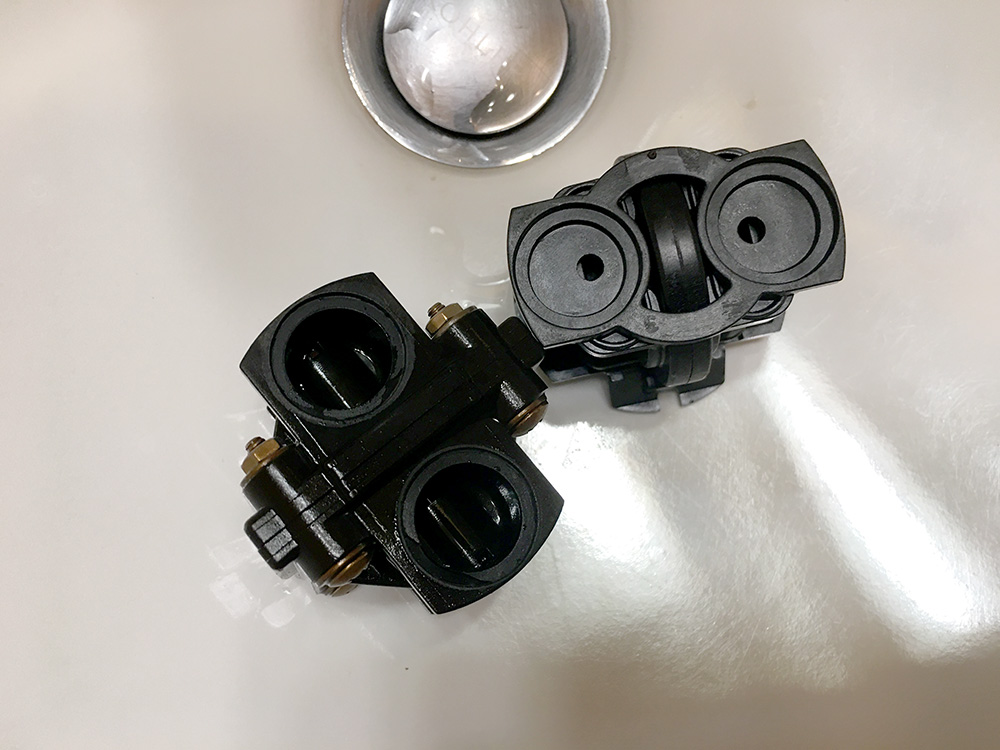
With the cartridge removed, it simply needs to be replaced with the new one. As you can see, the replacement is different. That's because we've had the previous cartridge in the shower for over 15 years, and Kohler, like most companies, likes to update its parts every now and then. According to the info on its Amazon page, it's supposed to last longer than the original did.
We'll see.
At any rate, it reminds me of Johnny Five, or for those who are a little younger, Wall-E. In other words, it's a friendlier looking cartridge than its predecessor. Apparently, that's important when it comes to redesigning such things.
Thankfully, the new cartridge plugged right into the hole where the old cartridge vacated. There were a couple of rubber O rings that needed to be inserted into the eyes. It doesn't have anything like a screw or a bolt holding it in, either.
Step No. 6
Basically, from here on out, instead of taking things off, things get put back. I did go ahead and buy a new cap to go with the new cartridge. It's very similar to the other one, except it has a red half ring that sits behind the stem. From what I understand, its added insurance from turning the handle too far, which doesn't seem to be much of a problem in our case.
I also used the newer screws that came with it. No big deal, but since they gave me some in the kit, why not?
Step No. 7
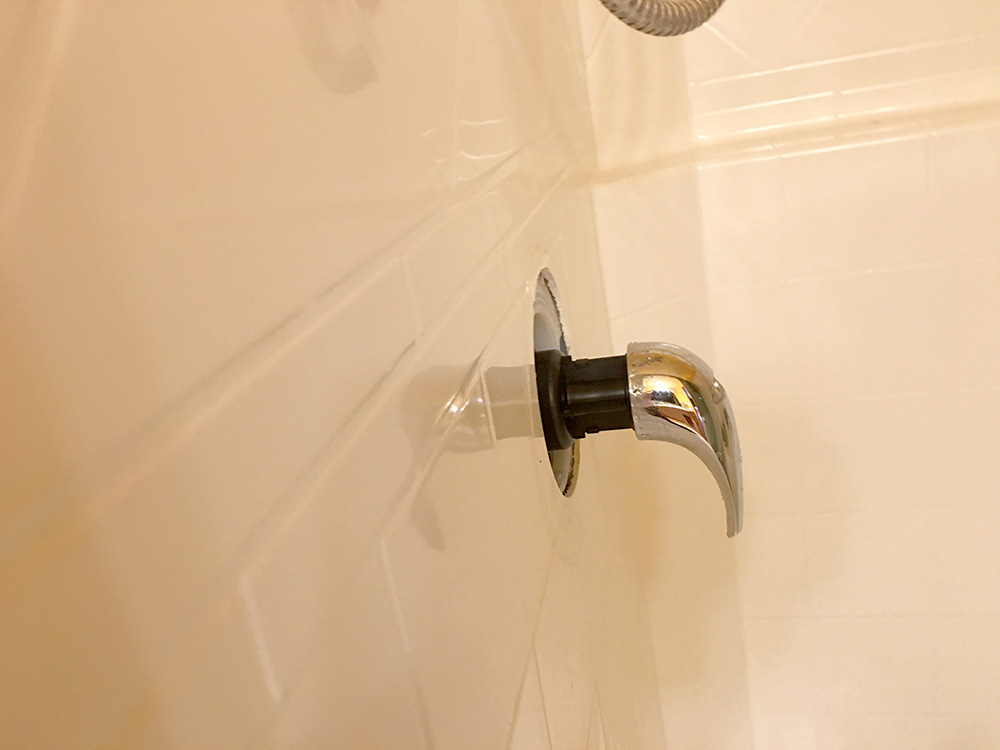
This is where everything else gets put back on. Before I did that, though, I decided I'd just put the handle on over the insert so I could check the water temperature before I put the fixtures back on. I wanted to make sure that the new pressure balancing unit didn't leak, and that it functioned properly.
That meant running out to the street again and back. I'll have you know that means a flight of stairs down and up and a brisk walk that is a good 400 feet, round trip, simply because I can't get to the meter straight through the backyard thanks to a little impediment I like to call a fence.
You live by the fence, you... Yeah, you get the picture.
I'm happy to report that the only water that came out was through the shower head, as planned, and that the water temperature did change from freezing to not quite scalding, with a reasonable range of warmth in between.
Might Need Another Step
After a couple of weeks of using it, I may need to go back in and adjust the temperature control a bit. Thankfully, I don't need to shut the water off for that.
In the penultimate image where the cap is still exposed, there's something that looks like a screw that goes through that red half ring I mentioned earlier. One way, you bring the temperature down throughout the 90 degree turning of the handle. The other way, you get to the heat quicker, and towards the full temperature setting of the water heater.
Right now, it gets to lukewarm pretty quickly, which is fine, but then it doesn't really get much hotter until the very end of the range. At 45 degrees would be nice to have the right temperature for me. My wife's setting would come in somewhere below that (she likes her showers a tad cooler than I normally do).
Wrap Up
That's it. Whole process took a little over half an hour to complete, a far cry from my previous dragged out attempt. At this rate, I'll be making house calls in the not too distant future.
Naaah. Grandpa definitely don't gotta fix other people's showers.
As it is, I still have a kitchen faucet I'm supposed to replace.
At least it has the shutoff valve right underneath it. I can use the same one I turned off when I replaced the dishwasher a couple of months back. I'm actually trying to see how long I can hold off on that. It's kind of a sociological experiment, if you will.
Wish me luck.
Until then...
If you've got something to do, do it yourself.
All images courtesy of Glen Anthony Albrethsen
Thank you for sharing this amazing DIY post on our Hive community page, we've given you a 100% in upvote and shared your work on our Twitter page for more exposure. Do enjoy the vote and keep being creative ;)
This is awesome thanks for sharing man! I love the step by step process you shared. Much like my style! I’ve never had to change this out and I pray that I don’t have a need to. In our condo, among many brutal things, we seem to have a decent one in our shower. I know where our hot water shut off valve is near the water heater but I don’t know where the cold water one is. That’s the main reason I’m also not changing out any of our sink faucets despite them looking hideous. I don’t want to break the valve and have no idea where the shut off is!
Hey, @cmplxty.
It's definitely strange that everything else in the house has a ready shut off valve, but not the shower (or in my case, the water heater). To be completely accurate, the latter does have some kind of shut off, and I turned it, but it didn't shut off all the water, so maybe it was just hot water like yours. Or maybe it was the shut off for the natural gas (which makes less sense to me.) I didn't really stop to check the temperature (wouldn't have helped, anyway).
So, the sink faucets don't have their own shut off valve(s) underneath? I figured that was pretty much standard, but when it comes to this kind of thing, I'm the least informed of all the possible variations. I've never lived in a condo, and the last time I lived in an apartment was close to 30 years ago.
I'll probably end up switching out our kitchen faucet before too long, and will probably have some kind of post about it in case you're interested. As I said, I've been (for now) successfully putting that one off. :)
This all sounds legit, and today must have been hive DIY day as I also did some of my own. I had a faulty pop up sprinkler in my front lawn. Some digging, twisting, more digging, swearing, digging, twisting, twisting and cursing later and bob's your uncle! Good as new. Lol.
Hey, @galenkp.
Less digging and more swearing. Does the trick every time. :)
You document all of that? It would be nice to have a tutorial (not of the swearing, but of the fixing :), because I can think of probably two sprinklers that it would be nice to twist a bit. We do have a guy who comes around to mow the lawn, and he generally gets roped into stuff like that, but we haven't had much of a need for watering the yard yet because its been raining so much.
This week looks warm and sunny, so I might have to turn our sprinklers on at some point.
I actually didn't to be honest and I regret it.
The pop up I replaced was a Hunter SRM and there is a YT video showing how it is done, which is where I learned how. It's easy, but you have to be careful when removing the old and replacing so that no dirt goes into the hole. I'll see if I can find the video for you and link it.
EDIT:
This is where I learned how. He mentions the Hunter spray heads but he replaces a different one. The Hunter simply has the stop point to the right, as opposed to the left on the other. Same otherwise.
The new pop up unit cost me $22.95 so I didn't for way less than it would have cost me to pay someone.
Grandpa, the handyman, to the rescue - again. :-)
Great job!
Hey, Vincent.
Yeah. I guess. It's probably more of a case of the procrastinator finally getting fed up with his procrastination. :)
Still, it's good to learn how to do some things, and hopefully, for as long as we live in this house, I won't have to change them out again. Not planning to be here for more than five years, I think, but who knows. We've been talking about moving for years, and so far, nada. :)
Hi Glen,
The thought of moving... oh dear... better not go there. I would rather have to fix the shower again than have to move. Better yet, no more moving, no more fixing of shower. :-)