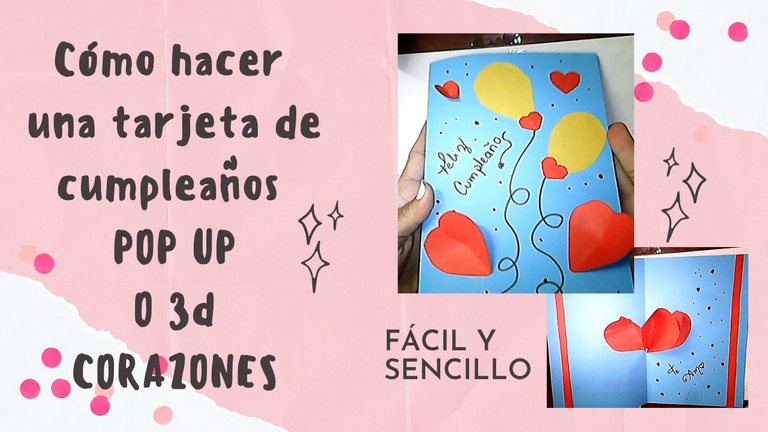
TUTORIAL: How to make a POP UP or 3D heart birthday card 💝❤️ Paper crafts 💝 (ESP/ENG)


Greetings, craft lovers.
Greetings dear friends, visitors, followers, welcome to all.
Today I present a new project, which you can adapt to give this February 14 "Valentine's Day".
Come with me to see the step by step to recreate this beautiful greeting card, it is simple and with few materials.
Dare to make crafts, give handmade, personalized, beautiful things, thinking about your loved one.

Saludos queridos amigos, visitantes, seguidores, bienvenidos sean todos.
Hoy te presento un nuevo proyecto, que puedes adaptar para regalar este 14 de febrero "día de los enamorados o día de San Valentín".
Acompáñame a ver el paso a paso para que recrees esta linda tarjeta de felicitación, es sencilla y con pocos materiales.
Anímate a realizar manualidades, regala cosas hechas a mano, personalizadas, bonitas, pensando en tu ser querido.
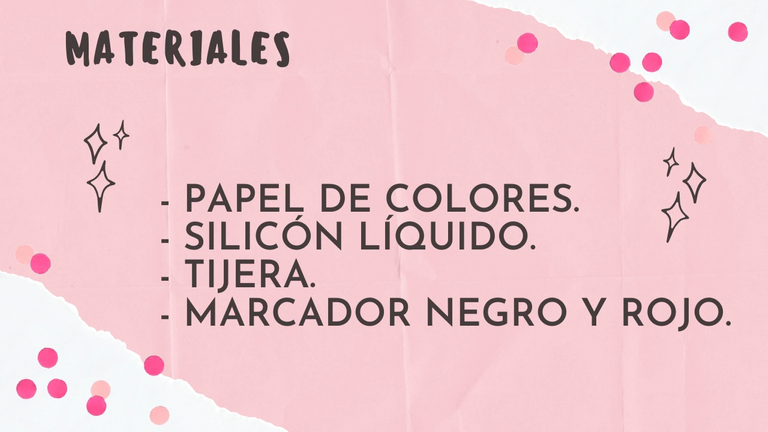
Materials:
- Colored paper.
- Liquid silicone.
- Scissors.
- Black and red marker.
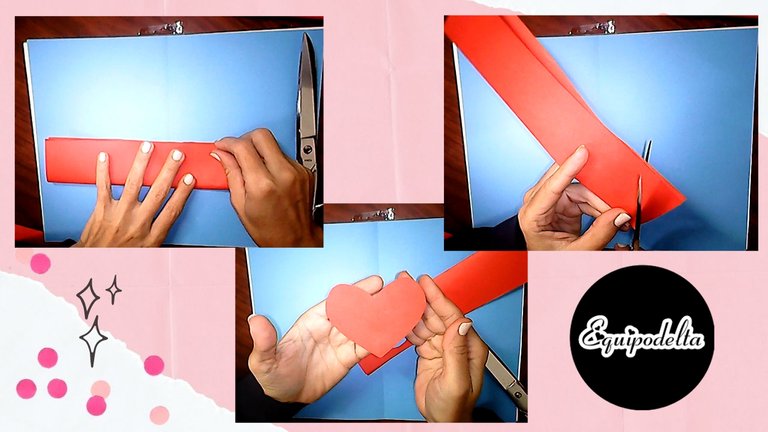
Step 1: cut a strip of paper of the color of your preference of approximately 7 cm, fold it in half and cut out three heart-shaped pieces. I used red paper.
Paso 1: cortamos una tira de papel del color de tu preferencia de 7 Cm aproximadamente, doblamos a la mitad y recortamos tres piezas en forma de corazón. Yo usé papel de color rojo.
Step 2: Make a small cut in the center of each heart, then make a small fold in between the cut, apply some silicone and wait for it to dry.
Paso 2: Realiza un pequeño corte en el centro de cada corazón, luego haces un pequeño doblez entre el corte, aplicas un poco de silicón y espera que seque.
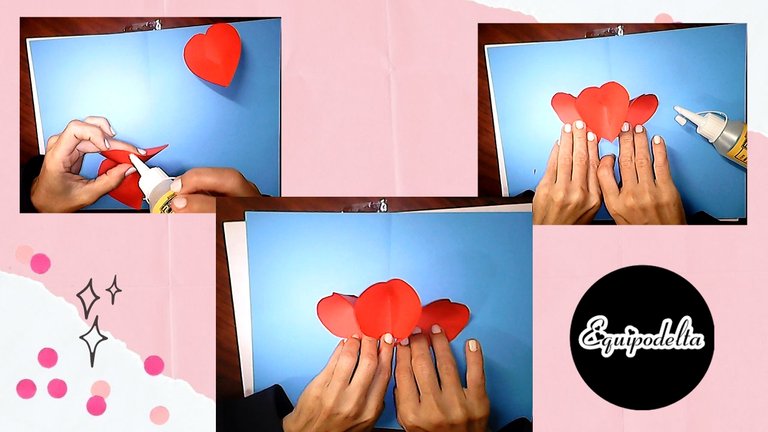
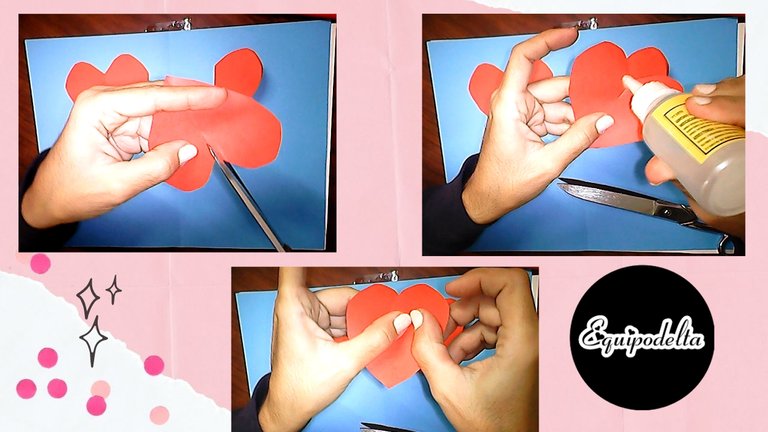
Step 3: Glue the three hearts together, apply glue to each side of each heart and join them together.
Paso 3: Pegamos los tres corazones, aplica pega en cada lateral de cada corazón y los unes.
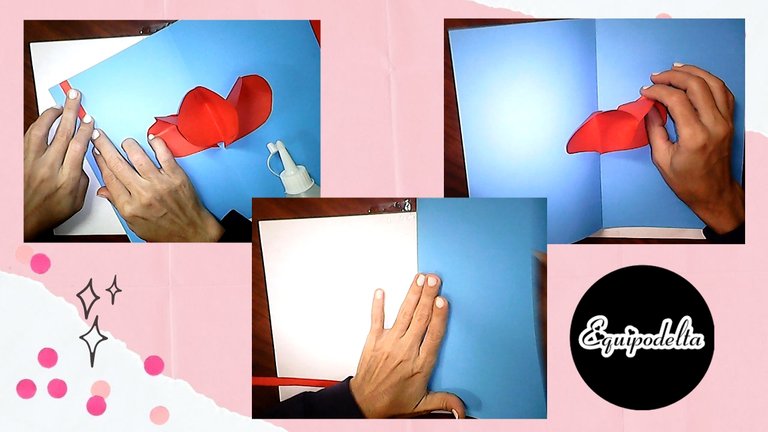
Step 4: Cut out two strips of 5 centimeters each and then stick it on each side of the card.
Paste the hearts using as a reference point the middle heart and the middle of the paper you will use as a card, I used a blue one to make contrast.
Put some glue on the hearts, one dot on each end, leaving the center free.
Then fold the paper (card) in two carefully, these should be free to open and close.
Paso 4: Recorta dos tiras de 5 Centímetros cada una y luego la pegas en cada lado de la tarjeta.
Pega los corazones usando como punto de referencia el corazón del medio y el medio del papel que usarás como tarjeta, yo usé uno de color azul para hacer contraste.
Coloca un poco de pega en los corazones, un punto en cada extremo, dejando el centro libre.
Luego dobla el papel (tarjeta) en dos con cuidado, estos al abrir y cerrar deben estar libres como para que abran.
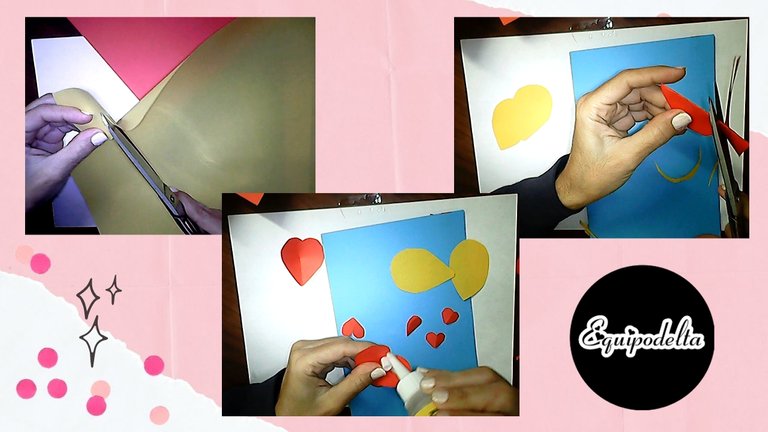
Step 5: With the paper of another color (I used a yellow one) cut out two little balloons. Cut out hearts of various sizes. The ones you need to cover spaces in a relaxed way.
Repeat the procedure from the beginning on some hearts, making a small cut in the center of them, joining and pasting the pieces.
Paso 5: Con el papel de otro color (yo usé uno de color amarillo) recorta dos globitos. Recorta corazones de varios tamaños. Los que necesites para cubrir espacios de forma relajada.
Repite el procedimiento del principio en algunos corazoncitos, haciendo un pequeño corte en el centro de ellos, uniendo y pegando las piezas.
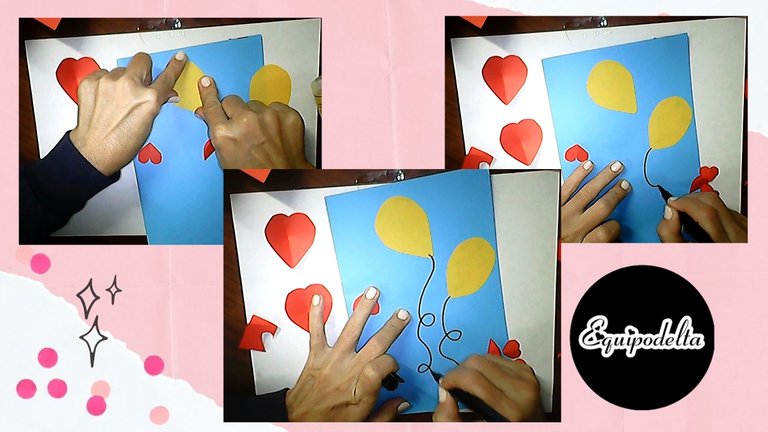
Step 6: Paste the two balloons, then with the black marker you draw some tangled threads.
Paso 6: Pega los dos globos, luego con el marcador negro dibujas unos hilos enredados.

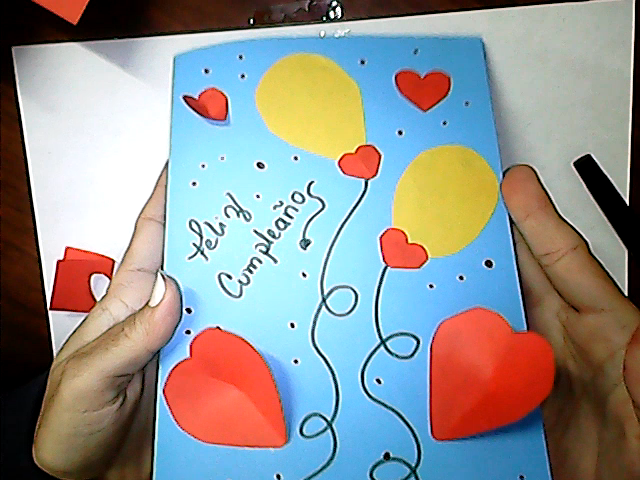
Step 7: Start gluing the little hearts at random to the card cover. Remember to use two to cover the beginning of the string you drew on each balloon.
Paso 7: Comienza a pegar los corazoncitos al azar en la portada de la tarjeta. Recuerda usar dos para tapar el comienzo de la cuerda o hilo que dibujaste en cada globo.
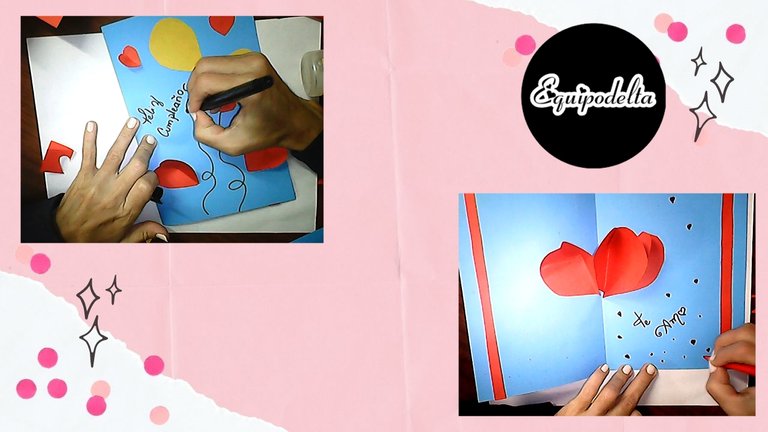
Step 8: To finish write your dedication with the red marker, both on the cover of the card and inside it, make some points and hearts to personalize.
Paso 8: Para finalizar escribe tu dedicatoria con el marcador rojo, tanto en la portada de la tarjeta como dentro de ella, realiza algunos puntos y corazones para personalizar.
Detalles Técnicos / Technical Details
Program: MediBang Paint Pro.
Graphics tablet: Huion (Usb Pen Tablet).
Pictures and vídeo of my own. Web Cam Omega.
Designs and images courtesy of Canva
Music Vídeo:
––––––––––––––––––––––––––––––
Freedom by Roa
Creative Commons — Attribution 3.0 Unported — CC BY 3.0
Music promoted by Audio Library
––––––––––––––––––––––––––––––
My Youtube Channel
Vídeo Process
![]() 👉
👉 ![]() 👉
👉 ![]() 👉
👉  👉
👉 ![]() 👉
👉 

https://twitter.com/EquipodeltaS/status/1351141338876669953
perfect for the upcoming Valentine's 😄 thank you for sharing!
https://d.buzz
Omg! thank you very much :)
The nice thing about the card is that we can adapt it to whatever we want, congratulations, birthdays, Valentine's Day.
Thanks for your support. <3
Soy muy malo con las manualidades pero admito que podría hacer un esfuerzo con este tutorial para un detalle. Se me ocurrió pegarle algunos chocolates. Yo y manía de dulcero ja ja ja!
Pues es la idea, que vaya acompañado con algo, los chocolates son la debilidad de toda mujer. <3
Saludos mi querido amigo.
Congratulations, your post has been upvoted by @dsc-r2cornell, which is the curating account for @R2cornell's Discord Community.
Enhorabuena, su "post" ha sido "up-voted" por @dsc-r2cornell, que es la "cuenta curating" de la Comunidad de la Discordia de @R2cornell.
Holla
Ey! ;)
Simplemente magistral. Muaaaak...
Gracias corazon de melón.
Congratulations @equipodelta! You have completed the following achievement on the Hive blockchain and have been rewarded with new badge(s) :
You can view your badges on your board and compare yourself to others in the Ranking
If you no longer want to receive notifications, reply to this comment with the word
STOPThe card is lovely, I recall years back when I did some card designs for birthday and valentine. It really felt nice to be creative, thanks to @maryed for writing about your post in the #learnandearn contest
Thanks for sharing your beautiful valentines card.