[ESP-ENG] Mi hermoso árbol Araguaney // My beautiful Araguaney tree
Hello my dear friends of Hive, today I bring you a brilliant idea that I want to share with you my tree, made with recycled materials. The Araguaney is the national tree of my country Venezuela, on May 29th was declared the national tree, as that date is approaching I wanted to make a beautiful art inspired by it.
.png) Foto tomada desde mi teléfono inteligente.
Foto tomada desde mi teléfono inteligente.Edición hecha por mi desde canva

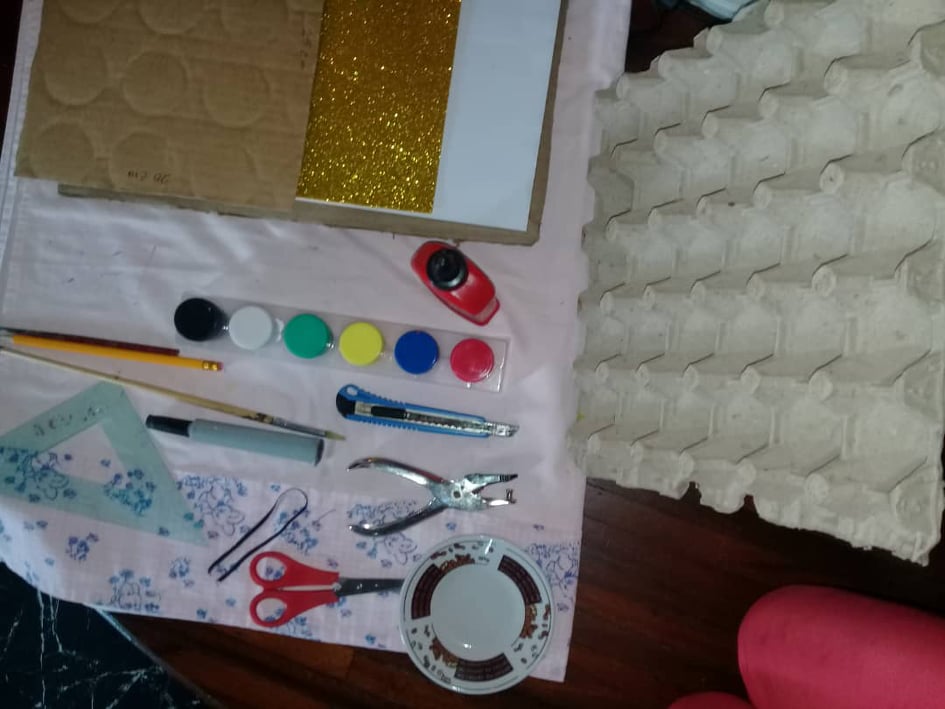
Los materiales a utilizar son:
- 2 cuadros de cartón.
- Cartón de huevo.
- Pega blanca.
- 2 hojas blanca.
- Silicon en barra.
- Foami dorado.
- Tijera.
- Lápiz.
- Regla.
- Cinta.
- Tempera.
- Exacto.
- Marcador.
- Platico.
- Pincel.
- Abridor de agujero.
The materials to be used are:
- 2 squares of cardboard.
- Egg carton.
- White glue.
- 2 white sheets.
- Silicon stick.
- Gold foami.
- Scissors.
- Pencil.
- Ruler.
- Tape.
- Tempera.
- Exactly.
- Marker.
- Plastic.
- Paintbrush.
- Hole opener.
.png)
Paso 1: Tomar los dos pedazos de cartón, regla y tijera, hacemos un cuadrado 25.0 cm de ancho y 35.0 cm de largo, ese sera el tamaño de nuestro cuadro. Luego a uno de los cuadros se le hace un marco de 1.0 cm de ancho.
Step 1: Take the two pieces of cardboard, ruler and scissors, make a square 25.0 cm wide and 35.0 cm long, that will be the size of our picture. Then make a 1.0 cm wide frame for one of the squares.
.png)
Paso 2: Ya tomadas las medidas del cuadro y del marco, pegamos las hojas de maquina con pega blanca en el cartón utilizándolo como el fondo. Luego la parte sobrante que nos quedo de cartón dibujamos el tallo de nuestro árbol y lo recortamos.
Step 2: Once the measurements of the picture and the frame have been taken, we glue the machine leaves with white glue on the cardboard using it as the background. Then, we draw the stem of our tree and cut it out from the remaining cardboard.
.png)
Paso 3: Tomamos pincel y las temperas, mezclamos el color azul y el rojo, obteniendo el color marrón, que sera el color del nuestro marco y tallo del árbol. Al terminar lo dejaremos secar al aire libre.
Step 3: We take a brush and tempera, mix the blue and red color, obtaining the brown color, which will be the color of our frame and stem of the tree. When finished we will let it dry in the open air.
.png)
Paso 4: Luego picaremos el cartón de huevo sacando las bases, cada una de ellas la picaremos en 6 partes iguales, de esta manera formaremos nuestra flor de oro, al terminar pintaremos las flores de color amarillo por los dos lado.
Step 4: Then we will chop the egg carton taking out the bases, each one of them will be chopped in 6 equal parts, in this way we will form our golden flower, when we finish we will paint the flowers yellow on both sides.
.png)
Paso 5: Teniendo todo seco de la pintura, procedemos a pegar el tallo dentro del marco, luego tomamos las flores y las pegamos con silicon formando el árbol, luego con el saca hueco sacamos pequeños círculos que irán en el medio de cada una de las flores, por ultimo colocamos una cinta por detrás del cuadro para poder colgarlo.
Step 5: Having all the paint dry, we proceed to glue the stem inside the frame, then we take the flowers and glue them with silicone forming the tree, then with the hole punch we remove small circles that will go in the middle of each of the flowers, finally we place a ribbon behind the picture to hang it.
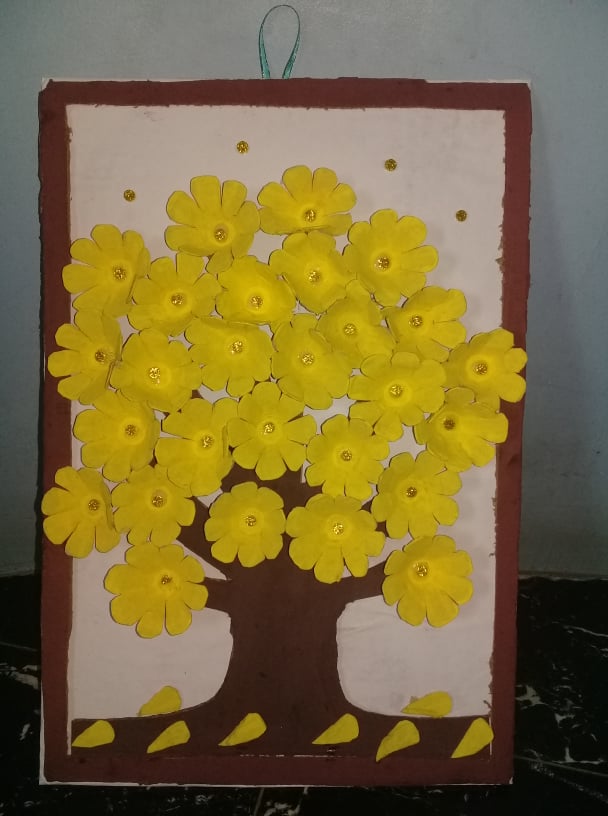
This is my result a beautiful tree in the form of a picture, made with all the intention of using it as an ornament, I hope you like more or the same as me this art, easy to perform.