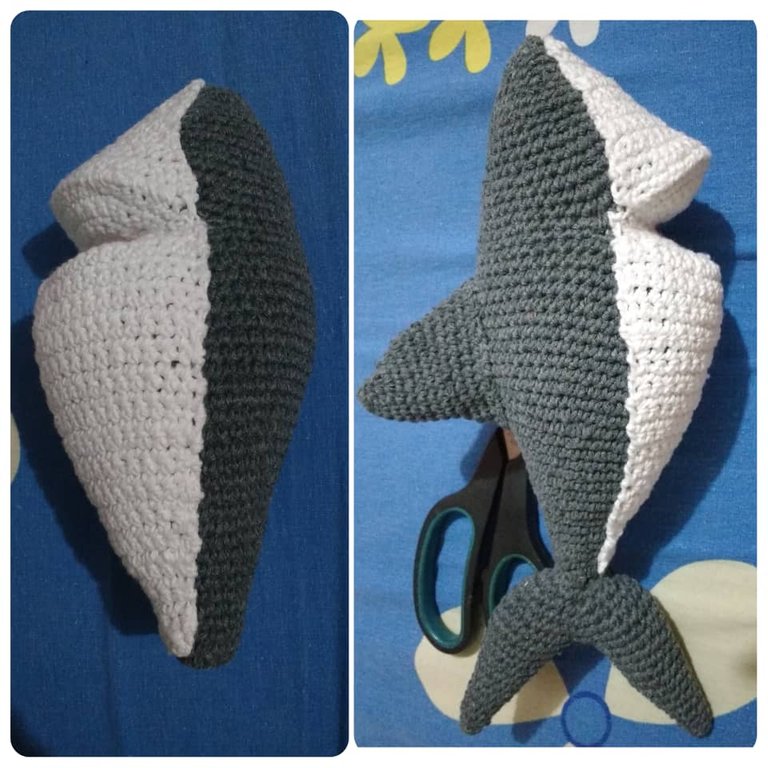
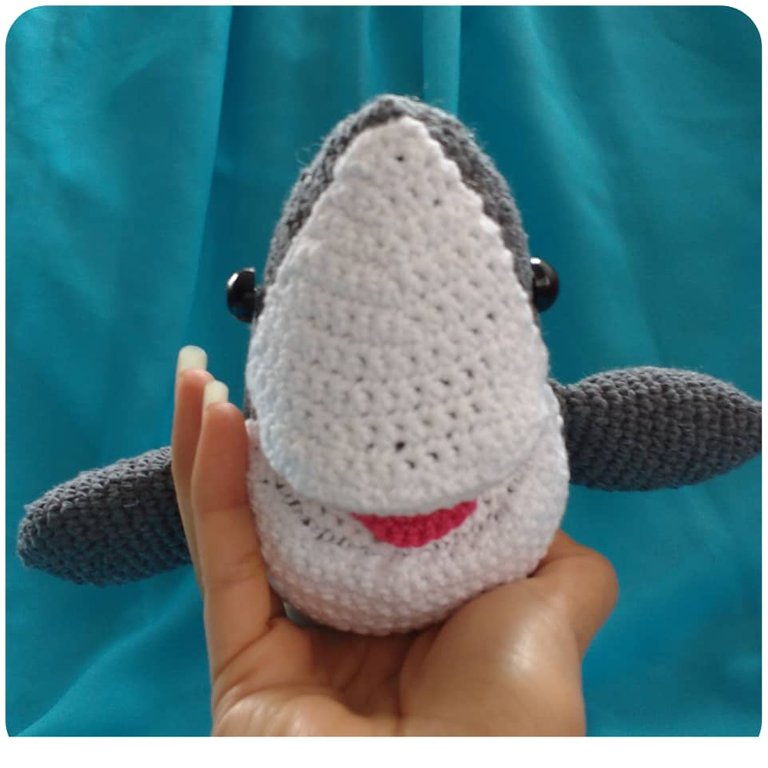
THE MANDIBULIN SHARK // EL TIBURON MANDIBULIN
Hello dear members of the #NeedleWorkMonday community. Today I bring you the creative process to make an adorable Shark.
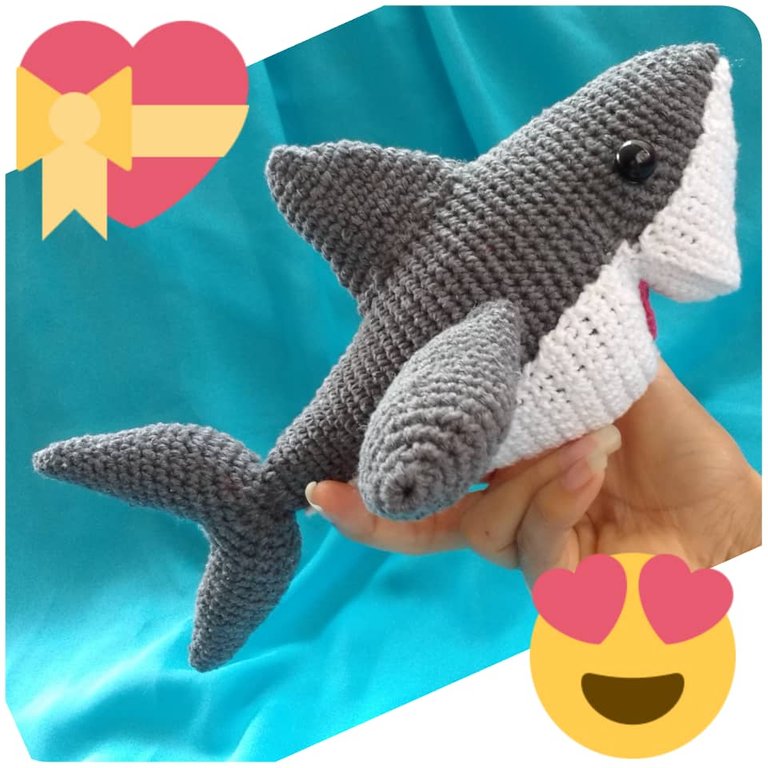
The idea came from @ambarvegas, who wanted a Shark for a gift, but she couldn't find one she liked in traditional stores, so she contacted me and asked me to knit her a Shark.
I couldn't resist, I had never made a Shark before, but the idea attracted me like pollen to bees. A new challenge and of course the answer was yes.
Getting the materials was tragicomic. It was a radical week and the only thing I got was gray thread to start the craft. I got the rest of the materials in the following weeks. I had never had such a hard time finding eyes before. So join me in making this adorable Shark.
MATERIALS
- Gray, white and fuscia cotton yarn.
- Crochet needle N° 2.
- Wool needle.
- Black eyes.
- Anti-allergic stuffing.
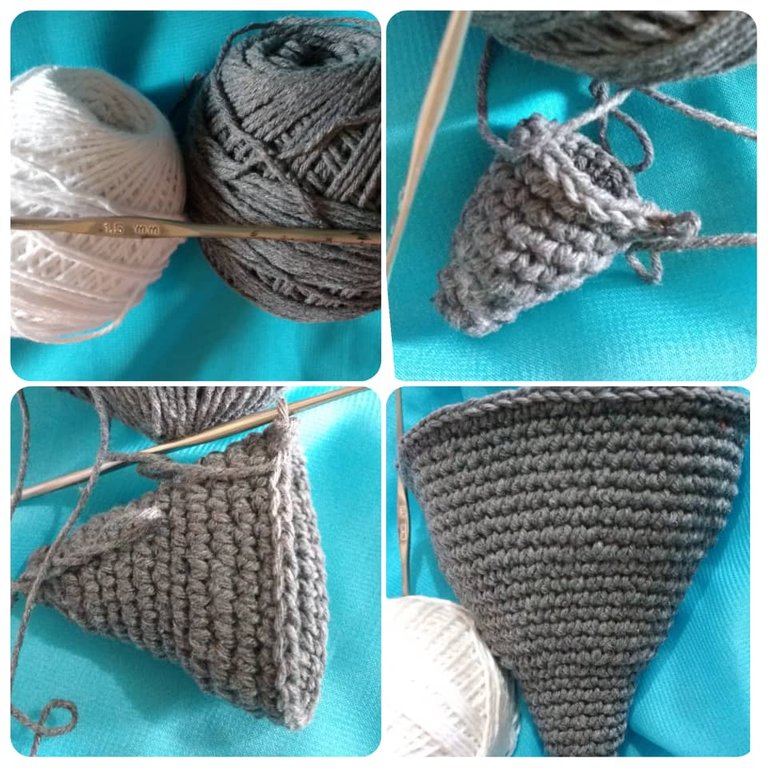
THE BODY IN GRAY COLOR
I started with the tail. I made 5 chains that I closed with a slip stitch. Then I started with half stitches in a wraparound way until I reached row N° 6. From this row on, I began to make increases every 5 half stitches until I reached row N° 12 and immediately I began to make increases every 3 half stitches until I reached row N° 18.
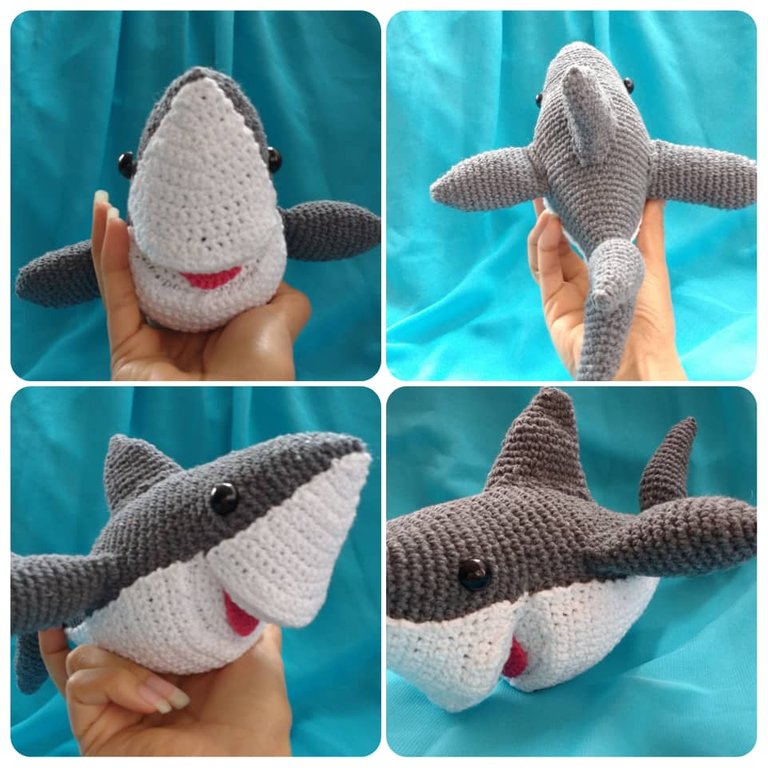
Once in row N° 18, I made increases every 2 half stitches until the end of the row. In rows 19 to 30, I kept knitting a half stitch on each chain. Here begins the adventure of the mouth. I decided that half of the stitches were going to be the mouth and the other half the back of the shark. Unfortunately I didn't write the stitches down and the Shark was already given to its owner.
At that moment I changed to white and started knitting the mouth making reductions every 5 half stitches until I reached the half of the stitches to return on the knitting making again reductions every 5 half stitches. On the next return I made reductions every 4 half stitches, which I did again on the next round. On the 5th return, I made reductions every 3 half stitches and on the 6th return, I made reductions every 2 half stitches, at this point I had already knitted half of the mouth.
To knit the other half of the mouth, I proceeded in reverse, that is, in the first return I made increases every 2 half stitches, in the second return I made increases every 3 half stitches, in returns N° 3 and 4 I made increases every 4 half stitches and finally in returns N° 5 and 6 I made increases every 5 half stitches.
I changed to gray again and resumed the knitting in a wraparound pattern in row N° 31, but in the half of the fabric corresponding to the mouth I made reductions every 4 half stitches, in the other half corresponding to the back I did not make increases or reductions, I knitted a half stitch on each chain stitch. I did this operation until row N° 40. From row N° 41 to 46 I made reductions in the whole row every 4 stitches. I filled and closed.
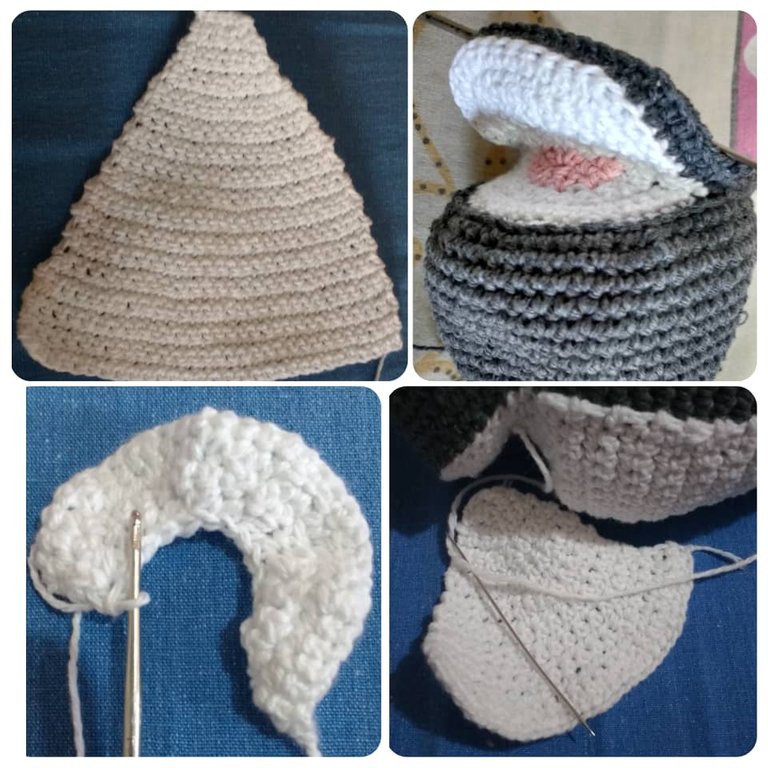
THE BELLY IN WHITE.
I'm not very good at changing colors, so to avoid the color changes from showing, I decided to knit the belly separately. So I started by knitting 4 chains and then made 3 half stitches. The truth is that I was measuring the knitting over the body of the Shark and making increases each time I considered it until I reached the lower end of the mouth. I closed the fabric and proceeded to sew with the help of a wool needle the lower part of the belly to the body of the Shark.
With the upper part of the belly I proceeded in the same way, making increases every time I considered it until I reached the upper end of the mouth. I closed and with the help of a wool needle I sewed the belly to the body of the Shark.
THE TONGUE.
I didn't have any red yarn, so @ambarvegas selected a nice fuscia color she had among the proposed colors. To make the tongue, I knitted 3 half stitches and made half-moon returns, making increases until I reached the desired size. I sewed it to the bottom of the mouth with the help of a wool needle.
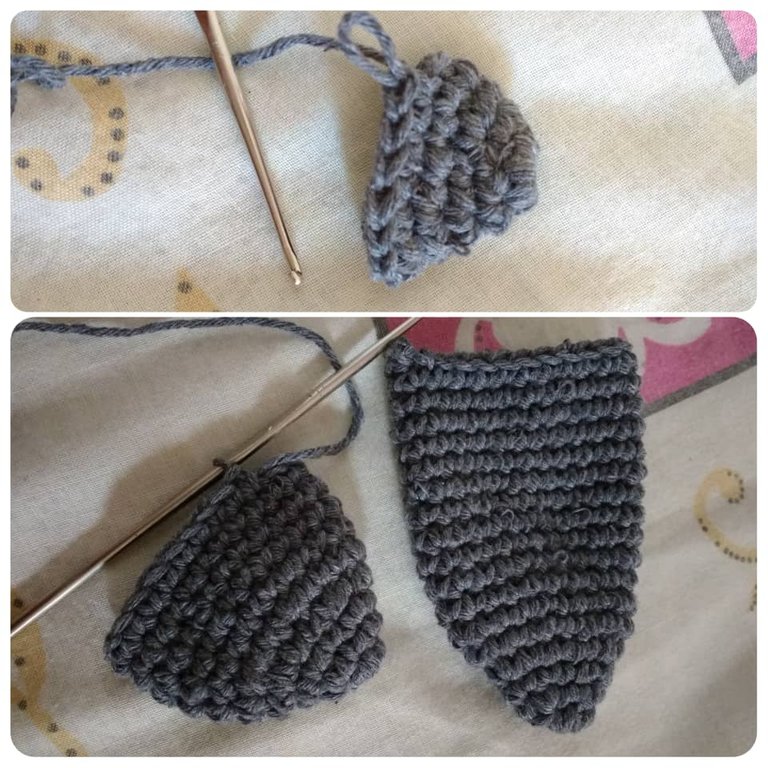
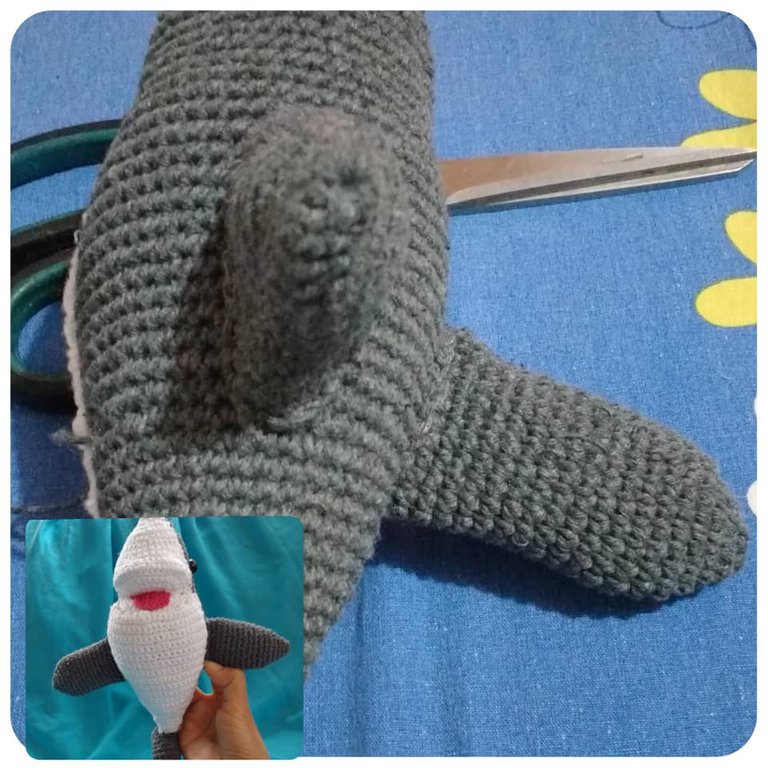
THE FINS. PECTORAL, DORSAL and CAUDAL
To make the 2 pectoral fins I started with a magic ring of 5 chains. Then I made increases until I reached the right size for the size of the shark and continued knitting until I reached the desired length.
The Dorsal Fin. I started by knitting a magic ring of 5 chains. Row 1, I knit 6 half stitches. Row 2, I knit 1 increase every half stitch. Row 3, I knit 1 increase every 2 half stitches. From this point on, I made increases to half of the fabric, while keeping the other half the same to achieve the shape of the fin. I knitted making increases until I reached the desired length.
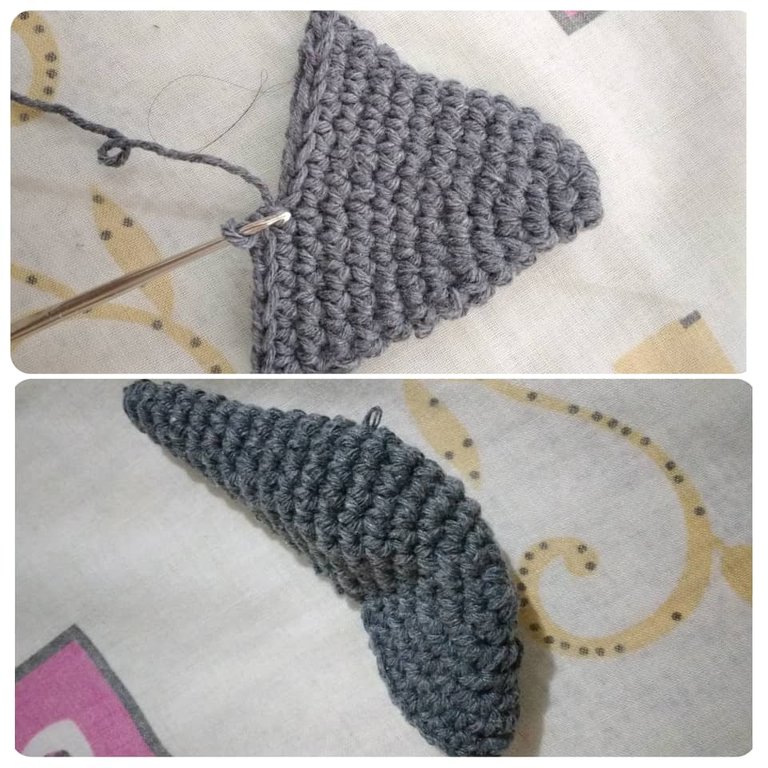
Finally the caudal fin. I started at the base, making increases until I achieved a fan shape, until I reached the 6th row. From the 7th row on, I only knitted half of the craft to give shape to the first end of the fin. I made reductions as I saw fit to achieve the desired height in relation to the size of the body. I did the same with the other half until I reached the lower end of the fin.
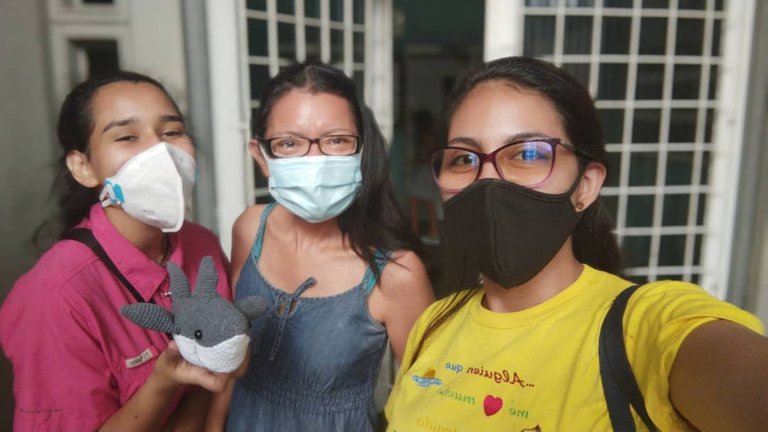
Pic taken for @ambarvegas
With the help of a wool needle, a lot of strength and patience I sewed all the parts together and glued the eyes.
I hope you liked my proposal. Thank you very much for reading me!
Translated with www.DeepL.com/Translator (free version). Sorry for mistakes in traslation.

AHORA EN ESPAÑOL
Hola queridos integrantes de la comunidad #NeedleWorkMonday. Hoy les traigo el proceso creativo para hacer un adorable Tiburón.
La idea surgió de @ambarvegas, quien quería un Tiburón para un regalo, pero no encontraba en las tiendas tradicionales uno que le gustara, así que me contactó y me pidió que le tejiera un Tiburón.
Yo no me pude resistir, nunca había elaborado un Tiburón, pero la idea me atrajo como el polen a las abejas. Un nuevo reto y claro que la respuesta fue sí.
Conseguir los materiales fue tragicómico. Era semana radical y lo único que conseguí fue hilo gris para iniciar la manualidad. El resto de los materiales lo conseguí en las semanas siguientes. Nunca antes se me había hecho tan difícil encontrar unos ojos. Así que acompáñame a elaborar este adorable Tiburón.
MATERIALES
- Hilo algodón gris, blanco y fuscia.
- Aguja de crochet N° 2.
- Aguja lanera.
- Ojos negros.
- Relleno antialérgico.
EL CUERPO EN COLOR GRIS
Comencé por la cola. Hice 5 cadenetas que cerré con un punto deslizado. A continuación inicié con medio puntos en forma envolvente hasta llegar a la vuelta N° 6. A partir de esta vuelta comencé a hacer aumentos cada 5 medio puntos hasta llegar a la vuelta N° 12 e inmediatamente comencé a hacer aumentos cada 3 medio puntos hasta llegar a la vuelta N° 18.
Una vez en la vuelta N° 18, hice aumentos cada 2 medio hasta finalizar la vuelta. Las vueltas 19 a la 30, me mantuve tejiendo un medio punto sobre cada cadeneta. Aquí comienza la aventura de la boca. Decidí que la mitad de los puntos iba a ser la boca y la otra mitad el lomo del Tiburón. Lamentablemente no anote lo puntos y el Tiburón ya fue entregada a su dueña.
En ese momento cambié al color blanco e inicie el tejido de la boca haciendo reducciones cada 5 medio puntos hasta llegar a la mitad de los puntos para devolverme sobre el tejido haciendo nuevamente reducciones cada 5 medio puntos. En el siguiente retorno hice reducciones cada 4 medio puntos, lo que volví a hacer en la siguiente vuelta. En el retorno N° 5, hice reducciones cada 3 medio puntos y en el retorno N° 6, hice reducciones cada 2 medio puntos, ya en este punto tenía tejida la mitad de la boca.
Para tejer la otra mitad de la boca, procedí de forma inversa, es decir, en el primer retorno hice aumentos cada 2 medio puntos, en el segundo hice aumentos cada 3 medio puntos, en los retornos N° 3 y 4 hice aumentos cada 4 medio puntos y finalmente en los retornos N° 5 y 6 hice aumentos cada 5 medio puntos.
Cambié al color gris nuevamente y retomé el tejido en forma envolvente en su vuelta N° 31, pero en la mitad del tejido correspondiente a la boca hice reducciones cada 4 medio puntos en la otra mitad correspondiente al lomo no hice aumentos ni reducciones, tejí un medio punto sobre cada cadeneta. Esta operación la hice hasta la vuelta N° 40. A partir de la vuelta N° 41 a la 46 hice reducciones en toda la vuelta cada 4 puntos. Rellené y cerré.
LA PANZA EN COLOR BLANCO.
No soy muy diestra cambiando colores, así que para evitar que los cambios de color se notaran, decidí tejer la panza aparte. Así que inicie tejiendo 4 cadenetas y luego hice 3 medio puntos. La verdad es que iba midiendo el tejido sobre el cuerpo del Tiburón y hacia aumentos cada vez que lo consideraba hasta llegar al extremo inferior de la boca. Cerré el tejido y procedí a coser con ayuda de una aguja lanera la parte baja de la panza al cuerpo del Tiburón.
Con la parte superior de la panza procedí de igual forma, haciendo aumentos cada vez que lo consideraba hasta llegar al extremo superior de la boca. Cerré y con ayuda de una aguja lanera cosí la panza al cuerpo del Tiburón.
LA LENGUA.
No tenía hilo rojo, así que @ambarvegas seleccionó un lindo color fuscia que tenía entre los colores propuestos. Para hacer la lengua, tejí 3 medio puntos y di retornos en forma de media luna haciendo aumentos hasta lograr el tamaño deseado. Lo cosí al fondo de la boca con ayuda de una aguja lanera.
LAS ALETAS. PECTORALES, DORSAL y CAUDAL
Para hacer las 2 aletas pectorales inicié con un anillo mágico de 5 cadenetas. Luego hice aumentos hasta lograr la medida adecuada al tamaño del Tiburón y continúe tejiendo hasta lograr la longitud deseada.
La Aleta Dorsal. Comencé tejiendo un anillo mágico de 5 cadenetas. Vuelta 1 hice 6 medio puntos. Vuelta 2, tejí 1 aumento cada medio punto. Vuelta 3, tejí 1 aumento cada 2 medio puntos. A partir de este momento hice aumentos a la mitad del tejido, mientras que la otra mitad lo mantenía igual para lograr la forma de la aleta. Tejí haciendo aumentos hasta lograr la longitud deseada.
Finalmente la aleta caudal. Inicié por la base haciendo aumentos hasta lograr una forma de abanico, hasta llegar a la vuelta N° 6. A partir de la vuelta 7, solo tejí la mitad de la manualidad para dar forma al primer extremo de la aleta. Hice reducciones según consideré para lograr la altura deseada en relación al tamaño del cuerpo. Hice lo mismo con la otra mitad hasta lograr el extremo inferior de la aleta.
Foto tomada por @ambarvegas
Con ayuda de una aguja lanera, mucha fuerza y paciencia cosí todas las partes y pegué los ojos.
Espero les haya gustado mi propuesta. Muchas gracias por leerme!
Quedo bien bonito ese tiburon 😊
Gracias. La verdad le puse mucho amor
Un trabajo muy hermoso, gracias @tibaire por hacer justo lo que deseaba🤍
Gracias a ti por confiar en mis manos para hacer tan adorable regalo.
Bello me encantó 😍
Gracias! Fue todo un reto hacer la boca.
Hola @tibaire
Se percibe en las palabras de este post la emoción que tu creación. Me alegra mucho hayas logrado complacer a alguien tu trabajo.
El tiburón ha quedado precioso, luce con vida y tiene una expresión vivaz en su cara.
Gracias por compartir el proceso creativo.
Saludos
Gracias @jicrochet , tanta verdad en tus palabras, mucha emoción y mucho amor. Amé la expresión amigable del tiburón.
Excelente amiga gran trabajo👏👏👍
Muchas gracias por tus palabras.
Ni bien vi la imagen, le di like, jaja. Es el tiburón más lindo que he visto hasta el momento. Me llamó la atención la manera creativa con la que formaste la boca.
Es cierto lo de los ojos, al inicio me la pasaba buscando y no encontraba, luego de un par de años recién empezaron a importar los ojos de seguridad y ya tengo un proveedor, felizmente. ¡Gran trabajo! y ¡Buenas vibras!.
Hola @inici-arte wow me emocionan tus palabras, sobre todo porque vienen de ti! Muchas gracias. La boca, vi una foto y quise replicarla y he ahí el resultado. Wow lo del proveedor de ojos me interesa. No compraré grandes cantidades, pero me gustaría conseguir ojos de seguridad. Lo que terminé comprando fueron botones muy parecidos a unos ojos.
Bueno, en Perú ya los importan. Vienen en kits de varios números/tamaños de ojitos. Hace poco, volví a comprar otro kit de ojitos porque requiero tamaños un poco más grandes. Y están a un precio cómodo (accesible).
Si está Perú, normal le puedo dar el número del proveedor. Sino, le recomiendo que busque en Youtube o facebook (grupos de tejido). Por pandemia, hay varios negocios de tejido que están dándose a conocer por las redes sociales.
Gracias por tu información. No estoy en Perú. Vivo en Venezuela. Aquí es un poco complicado encontrar
Si mal no recuerdo mandibulina era una comiquita, y era muy chistoso. me encanto como lo diseñaste de manera perfecta. Gracias por compartir.
Hola @carolinacardoza si era una comiquita, me encantaba ese Tiburón amigable!. Gracias por comentar!
Una artista es del nivel del reto que le colocan. Está hermoso el resultado. Felicidades cariño.
Gracias @leslieebano por tus lindas palabras!
Un fuerte abrazo reina
¡Lo certifico!
Los amigurumis de @tibaire son espectaculares! Excelente tiburón que nos hace recordar a Mandibulín y las Gatimelódicas.
jajajajaja @charsdesign te acuerdas de las gatimelodicas, tengo en mi celular una comiquita de mandibulin pero en portugués
Awww que bello, me encantó, me pareció una idea estupenda. Te felicito, por esa creación. Quedó súper tierno
Muchas @izzieperez por tus lindas palabras. Lo hice con mucho amor
Ay que lindooooo, me encantó. Si las semanas radicales con lo peor, aquí en mi pueblo yo solo puedo comprar hilos los lunes de semana flexible porque viene un señor buhonero de otra ciudad a vender, porque en las tiendas no hay variedad y de paso super caros,yo nunca he usado ojos de seguridad jeje siempre he usado cuentas de madera o plástico, es decir lo que consiga y si no pues los bordo, porque aquí no llegan esas cosas. Te felicito <3
Hola @irenenavarroart que fuerte, lo bueno es que el señor va y puedes comprar hilo. Yo no encontré ojos de seguridad. No los encuentro. Lo que si encontré fueron unos botones muy parecidos a ojos. Si gustas te puedo servir de puente y te los envío. Están en 1,5 dólares la docena. Es cuestión de que saques cuenta a ver si te conviene. La verdad no sé en cuanto está el envío.
Muchísimas gracias @tibaire tengo que hacer mis cuentas, si no me equivoco el envío mínimo por mrw sale en 4$ pero eso a veces varía por la zona, de hacerlo tendría que comprar varias docenas de una vez para nos salir tan mal jejeje, pero igualmente ya que se que son botones, voy a revisar en las tienditas de aquí a ver si no hay de esos, sino voy a esperar un poquito a ver si hbd sube para que cuadremos <3
Bueno piénsalo y saca tus cuentas, yo feliz de ayudarte, por cierto hay tiendas donde compro los hilos y el ovillo de 40gs sale en 1.800.000 bolívares. En todo caso podemos cuadras si estás interesada y te hago una compra global. Saludos
Hola @tibaire me gustó mucho tu post, no solo por el lindo tiburón que has creado, sino también por lo interesante que fue seguir todo las maniobras que tuviste que hacer para lograr tu reto.
Te felicito amiga, te anotaste otro gol! Jaja
Que bonito es crear con las agujas, la mente y el corazón.
Saludos!
Hola @kattycrochet gracias. Cada día estoy más enamorada de tejer amigurumis. La verdad no solo potencia mi creatividad, sino que me da mucha alegría y paz.
Que hermoso tiburón me encantó y con la boca abierta esta genial!!! Me sigues sorprendiendo con tus diseños ❤️
Gracias! Ahora tengo otros retos más... Uno lo voy a utilizar para el lunes 😸