NeedleWorkMonday DIY Spanish and English: Paso a Paso Zarcillo Soutache con flecos en Mostacillas 💕💕💕 Step by Step Zarcillo Soutache with fringes in Mostacillas
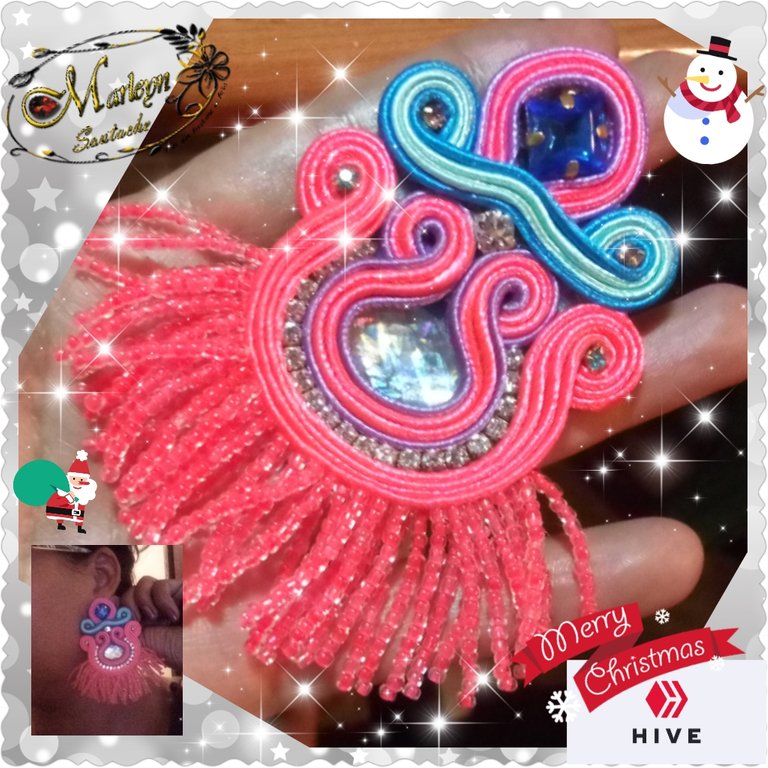
feliz y bendecido inicio de semana a todos 💕, Espero que se encuentren bien llenos de salud y abundancia 🙏, el día de hoy e realizado un par de zarcillos bajo la técnica del soutache con unos flecos de mostacillas que se los he cocido en la parte de abajo. Espero les guste e tratado de explicar con detalles ayudandome con una secuencia de imagenes. En la publicación anterior subí un video que te puede ayudar si eres mas visual no es el mismo modelo de Zarcillo pero la técnica es la misma a la hora de doblar cortar y quemar las puntas 🤗😋 Deseo sea de tu agrado 😁
Materiales
Hilo Soutache
Tijera
Encendedor
Aguja e Hilo
Mostacillas
Aplique ovalado plano 1,5 centímetros
Aplique cuadrado engastado 1 centímetro de diámetro de
Cuero o tela gruesa
Silicón Liquido
Strass 3 milímetros
Strass 6 milímetros
Base o pin para Zarcillos
Amor, paciencia y animo por aprender! 😀🎉
materials
Soutache thread
Scissors
Lighter
Needle and thread
Mostacillas
Apply flat oval 1.5 centimeters
Apply square set 1 centimeter in diameter of
Leather or thick fabric
Liquid silicone
Strass 3 mm
Strass 6 mm
Base or pin for Tendrils
Love, patience and encouragement to learn! 😀🎉
.
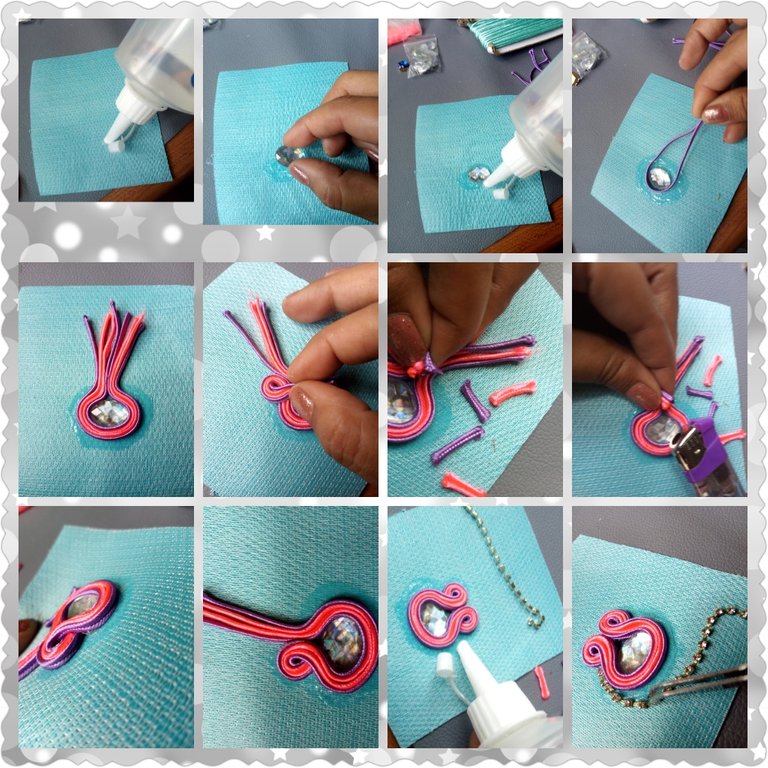
Step 1: Cut a square of leather or thick fabric, place a little liquid silicone and glue the oval stone about 3 centimeters from the bottom of the leather, now cut 4 strips of Soutache of approximately 12 or 15 centimeters each, place more liquid silicone around the stone and glue the threads, take each thread by the ends to find its center and glue it one by one, you can help yourself with a tweezers used to repair watches or with an eyebrow tweezers they are very useful, when gluing it, fold 4 threads downwards making a circle, cut the excess, burn and with the help of the tweezers introduce the threads below the already glued ones, carry out the same process on the other side , now place more liquid silicone under the threads and glue 3 millimeters stras that cover the entire bottom of the threads
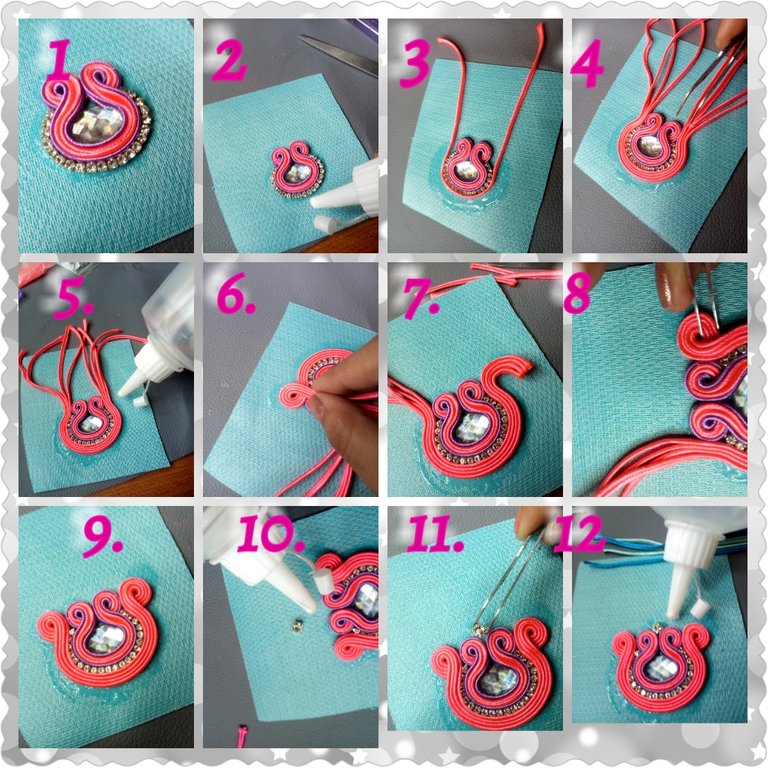
Step 2: It should look like image 1, now place more liquid silicone on the bottom, cut 4 long threads of about 20 centimeters and glue them down, doing the same process as the previous step . Now cut a stone from the strass of 6 millimeters and paste it in the center of the Tendril at the top as you see in image 11
Step 3: Now place more liquid silicone on the top, now cut 4 threads of soutache 12 or 15 centimeters long, paste them carefully on the top of the rhinestone as you I show in image 3, now place the square appliqué diagonally and mark the tip there you are going to place the Zarcillo pin 💕 now paste the stone whose tip is on the tendril pin, cut 4 threads or you can use the scraps of the Threads that we have already used and line the square stone with these, introducing the threads below the glued ones with the help of the pliers, it should be as seen in image 8, now fold the long threads to form a circle leaving a small hole In the center, mark, cut and paste, inserting the tips from below. Wait a few minutes for it to stick a bit and cut before it dries completely so that it still has mobility and you can cut easier.
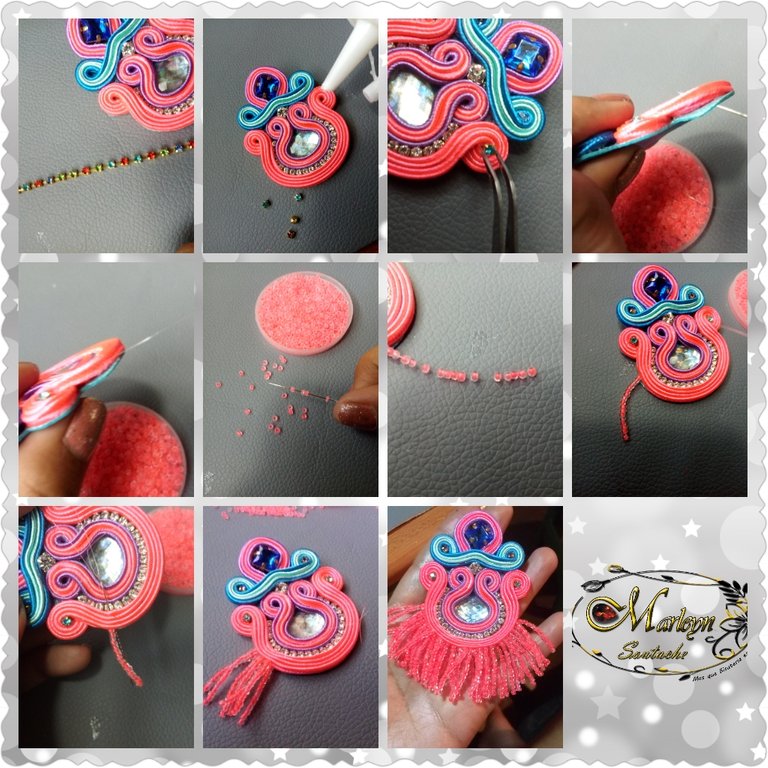
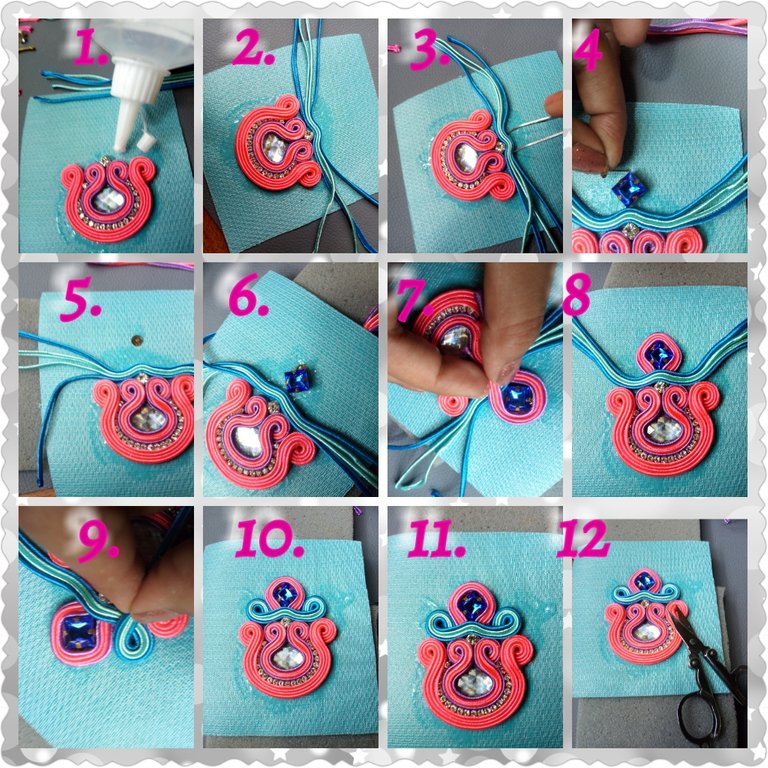
Step 4: Now cut some 3 millimeter rhinestone stones and carefully glue them into the holes in each circle. Thread the needle with the thread, lift the leather from below a little and insert the needle from the back to the front so that the knot of the thread is under the leather and sticks the leather again, now introducing the needle from above through the thread downwards not to the leather if not to the air only through the thread, now insert Beads as many as you want the length of the fringe in the last bead, you pass the thread over it and you return with the needle through all the other beads, inserting the needle again into the thread Soutache and so on until completing as many fringes as you want. When finished, reinforce the seam preferably below the leather and cut the remaining thread! In this way we have finished I hope you try and continue creating and innovating! You can. 💕🤗

Autoría del texto y todas las imágenes: @Marleyn , La edición de las imágenes las realicé yo misma, Por favor no Utilices mis fotos sin mi autorización, edites ni re-publiques mi material ¿Deseas ponerte en contacto conmigo? Escríbeme:
Correo electronico: [email protected]
Discord Marleyn#7821
Twitter: @marleynleal1
Imstagran: @MarleynSoutache
Authorship of the text and all the images: @Marleyn, Editing of the images was done by myself, >Please do not use my photos without my authorization, edit or re-publish my material Do you want to >contact me? Write me:
Email: [email protected]
Discord Marleyn #7821
Twitter: @marleynleal1
Imstagran: @MarleynSoutache
Que hermoso 😍💙💙
Gracias 😁
Quedo espectacular me encantó
Gracias, me alegra que guste! Espero lo intentes seguro te quedara fantástico
Cuanto trabajo en una pieza tan pequeña. El diseño y los detalles son preciosos 😍
Muchas gracias, me alegra q te guste 😁 los detalles lo hacen especial y con un mejor acabado