NeedleWorkMonday DIY Spanish and English: Lazos para niña Divertido halloween / Bows for girl Funny halloween
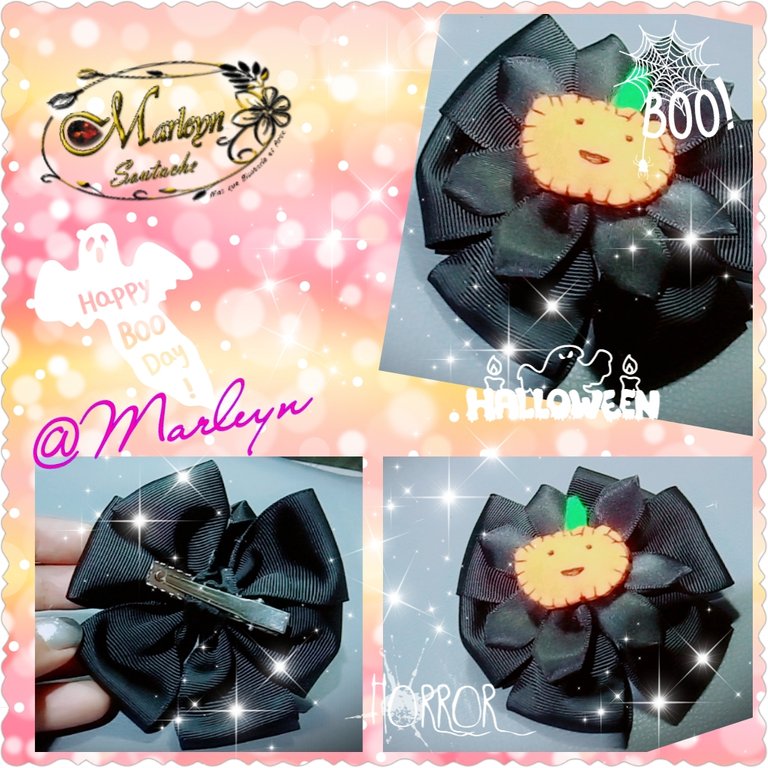
Happy and Blessed Monday, this is a special day I love needle Monday ... I learn more every day from everyone Thank you for sharing such creative work. Today my mother gave me a sewing machine. I am super happy and we will see what I will do. I have become creative and with her help I have learned some incredible things, less crochet hahaha I still have a terrible time. Well for this day I have made some bows for the princesses of the house that fill us with joy our days on the occasion of Halloween for sure they will like it a lot. All the materials can be found easily and the finish is spookily beautiful. Try it with creativity and love, everything is better!

| MATERIALES | MATERIALS |
|---|---|
| Cinta razo de 4 centímetros de ancho por 60 centímetros de largo | Satin ribbon 4 centimeters wide by 60 centimeters long |
| Cinta razo de 1.5 centímetros de ancho por 54 centímetros de largo | Satin ribbon 1.5 centimeters wide by 54 centimeters long |
| Fieltro anaranjado y Verde | Orange and Green Felt |
| Aguja e Hilo | Needle and thread |
| Tijera | Scissors |
| Encendedor | Lighter |
| Silicon en Barra | Silicon Stick |
| Pinza tipo Caimán para lazos | Alligator clip for ties |
| Amor, Animo por aprender y Paciencia | Love, encouragement to learn and patience |
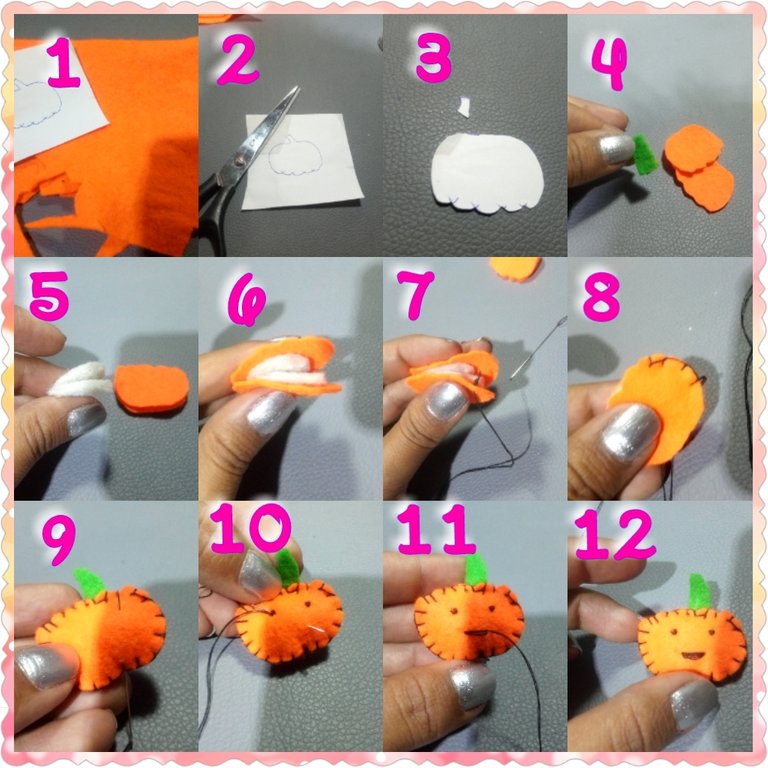
STEP 1. The Pumpkin: Make the drawing on a paper that measures approximately 3 centimeters, you cut it and it will be used as a pattern to mark the felt, after having cut it we will put a little cotton on it In the center as I show you in image 6, now we take the needle and the thread and begin to sew all over the edge of our pumpkin, in the center introduce a green piece to make it look like the stem and continue cooking at Finish insert the needle and form the eyes and the mouth with the same thread, at the end you make a tie and cut the excess thread. We will have a beautiful small pumpkin that will be the center of our bow.

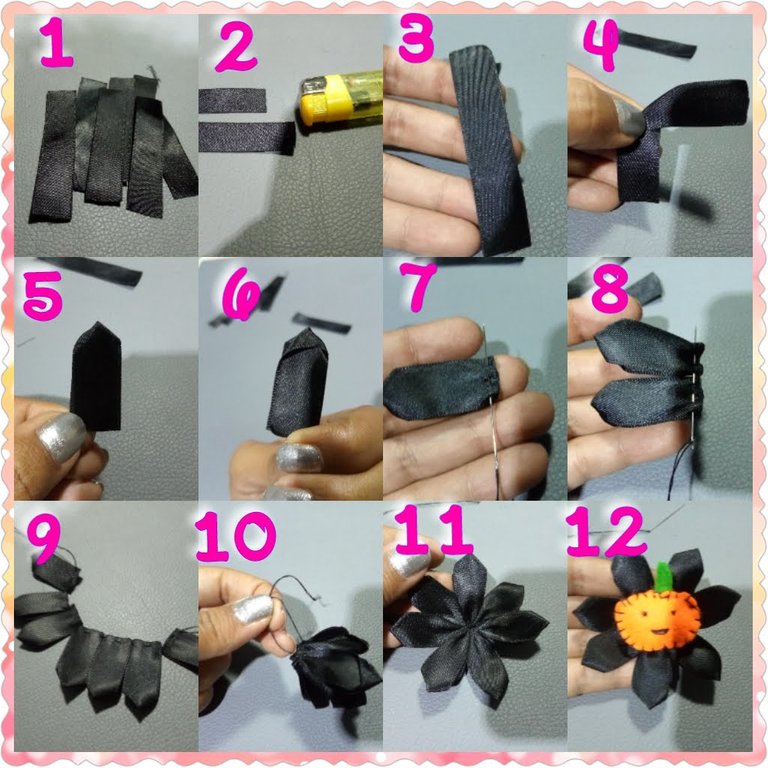
STEP 2: Central Flower, Cut 7 strips of 1.5 centimeters wide by 7 centimeters long, burn the ends with a lighter to seal, now we fold each one to form the petals you can look at the images, fold in half to the right as I show you in image 4, now fold down, from the front it will look like image 5 and from the back it will look like image 6, in this way you already formed the petal with the needle. Threaded, sew straight along the bottom edge, carry out the same process with the other petals as you form them at the end, pull the thread and make a tie, in this way the flower will be formed, see images 10 and 11 then place a stitch of hot silicon in the center of the flower and we will glue our pumpkin
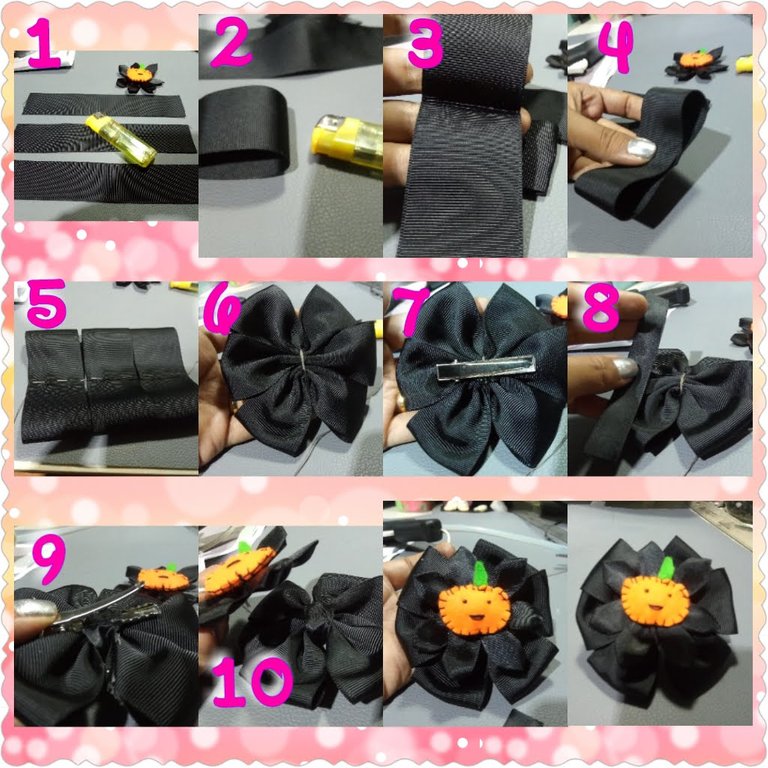
STEP 3: Large flower: Now the large ribbon cuts 3 pieces of 20 centimeters long each, burn the ends with the lighter to seal, fold in half and quickly pass the lighter of This way we will mark the center of the ribbon, now fold each point towards the center as you see in image 4 and start sewing straight across the center, carry out this process on the 3 ribbons as you see in image 5, when finished pull and sew at the back to ensure that it does not come loose. When you are ready with the hot silicone stick the hook on the part that you decide will be behind the loop. Now with a small piece of tape 1.5 centimeters wide, it is going to be placed in the center, you just have to place a drop of silicone on a bar and stick the tape, the excess, pass it through the back, lift the hook and stick that excess inside the hook. It will give you more resistance, now in the upper part, place a little silicone and glue the central flower with our beautiful pumpkin and in this way we finish a beautiful bow I wish you like it as much as I do and do not stop doing it, this relaxes you, it entertains you and better still, it is something we do ourselves!

Autoría del texto y todas las imágenes: @Marleyn , La edición de las imágenes las realicé yo misma, Por favor no Utilices mis fotos sin mi autorización, edites ni re-publiques mi material ¿Deseas ponerte en contacto conmigo? Escríbeme:
Correo electronico: [email protected]
Discord Marleyn#7821
Twitter: @marleynleal1
Imstagran: @MarleynSoutache
Authorship of the text and all the images: @Marleyn, Editing of the images was done by myself, >Please do not use my photos without my authorization, edit or re-publish my material Do you want to >contact me? Write me:
Email: [email protected]
Discord Marleyn #7821
Twitter: @marleynleal1
Imstagran: @MarleynSoutache
Vamos a pensar positivo, el pensamiento positivo no significa que no quieras ver la realidad o ignores las situaciones menos agradables del día a día. Pensar positivo significa enfrenar lo desagradable de una manera más positiva y productiva, de manera que pensamos o decidimos pensar que lo mejor va a pasar, no lo peor.
Let's think positive, positive thinking does not mean that you do not want to see reality or ignore the less pleasant situations of the day to day. Thinking positive means dealing with the unpleasant in a more positive and productive way, so that we think or decide to think that the best will happen, not the worst.
I believe that anything is possible if you have the mindset, the will and the desire to do it and put the time into it. Roger Clemens
Hola...Como siempre no trae tutoriales espectaculares. Que buena noticia que te hayan regalado una máquina, seguramente vamos a ver cosas muy bonitas hechas por ti. saludos
¡Gran trabajo! Voy a marcar esta publicación para cuando quiera hacer un moño en el vestido de mi sobrina.
https://twitter.com/marleynleal1/status/1321658011815989248