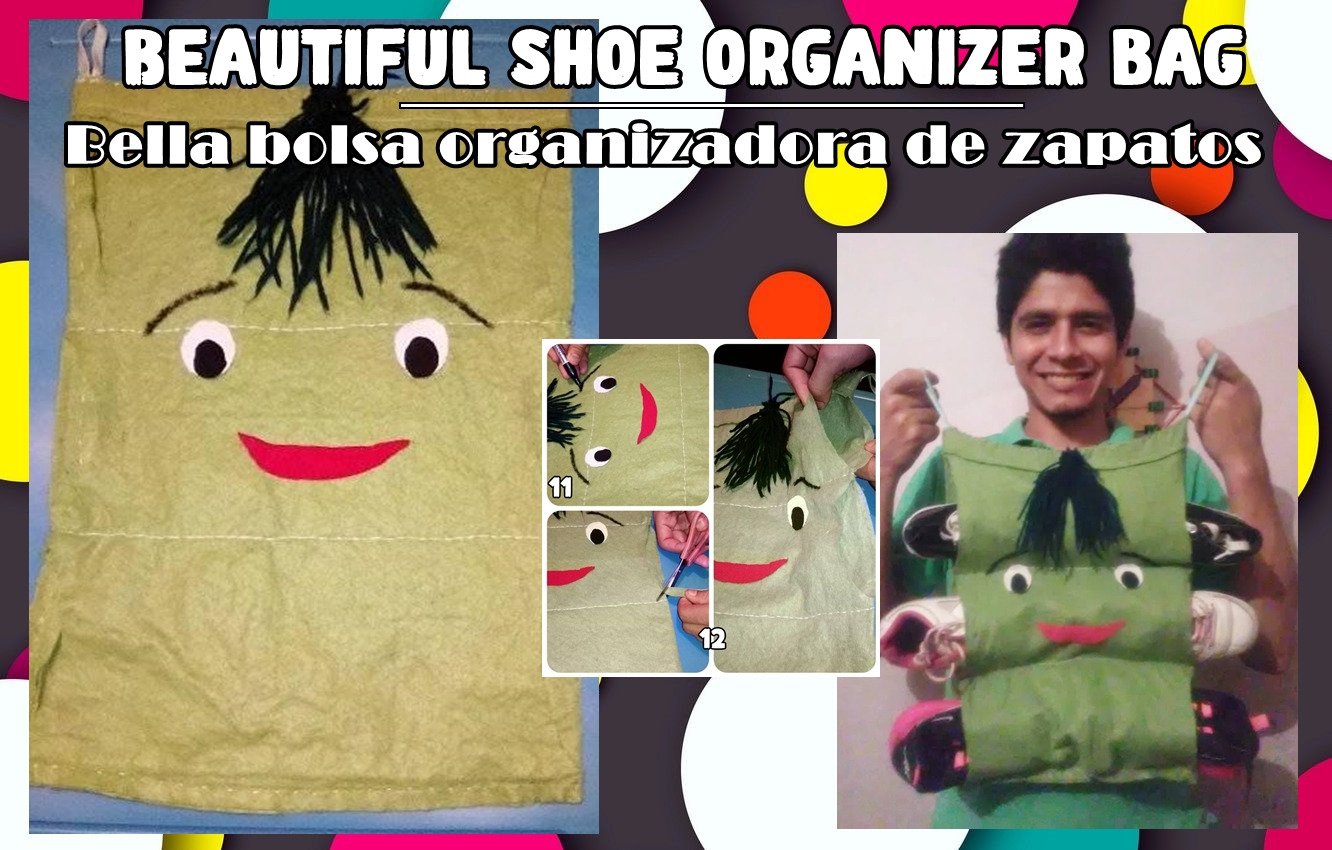
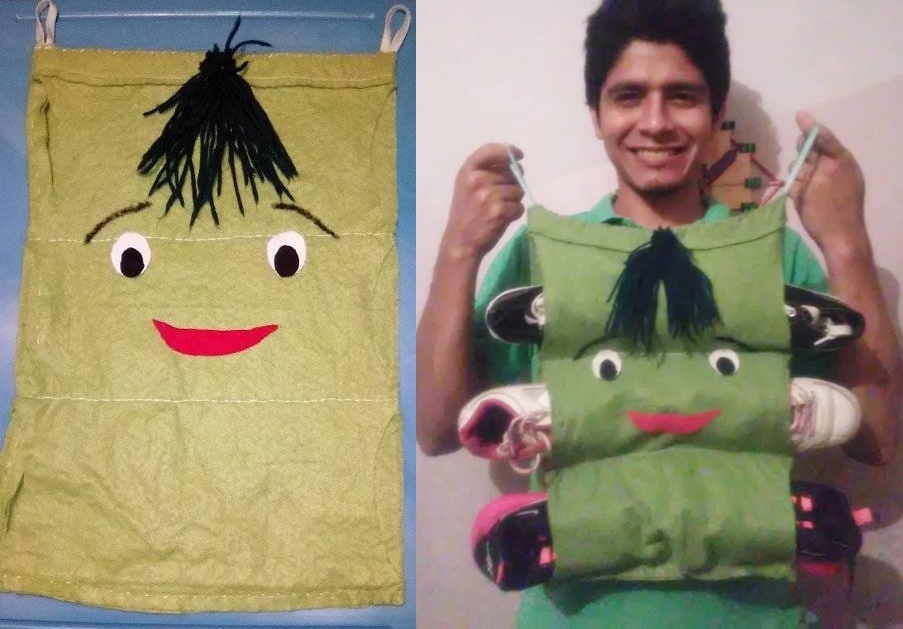
[ENG - ESP] Beautiful shoe organizer bag | Bella bolsa organizadora de zapatos
Hola, que tal amigos, tengan un buen día. He estado aprendiendo mas sobre este bello arte de la costura, y he querido crear cosas nuevas usando el hilo y la aguja, en esta oportunidad tenia un trozo de tela y algunos materiales utiles, y dije "Hey! necesito algo para organizar mis zapatos" si, hagamos una bolsa organizadora para mis zapatos dándole un toque divertido y original, manos a la obra.
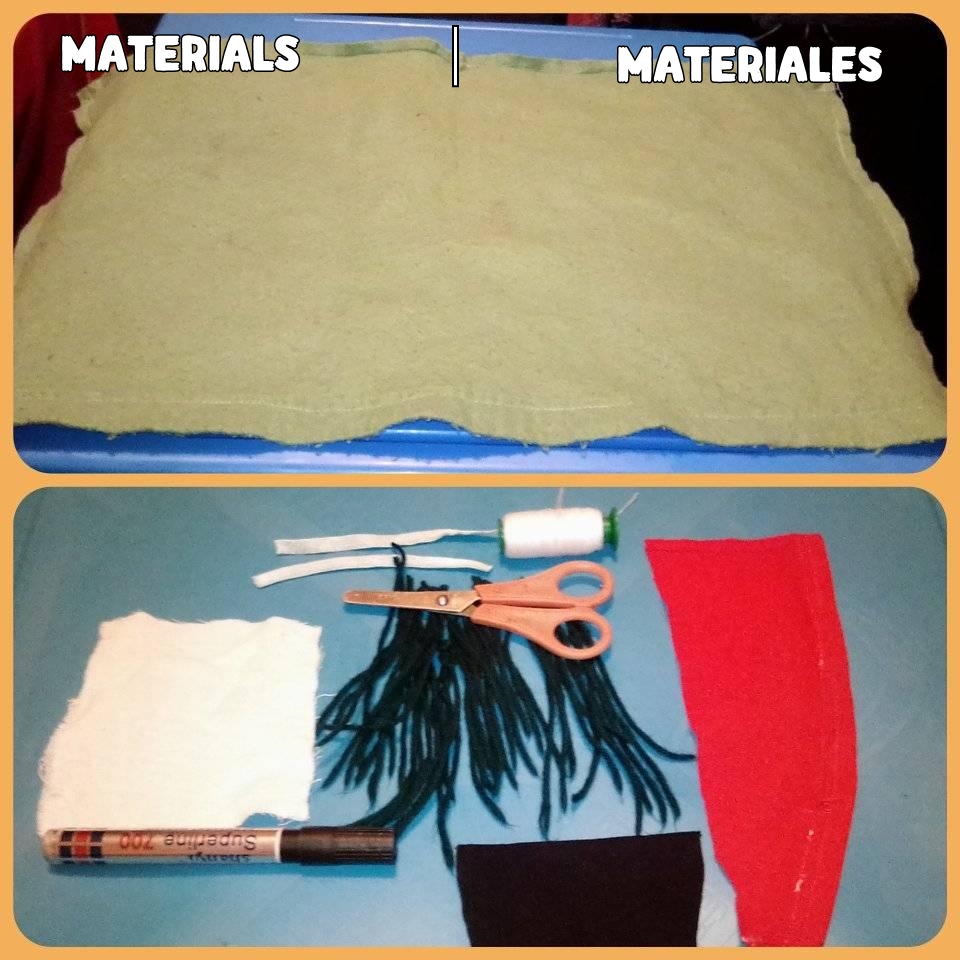
•80 centimeters of fabric (color of your preference).
•Pieces of fabric color: red, white, black.
•Wire.
•Scissors.
•Black marker.
•Decorative strip.
•Thread and needle.
•80 centímetros de Tela (color de su preferencia).
•Retazos de tela color: rojo, blanco, negro.
•Estambre.
•Tijera.
•Marcador negro.
•Tira decorativa.
•Hilo y aguja.

•STEP 1: Cut or fold the fabric in half "now we will have 2 pieces" (we fix with pins or needles for those who sew by hand).
•STEP 2: Measure 10 or 12 centimeters at one end, then sew a straight line horizontally joining the 2 fabrics.
•PASO 1: Cortar o doblar la tela a la mitad “ahora tendremos 2 piezas” (fijamos con alfileres o agujas para los que cosen a mano).
•PASO 2: Medimos 10 o 12 centímetros en uno de los extremos, luego cosemos una línea recta en forma horizontal uniendo las 2 telas.
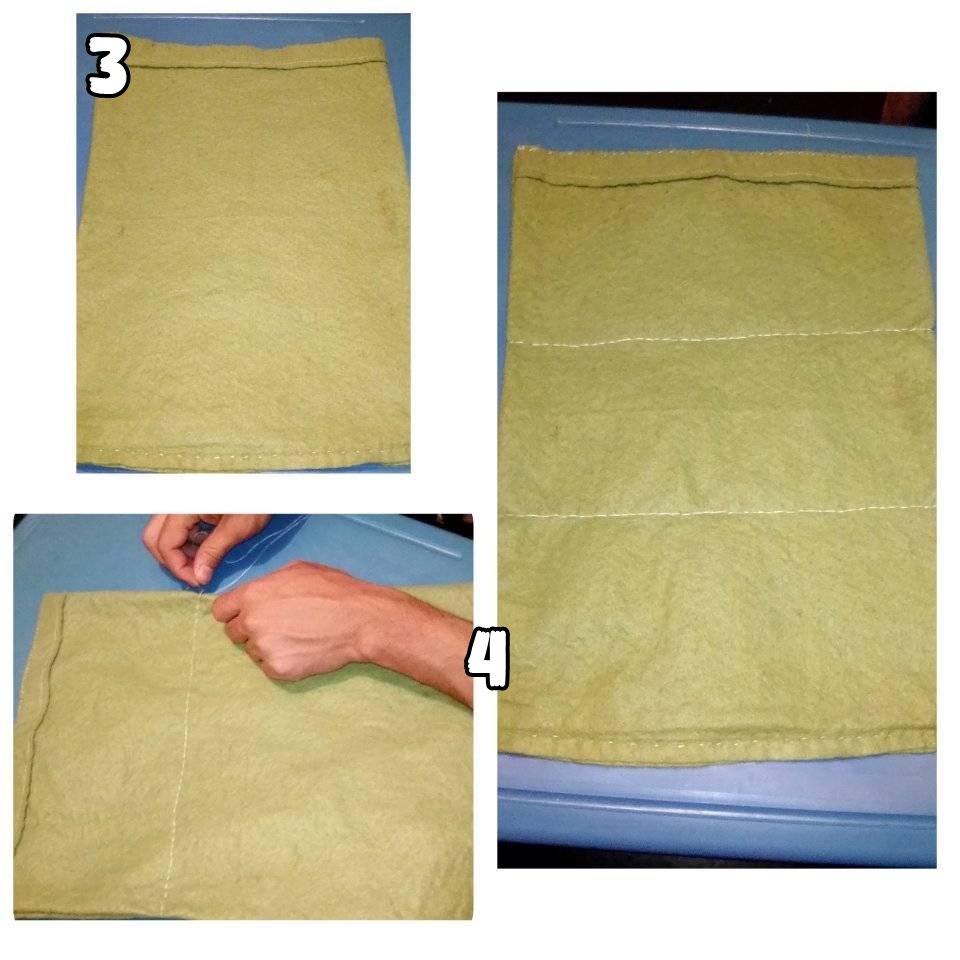
•STEP 3: Fold the edges ½ centimeter and sew.
•STEP 4: Repeat step 2 leaving a space of 10 or 12 centimeters between each seam.
•PASO 3: doblamos los bordes ½ centímetro y cosemos.
•PASO 4: Repetimos el paso 2 dejando un espacio de 10 o 12 centímetro entre cada costura.
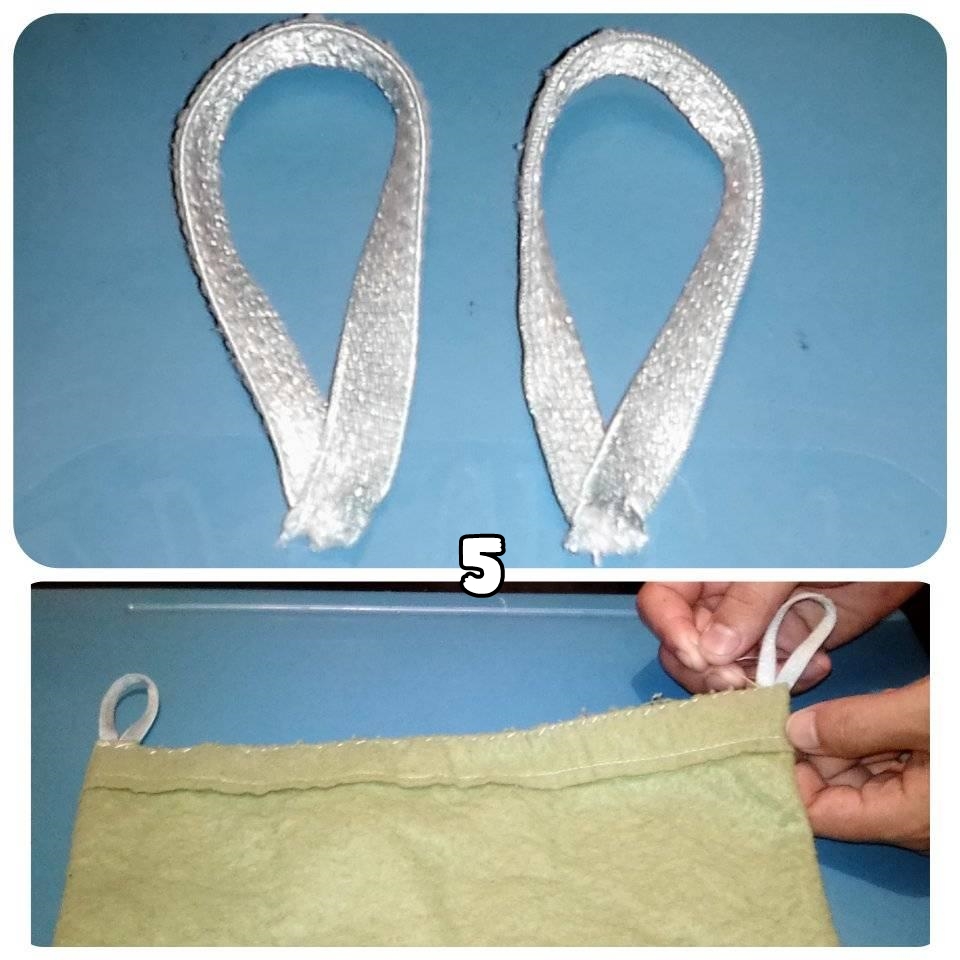
•STEP 5: Cut two 10-centimeter pieces of the decorative ribbon, then sew one decorative ribbon to one corner of the bag (Repeat the process with the other ribbon on the other corner of the bag).
•PASO 5: Cortamos dos trozos de 10 centímetros de la cinta decorativa, luego cosemos una cinta decorativa a una de las esquinas de la bolsa (Repetimos el proceso con la otra cinta en la otra esquina de la bolsa).
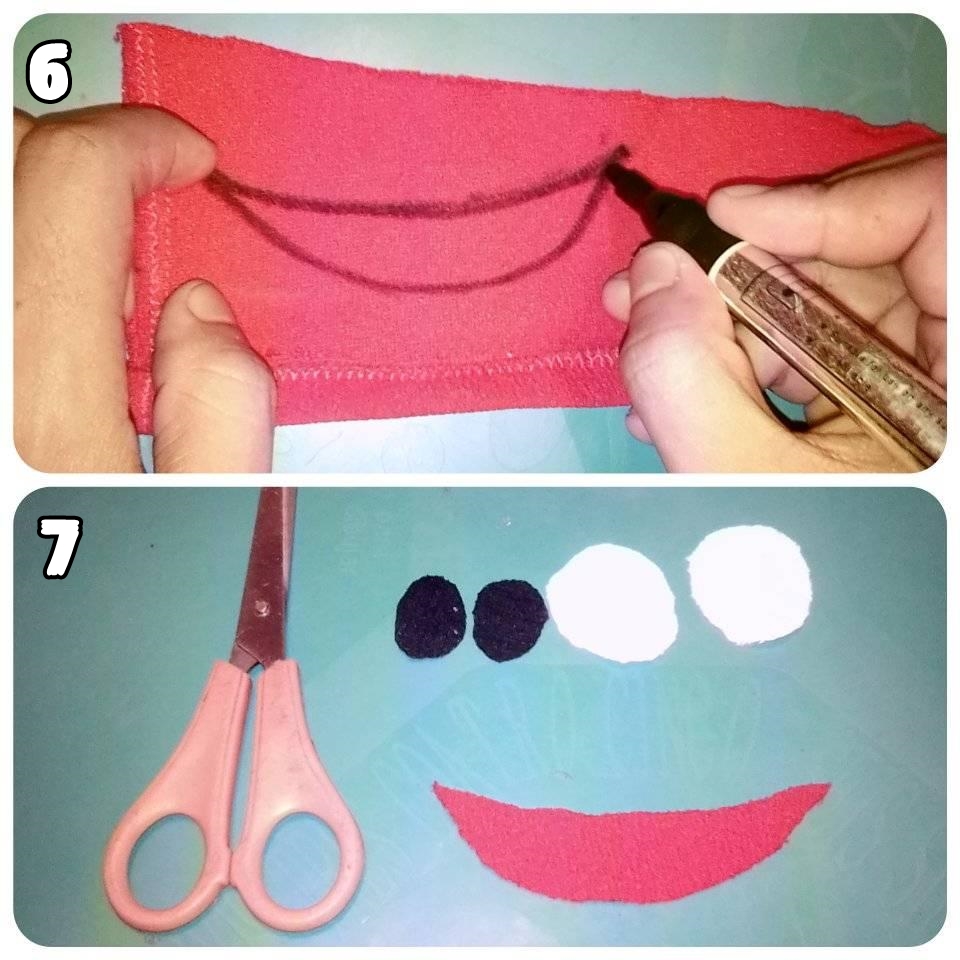
•STEP 6: On the red fabric piece we draw the shape of a half moon 7x2 centimeters (this will be the mouth of our funny bag), then on the white fabric we draw 2 circles of 2x2 centimeters, then we draw 2 circles of 1x1 centimeters on the black fabric (these circles will be the eyes).
•STEP 7: Cut out all the pieces we have just drawn (use the scissors).
•PASO 6: En el retazo de tela roja dibujamos la forma de una media luna 7x2 centímetros (esta será la boca de nuestra divertida bolsa), luego en la tela blanca dibujamos 2 circulo de 2x2 centímetros, seguidamente dibujamos 2 círculos de 1x1 centímetros en la tela negra (estos círculos serán los ojos).
•PASO 7: Recortar todas las piezas que acabamos de dibujar (usar la tijera).
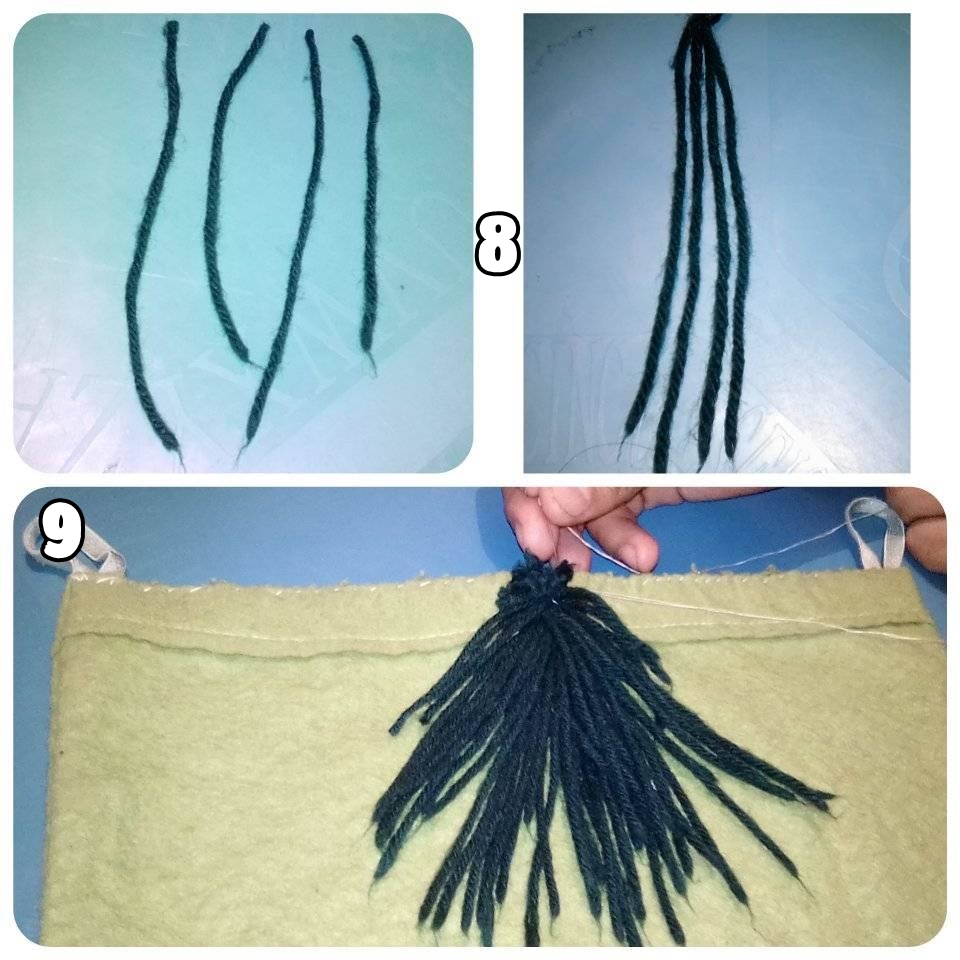
•STEP 8: Cut 50 or more 10 centimeter pieces of yarn (this will be the hair of our doll-shaped bag).
•STEP 9: We join the strips simulating hair, then we sew it to one of the 2 edges of the bag simulating the hair of our bag in the form of a doll.
•PASO 8: Cortamos 50 o más trozos de 10 centímetros de estambre (este será el cabello de nuestra bolsa en forma de muñeco).
•PASO 9: Unimos las tiras simulando cabello, seguidamente lo cosemos a uno de los 2 bordes de la bolsa simulando el cabello de nuestra bolsa en forma de muñeco.
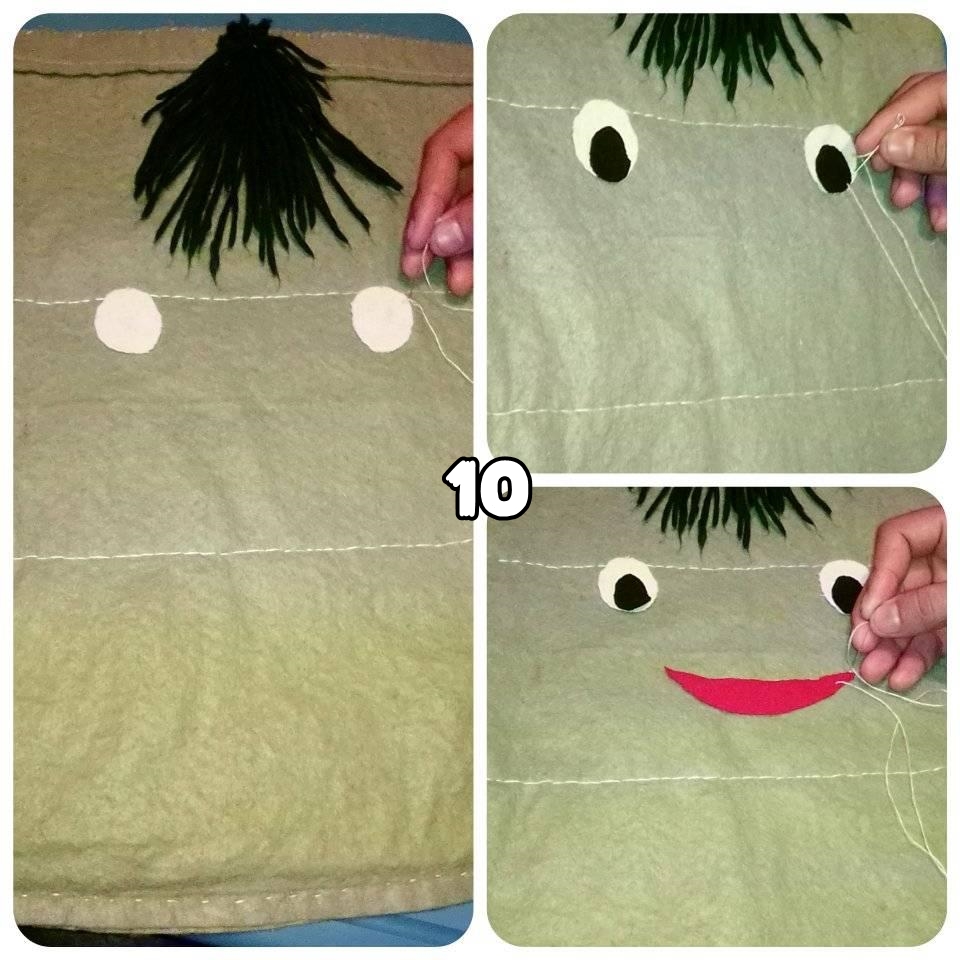
•STEP 10: We sew the white circles under the yarn simulating 2 eyes, then we sew 1 white circle on top of each black circle, then we sew the piece of red fabric in the shape of a half moon under the 2 eyes simulating the mouth, to complete the shape of our doll. "We are almost finished".
•PASO 10: Cosemos los círculos blancos debajo del hilo de estambre simulando 2 ojos, luego cosemos 1 círculo blancos encima de cada círculo negro, seguidamente cosemos el trozo de tela roja en forma de media luna debajo de los 2 ojos simulando la boca, para completar la forma de nuestro muñeco. “ ya casi terminamos”.
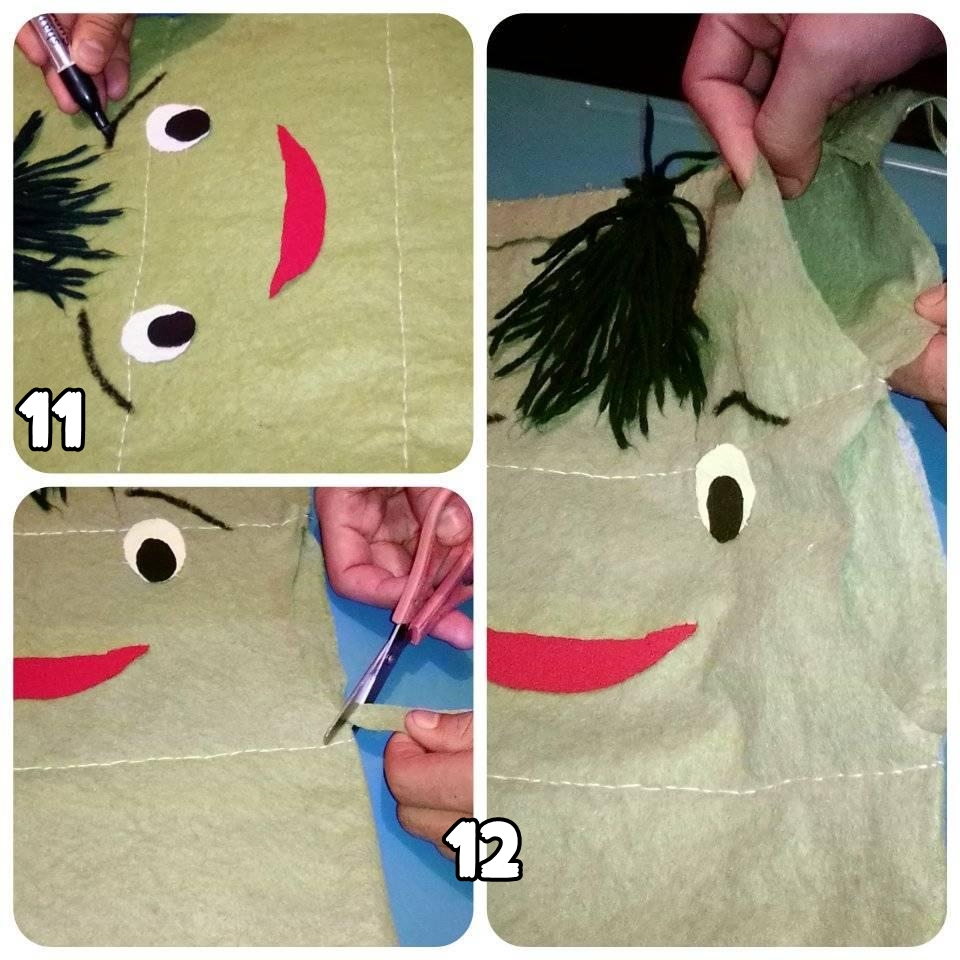
•STEP 11: Use the black marker and draw 1 eyebrow-shaped line above each eye.
•STEP 12: Cut and open 3 holes of 8 or 10 centimeters on each side of the bag (these will be the deposits of our shoes).
•PASO 11: Usamos el marcador negro y dibujamos 1 línea en forma de ceja encima de cada ojo.
•PASO 12: Cortamos y abrimos 3 agujeros de 8 o 10 centímetros en cada lateral de la bolsa (estos serán los depósitos de nuestros zapatos).
All photos are my own, edited in PhotoScape, translator used: DeepL.
Hola @deivisperez,
Que super ha quedado tu bolsa, me gusta la expresión que le has dado al rostro, el cabello luce espectacular.
Con este paso a paso que nos compartes, podemos hacer tantos espacios como se requiera de tal forma poder colocar más zapatos.
Gracias por compartir.
Saludos
Hola @jicrochet , muchas gracias por tomarte tiempo para ver mi post, eso es correcto, el rostro le da un toque original y muy bonito y lo mejor es; que si usamos un poco mas de tela lo podemos agrandar mas y también podemos colocarle bolsillos para guardar prendas. Encantado de compartir mi contenido con toda la comunidad. Saludos!
Congratulations @deivisperez! You have completed the following achievement on the Hive blockchain and have been rewarded with new badge(s) :
Your next target is to reach 100 replies.
You can view your badges on your board and compare yourself to others in the Ranking
If you no longer want to receive notifications, reply to this comment with the word
STOPHola @deivisperez, me alegra ver que te has animado a intentar cosas nuevas con la costura.
Tu idea del organizador para zapatos está genial. Te felicito.
Está muy lindo.
Bienvenida!!
Muchas gracias, usted también puede intentar crear uno de estos y así organizar los zapatos de una manera creativa y dándole un toque divertido. ANÍMATE! Gracias por tu comentario. Saludos!
@kattycrochet que bueno verte por aquí una vez mas, me alegra que te haya gustado mi post.
Si, me anime a crear algo mas grande que los atuendos para mi muñeco, creo que me atreveré a crear pronto alguna prenda para mi, espero poder compartirla con ustedes. Saludos!
Me encanta! Es una idea genial. La cara le da un toque especial ♥ gracias por compartir
@bunnysneedle Hola!!
Gracias por apreciar mi trabajo, es importante para mi saber que a las personas le gusta lo que hago.
Si, definitivamente la cara le da un toque agradable y muy decorativo. Es un placer para mi hacer cosas como estas y compartirlo para que todos podamos crear y poner a volar nuestra imaginación.
This is a really nice and clever shoe organizer you’ve made @deivisperez! I really like the added character you put on this. Thanks so much for sharing your creative work with us :)
Hey @Crosheille Welcome to my blog! You're right, it's a very nice organizer and now my shoes have a place to rest better hahaha. Thanks for your words, glad to hear you liked it, It's always an honor for me to share my creations with all of you, I feel pleased and I want to keep doing it.
Adorable, ideal para el cuarto de los niños!
@tibaire Hola y bienvenida. Si, queda muy bien para colgarlo en la paredes del cuarto de los mas pequeños de la casa. Saludos!