Marbled Chocolate & Vanilla cake - which I can bake, but my wife makes it better
I've been baking cakes since I can remember, and the amount of different sort of cakes I've baked in my lifetime is nothing short of a three figure number. My mum was just an outstanding person who has taught me many many skills which are important in life, including how to bake delicious cakes. When I got married all them years ago, little did I know my wife was extremely good at that too.
I've always been fan of creating something from nothing or that one thing from many! I've never been shy to pick up various ingredients around the house at any given time (if I've had time) to make a delicious mouthwatering nibble. Sure, cakes weren't on my top list of things to create as being a major homemade pizza fan, that would have come 1st! I still remember back in 2008 when I've baked a traditional cake for my 'not yet wife' and my god was she impressed! Yes, I thought of the possibility of her beeing polite and saying how good it was, but I guess I'll go with the other possibility that it actually was.
Cake that I've made all them years ago was a traditional Slovenian cake called 'Prekmurska Gibanica' or translated in english 'Over Mura Moving Cake'. Trust me, if made in the right way they can and will blow your mind away.
What my wife did in return a month or so after was a similar gesture to mine; she baked me a tray of brownies. Brownies so good I still remember biting into them to this day.
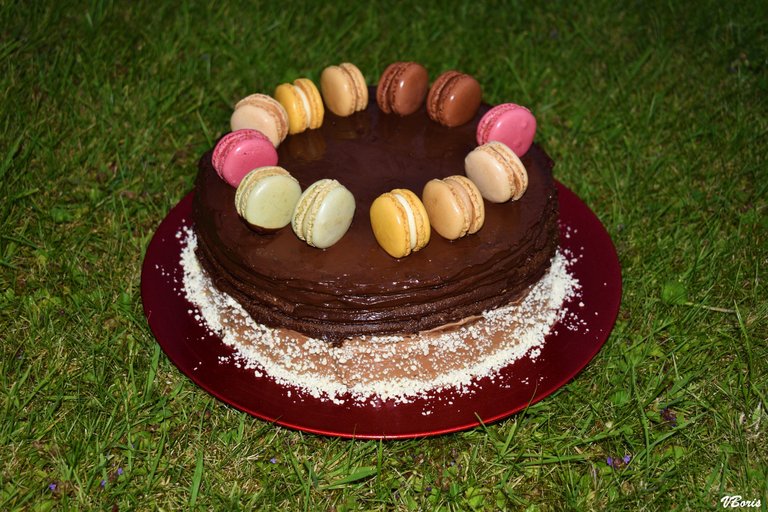
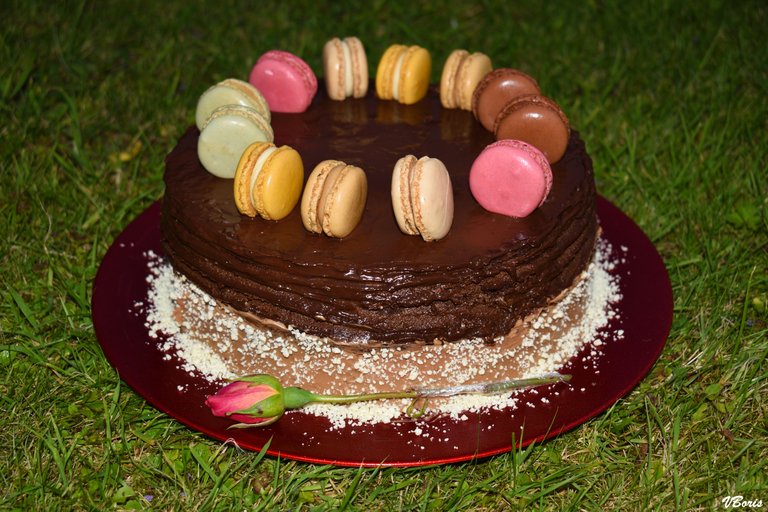
Not to get distracted from my main article's story, again, I'd like to present to you my wife's latest creation (which she gave to her work collegue and best friend for her birthday), a Marbled chocolate & vanilla cake.
In case you're wondering, I don't always put our cakes out on the lawn in the evening to take photos of them.
As mentioned above, it was my wife's idea to take a photo of the cake being placed down on our lawn.
All joking aside, I'll have to dissapoint you with telling you that there won't be any photos of this cake being served as nor can I tell you how it taste like as we've not tried it. Similar cakes to this one were made and if the taste was anything close to how they've tasted, then it was a winner for sure! I've been handed over an information from my wife's best friend that cake's taste was sublime nevertheless.
Before I share a few other photo angles of the same cake which I took before being wrapped and picked up, I better give you some instructions of how to make this cake, in case you want to.
INGREDIENTS:
Vanila sponge:
- 280g baking butter or if you like, you can buy baking spread
- 280g caster sugar (try to get a fine powder sugar if possible)
- 280g self rising flour
- 5 large eggs
- 2 teaspoons of vanilla extract
- 2 tablespoons of dark Rum
Chocolate sponge:
- 280g baking butter or if you like, you can buy baking spread
- 280g caster sugar (try to get a fine powder sugar if possible)
- 240g self rising flour
- 5 large eggs
- 40g cocoa powder
- 1 tablespoon of milk
- 2 tablespoons of dark Rum
Vanilla buttercream:
- 240g butter or baking spread
- 500g icing sugar
- 2 teaspoons of vanilla extract
Chocolate buttercream:
- 240g butter or baking spread
- 440g icing sugar
- 60g cocoa powder
- 1 tablespoon of milk
Cake cover and decorations:
- 300g ordinary milk chocolate
- 400g of custard
- 100g white chocolate
- Grated coconut
- Macarons (not the noodles)
INSTRUCTIONS/PREPERATION:
1. Pre-heat your oven to 160 degrees or a fan oven to 180 degrees centegrade (350F/Gas Mark 4), you'll need 3 cake tins which should ideally be 8" in diameter, but you could just as well use a 10" as we did, which will make cake wider and not as tall. Don't forget to grease all 3 tins.
2. Make the vanilla sponge by mixing the butter and caster sugar in a large bowl with a spoon until fluffy, or mix using an electric mixer (I recommend the mixer).
3. Add eggs, vanilla extract and rum, and whisk until fully blended together in one.
4. Add self raising flour and whisk in until you can't see any flour anymore.
5. Make the chocolate sponge by mixing the butter and caster sugar in a large bowl with a spoon until fluffy, or mix using an electric mixer (again, I'd recommend the mixer).
6. Add the eggs, milk and rum, and whisk until fully blended.
7. Add self raising flour, cocoa powder and again whisk it in until you can't see any flour anymore.
8. Don't forget to taste everything you've done so far with a wooden spoon as we do all the time (just make sure your eggs are free range and hens have been treeted against salmonela).
9. Add the batter to the cake tins in alternate spoonfuls, place each spoonful on top of the previous one. Continue until all of the batter is used up. The batter will spread out and fill the tin as you add it, but you can give them a little shake if needed to encourage it to settle properly.
10. Bake them for 30 minutes or until a skewer inserted in the middle comes out clean (I use wooden toothpicks if I don't have skewers at hand). Leave them to fully cool either in the tins or on cooling racks. Don't place them on a plate as there will be moist gathering at the bottom.
11. To make the chocolate buttercream, mix the butter, cocoa powder and icing sugar together. Once it starts to come together add the milk and mix until smooth. Again, you have a choice of using a mixing spoon or a mixer.
12. To make the vanilla buttercream, mix the butter and icing sugar together, and as it starts to come together add the vanilla extract and mix until smooth. I recommend using an electric mixer to mix all of this together.
13. If the cakes have domed on top, level them off with a cake leveller or a piece of string, most likely found in your sewing kit.
14. Place one of the sponges on a decorating turntable and spread a layer of chocolate buttercream over it. If you don't have a truntable then place it on a roundiest and biggest mat or plate you've got.
15. Add the second sponge on top and spread a layer of vanilla buttercream over it.
16. At the end add the third sponge, and then cover the whole cake in a thin layer of vanilla buttercream as the crumb coat. When finished place it in the fridge.
17. Melt 200g of milk chocolate in a pan and add all of the custard whilst mixing it gently making sure it doesn't burn.
18. Slowly add melted chocolate & custard over the cake layers to for the last covering layer.
19. Leave it to stand 30 minutes so it cools down and coating can form.
20. Melt 100g milk chocolate and 100g white chocolate and repeat the process of mixing it gently so it doesn't burn.
21. Make a ring around the bottom of the cake with melted white and milk chocolate and leave it to stand for another 30 minutes whilst constantly correcting the ring.
22. Spinkle grated coconut all around the bottom ring that you've created in previous step.
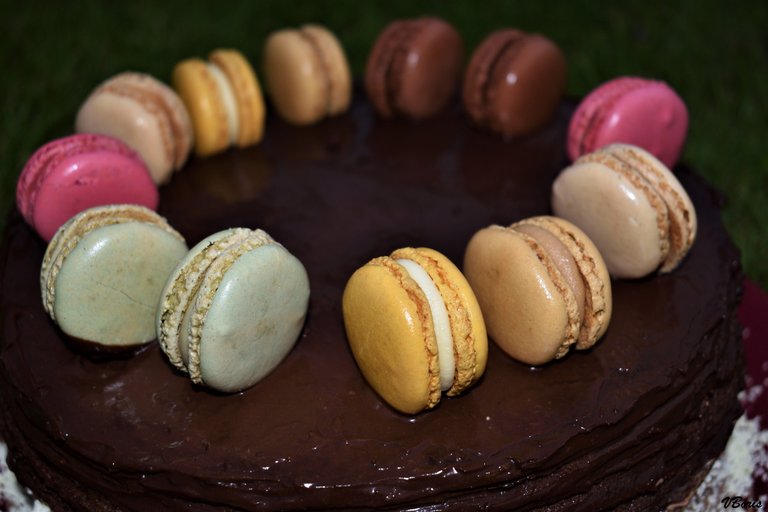
23. Add Macarons on top of the cake for extra decoration and in case you've never had macarons before, they are edible. (Before you place macarons on top of the cake make sure to leave them outside for 2 hours to thaw in case you've kept them in the freezer. If they were in the fridge, then you can use them right away.
24. Cut a rose from your garden's flower bed as my wife did, because for some reason it wasn't decorated enough without it. (Most of our rose bushes are actually edible).
25. Take 143 photos because your wife or a husband isn't happy with just two of them.
26. And that my friends, is all. You've just made a brilliant cake.
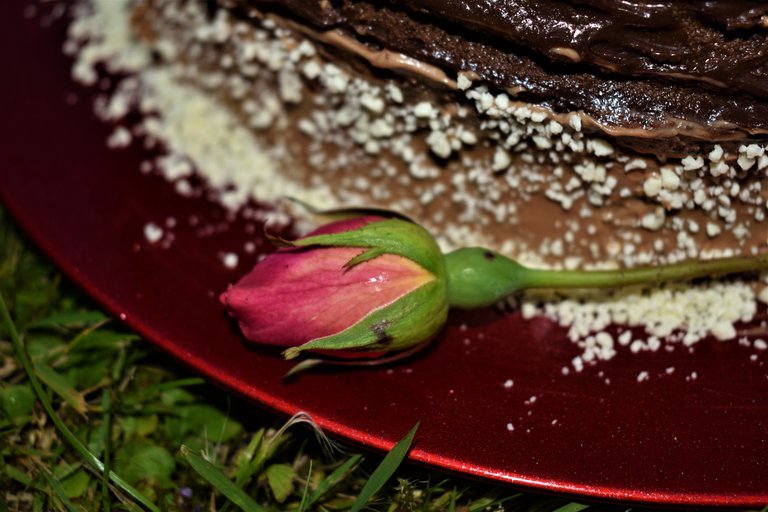
You can remove black sun spots from the rose before eating it. If you ever have an opportunity, try the rose.
Some of you might think that the amount of ingredients in this cake including all of them used to covering it, that it might be too much?! No, trust me it really isn't. They'll compliment each other well and at least from it all, you'll be plepleasantly surprised. Best ingredient from them all by a mile is dark rum! When I was a youngster, my mum used rum in every bake ever, as did her mum before her and so on. It doesn't make you drunk nor does it make taste like rum, no, it makes it nice and moist! Flavours come to life because of adding a touch of rum. Here's to say that you don't have to add rum at all, no pressure.
At the moment I'm off work for a week or so as is my wife, a little holiday time. And so, today being Sunday, we didn't do much else then relax throughout the day making a lot of delicious treats, which also included brownies. You never know, when we'll be doing brownies next time I might just make an article about that too.
Thanks for stopping by and take care.
Congratulations @vraba! You have completed the following achievement on the Hive blockchain and have been rewarded with new badge(s) :
You can view your badges on your board And compare to others on the Ranking
If you no longer want to receive notifications, reply to this comment with the word
STOPDo not miss the last post from @hivebuzz:
Both of you bake?
I am coming over!! :D
Yes, yes we do :)
So, when can we expect you? There's plenty of room! :)
Plenty of room for cakes too :P
I think the cake looks beautiful and colorful 😍
Thanks :)
Mmmmmmmmmmmmmmmmmm and Mmmmmmmmmmmmm macaroons as topping looks grand!
You as a foodie might enjoy this contest from now on every month, go to the blog and see what category we have this month.
https://peakd.com/hive-101265/@theterminal/new-monthly-cookbook-contest-or-august-category-poultry-salads-and-appetizers
Haha, longest mmmm I've ever seen! Thanks for liking the post and also for letting me know about the contest 👍🏻