Biscocho de Chocolate, decorado con merengue italiano/Chocolate cake decorated with italian meringue
La mayoría de las personas están acostumbradas, a realizar con más frecuencia un biscocho pesado en vez de un bizcocho liviano, la diferencia entre ellos es que el pesado lleva entre sus ingrediente materia grasa y líquidos a diferencia de un biscocho liviano que solo está compuesto por azúcar, huevos y harina, siendo los huevos los encargados de dar volumen y una miga suave al resultado final del pastel, la verdad es que el biscocho tiene sus ventajas como la poca cantidad de ingredientes, económico, muy aireado, y bastante fácil de cortar, rellenar y decorar, pero obviamente también tiene sus dificultades como que es necesario el uso de la batidora para mezclarlo y dar punto a los huevos, también debemos embeber el biscocho por qué es un poco seco y cuidar un temperatura media del horno.

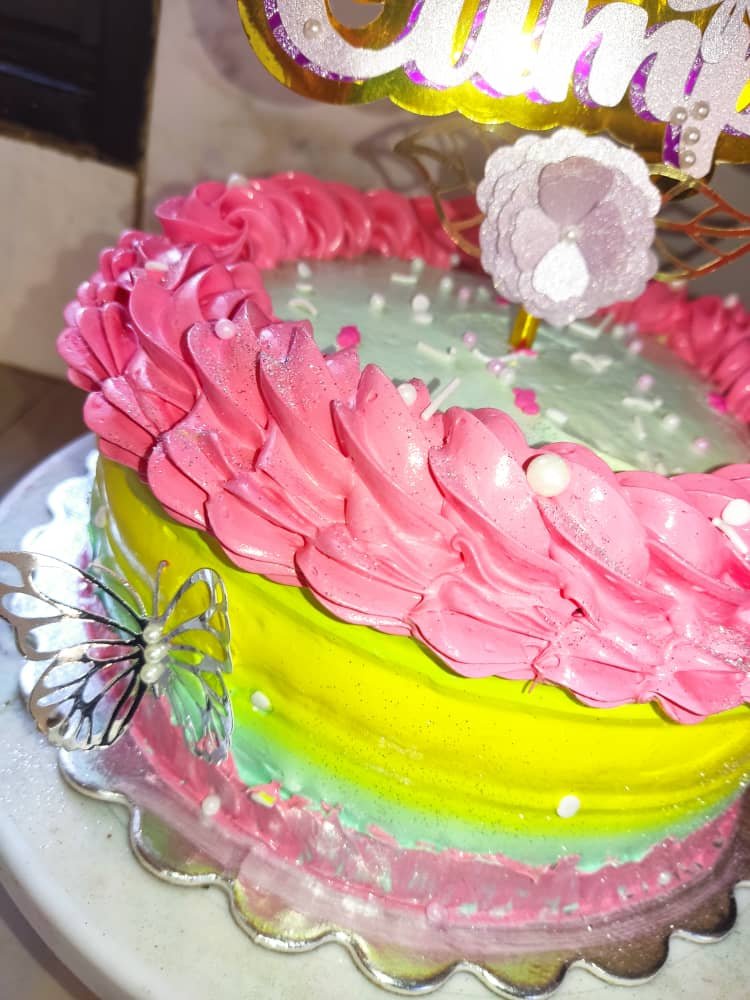
El biscocho es bastante versátil y nos permite variar con los sabores, podemos hacer un tres leches, así como una marquesa de almendra o así como realice yo, una biscocho liviano de chocolate relleno de chantilly y crema pastelera, decore con un colorido merengue italiano , súper ideal para celebrar un cumpleaños en familia, este biscocho alcanza aproximadamente para 12 personas, y puede durar hasta 3 días en la nevera, por ser embebido y relleno es necesario tenerlo en la nevera, para que se mantenga fresco y húmedo, les puedo asegurar que es bastante delicioso, además de fácil de preparar así que vamos con esta receta fácil, económica y muy llena de sabor.

Primero que nada, Precalentaremos el horno a 180° y tendremos un molde de 18 cm por 8 cm de alto previamente engrasado y enharinado. Podemos colocar un circulo de papel en el fondo de nuestra tortera para que no se nos pegue.
Con ayuda de nuestra batidora, se baten las claras a punto de nieve a velocidad media, al alcanzar este punto agregamos el azúcar y seguimos batiendo, hasta que la preparación monte al doble de su tamaño y alcancemos el punto de letra, es decir que la mezcla este espesa de manera que al levantar el batidor forme dibujos sobre la misma mezcla).
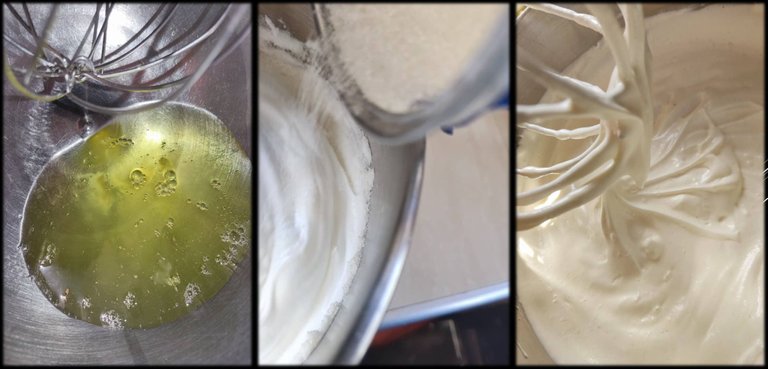
Ahora incorporaremos las yemas una a una y seguimos batiendo hasta que estén bien integradas, en este momento poco a poco la harina cernida previamente con el cacao sobre la mezcla en 2 partes con el tamizador para que se nos haga más fácil.
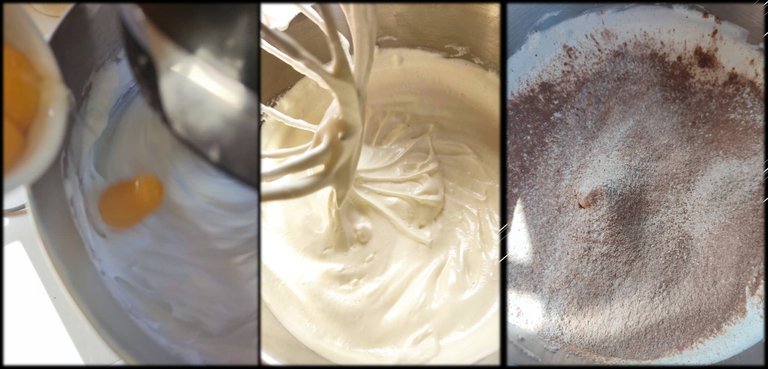
A continuación, mezclaremos de forma envolvente con una paleta de madera o miserable hasta que la harina se integre totalmente sin que queden grumos en el fondo del recipiente. Debemos hacerlo siempre hacia el mismo lado tratando de no bajar el volumen de la mezcla. Luego de incorporar toda nuestra harina, la agregamos en nuestro molde previamente enharinado y engrasado, esta mezcla queda bastante aireada, es decir que durante su horneado no crecerá mucho, mantendrá el tamaño y volumen que le dieron las claras. Este se cocinará en un tiempo aprox. De 20 min. Recordemos que esto varía según nuestro horno. No abrir el horno antes de lo primeros 30min, sabremos si nuestro biscocho está listo porque se desprende de las paredes del molde y al tocarlo con la yema de los dedos se regresa como un colchoncito. Al retirar del horno esperamos un aproximado de 5 minutos desmoldamos preferiblemente en una rejilla y dejamos enfriar, normalmente lo dejo reposar de un día para otro.

Ahora prepararemos un almíbar con 200 mililitros de agua y 200 gramos de azúcar para embeber nuestro biscocho, recordemos que es solo para humedecer si le agregamos mucho este se romperá, o el decorado no se mantendrá firme, lo digo por experiencia propia. Rellenamos como sea de nuestra preferencia yo utilice una crema pastelera de vainilla y chantilly que además de adicionar sabor le da altura al relleno, y listo decoramos como sea de nuestra preferencia merengue italiano, suizo o chantilly, cualquiera de estos le combina muy bien, recordemos que cuando decoramos con alguno de estos siempre debemos colocar primero una capa fina del decorado para recoger las migajas del biscocho y nuestra decoración sea más estética y pareja. En lo personal me gusta hacer el biscocho 1 día, rellenar el siguiente y llevar a la nevera y el tercer día decorar.

El resultado final

Todas las imágenes son de mi propiedad, tomadas con la cámara de mi teléfono Poco X3 Pro y otras están publicadas en mis Instagram personal Valeria.sweet.and.cake. Traducido con https://www.deepl.com/es/translator

El biscocho es bastante versátil y nos permite variar con los sabores, podemos hacer un tres leches, así como una marquesa de almendra o así como realice yo, una biscocho liviano de chocolate relleno de chantilly y crema pastelera, decore con un colorido merengue italiano , súper ideal para celebrar un cumpleaños en familia, este biscocho alcanza aproximadamente para 12 personas, y puede durar hasta 3 días en la nevera, por ser embebido y relleno es necesario tenerlo en la nevera, para que se mantenga fresco y húmedo, les puedo asegurar que es bastante delicioso, además de fácil de preparar así que vamos con esta receta fácil, económica y muy llena de sabor.
**Biscocho**
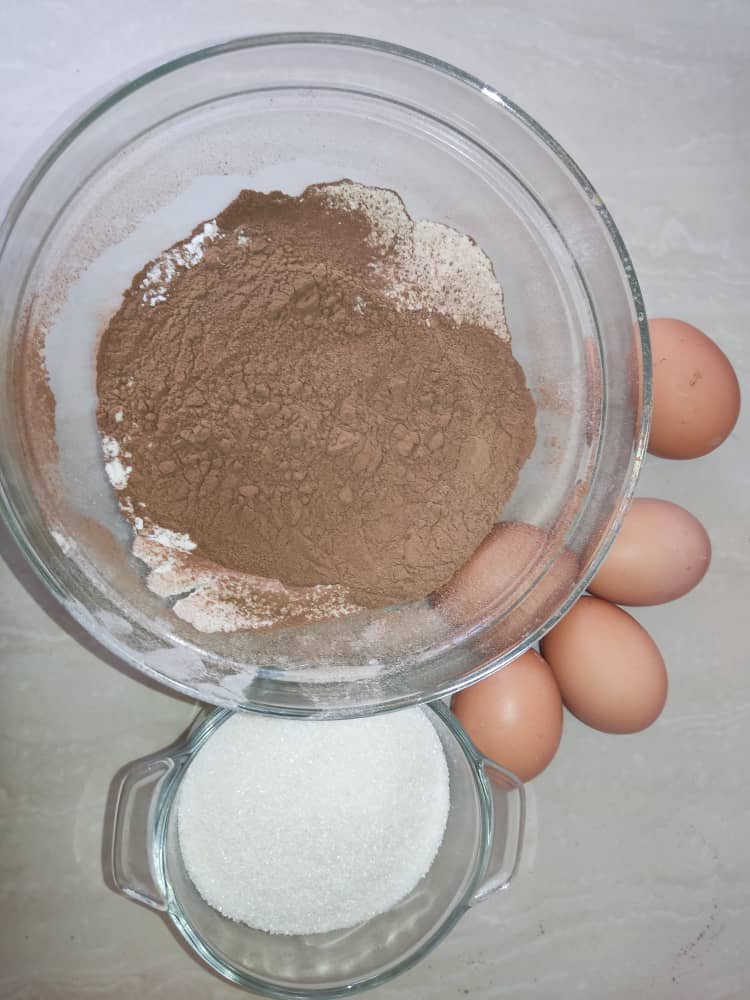
| Cantidad | Ingrediente | |
|---|---|---|
| 35 gramos | Cacao | |
| 140 gramos | Azúcar | |
| 175 gramos | Harina Todo Uso | |
| 5 | Huevo | |
| 1 Cucharadita | Vainilla |
Paso a paso
Primero que nada, Precalentaremos el horno a 180° y tendremos un molde de 18 cm por 8 cm de alto previamente engrasado y enharinado. Podemos colocar un circulo de papel en el fondo de nuestra tortera para que no se nos pegue.
Con ayuda de nuestra batidora, se baten las claras a punto de nieve a velocidad media, al alcanzar este punto agregamos el azúcar y seguimos batiendo, hasta que la preparación monte al doble de su tamaño y alcancemos el punto de letra, es decir que la mezcla este espesa de manera que al levantar el batidor forme dibujos sobre la misma mezcla).
Ahora incorporaremos las yemas una a una y seguimos batiendo hasta que estén bien integradas, en este momento poco a poco la harina cernida previamente con el cacao sobre la mezcla en 2 partes con el tamizador para que se nos haga más fácil.
A continuación, mezclaremos de forma envolvente con una paleta de madera o miserable hasta que la harina se integre totalmente sin que queden grumos en el fondo del recipiente. Debemos hacerlo siempre hacia el mismo lado tratando de no bajar el volumen de la mezcla. Luego de incorporar toda nuestra harina, la agregamos en nuestro molde previamente enharinado y engrasado, esta mezcla queda bastante aireada, es decir que durante su horneado no crecerá mucho, mantendrá el tamaño y volumen que le dieron las claras. Este se cocinará en un tiempo aprox. De 20 min. Recordemos que esto varía según nuestro horno. No abrir el horno antes de lo primeros 30min, sabremos si nuestro biscocho está listo porque se desprende de las paredes del molde y al tocarlo con la yema de los dedos se regresa como un colchoncito. Al retirar del horno esperamos un aproximado de 5 minutos desmoldamos preferiblemente en una rejilla y dejamos enfriar, normalmente lo dejo reposar de un día para otro.
Ahora prepararemos un almíbar con 200 mililitros de agua y 200 gramos de azúcar para embeber nuestro biscocho, recordemos que es solo para humedecer si le agregamos mucho este se romperá, o el decorado no se mantendrá firme, lo digo por experiencia propia. Rellenamos como sea de nuestra preferencia yo utilice una crema pastelera de vainilla y chantilly que además de adicionar sabor le da altura al relleno, y listo decoramos como sea de nuestra preferencia merengue italiano, suizo o chantilly, cualquiera de estos le combina muy bien, recordemos que cuando decoramos con alguno de estos siempre debemos colocar primero una capa fina del decorado para recoger las migajas del biscocho y nuestra decoración sea más estética y pareja. En lo personal me gusta hacer el biscocho 1 día, rellenar el siguiente y llevar a la nevera y el tercer día decorar.
English
Most people are used to making a heavy cake instead of a light cake, the difference between them is that the heavy cake has among its ingredients fat and liquids, unlike a light cake that is only composed of sugar, eggs and flour, being the eggs the ones in charge of giving volume and a soft crumb to the final result of the cake, the truth is that the biscocho has its advantages as the small amount of ingredients, economic, very airy, and quite easy to cut, fill and decorate, but obviously it also has its difficulties as it is necessary to use the mixer to mix it and give point to the eggs, we must also soak the cake because it is a little dry and take care of a medium oven temperature.
The cake is quite versatile and allows us to vary the flavors, we can make a tres leches as well as an almond marquise or as I did, a light chocolate cake filled with whipped cream and pastry cream and decorated with a colorful Italian meringue, super ideal to celebrate a birthday with the family, this cake is enough for approximately 12 people, and can last up to 3 days in the refrigerator, because it is embedded and filled it is necessary to keep it in the refrigerator, to keep it fresh and moist, I can assure you that it is quite delicious, and easy to prepare so let's go with this easy, economical and very full of flavor recipe.
First of all, we will preheat the oven to 180° and we will have a mold of 18 cm by 8 cm high previously greased and floured. We can place a circle of paper in the bottom of our cake pan so that it does not stick.
With the help of our mixer, beat the egg whites until stiff at medium speed, when this point is reached add the sugar and continue beating, until the preparation doubles in size and we reach the point of letter, that is to say that the mixture is thick so that when lifting the whisk it forms drawings on the same mixture.
Now we will incorporate the yolks one by one and continue beating until they are well integrated, at this time gradually add the flour previously sifted with the cocoa on the mixture in 2 parts with the sifter to make it easier.
Then, we will mix in an enveloping way with a wooden paddle or miserable until the flour is totally integrated without lumps at the bottom of the bowl. We must do it always towards the same side trying not to lower the volume of the mixture. After incorporating all our flour, we add it in our previously floured and greased mold, this mixture is quite airy, that is to say that during its baking it will not grow much, it will keep the size and volume that the egg whites gave it. It will bake for approximately 20 minutes. Remember that this varies according to your oven. Do not open the oven before the first 30 minutes, we will know if our cake is ready because it comes off the walls of the mold and when touching it with the fingertips it comes back as a little mattress. When removing from the oven we wait approximately 5 minutes, unmold preferably on a wire rack and let it cool, I usually let it rest from one day to the next.
Now we will prepare a syrup with 200 milliliters of water and 200 grams of sugar to soak our cake, remember that it is only to moisten if we add too much it will break, or the decoration will not hold firm, I say this from my own experience. Fill as we prefer, I used a vanilla and whipped cream that besides adding flavor gives height to the filling, and ready we decorate as we prefer Italian meringue, Swiss or whipped cream, any of these combines very well, remember that when we decorate with any of these we must always place first a thin layer of the decoration to collect the crumbs of the cake and our decoration is more aesthetic and even. Personally I like to make the cake 1 day, fill the next day and take it to the refrigerator and decorate the third day.
The final result
All images are my own, taken with my Poco X3 Pro phone camera and others are posted on my personal Instagram Valeria.sweet.and.cake.Translated with https://www.deepl.com/es/translator
The cake is quite versatile and allows us to vary the flavors, we can make a tres leches as well as an almond marquise or as I did, a light chocolate cake filled with whipped cream and pastry cream and decorated with a colorful Italian meringue, super ideal to celebrate a birthday with the family, this cake is enough for approximately 12 people, and can last up to 3 days in the refrigerator, because it is embedded and filled it is necessary to keep it in the refrigerator, to keep it fresh and moist, I can assure you that it is quite delicious, and easy to prepare so let's go with this easy, economical and very full of flavor recipe.
**Cake**
| Quantity | Ingredient | ||
|---|---|---|---|
| 35 grams | Cocoa | ||
| 140 grams | Sugar | ||
| 175 grams | All Purpose Flour | ||
| 5 | Eggs | ||
| 1 teaspoonful | Vanilla |
Step by step
First of all, we will preheat the oven to 180° and we will have a mold of 18 cm by 8 cm high previously greased and floured. We can place a circle of paper in the bottom of our cake pan so that it does not stick.
With the help of our mixer, beat the egg whites until stiff at medium speed, when this point is reached add the sugar and continue beating, until the preparation doubles in size and we reach the point of letter, that is to say that the mixture is thick so that when lifting the whisk it forms drawings on the same mixture.
Now we will incorporate the yolks one by one and continue beating until they are well integrated, at this time gradually add the flour previously sifted with the cocoa on the mixture in 2 parts with the sifter to make it easier.
Then, we will mix in an enveloping way with a wooden paddle or miserable until the flour is totally integrated without lumps at the bottom of the bowl. We must do it always towards the same side trying not to lower the volume of the mixture. After incorporating all our flour, we add it in our previously floured and greased mold, this mixture is quite airy, that is to say that during its baking it will not grow much, it will keep the size and volume that the egg whites gave it. It will bake for approximately 20 minutes. Remember that this varies according to your oven. Do not open the oven before the first 30 minutes, we will know if our cake is ready because it comes off the walls of the mold and when touching it with the fingertips it comes back as a little mattress. When removing from the oven we wait approximately 5 minutes, unmold preferably on a wire rack and let it cool, I usually let it rest from one day to the next.
Now we will prepare a syrup with 200 milliliters of water and 200 grams of sugar to soak our cake, remember that it is only to moisten if we add too much it will break, or the decoration will not hold firm, I say this from my own experience. Fill as we prefer, I used a vanilla and whipped cream that besides adding flavor gives height to the filling, and ready we decorate as we prefer Italian meringue, Swiss or whipped cream, any of these combines very well, remember that when we decorate with any of these we must always place first a thin layer of the decoration to collect the crumbs of the cake and our decoration is more aesthetic and even. Personally I like to make the cake 1 day, fill the next day and take it to the refrigerator and decorate the third day.
0
0
0.000
Wow
This will taste just as it looks yummy and delicious. That's Is good one. The texture is tempting 😋
Hello! yes, super delicious, glad you liked it.😊
Que hermosa torta, me gustó mucho la combinación de colores.
Gracias!! Si Ami tambien me gusta esa combinación es algo diferente y colorido,saludos ☺️
¡Enhorabuena!
✅ Has hecho un buen trabajo, por lo cual tu publicación ha sido valorada y ha recibido el apoyo de parte de CHESS BROTHERS ♔ 💪
♟ Te invitamos a usar nuestra etiqueta #chessbrothers y a que aprendas más sobre nosotros.
♟♟ También puedes contactarnos en nuestro servidor de Discord y promocionar allí tus publicaciones.
♟♟♟ Considera unirte a nuestro trail de curación para que trabajemos en equipo y recibas recompensas automáticamente.
♞♟ Echa un vistazo a nuestra cuenta @chessbrotherspro para que te informes sobre el proceso de curación llevado a diario por nuestro equipo.
Cordialmente
El equipo de CHESS BROTHERS
Gracias por el apoyo! ☺️
Congratulations @irenebarreto! You have completed the following achievement on the Hive blockchain and have been rewarded with new badge(s):
Your next target is to reach 20000 upvotes.
You can view your badges on your board and compare yourself to others in the Ranking
If you no longer want to receive notifications, reply to this comment with the word
STOPCheck out the last post from @hivebuzz:
Support the HiveBuzz project. Vote for our proposal!
Thanks for the support! ☺️
You're welcome @irenebarreto! Have a nice day 😊👍🌹
This cake decoration is spectacular, I loved the colors, congratulations!
Thank you! I love using color combination like this they are look very beautiful. Greetings😊