And I Said: I Need a Light! And I Made One.
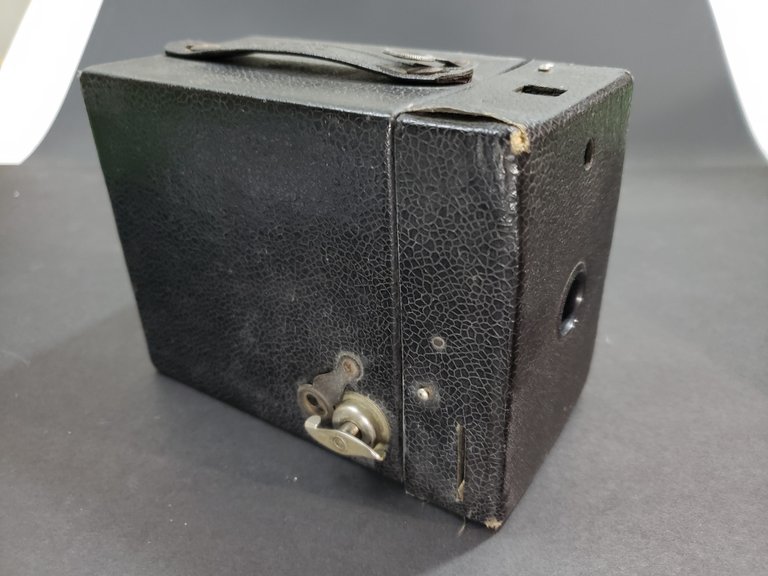
I have, squirreled away in various locations in my work area, a number of old, antique cameras. Some of them are very, very nice. A couple of them are just very old, and so beat up that all they really retain is their original shape. They are in such bad shape that I did not mind having the idea to begin to drill holes in them.
I actually built this last December - two of them, in fact - and sent one off as a Christmas gift. If you look closely at the Brownie (the camera), you'll see that the strap is broken, the latch is broken, and it is otherwise in a serious state of disrepair. Perfect for a light!
And how did I do this, you might ask? Well, I started by first of all getting over the dread I faced about drilling a hole in any camera, working or not. It originally seemed like sacrilege, but.. well.. sometimes a sacrifice needs to be made. The second step was to buy the light assembly from a hardware store.
I do not yet have access to Power Over Air (and if anyone does, please let me know how you do it), so I need to resort to the tried and true method of Power Over Cable. And to do this, I needed to drill a hole in the top of the camera. Ultimately this would be where the light fixture will sit, so measuring the correct diameter is important! Crucial! Remember, kids, measure twice, cut once.
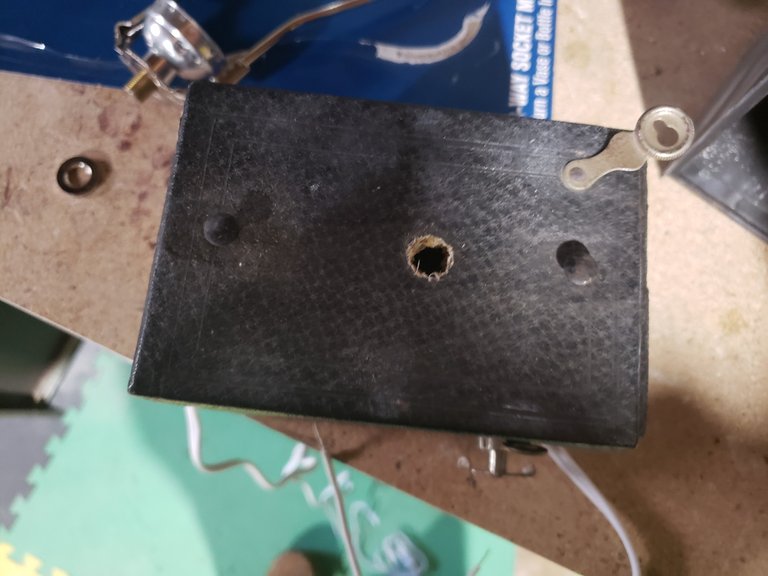
This is the diameter the hole needs to be.

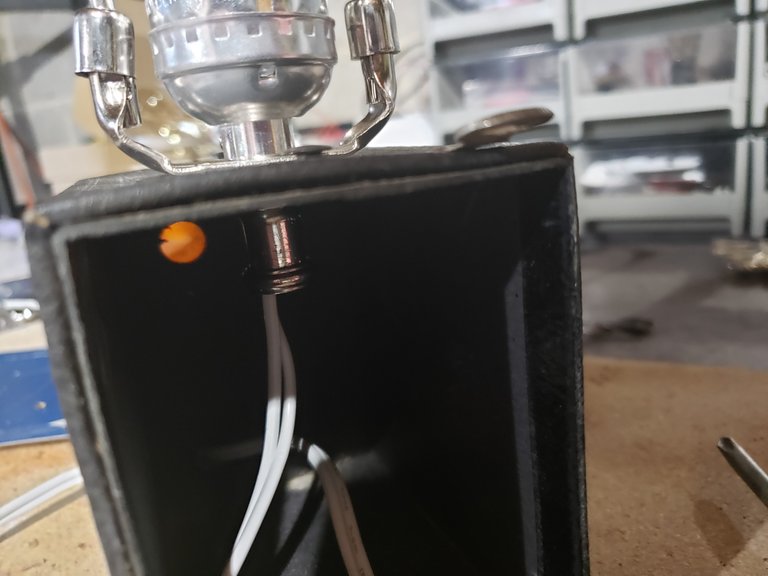
And before we attach the fixture, we need to run the wire through it.
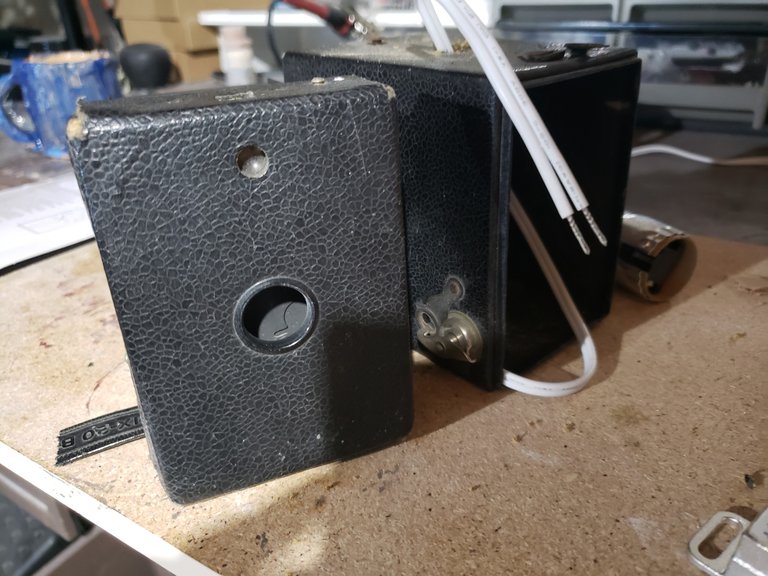
Threading the wire through is important to be able to easily connect it to the fixture. A serious word of warning at this point:
- Obviously, the wires were not plugged in. Regardless, they need to be attached to the fixture correctly. If you wish to try this at home, know what you are doing. If you are uncomfortable attaching electricity-sharing components, find someone who is comfortable for help.
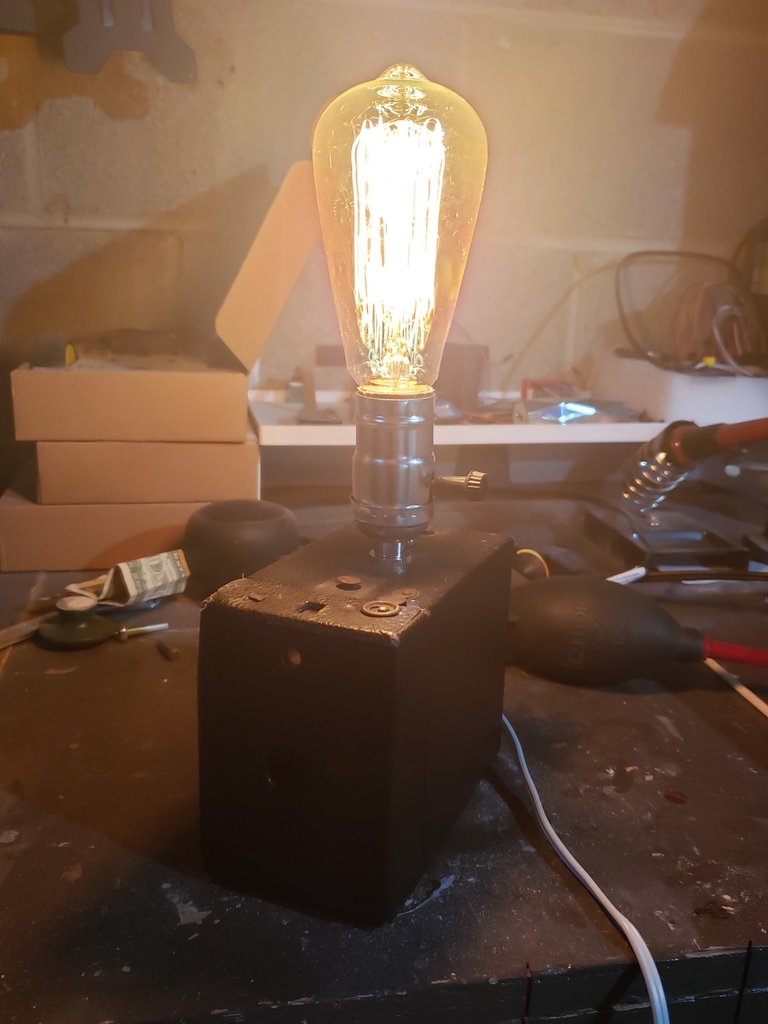
Ultimately, after threading the wire into the fixture and attaching the fixture to the camera, it'll need to be screwed back together and look like this from the inside:
And finally, after putting the entire camera back together, we have a fully functional light. After putting the base back on it even looks good! And here it is, sitting on my old-WW2-beat-up end table (which I really need to refinish) in the front room. It'll be perfect for reading comic books with.
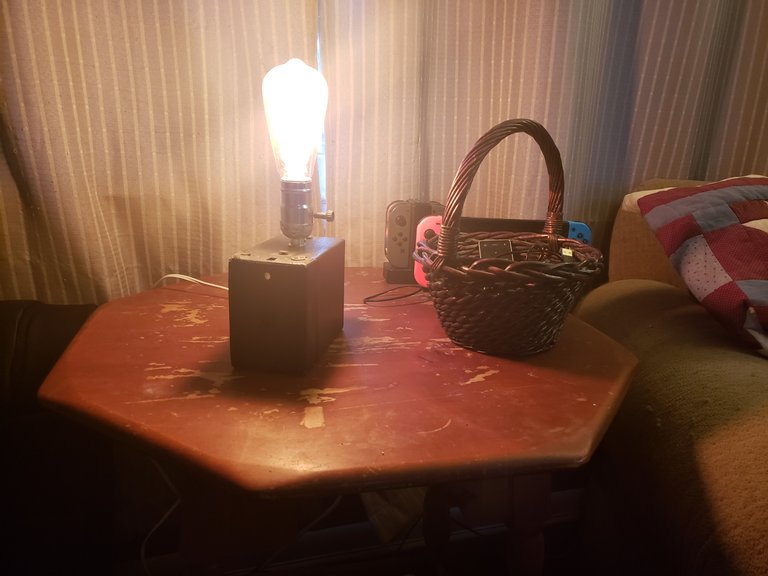
(As a quick aside, that table has some great history behind it. It was built by a German WWII officer for an American WWII officer as part of war reparations, and gifted to me by the American officer before he finally passed away a few years back. I really need to refinish it and take care of it).
(c) All images and photographs, unless otherwise specified, are created and owned by me.
(c) Victor Wiebe


(design by remyrequinart: https://steempeak.com/@remyrequenart)
You've been chosen to be featured in @creativecoin's 🔥DAILY BURN🔥 post!

So... you take all the guts out of the camera? And it's essentially just a safe box to run wires through?
Also, war reparations are WEIRD. "Here's a table. Sorry about all the killing and blowing stuff up." Not that I have a better idea, but still... weird.
Thanks for sharing! This is quite 'creative'. 😉
😍@carrieallen
Thank you for the burn @carrieallen!
Those old Brownie cameras are essentially empty boxes to begin with, so yes, it becomes just safe box with the wires through it. I have about half a dozen other non-Brownie cameras I want to do something with, too.
And.. yeah. Reparations. We had a close family friend who was a Major in WWII and ultimately retired a Colonel. He was in his 80's when he gifted me that table, along with a set of drawers. According to the story he told, one of the reparation tasks that German officers had to perform was to help provide furnishings for the Allied officers in Germany. I have nothing other than his word and story, certainly no pictures or documentation, but if nothing else, it's a helluva story!
Hello!
This post has been manually curated, resteemed
and gifted with some virtually delicious cake
from the @helpiecake curation team!
Much love to you from all of us at @helpie!
Keep up the great work!
Manually curated by @carrieallen.
@helpie is a Community Witness.
Thank you!
Really interesting what you can find here at Steem, I like it very much.
Thank you very much!
Ohh I love that as a light it is so cool
Thank you @tattoodjay! I've got ideas for a few other cameras I have, too.
👍🙂👍
!trdo it's amazing.. wish I am as handy as you... but I also do not have space or resource for any DIY stuff. but this is an amazing project.
Congratulations @sinlg, you successfuly trended the post shared by @wwwiebe!
@wwwiebe will receive 0.00224775 TRDO & @sinlg will get 0.00149850 TRDO curation in 3 Days from Post Created Date!
"Call TRDO, Your Comment Worth Something!"
To view or trade TRDO go to steem-engine.com
Join TRDO Discord Channel or Join TRDO Web Site
Thank you very much @sinlg! I enjoy DIY projects when I can get to them. Too much fun!
I wonder if you could add a layer to the lamp to make it stand out even more. Take a look at this Ikea lamp(s) :
The transparent tinted glass or plastic gives the light an added dimension
Ooooh, I like those!
something to think about.. its very modern looking..
What a great DIY project. Love it WW.
That is so cool, Victor! I love making lamps out of unusual objects. I always appreciate when someone does the step by step instructions so I can see if it is even in my skills before I start a project.
I am sure you have checked out the power over air progress. It's pretty exciting stuff. here and here Powercast is the only one around here that I know of.
I have heard some real stories regarding WWll from family and from Veterans in the VA or Rest Homes. Nothing surprises me anymore, but, I admit, that is a supercool story nonetheless!
Have a brilliant Saturday! Hope you got fewer clouds than I do!
!tip
🎁 Hi @wwwiebe! You have received 0.1 STEEM tip from @dswigle!
@dswigle wrote lately about: On The Eleventh Day, I'Ll Be Piping Feel free to follow @dswigle if you like it :)
Sending tips with @tipU - how to guide.
Congratulations @wwwiebe, your post successfully recieved 0.00224775 TRDO from below listed TRENDO callers:
To view or trade TRDO go to steem-engine.com
Join TRDO Discord Channel or Join TRDO Web Site