Spanish and English Tutorial paso a paso de brazalete o Pulsera / Step-by-step tutorial of bracelet or bracelet
Authored by
@Migdalia Ramos
Hola a todos hoy escribo feliz de tener la oportunidad y la dicha de hacerlo en esta maravillosa comunidad que me a apoyado desde el principio, este día les explicare como realizar una sencilla pulsera que queda muy linda, esta pulsera fue una de las primeras manualidades en bisutería que aprendí a hacer es realmente sencilla y delicada, cuando te colocas varias se ve fabulosa. Antes de escribir sobre las pulseras o brazaletes estuve leyendo un poco sobre ellas descubrí que Los brazaletes o las pulseras tienen la función principal de contrastar y diferenciar las muñecas y los brazos de las manos. ¿Lo sabías? yo no lo sabia! Las pulseras se han encontrado en el antiguo Egipto en momias, en sepulturas de determinados períodos prehistóricos, Realmente encontré mucha información sobre las pulseras desde la historia hasta su significado. Algunas civilizaciones pensaban que los metales en las muñecas los acercaban con los astros y renovaban la vitalidad de su cuerpo entre otras cosas leí y cito: El significado de las pulseras puede ir desde la protección, hasta incluso atraer la buena suerte o el amor. Se suelen usar estos dijes como amuletos los cuales brindan un mensaje también es una representación sobre la visión que gozas de la vida, mostrándola al mundo camino los mismos bellos colgantes.
Hello everyone, today I write happy to have the opportunity and the happiness of doing it in this wonderful community that has supported me from the beginning, this day I will explain how to make a simple bracelet that looks very nice This bracelet was one of the first jewelry crafts that I learned to make, it is really simple and delicate, when you put on several it looks fabulous. Before writing about bracelets or bangles I was reading a little about them I discovered that bracelets or bracelets have the main function of contrasting and differentiating the wrists and arms of the hands. Did you know? I did not know! Bracelets have been found in ancient Egypt in mummies, in graves of certain prehistoric periods, I really found a lot of information about bracelets from history to its meaning. Some civilizations thought that the metals in the wrists brought them closer to the stars and renewed the vitality of their bodies, among other things I read and quote: The meaning of bracelets can range from protection, to even attract good luck or love. These charms are often used as amulets which provide a message. It is also a representation of the vision you enjoy of life, showing it to the world on the way to the same beautiful pendants.
Materiales: hilo chino 45 centímetros, Encendedor, Tijera, Balin laminado 6 milímetros hueco grande, aro laminado de 0.5 milímetros, pinza para bisutería, alfiler macho de bisutería, piedra de su selección para el dije.
Materials: Chinese thread 45 centimeters, Lighter, Scissors, Balin laminated 6 mm large hollow, laminated hoop 0.5 mm, jewelry clip, male jewelry pin, stone of your choice for charm .

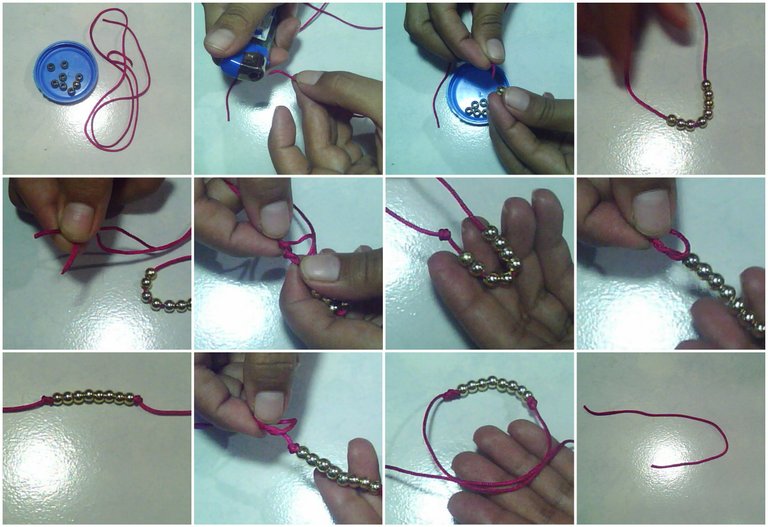
1: Antes de comenzar corta un hilo de aproximadamente 6 centímetros de largo, ahora Vamos a introducir en el hilo los 8 balines, une punta con punta y arregla los balines o las pepitas que seleccionaste para que queden justo en el medio y realiza un nudo sencillo en cada lado dos veces para que las pepitas o balines no se rueden. El hilo que cortaste al principio colocarlo así como en la ultima imagen un lado mas largo que el otro ya te explico por que?
1: Before you start cut a thread approximately 6 centimeters long, now we are going to introduce the 8 beads in the thread, connect one tip to the other and fix the beads or nuggets you selected to They are right in the middle and tie a single knot on each side twice so that the nuggets or pellets do not roll. The thread that you cut at the beginning place it as well as in the last image one side longer than the other, I already explain why?

2: Coloca la pulsera como te muestro en el paso anterior en la imagen 11, ahora el hilo que cortaste se va a colocar sobre los hilos de las pulseras recuerda un lado mas largo que el otro el lado corto quedara en el frente y el lado largo quedara hacia ti, ahora el largo lo vas a enrollar sobre el corto de adentro hacia afuera dando al menos 3 vueltas sin apretar formando una especie de túnel hacia la derecha y la punta de este hilo mas largo la vas a introducir por adentro del túnel que formaste después debes halar con cuidado de no dañar la forma, corta las puntas sobrantes y quemar con el encendedor, medir el largo que deseas la pulsera y en cada punta realiza un nudo, debes introducir un balin y vuelve a hacer otro nudo corta los hilos sobrantes y quemar las puntas con el encendedor. puedes verificar en la secuencia de imágenes el paso a paso.
2: Place the bracelet as I showed you in the previous step in image 11, now the thread you cut is going to be placed on the threads of the bracelets remember one side longer than the other the short side will be in the front and the long side will be towards you, now you are going to wind the length over the short from the inside out giving at least 3 loosely turns forming a kind of tunnel to the right and the tip of this thread the longer you are going to introduce it inside the tunnel that you formed later you must pull carefully not to damage the shape, cut the excess tips and burn with the lighter, measure the length you want the bracelet and at each end make a knot, you must introduce a pellet and make another knot again cut the excess threads and burn the ends with the lighter. you can check the image sequence step by step.
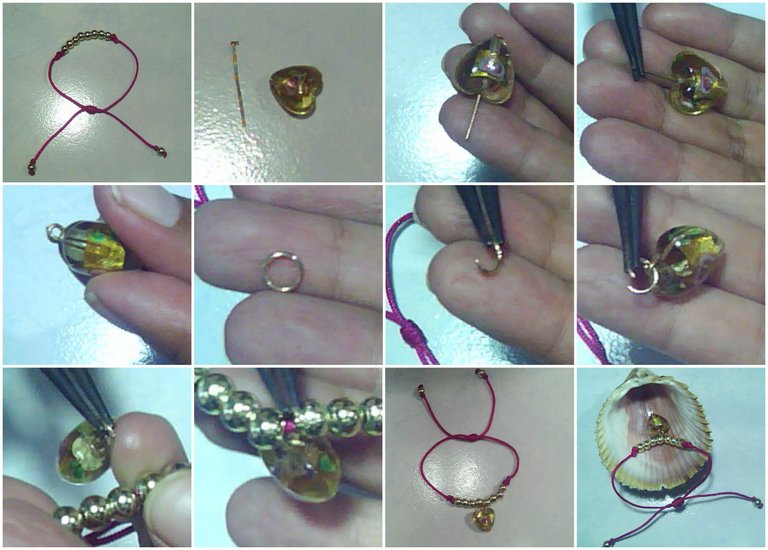
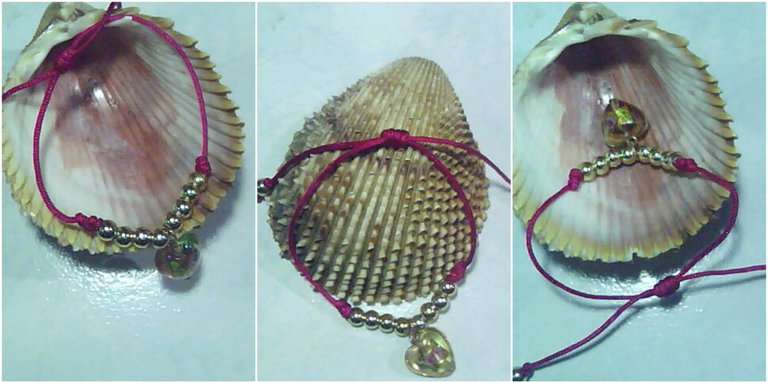
3: Introduce la piedra seleccionada en el alfiler de bisutería, el alfiler macho es el que abajo es plano yo seleccione un corazón estas piedras me encantan, con ayuda de la pinza de bisutería punta redonda vamos a entorchar el alfiler eso lo que debes hacer agarrar la punta del alfiler con la punta de la pinza y vas enroscando poco a poco para que siempre quede del mismo tamaño, cuando lo hagas con ayuda de la pinza abre el aro de bisutería y mete por allí la piedra a la vez mete el hilo de la pulsera justo en el medio que en este caso es a la cuarta piedra o balin ya que le colocamos 8, con cuidado cierra el aro y verifica que este bien cerrado para así evitar que la piedra se salga, y así hemos terminado nuestra pulsera es super sencilla y como ves queda hermosa.
3: Insert the selected stone into the jewelery pin, the male pin is the one that is flat below, I select a heart I love these stones, with the help of the round nose jewelery clip To twist the pin, what you should do is grab the tip of the pin with the tip of the clip and you screw it little by little so that it always remains the same size, when you do it with the help of the clip, open the jewelry ring and put in there the stone at the same time puts the thread of the bracelet right in the middle which in this case is the fourth stone or balin since we put 8, carefully close the ring and verify that it is well closed to avoid the stone it comes off, and so we have finished our bracelet is super simple and as you can see it is beautiful.
The thread you can use the one you want or the one you have on hand remember that the most important thing is that you stay at home.
Autoría del texto y todas las imágenes: @Migda
¡Por favor no tomes, edites ni re-publiques mi material
¿Deseas ponerte en contacto conmigo? Escríbeme https://discord.gg/TanA7tW allí también puedes compartir ideas y tus post para que aprendamos juntas.
Authorship of the text and all the images: @Migda
Please do not take, edit or republish my material!
Do you want to contact me? Write me https://discord.gg/TanA7tW there you can also share ideas and your posts so we can learn together.
0
0
0.000
@tipu curate
Upvoted 👌 (Mana: 21/28)
Congratulations @migda! You have completed the following achievement on the Hive blockchain and have been rewarded with new badge(s) :
You can view your badges on your board And compare to others on the Ranking
If you no longer want to receive notifications, reply to this comment with the word
STOPDo not miss the last post from @hivebuzz:
Support the HiveBuzz project. Vote for our proposal!
Me encanta como presentas tu paso a paso, muy detallado. Genial post.
if we were in the same place i would definitely buy one of the bracelets from you