DIY Spanish and English: Paso a Paso de creativos zarcillos Soutache con pegamento 💕 Step by Step of creative Soutache tendrils with glue

PhotoGrid_Plus_1608321547902.jpg

Bendecido nuevo dia amigos, deseo se encuentren con bien en casa 🤗 hoy he realizado un tutorial de unos zarcillos de soutache con pegamento, quise hacerlo de una manera más fácil y parctica para todos colocando la explicación paso a paso con una secuencia de imágenes 🖼️ y a su vez un video 🎥 donde se ve todo el proceso con mas detalle; Espero que de esta manera sea más fácil entenderlo y se atrevan a realizarlo yo solamente les doy una idea queda de ustedes agregarla su toque personal comencemos! 💕😃
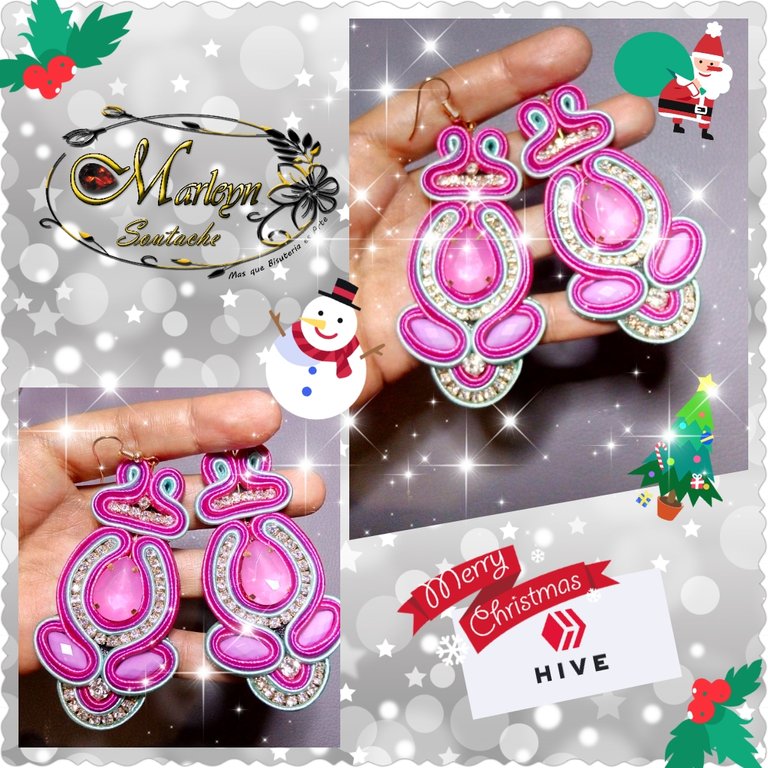
Blessed new day friends, I wish you are well at home 🤗 today I made a tutorial of some soutache tendrils with glue, I wanted to do it in an easier and more practical way for everyone by placing the explanation step by step with a sequence of images 🖼️ and in turn a video 🎥 where the whole process is seen in more detail; I hope that in this way it is easier to understand it and you dare to do it, I only give you an idea left of you, add your personal touch, let's start! 💕😃

Materiales
Hilo soutache
tijeras
Silicón líquido
Encendedor
Bases para zarcillos
2 Apliques tipo Gota engastada de 13 mm por 18 mm
4 Apliqué tipo Lágrima engastada de 1.2 mm
Cuero o tela gruesa
Strass 3 milímetros
Strass 6 milímetros

Materials
Soutache thread
scissors
Liquid silicone
Lighter
Bases for tendrils
2 13mm by 18mm Crimp Drop Type Appliques
4 Appliqué type 1.2 mm crimp
Leather or thick fabric
Strass 3 mm
Strass 6 mm

PhotoGrid_Plus_1608320726741.jpg

Paso: 1 Colocar silicón líquido, a unos 4. Centímetros hacia arriba de la parte inferior del cuero o tela gruesa, toma el aplique tipo gota y lo pegas Ahora vas a cortar tres tiras de hilo de aproximadamente 20 a 25 cm de largo vuelve a colocar silicón líquido alrededor de la piedra y vas pegando los hilos como te muestro en las imágenes, puedes ayudarte con una pinza de cejas o una pinza punta fina como las que utilizan para reparar los relojes, al terminar de pegar los hilos, toma el strass 3 mm y pegarlos justo al lado de los hilos como vez en las imágenes, ahora vuelve a colocar silicón líquido y baja los hilos hasta el centro y los pegas puedes ver cómo cómo queda en la última imagen
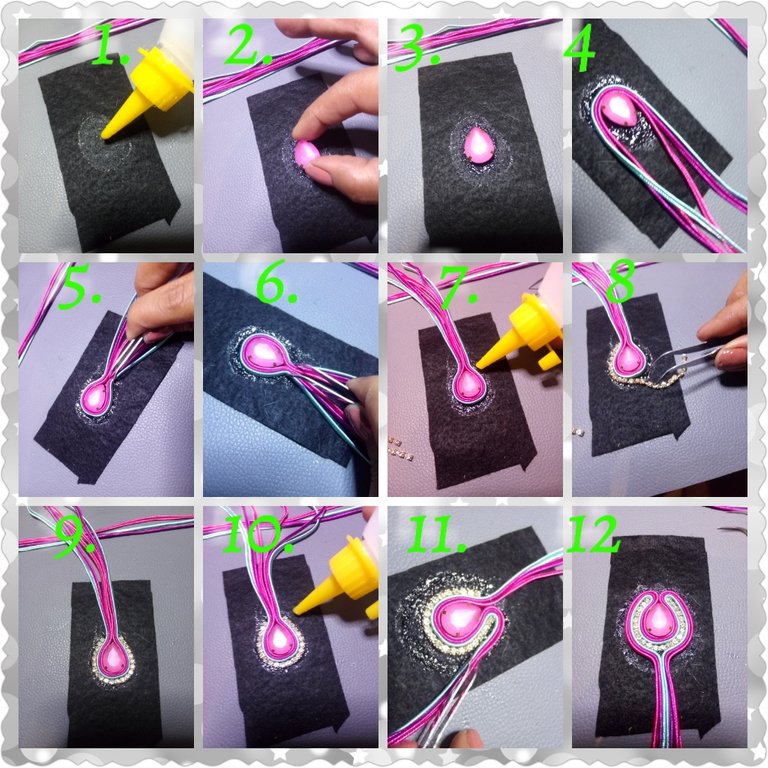
Step: 1 Place liquid silicone, about 4. Centimeters up from the bottom of the leather or thick fabric, take the drop-type appliqué and glue it. Now you are going to cut three strips of thread approximately 20 to 25 cm long, put liquid silicone back around the stone and you stick the threads as I show you in the images, you can help yourself with an eyebrow tweezer or a fine point tweezers like the ones used to repair watches, When you finish gluing the threads, take the 3 mm strass and stick them right next to the threads as you see in the images, now place liquid silicone again and lower the threads to the center and glue them you can see how it looks in the last image

PhotoGrid_Plus_1608320902357.jpg

Paso 2: ahora vamos a utilizar el aplique tipo lágrima, en la parte de abajo del zarcillo unta un poco de silicón líquido con ayuda de la pinza puedes colocar el aplique para no ensuciarlo con el silicón ahora con los y los restantes arropa el aplique marca dónde es él y lo restante corta ese sobrante y quema la punta con El encendedor ahora con ayuda de la pinza introducen esas puntas por abajo de los otros y los realiza el mismo proceso del otro lado,al terminar se verá cómo está la imagen 7 👍😚 vamos a hacer lo que está en la imagen 8 en el centro en la parte de abajo del zarcillo coloca un poco de silicón líquido y pega una piedra del strass 6 mm ahora con los restantes de los hilos arropa el estras vuelve a colocar silicón líquido coloca una hilera de strass 3 mm y por último otro hilo, 😋 ahora en la parte superior del zarcillo vas a colocar tres hilos de aproximadamente 12 centímetros puedes utilizar los hilos restantes de la primera parte del zarcillo coloca suficiente silicón líquido y cortas 6 piedras de strass de 3 milímetros, pegarlos frente a los hilos y ahora arropa el strass con los hilos cómo puedes ver en las últimas imágenes con las puntas restantes dóblala formando un círculo marca dónde está el restante corta los hilos sobrantes, quema las puntas con el encendedor e introduce las puntas por abajo del mismo hilo, esto le da un acabado mas limpio a la pieza
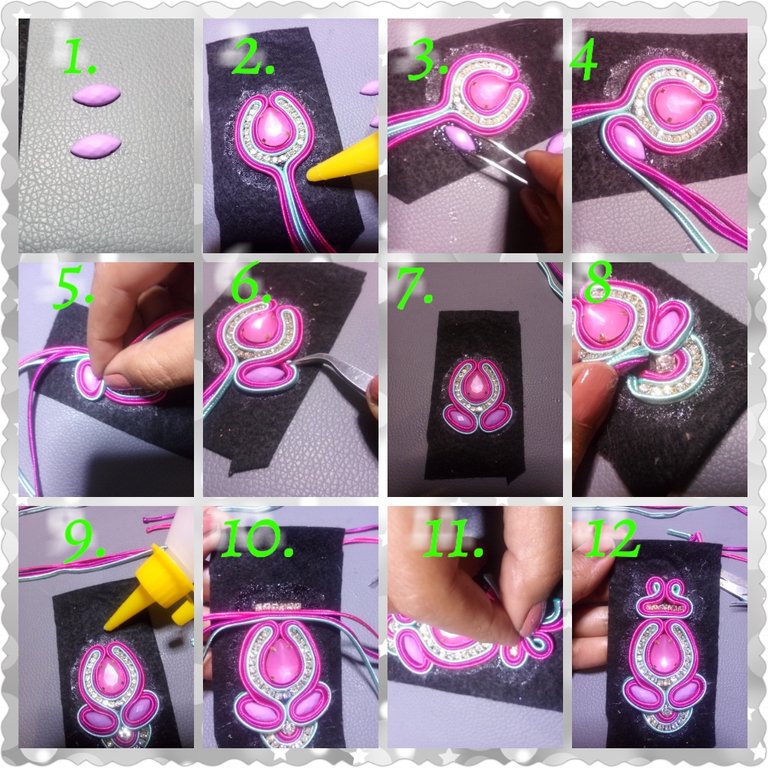
Step 2: now we are going to use the tear-drop appliqué, on the underside of the tendril spread a little liquid silicone with the help of the tweezers, you can place the appliqué so as not to get it dirty with the silicone Now with the remaining ones, he wraps the applique, marks where he is and the rest cuts that excess and burns the tip with The lighter.Now, with the help of the tweezers, they introduce those tips below the others and perform the same process on the other side, When finished you will see how image 7 is 👍😚 we are going to do what is in image 8 in the center at the bottom of the earring, place a little liquid silicone and glue a 6 mm rhinestone stone now with the rest of the threads clothe the stretch mark, replace the liquid silicone, place a row of 3 mm strass and finally another thread, 😋 now on the top of the tendril you are going to place three threads of approximately 12 centimeters, you can use the remaining threads from the first part of the tendril co crazy enough liquid silicone and cut 6 stones of 3 millimeters strass, stick them in front of the threads and now wrap the strass with the threads how you can see in the last images with the remaining tips fold it into a circle mark where the remaining cut the threads is leftover, burn the tips with the lighter and insert the tips below the same thread, this gives a cleaner finish to the piece

PhotoGrid_Plus_1608321238952.jpg

Paso 3: Antes de que la pieza se seque, debemos cortar el cuero restante xon cuidado, al terminar de cortar pasa el encendedor rápidamente por la pieza, ahora introducir un alfiler de Bisutería con cuidado, puedes desprender la piedra colocar mas silicon liquido y volver a pegar. Para asegurar que se pegue bien coloca presión puede ser un gancho de ropa
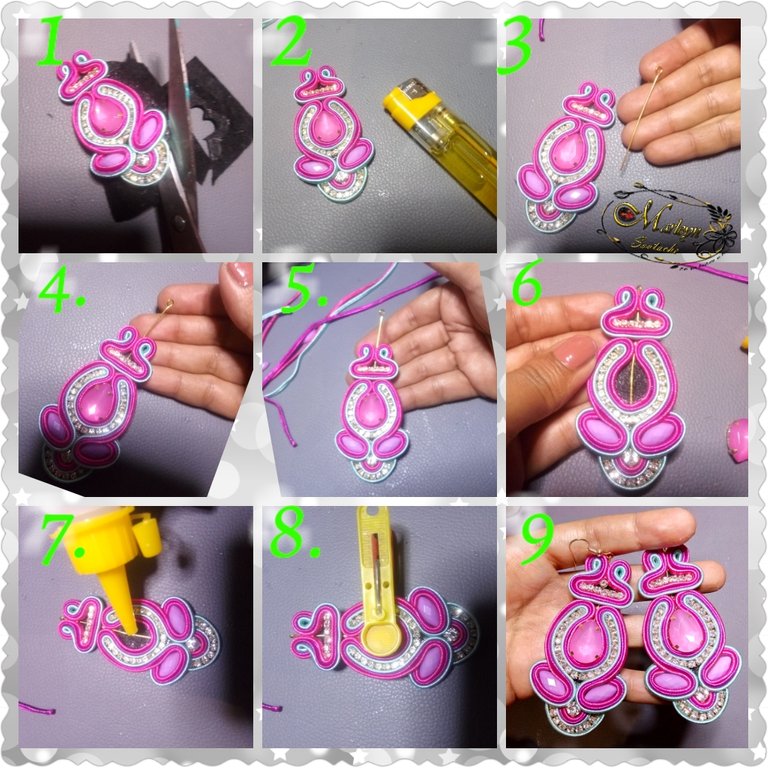
Step 3: Before the piece dries, we must cut the remaining leather carefully, when finishing cutting, pass the lighter quickly through the piece, now insert a jewelery pin carefully, You can loosen the stone, place more liquid silicone and stick it back. To ensure that it sticks well, put pressure on it can be a clothes hanger
Para un mejor comprensión te he realizado el video de la manera mas detallada posible, de corazón espero te guste tanto como a mi! Disfruta y aprende con amor 💕😚
For a better understanding I have made the video in the most detailed way possible, I sincerely hope you like it as much as I do! Enjoy and learn with love 💕😚

Si tienes una duda escríbeme un comentario, estaré feliz de ayudarte con cualquier detalle, Espero que mis diseños les gusten tanto como a mí me gusta, aprendan con placer ...!

Nunca olvides que el Poder es Querer y si quieres Puedes...

Eres Luz eres Energía, TU PUEDES ... Que el universo infinito Conspire para que todo siempre sea mejor ... Se les quiere ...

Venezuela FE

Somos Seres Abundantes! Qué las energías del universo vibren en sintonía con las de cada uno de nosotros en armonía! Cuidemos nuestras palabras, acciones y pensamientos!

If you have a question, write me a comment, I will be happy to help you with any details, I hope you like my designs as much as I like, learn with pleasure ...!

Never forget that Power is Wanting and if you want you can ...

You are Light, you are Energy, YOU CAN ... May the infinite universe Conspire so that everything is always better ... They are loved ...

Venezuela FAITH

We are Abundant Beings! May the energies of the universe vibrate in tune with those of each of us in harmony! Let's take care of our words, actions and thoughts!

Autoría del texto y todas las imágenes: @Marleyn , La edición de las imágenes las realicé yo misma, Por favor no Utilices mis fotos sin mi autorización, edites ni re-publiques mi material ¿Deseas ponerte en contacto conmigo? Escríbeme:
Correo electronico: [email protected]
Discord Marleyn#7821
Twitter: @marleynleal1
Imstagran: @MarleynSoutache

Authorship of the text and all the images: @Marleyn, Editing of the images was done by myself, >Please do not use my photos without my authorization, edit or re-publish my material Do you want to >contact me? Write me:
Email: [email protected]
Discord Marleyn #7821
Twitter: @marleynleal1

Imstagran: @MarleynSoutache

Mi trabajo es mi pasión y cuando tu trabajo es tu pasión nada es imposible / My work is my passion and when your work is your passion nothing is impossible


0
0
0.000
0 comments