Building a guitar body, part 6
Hello, and welcome to my page!
This post is a continuation of my series on building a body for my 4 string guitar project. This will be an electric baritone ukulele, or short scale 4 string electric guitar, depending on how you look at it. The baritone ukulele uses the D, G, B, and high E strings of a guitar, tuned the same way.
My last post about this project was about 2 months ago. You can read that post at this link.
https://steemit.com/guitar/@amberyooper/building-a-guitar-body-part-5
I had not done any work on the body for the past couple of months because I couldn't make up my mind about where I wanted to put the volume and tone controls on the body, and how to mount them. I had thought about mounting the controls from the back of the body, but drilling the holes for the controls is more tricky from the back, and it's easier to mess it up. I finally decided to drill holes from the front to make a cavity for the controls and mount the controls to a plate that would cover the cavity. This is a fairly common method that a lot of guitar makers use.
Once that was decided, I had to figure out where to put the controls, and how to drill flat bottom holes for the cavity. Since this is a custom project, there are no instructions for how to go about doing any of this stuff, so I had to make the decisions as I got to that part of the project. Sometimes it takes me a while to make up my mind with stuff like this. Some people call that "analysis paralysis".
Here's what the guitar body looked like before I started on the cavity for the controls.
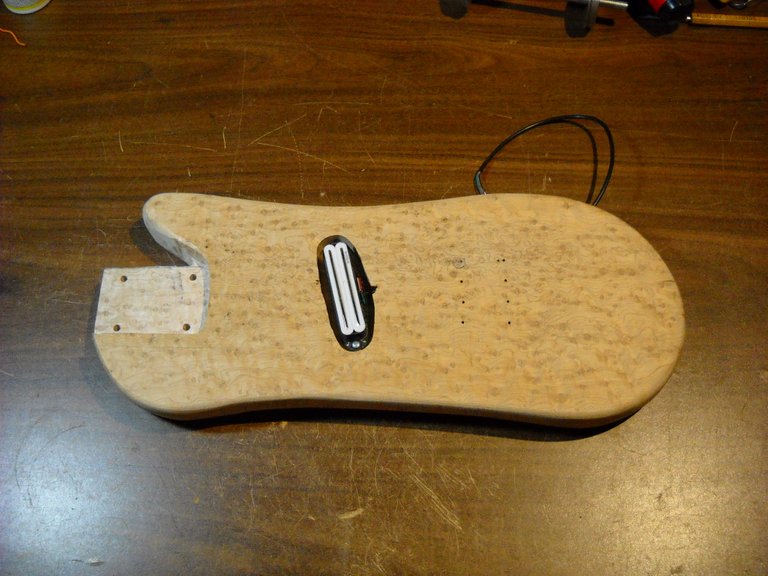
I don't have any type of drill bits that will make a flat bottomed hole in wood. There's a couple of different ones on the market, but they're a bit expensive and I didn't want to buy one for a one off project, so I improvised. I used one of my hole saws of about the right diameter for the size of the holes that I wanted, and I adjusted the center drill of the arbor so that it only stuck out about 1/2 inch from the edge of the saw teeth. I set the drill press to drill a fairly shallow hole in the body, about 3/4s of an inch deep or so. I put one hole on each side of the hole in the side for the guitar cord jack. That will make it easy to wire up the pickup and the controls to the jack.
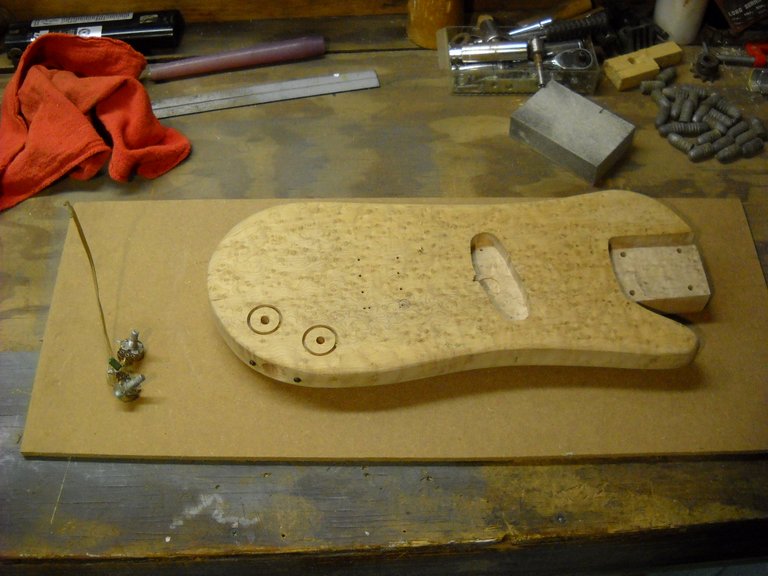
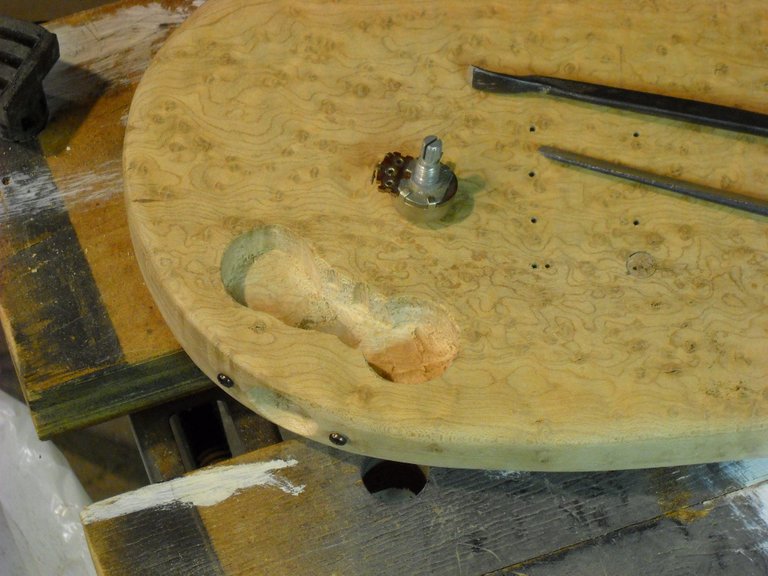
After starting the basic holes in their positions, I put a 1/4 inch drill bit in the drill press and drilled out the wood inside the circles as best I could. Then I got out a couple of my carving chisels and started removing the rest of the wood from inside the circle cuts. I used the drill press to help me cut the holes to a depth that would fit the control pots with only the shaft sticking out above the body.
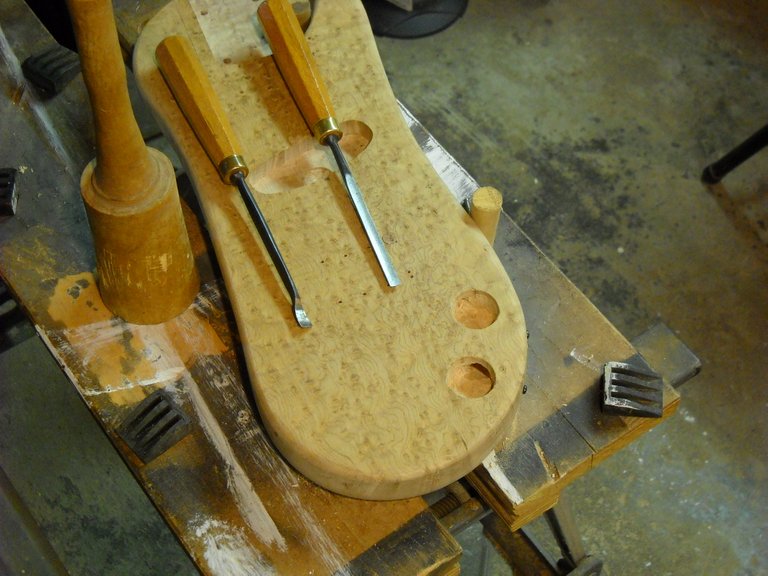
Once I got that done to my satisfaction, I used the drill press to drill out much of the wood between the holes to form a slot that connects the holes. I cleaned out the rest of the wood and smoothed out the bottom of the slot with the chisels. When I was done, I had a pretty decent cavity for the volume and tone controls and all the wiring necessary. It's a bit rough, but it will be covered with the cover plate that the controls will be mounted to. In this picture, you can also see the mounting holes for the bridge pieces, and the repair that I had to make for one of the holes. I covered that in a previous post.
The next thing on the list is to decide how to ground the 4 separate bridge pieces, if I'm going to do that, and then decide what I want to do for a finish on the body. I'm not sure if I'm going to use a clear oil finish, or a red stain oil finish. I'm leaning toward the clear finish, to show off the bird's eye detail of the wood. I thought about a clear lacquer finish, but I'm not equipped to do something like that. I hope it doesn't take me as long to decide on the finish as it did on the controls placement, because I'd like to get this project done so that I can actually play it. I don't want to put the parts on it and wire it up until after I put the finish on the body, because I would just have to take all the parts back off to finish it.
Well, that's all I have for this post. Thanks for stopping by to check it out!


I am someone who always used to have great trouble while changing my strings itself so I can really appreciate the work you are doing here :)
Thank you!
This is pretty cool. You've obviously done this before and have all the right stuff. Must be rewarding making stuff like this yourself. Very impressive.
Posted using Partiko Android
Thank you!
It's been an interesting project so far with this piece of bird's eye maple.
How many have you done already and was it a difficult process to learn?
This is the first guitar body that I've done. I've done other wood working stuff, so I have a basic knowledge of wood working.
This guitar body is one of those experiments to see if I can make one for myself.
Impressive. My grandfather was a whiz with woodworking...Wood carving plus design and construct of all manner of things. He's gone now of course, but I wish I had picked up some of his skill. I'll keep an eye out for how this project comes along.
This post was shared in the Curation Collective Discord community for curators, and upvoted and resteemed by the @c-squared community account.
If you are a community leader and/or contest organizer, please join the Discord and let us know you if you would like to promote the posting of your community or contest.
@c-squared runs a community witness. Please consider using one of your witness votes on us here
Questo post è stato condiviso e votato all'interno del discord del team curatori di discovery-it.
This post was shared and voted inside the discord by the curators team of discovery-it
Thank you for using the #diy tag. This post has been manually rewarded with BUILD tokens in the form of an upvote with our @build-it.curator account. You can buy, stake, and exchange our "BUILD" tokens for steem on steem engine and Steem Leo's exchange
Build-it is a central hub for DIY and How-To projects. It's an opportunity to find and share the latest in DIY, and How-To tutorials. The recommended tags required when creating a DIY article are #diy, #build-it. #how-to, or #doityourself.
Chat with us on our discord and telegram channels Discord, Telegram. Are we adding value ? your witness vote will be appreciated! Click here to vote
Maybe a simple washer/metal screw ground could work in the controls cavity. I have a strat that is grounded this way to avoid having to drill a hole out to the spring plate.
Posted using Partiko Android
I figured that I would ground everything to the shields on the control pots and see what happens. The humbucker pickup shouldn't buzz like a single coil would.
I wonder what will happen when you spin the control pots, would you become the ground for the instrument then? Or maybe it would introduce noise on tone/volume up or down?
Well, if I use plastic knobs, I won't have to worry about being part of the ground. I'm not sure what would happen if I use metal knobs.