New Apple Tree Grafts: Akane, Northern Spy, William's Pride [Gardening]
Grafting apple trees is not for the casual gardener. It can be a very rewarding process to be able to grow all kinds of unique and delicious fruit varieties not always available for purchase at the stores.
Since apple seeds produce fruit different than the fruit it came from, this means grafting is the only way to clone an exact copy of a favorite apple variety. Favorite apple varieties have been grafted for centuries, allowing us to enjoy the same apples genetically identical in appearance and flavor as people enjoyed them generations ago. Every bite is a slice out of history!
Personally, the idea of growing fruit at home has always appealed to me. Free food source. Infinite years of harvests. Better selection of fruit. Fresher. Healthier. Pesticide free.
In this article, I will be demonstrating a detailed walk-through of my entire apple tree grafting process.
Table of Contents:
- Introduction
- Package Arrived
- Akane
- Northern Spy
- William's Pride
- Preparing the Grafting Tools
- Choosing Where to Graft
- Cleft Grafting Scions
- Grafting the Branches
- Finishing Touches
- Final Look
- Conclusion
Introduction
After four years of growing apple trees, I still consider myself a beginner backyard Orchard Expert. With only two container trees to work with, I cannot with any assurance all my grafts will succeed. The results sort of speak for themselves when you look at my photos below. Learn from my mistakes. Celebrate my successes with me as I provide updates.
With grafting, you only get one shot every year. Using these photos, you and I can both improve our techniques before the next opportunity comes up.
It is really rare to see realistic photos of various graft cuts being done, so I hope this is a benefit to somebody. I've been studying videos and checking out books on the subject to help me to design a plan for myself.
Package Arrived
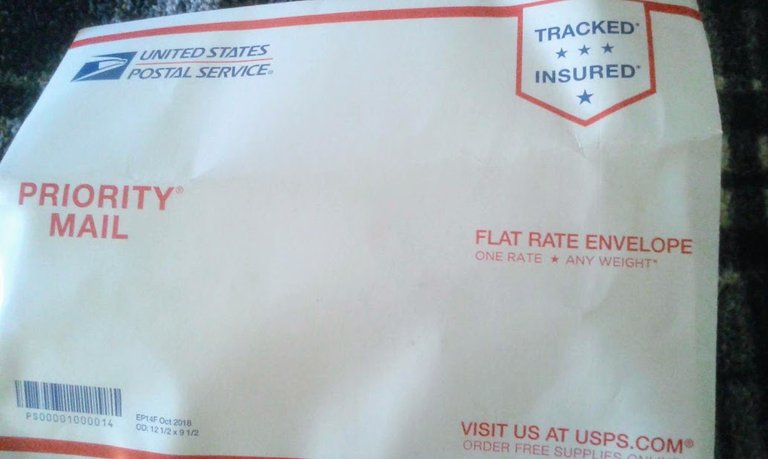
April 16, the package arrived. It contained all the apple wood scions* (cuttings suitable for grafting) I will be using to graft onto my trees. As soon as the package arrived, I gathered my supplies and prepared to graft.
One good thing about being in quarantine is I can always get started with any new project right away!
This year, despite all the event closures, it nearly cost me a second year of no new apple grafts. When this package finally arrived, I felt really lucky!
The Home Orchard Society is a volunteer team in Clackamas, Oregon that normally hosts a large Propagation Fair in early March. Since this year's fair was cancelled shortly after the pandemic was announced, and they didn't want to waste all the scions they harvested, they kindly created an online order form to let people purchase scions through mail order.

Inside, it looked like some strangely coded baggies of hospital drugs.
They returned my order page. I had to write out the order by hand because I do not have a printer at home.
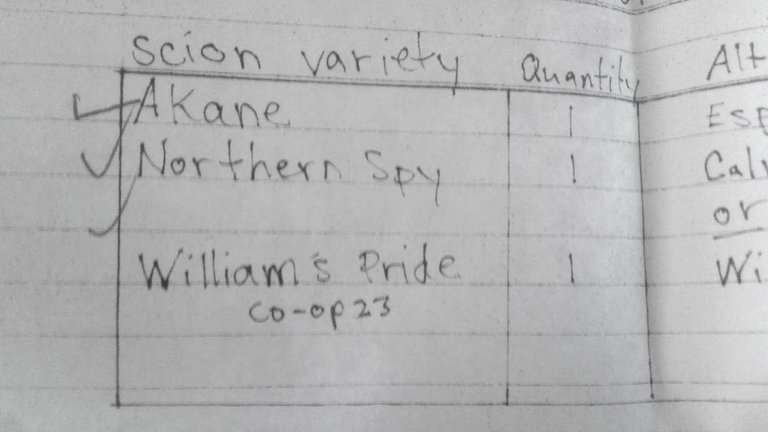
All three of my first choice apple varieties were filled in this order. Alternative choices were also provided in case they ran out of anything.
Akane
A Japanese apple. All-around great tasting early season apple.
According to my research, this one will help to pollinate Sweet 16, which is one of the grafted apples I am already growing.
Northern Spy
Many people swear this is their favorite apple. I have never been able to find it on store shelves. Known for being incredibly sweet, and crispy fruit that holds its shape and flavor well in pies. Some say it has a candy licorice flavor. It is a parent of Sweet 16.
This apple has been on my wish list for two years, so I'm very excited to have it.
William's Pride
A very picturesque apple. Lovely round shape and beautiful deep red rind. It is very resistant to disease, such as scab. Great classic apple flavor. This apple sounds like it puts the more common Red Delicious to shame.
I chose this one as a pollinator for Gravenstein, the other grafted apple tree I am growing.
Preparing the Grafting Tools
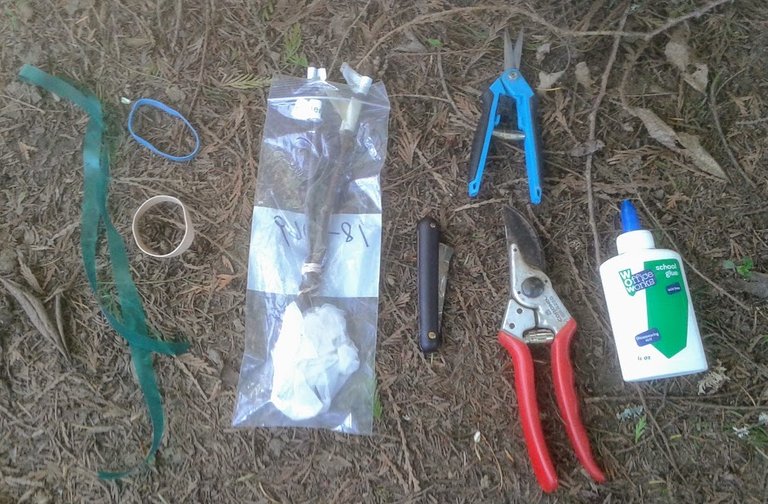
Homemade/DIY in it's truest form is all about using the tools you got. Waste nothing.
First thing I do is look and see what tools I have on hand. Since we're in the midst of a statewide quarantine, I had to make due with a few less-than-ideal choices. Higher quality tools and materials can improve the success rate of grafting.
- Scissors: for cutting tape, package, etc.
- Pruners: for pruning the branches and scions.
- Grafting Knife: for carving the grafts.
The grafting knife is a specialty knife, and I only use it once a year for grafting. It is razor sharp and very dangerous folding knife. Basic skills and training are essential to handle it safely. Even after a few cuts, the blade has to be resharpened, or else the dull edge can become unpredictable to use as it rips unevenly. It has to be sharpened with the correct tools and technique to avoid damaging it.
I used rubbing alcohol to clean and sanitize all my blades prior to working. Did not use the whetstone to sharpen the grafting knife, as I would rather wait to have it professionally sharpened. Hoping it hasn't dulled too much in the few times I've used it.
The grafting tape comes in a green roll. I thought the tape looked a bit too wide for me, since I am not great at tying knots, and a wide band would make the knot very loose. So I cut the width of the strip in half lengthwise, and that made two strips available to use. Grafting tape is just green flexible thick plastic, which blocks certain colors of sunlight.
Rubber bands. These can be used for wrapping the grafts instead of grafting tape. I like they they are more flexible, and have a better grip on the wood than the plastic grafting tape.
For wrapping grafts, professionals will use parafilm, a waxy, stretchy tape, which slightly melts in place as it is touched and handled. Parafilm is very good at making an air-tight seal while wrapping the wood. Some people also use electrical tape. I almost went that route, but I did not want to worry about the tearing the sticky tape off my fragile grafts. Even flexible plastic bags can be used, cut into strips.
White paper glue. Or Elmer's Glue. Here I went the cheap route, because this is the only thing I had on hand for sealing any open exposed wood wounds I make.
Professionals would use melted beeswax (sometimes called Grafting Wax) to seal the wood. Wax hardens air tight and water tight, yet also flexes as the wood expands. Wood sealers for pruning and grafting can also be used. Usually a wood sealer is a thick glue with a dark brown stain, and it has antibacterial properties. It will permanently stain the wood. Cut Paste, a putty used to heal wounds on bonsai trees, would be another good alternative.
One year I tried using Raw Honey to seal wood wounds, and that works to prevent mold and infection, but it does not prevent the wood from drying out. It will evaporate the moisture in daylight.
Choosing Where to Graft
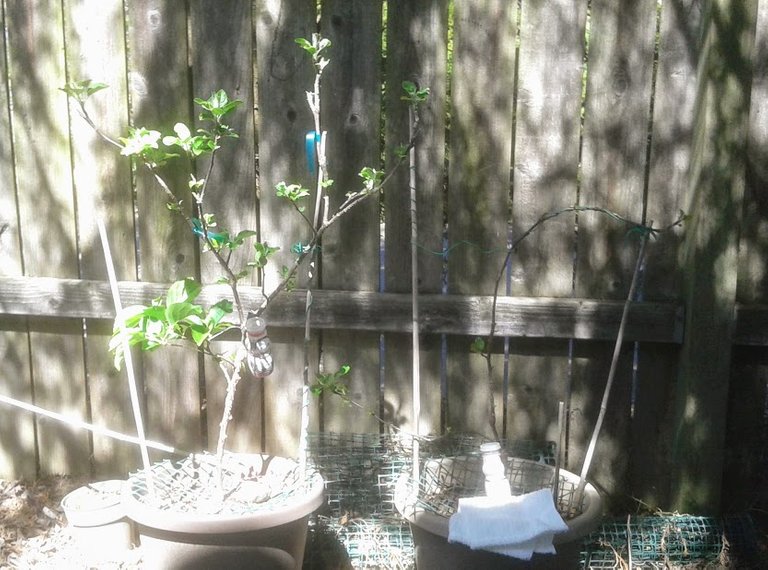
Above, these are my two container trees.
The one of the left is a four year old M27 superdwarf rootstock with Sweet 16 grafted above the lowest branch.
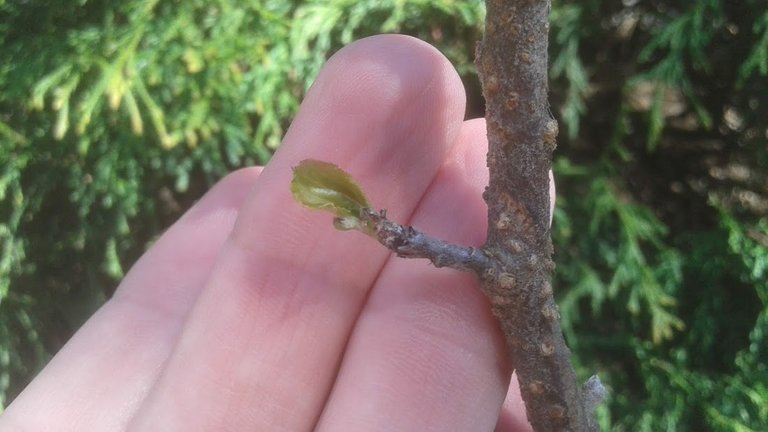
I selected two branches thick enough to hold the two scions I want to graft. The possible graft location I marked with green grafting tape ties.
Ideally I want to remove the least amount of future fruiting wood as possible, because I want lots of Sweet 16 and Gravenstein apples too! There is no way I can prune off anything less than pencil thickness, because otherwise the wood will be too thin to work with.
The tree on the right is a three year old M9 dwarf rootstock with Gravenstien Red grafted onto it. The branch was trained to arch to the right. The area I taped off for pruning, the wood was a bit too narrow I later discovered.
Match up the scion next to the grafting site and check if the wood will be thick enough to hold the graft. This scion, above is a bit too wide to be grafted here, so I'll need to prune lower on the tree where the wood is thicker. Ideally the branch should be the same thickness as the scion.
Here we have a better match for the next scion.
Selecting a branch in an upright position is also much easier to work with. It is easiest when working with the grafting knife to press straight down.
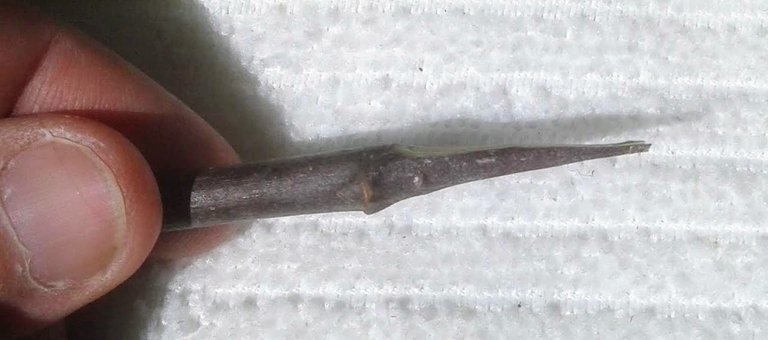
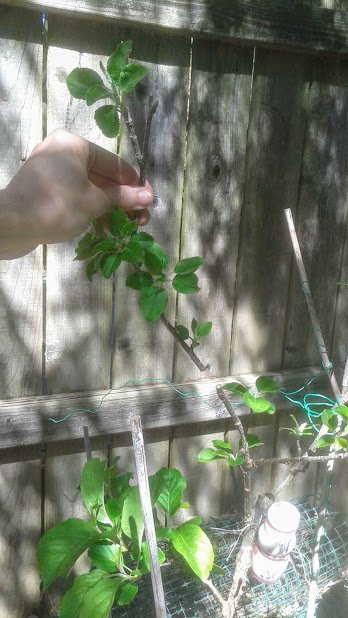
For my third grafting site I find a close match in thickness. Sometimes the scion can have a different thickness between at the buds and between the buds. Also when rotated around the thickness change change. Inspect all areas of the scion to choose where the wood will match the branch the best.
Cleft Grafting Scions
I've been looking at various grafting techniques recently, and I decided on the cleft graft this time as the one I will attempt.
A cleft graft is a basically a split in the branch and a scion wedge forced to grow inside the split wood. Success rate for clefts is not very high compared to other grafts.
I chose this graft because it it requires minimal knife skills. I thought it might be an easier graft for branches that potentially heading in awkward lateral or diagonal directions.
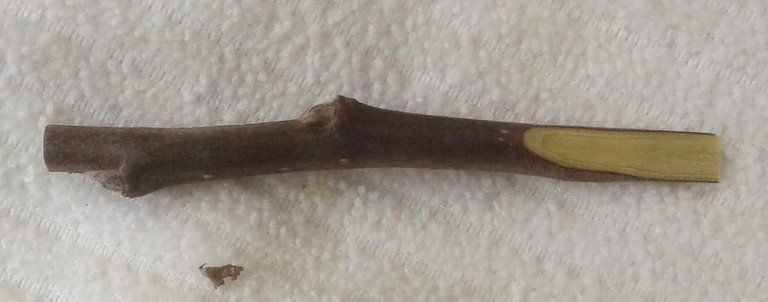
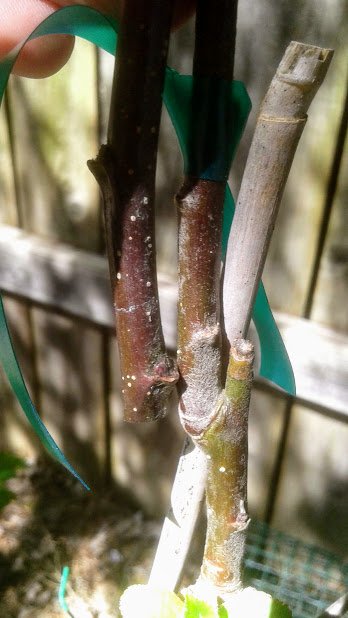
One one side we want a smooth, long, flat, diagonal cut. Try to position the cut away from any buds.
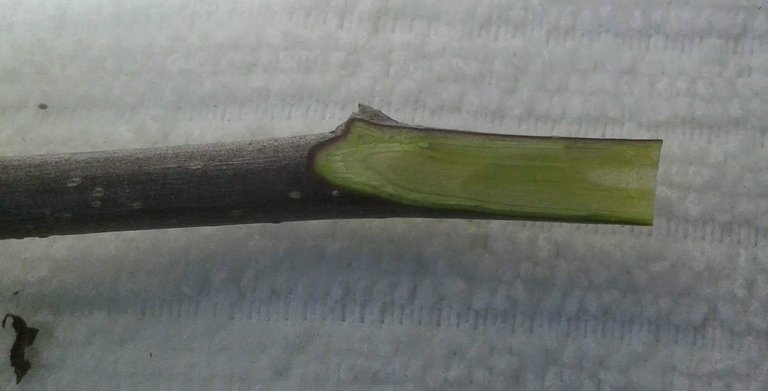
Getting the cut flat is actually harder to do than I thought. Sometimes the blade follows the grain of the wood, and the cut direction with twist and turn.
Really, I'm quite skiddish with razor type blades, especially folding knives. My knife is beveled on one side only, so it can only cut when held in the right hand. Sometimes when cutting I noticed the blade will dig in, and scoop outward, leaving a curved cut on the wood.
If the cut gets really bad, start over. A fast, strong stroke with a sharpened blade is essential to get the cut edge as flat as possible.
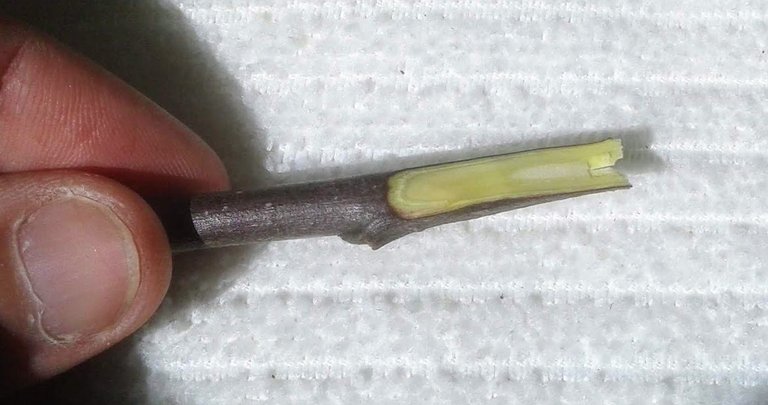
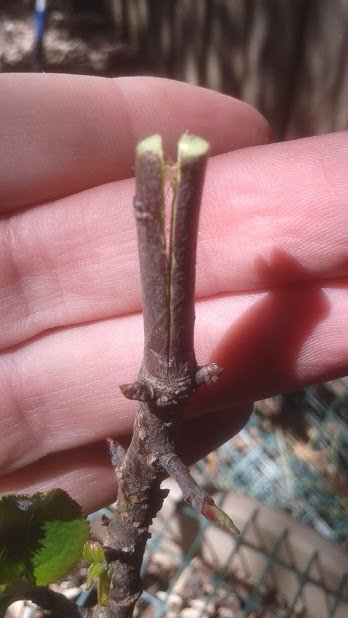
On the opposite side of the scion, a matching diagonal cut has to made, to create a cleft graft.
This cut is even harder to make. Not only does it have to be flat and the same length, it also needs to be perfectly parallel along the width of the wood. A bad angle will mean this wood wedge shape will not slide in to fit inside the branch cut.
Note: There is also a special tool you can purchase specifically for making these diagonal flat cuts into scions absolutely perfect every time. When I saw them in action at the Propagation Fair, it clamps onto the wood. It has a squeeze handle, like a stapler, which safely punches a concealed blade to cleave through the wood. It's a bit spendy, but a good investment to improve grafting success rates. The hard thing about the tool is it can require a lot of a hand-grip strength to trigger the spring action to press the blade through the wood. Dormant apple wood is very hard!
Grafting the Branches
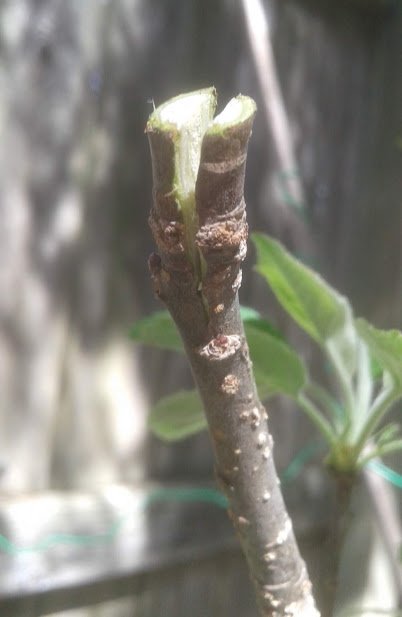
Using the pruners, I clip off the top of the branch, then split the branch through the center using the grafting knife.
A slow rocking motion is used to gently guide the blade through the wood split. I watch from all sides to make sure the blade is continuing straight down.
The deeper in, the more the bevel on the blade and the shape of the wood grain will try to re-align the blade edge outward. Slow and steady is better to stay straight and true.
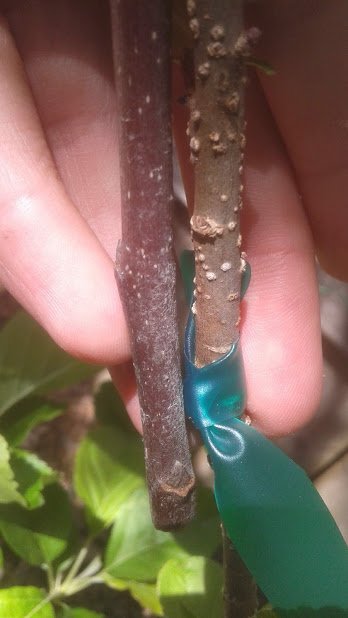
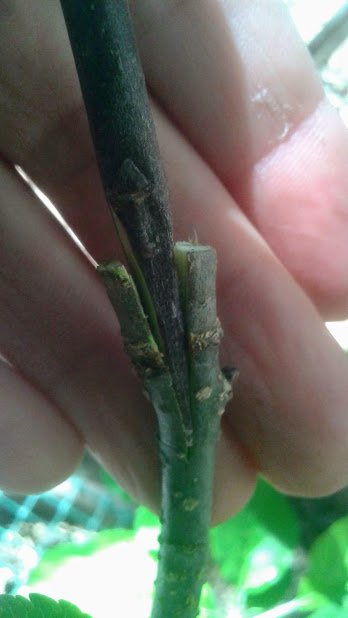
Line up the wood. It should fit like a snug puzzle piece. Do not jamb it in with force. Make sure the branch cut is deep enough to cover most of the exposed scion wood. Look at the shape of the scion wood. Make sure its surface will fit cleanly against the flat surface inside.
One of the faults of a cleft graft is the flat cut edge at the top of the branch split will never match perfectly against the scion's rounded top edge. Rounded pegs won't match a square hole. Modified Cleft Grafts exist to help make the cut edges match perfectly on all sides (by cutting horizontally into the side of the scion, then a new angle diagonally to the tip), but I'm not that advanced yet in my abilities to attempt it. There are other graft styles, easier to implement, with higher success rates, rendering the difficult Modified Cleft Graft somewhat non-essential.
Adjust the scion so the bark edge on one side is flush with the branch. The cambium layer must be squeezed tightly to stay in contact in order for the graft to take. Too much air in-between, and the wood will not heal. If the wood dries out, the grafted end will die off.
I tied it off using the rubber band.
Graft 1: William's Pride is done.
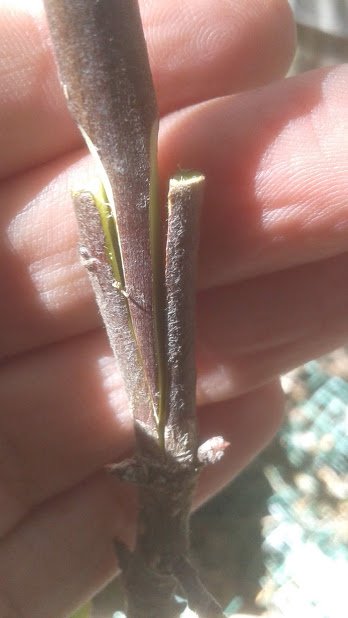
Second graft has a much better matching shape.
The scion is not going very deep into the branch. The branch cut will need to be deepened another quarter inch.
The wood on this branch was tearing/breaking slightly off-center below the blade the deeper I went. It can be a bit unnerving to watch ripping cracks appear in random directions below the blade edge, so I had to be really careful not to allow the wood to completely snap the deeper I went.
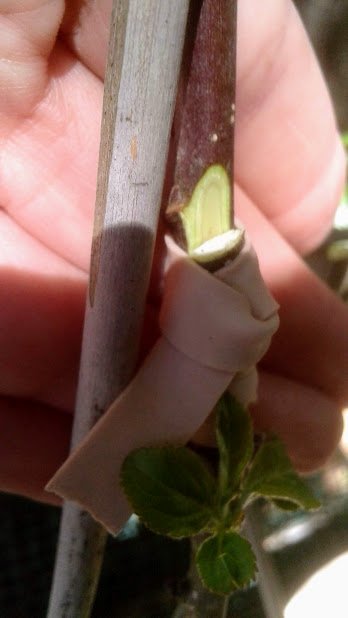
Wrap the graft from the bottom up. Only a single layer of the rubber band is needed around each coil.
Tying the knot can be kind of tricky. Wrap the last coil around the top of the graft by leaving a finger through as a spacer. Coil around once more, and pull the end through the finger space, and pull tight.
Alternatively, fold the end, and press the folded end through the finger space, and this will make a slip knot. When the graft has healed in July, a slip knot is easy to untie because it will unravel by simply pulling the end out.
Graft 2: Northern Spy is complete.
Be very careful when selecting the cut site for the branch. I am noticing a slight bend in the branch, which was not originally apparent. By pressing the blade down the center to follow the branch direction, this may cause a curved cut. Too much curve cut down the center will not match the flat edge of the scion. If a curved split happens, prune off the split branch, and start over again on a straighter portion of the branch.
Also watch out for buds nearby the cut zone. Buds too close can weaken the graft area, and pull energy. It is better to position grafts an inch above or below a bud if possible. Awakened buds will try to push new leaves through the grafting tape, which will weaken the seal, and the graft could fall off or heal improperly.
This was the trickiest branch for me to graft. You can see one side of the cut branch was thinner than the other. The wood was just barely thick enough to hold onto the thick scion.
This was the thickest part of the wood I dared to use. Any deeper, the next branch would have to be removed. Then I would lose most of my Sweet 16 fruit branches completely. I would rather have this new graft fail than remove a previous year's graft.
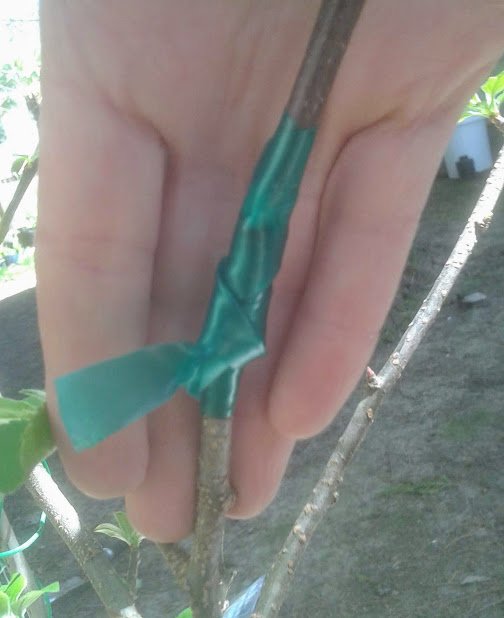
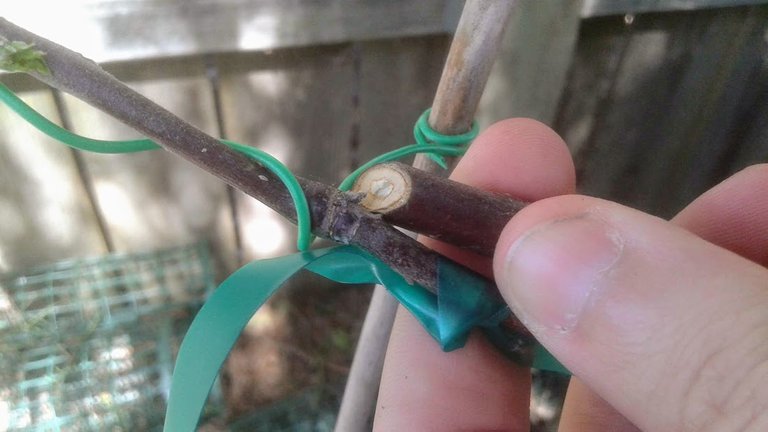
The rubber bands were quite easy to work with, but I ran out. So I had to use the green grafting tape to tie up this final graft.
The narrow width that I cut the tape to made things a little bit easier to coil and mold it into the shape I wanted. For each coil, I pull and squeeze the tape until it stretches tightly, and I wrap the next coil so the edge only barely overlaps the next one.
Too much double wrapping, and the tape tends to buckle on the edges and not hold form against the wood.
Graft 3: Akane is done.
Finishing Touches
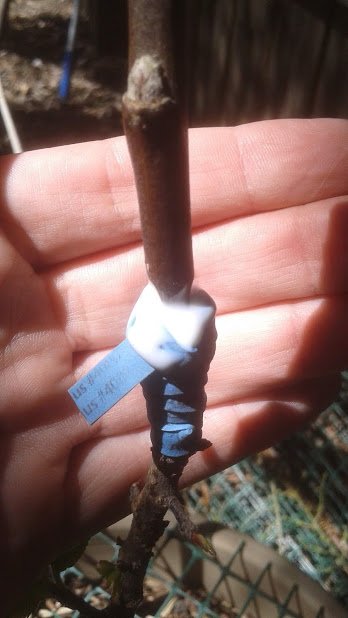
Look around for any exposed open cut wounds on the wood. Seal them up with the glue. Grafting wax would be better.
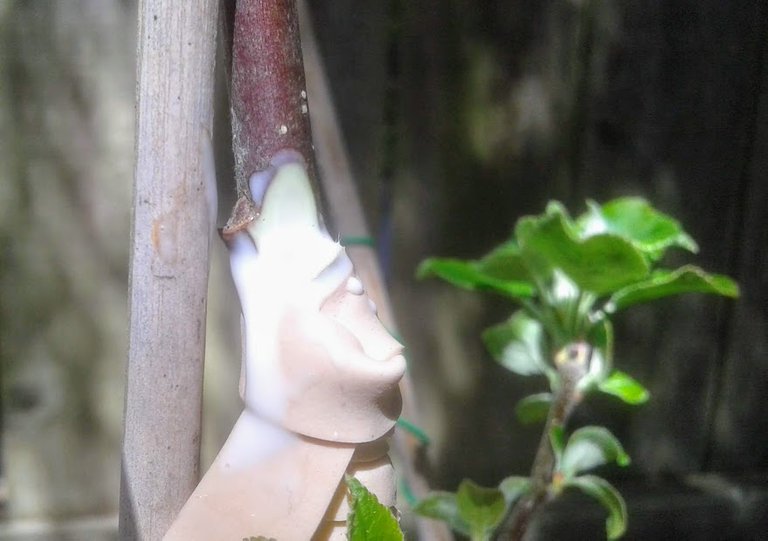
I trace around the outside of the cut wounds, and over the rubber band slightly to help make sure it will block out the air, edge to edge, as it dries.
White glue is a bit runny. This glue is slightly watery, so when it evaporates, the glue may not leave a good seal. Water inside the wood also needs to be held in, water tight. To make sure the seal is good, I apply a second layer of glue after the first layer starts to dry. A thicker glue layer should help prevent water inside the wood from evaporating out through the glue.
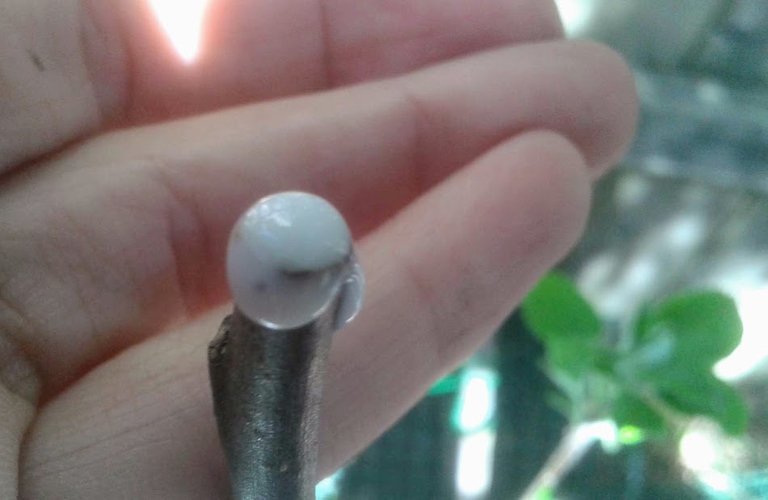
Lastly, I apply a double layer of glue to the tops of the wood scions.
Make sure the scion is not too long. I usually shorten the scion prior to grafting it, but it can also be pruned at the end. Each graft only needs 2 or 3 buds. Too many buds, and the energy to each bud might not be supported enough for any of them to produce leaves.
Parafilm is also a good way to seal this top wound.
Final Look
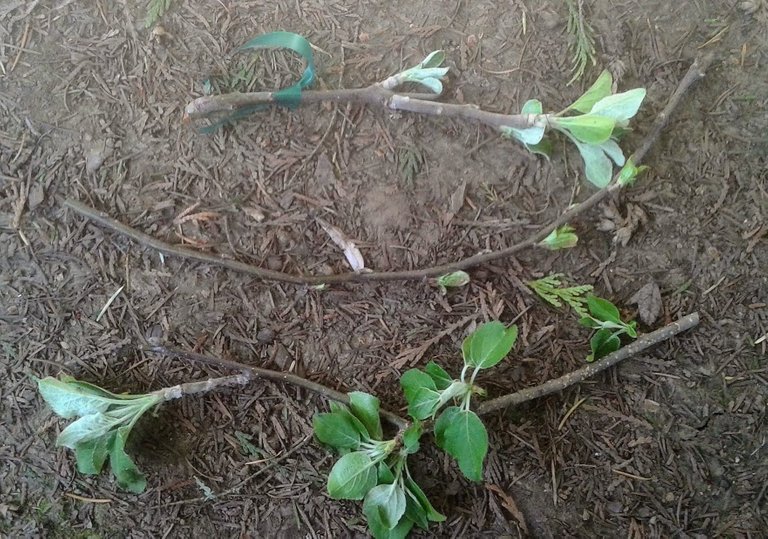
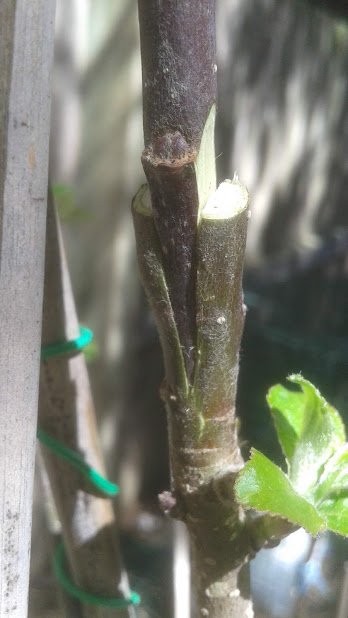
One of the last things I always do is analyse the damage I have done. These three branches were removed from the two trees. About a foot of growth takes about a year for a dwarf apple tree to grow. So this has basically set the trees back a year in terms of maturity. It will take another year for the new grafts to develop new wood to replace what has been lost.
This was an earlier photo, displaying where one of the branches used to be, immediately after it was pruned off.
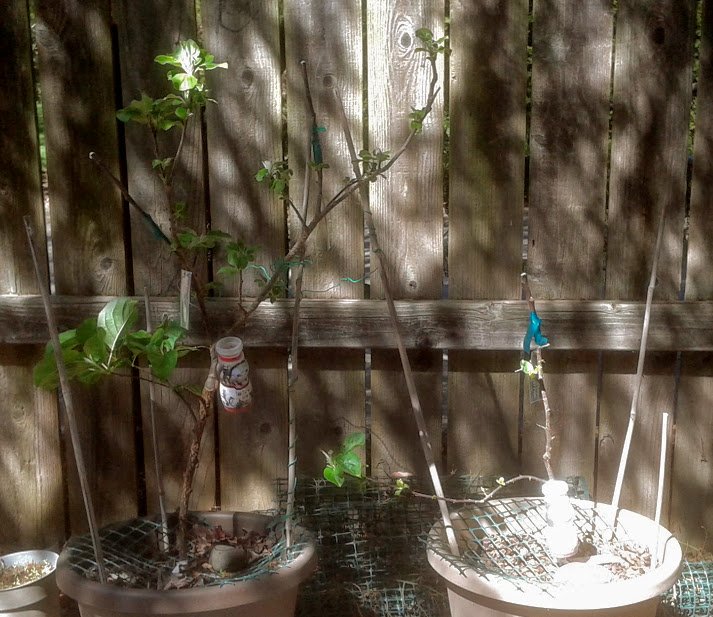
Here is the trees after they were finished being grafted.
For the first two grafts, I added a layer of grafting tape over the rubber bands, just to be safe. This will also help protect the rubber bands from the sunlight, which can possibly make them dry out and crumble.
These trees are normally growing in full sun in my front yard. Now they are moved to a new location to be allowed to grow in the dappled shade. This is one advantage to growing them in containers.
Grafts are supposed to be protected from full sun. I believe the reasoning is that the sun tends to cause moisture in the graft to evaporate, which dries out the wood. We need the sap to stay watery and loose for it to heal the cambium inside.
Green leaves will be healthy in low-light conditions. The inner green cambium wood is providing all of the energy for the tree's new growth for the next couple months. Even in shadows, leaves still benefit from ambient light reflected off lower surfaces. In Summer, we'll need to return the trees to the full sun so the leaves can photosynthesize maximum energy to store for next year's growth.
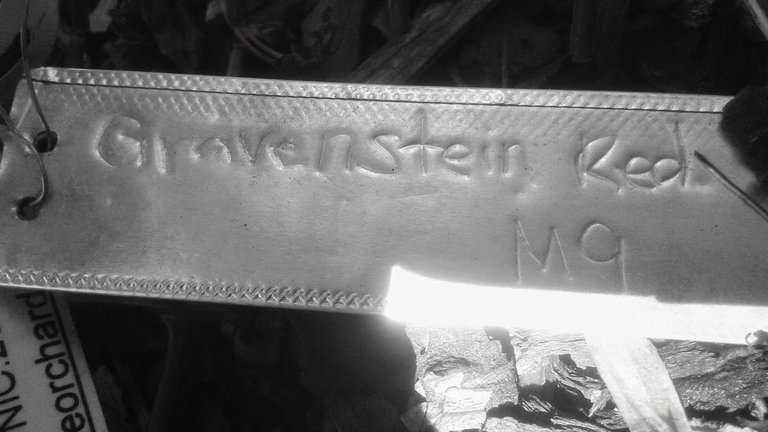
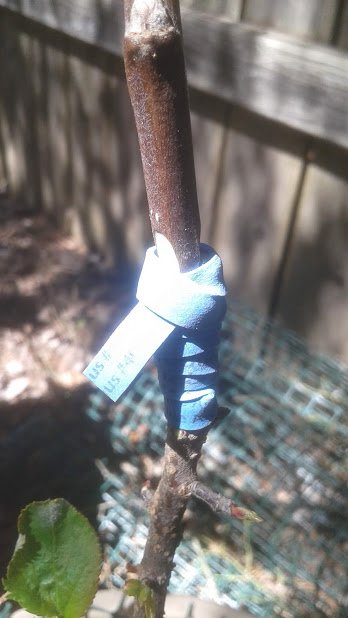
Oh! And don't forget to tag the trees. I labeled each of my grafts by using tin tree tags. Tin tags will last forever because the letters will never fade in the sun. Write on them by using a ball-point pen to dent the letters into the tin. Use the included wires to tie and twist a loose loop through the tags so they hang on near the grafts.
Save any scrap pieces of the scions, seal them up in a ziplock back, and store them in the fridge. Bud grafts (a.k.a. Chip Budding) can be performed in the Summer in case these grafts fail. Each bud on the scrap scions can be used to create a whole new branch with the same fruit clone it came from.
Conclusion
This was a long, but important article for me to write.
Yes, most of these posts I make, I admit, are for myself to document and practice my gardening techniques. I look back on these posts to help give me a historical record of when certain actions were taken on my trees, for instance. Then I can keep track of the age of the trees, the age of the grafts, and monitor my success rate with the grafts with the methods I used.
Yet, many people are so fascinated, entertained, and uplifted by the work I present, it gives me a lot of joy to share it with others here on the blockchain. I do hope that my works here adds to the limited, and hard to find grafting wisdom that exists on the internet, and perhaps offers someone out there a helping hand if they need it.
I am always here to offer free advice if anyone needs it. Kind criticisms and comments are always welcome, but obviously the grafts are already finished, so I can't change them now. We'll just wait and see how everything turns out.
#apples #apple-grafting #graft #scion #branch #wood #trees #fruit #fruit-trees #container-gardening #grafting-knife #knife #blade #cutting #carving #diy #tutorial #instructions #learning #how-to #package #quarantine #project #hobby #blog

This is an excellent post! I just planted my first fruit trees and I will be saving this post for the future! I far prefer carefully written posts with photos over videos for learning something!
Thanks for putting the time into this one!
Ma bru, nice job there boss. I tried grafting apples with persimmons and vice versa last year. The first few months I thought for sure they would take, until the fruiting season arrive, branches died.. sigh, try again we shall... Cheer$;)
Wow! The simple apple has a whole different meaning now! How long does it nkr. How take before the tree bears fruit?
It still has not bloomed yet. Hope it hurries up one of these years. Dwarf trees have a shorter lifespan.
A few years but ours are mature just finishing now actually :)