[ESP-ING] Tutorial: Bolso de mano multiusos hecho con tela de jean o denim. 👜|| Tutorial: Multipurpose handbag made from denim or jean fabric. 👜
¡Hola comunidad de Hive!
Hello Hive community!
Hola queridos Needleworkers, espero hayan tenido una semana santa sana, en familia y de reencuentro espiritual. Yo está semana santa estuve trabajando, en casita. Para los que fueron a la playa o mes encanta ir a la playa (cómo a mi) este tutorial les vendrá de maravilla pues realicé uno bolsos que en el título coloqué que es multiusos hecho con tela de jean o denim, aunque inicialmente pensé hacerlos para llevarlo a la playa, pero luego de terminarlo me di cuenta que queda muy bien con un lindo outfit, además de que es muy cómodo para ir de compras pues es bastante espacioso.
Hello dear Needleworkers, I hope you had a healthy Easter week, with family and spiritual reunion. This Easter I was working, at home. For those of you who went to the beach or love going to the beach (like me) this tutorial will come in handy because I made a multipurpose bag made with denim or jean fabric, although initially I thought to make it to take it to the beach, but after finishing it I realized that it looks great with a nice outfit, plus it is very comfortable to go shopping because it is quite spacious.
Estoy muy, muy feliz de poder compartir con todos ustedes mi proyecto de hoy, en esta oportunidad y como en la mayoría de mis trabajos utilicé algunas telas recicladas y retazos que tenía en casa, siempre hay que tratar de darle en mayor uso posible (yo soy de las que guardan todos los retazos que van quedando de costuras), utilice tela de jean o denim pero en un color beige que está espectacular, espero les guste este proyecto y se animen hacerlo en casita.
I am very, very happy to share with you all my project today, this time and as in most of my work I used some recycled fabrics and scraps that I had at home, always try to give it as much use as possible (I am one of those who keep all the scraps that are left over from sewing), I used denim fabric but in a beige color that is spectacular, I hope you like this project and dare to do it at home.
🧵🧷🧵🧷🧵🧷🧵🧷🧵🧷🧵🧷🧵🧷🧵🧷🧵
Necesitaremos || We will need
- Denim beige
- Tela de forro azul oscuro
- Tela de cuadros
- Hilo beige
- Cinta métrica
- Alfileres
- Tijera
- Lápiz
- Aguja y máquina de coser
- Beige denim
- Dark blue lining fabric
- Plaid fabric
- Beige thread
- Tape measure
- Pins
- Scissors
- Pencil
- Needle and sewing machine
🧵🧷🧵🧷🧵🧷🧵🧷🧵🧷🧵🧷🧵🧷🧵🧷🧵
Paso 1 || Step 1
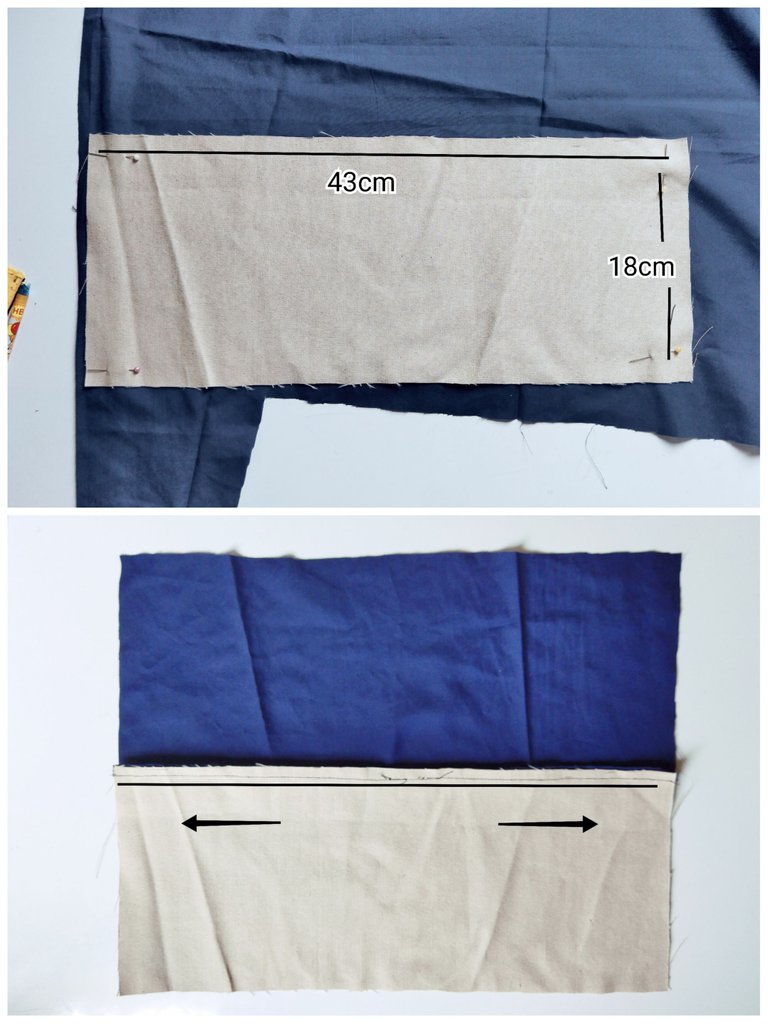
Coloqué este paso como el primero pero podemos primero cortar todas los piezas y luego coser, lo ubiqué así para no perderme explicando.
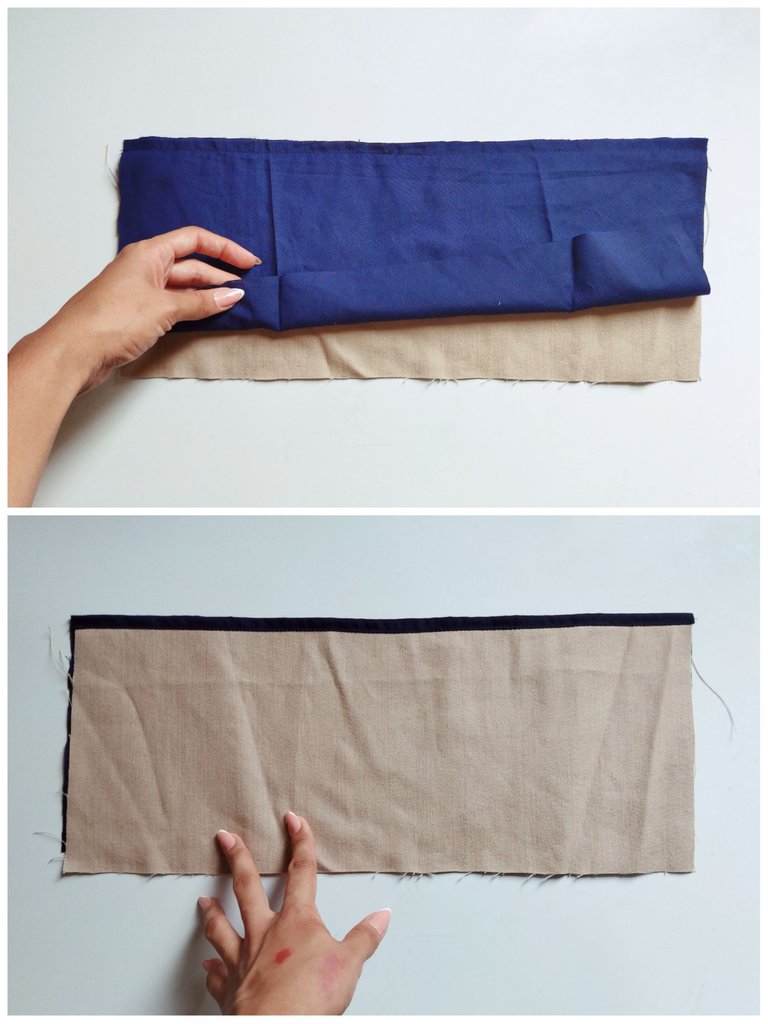
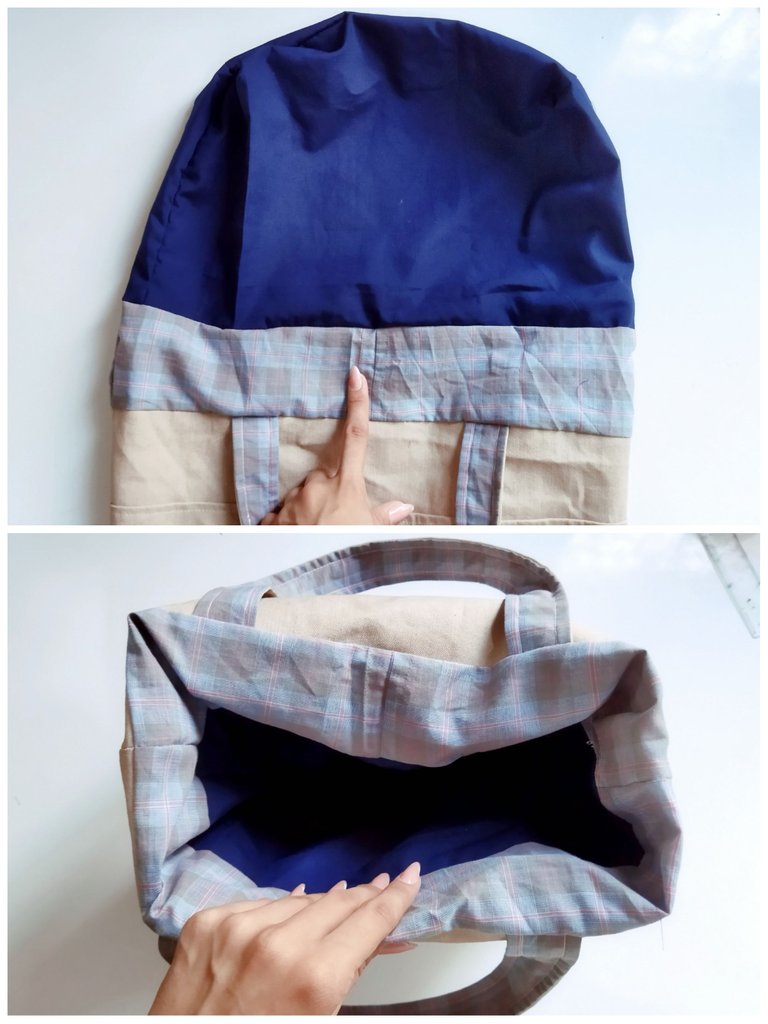
Entonces el primer paso es corta un rectángulo de 43 cm de largo y 18 cm de ancho, luego de cortarlo en la tela beige de jean lo coloqué sobre la tela de forro azul y corte otra pieza igual. Ahora vamos a la máquina y cosemos solo un lado hacia lo largo, aquí unimos la tela de jean con el forro.
Luego volteamos esta pieza ya cosida y sujeté con alfileres para coser el borde dejando a la vista el forro como puedes ver en la imagen 👆 (pasé costura recta) y quedaría así, el resto de los lados los dejamos sin coser.
I placed this step as the first one but we can first cut all the pieces and then sew, I placed it like this so I don't get lost explaining.
So the first step is to cut a rectangle 43 cm long and 18 cm wide, after cutting it in the beige jean fabric I placed it on the blue lining fabric and cut another piece the same way. Now we go to the machine and sew only one side lengthwise, here we join the jean fabric with the lining.
Then we flip this piece already sewn and I pinned it to sew the edge leaving the lining visible as you can see in the image 👆 (I sewed straight seam) and it would look like this, the rest of the sides we left without sewing.
Paso 2 || Step 2
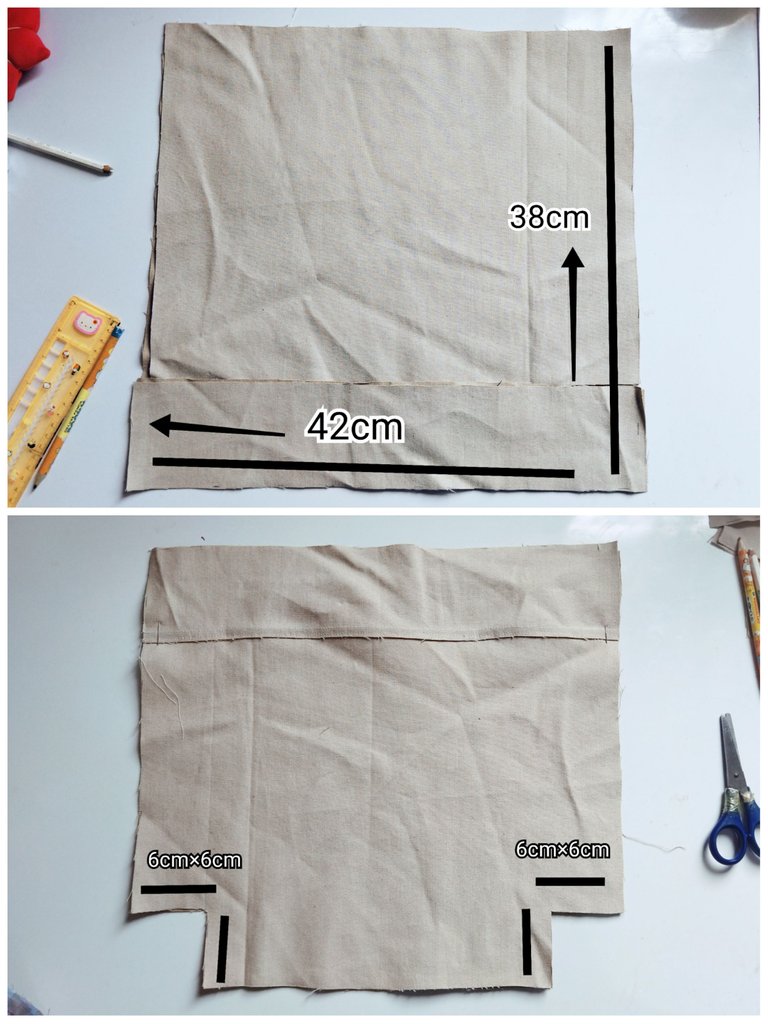
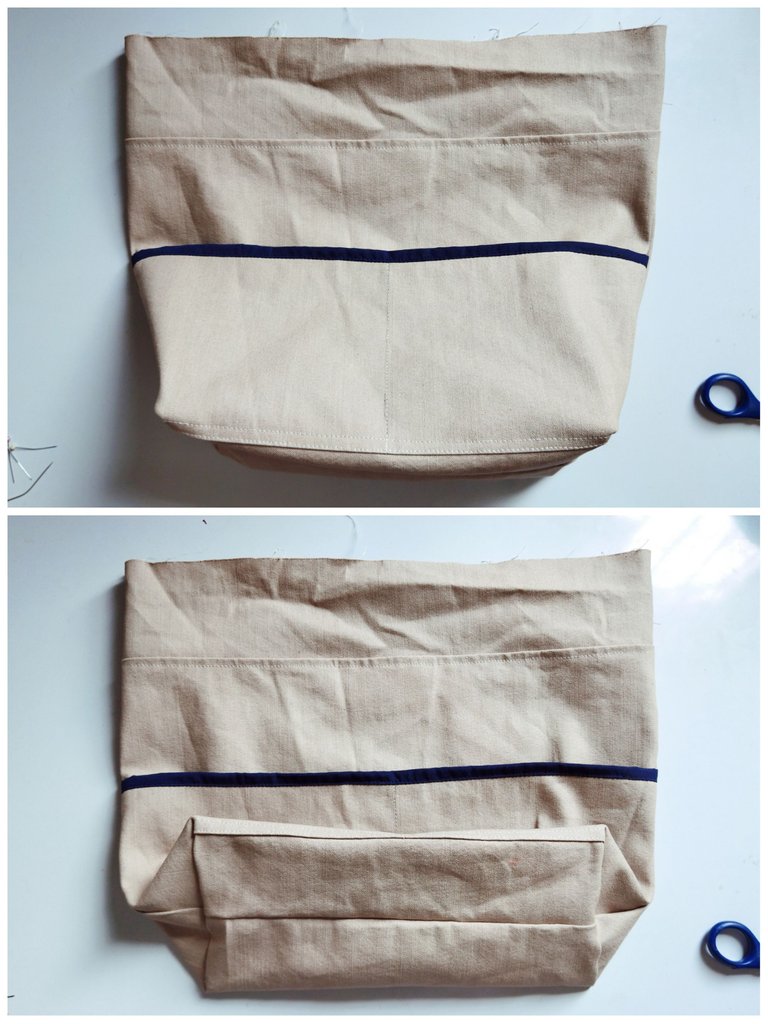
Con la tela de jean beige vamos a cortar dos rectángulo de 42 cm de largo y 38 cm de ancho (esta pieza yo la tuvo que empatar por qué el retazo que tiene no me daba hacia lo ancho), ahora medimos en las puntas un cuadrado de 6×6 cm y lo recortamos a ambos lados y a las dos piezas.
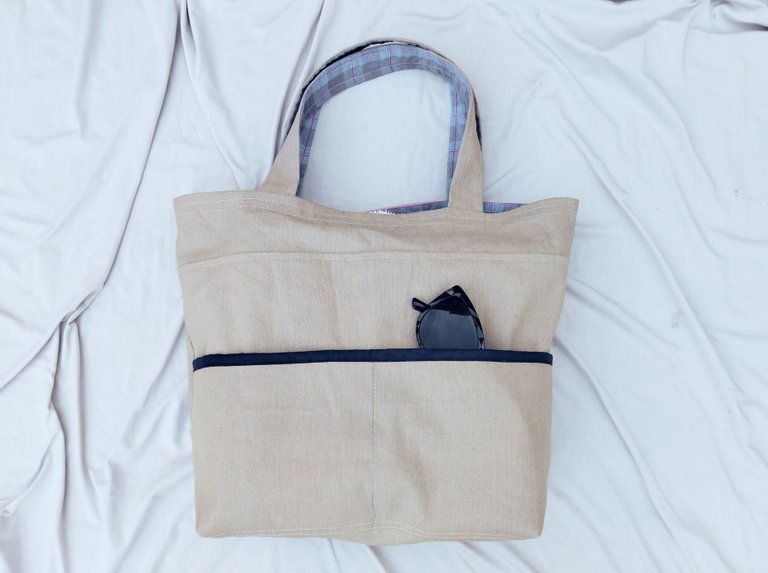
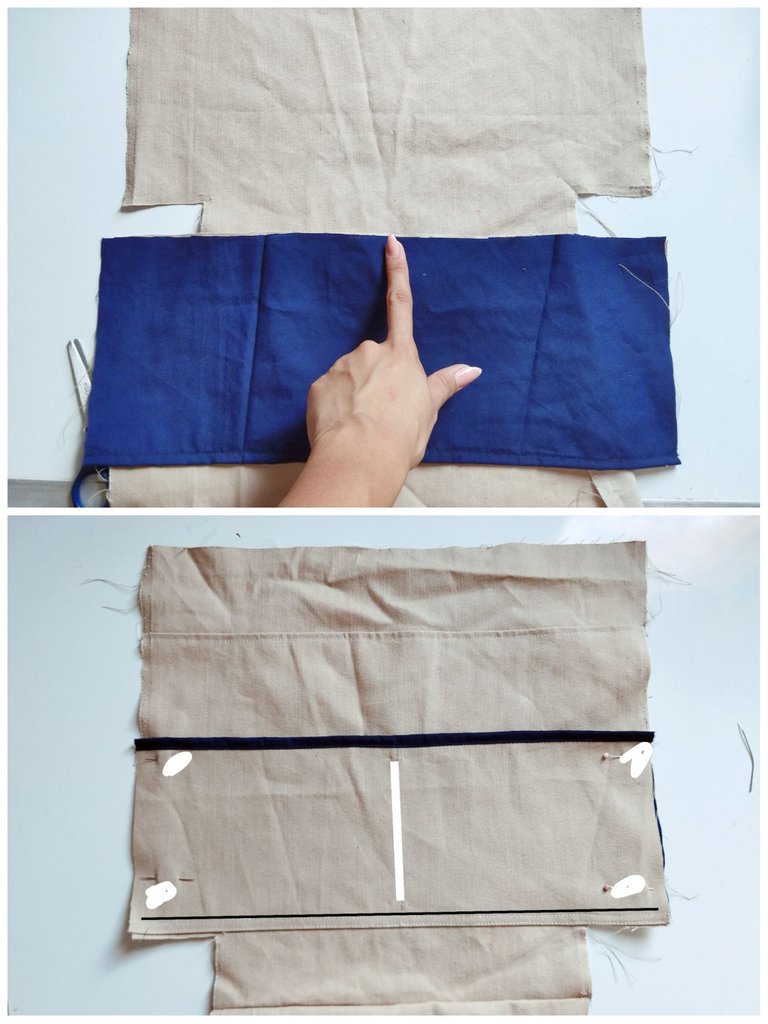
Proseguí colocando a una de estas piezas el rectángulo que cosí anteriormente, enfrenté los derecho colocando el rectángulo con el forro viendo hacía abajo, cosí una recta guiada con los comienzos de los cuadrados. Pasé costura recta y luego voltee la pieza hacia al frente cómo te muestro en la imagen 👆 ahora cosí sobre recto sobre en doblez de lo que ya sería el bolsillo del bolso (un bolsillo frontal), pase costura recta sobre el bolsillo para dividirlo en dos.
With the beige jean fabric we are going to cut two rectangles of 42 cm long and 38 cm wide (this piece I had to tie it because the piece was not wide enough), now we measure at the ends a square of 6×6 cm and cut it on both sides and on the two pieces.
I continued placing to one of these pieces the rectangle that I sewed previously, I faced the right sides placing the rectangle with the lining facing down, I sewed a straight seam guided with the beginnings of the squares. I sewed a straight seam and then turned the piece to the front as I show you in the image 👆 now I sewed a straight seam over the fold of what would be the pocket of the bag (a front pocket), I sewed a straight seam over the pocket to divide it in two.
Paso 3 || Step 3
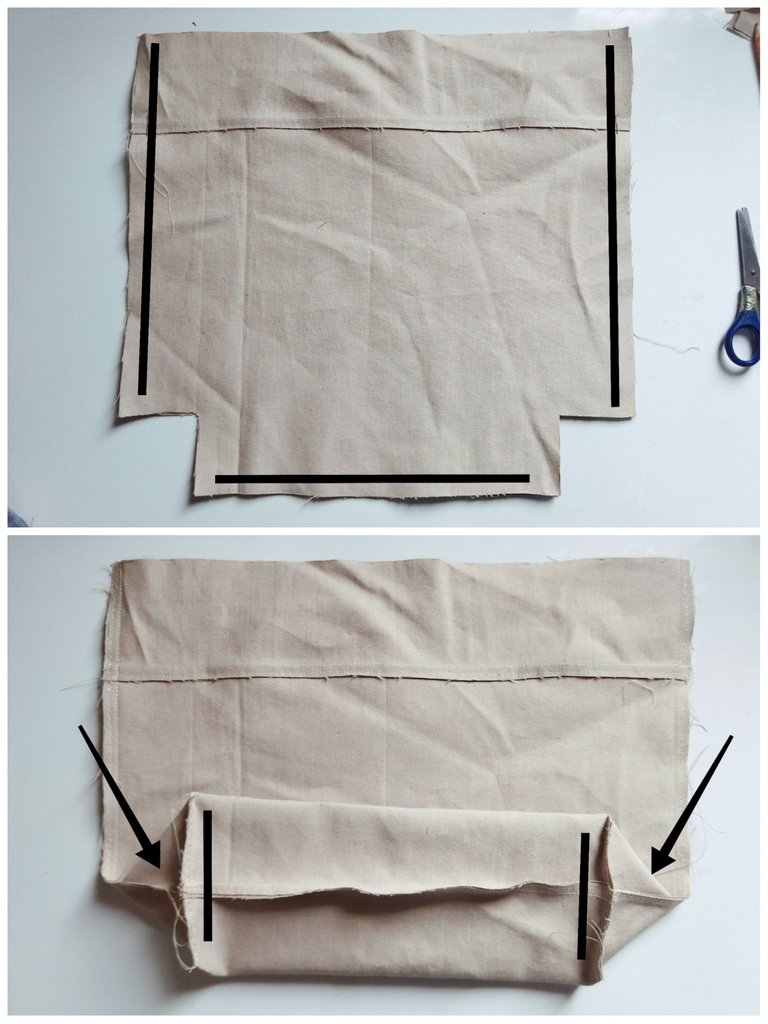
Enfrentamos los derechos del las dos piezas del bolso y cosemos los costados y la parte de abajo, luego unimos la abertura de los cuadrados y cosemos, podemos rematar las costuras con zigzag o si tienes overlock mucho mejor.
We face the right sides of the two pieces of the bag and sew the sides and the bottom, then we join the opening of the squares and sew, we can finish the seams with zigzag or if you have overlock much better.
Paso 4 || Step 4
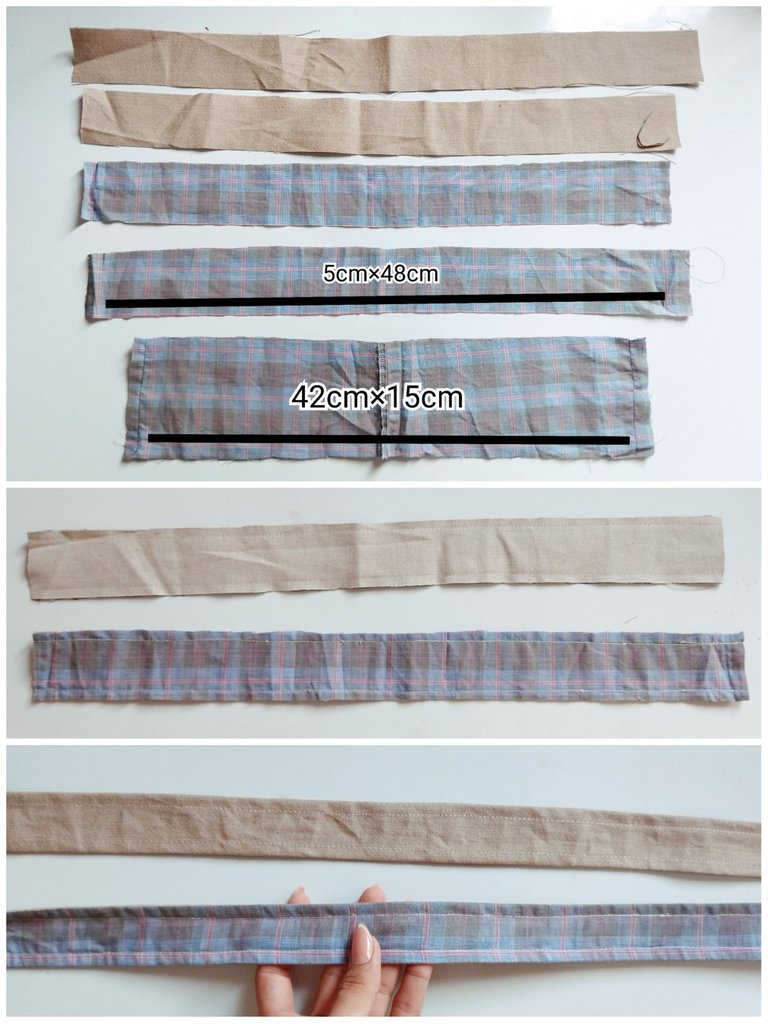
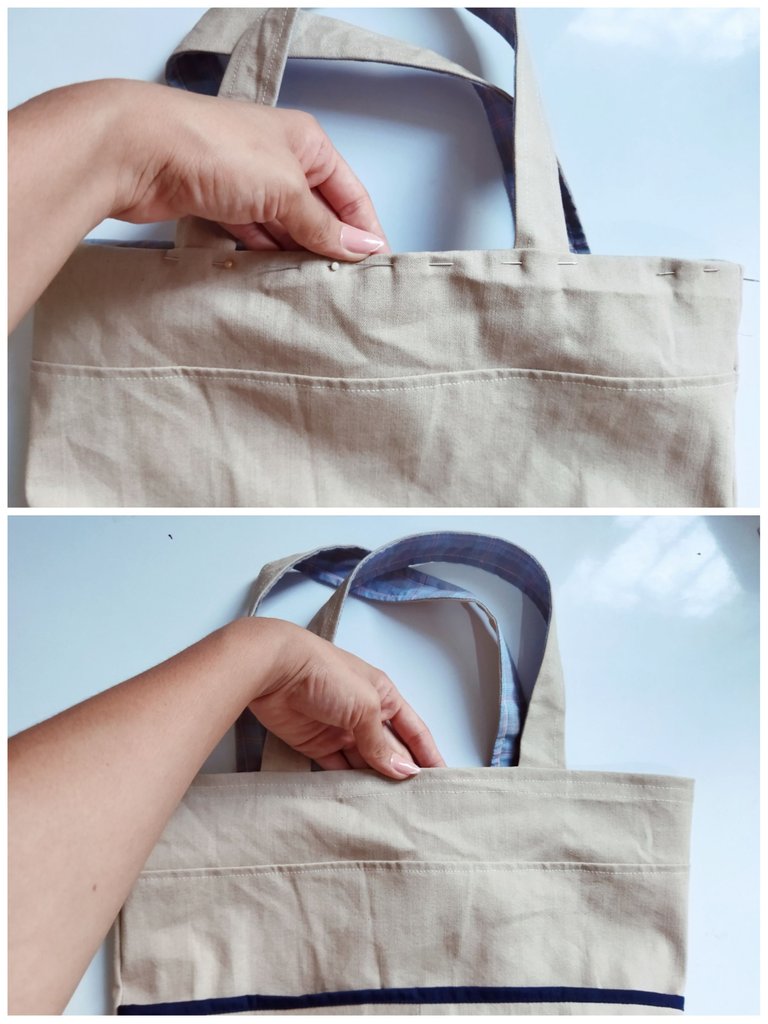
Vamos con las asas y el forro del bolso, para los asas cortamos cuatro tiras de 48 cm de largo y 5 cm de ancho, dos en color beige y dos en la otra tela (en mi caso utilicé la tela de una camisa a cuadros vieja), también corté una tira con la tela se cuadros de 84 cm de lago que doblada sería de 42 cm y de 15 cm de ancho, la podemos empatar pues está es para el forro.
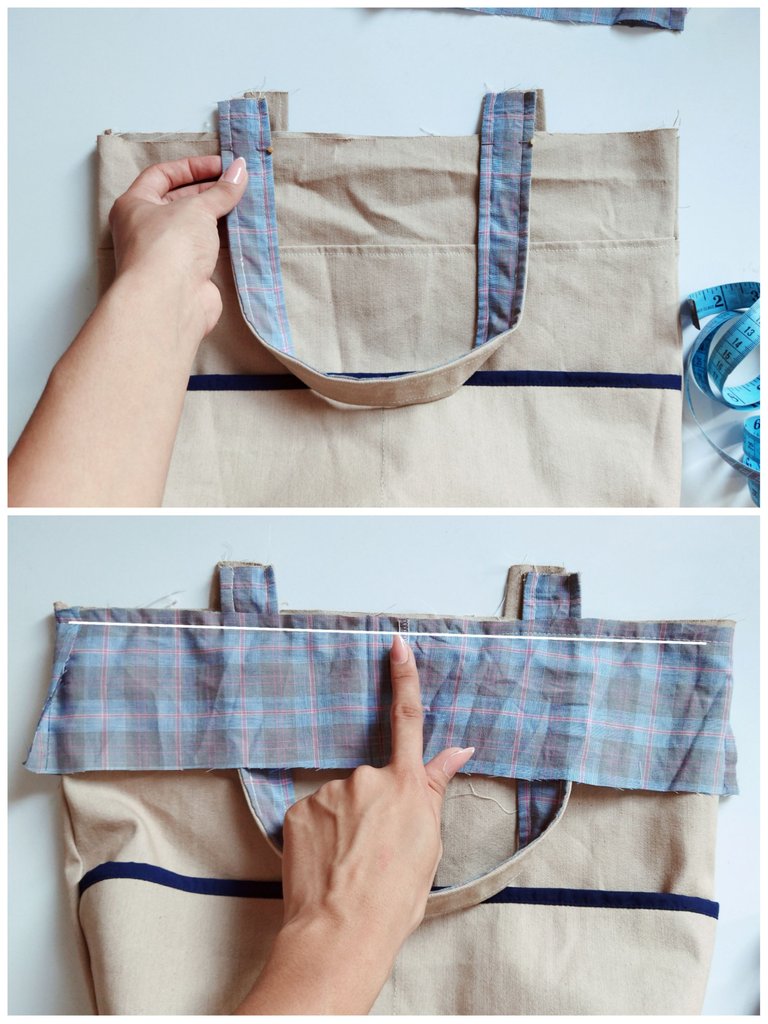
Tomamos el bolso y colocamos las asas a 10 cm de los costados, también colocamos la asa en la parte trasera, cosemos. Colocar el forro de tela se cuadros enfrentando los derecho y cosemos por toda la orilla dejando 1 cm de margen de costura.
Let's go with the handles and the lining of the bag, for the handles we cut four strips of 48 cm long and 5 cm wide, two in beige color and two in the other fabric (in my case I used the fabric of an old plaid shirt), I also cut a strip with the plaid fabric of 84 cm long that folded would be 42 cm and 15 cm wide, we can tie it because this is for the lining.
We take the bag and place the handles 10 cm from the sides, we also place the handle on the back, we sew. Place the lining fabric squares facing the right sides and sew all around the edge leaving 1 cm seam allowance.
Paso 5 || Step 5
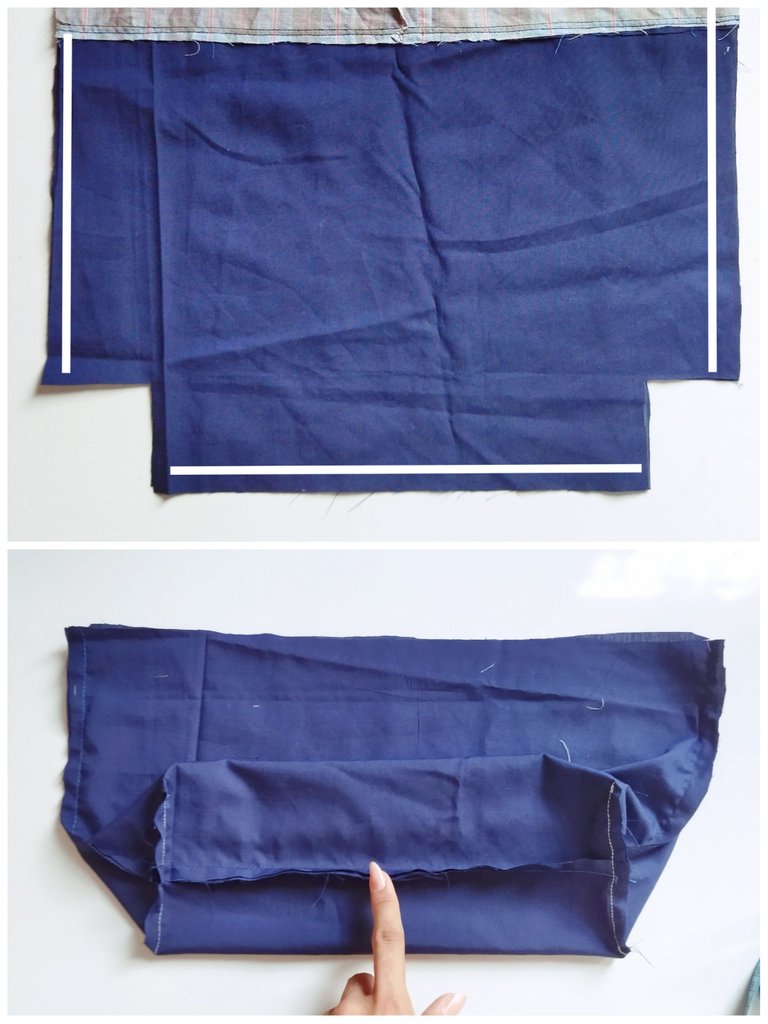
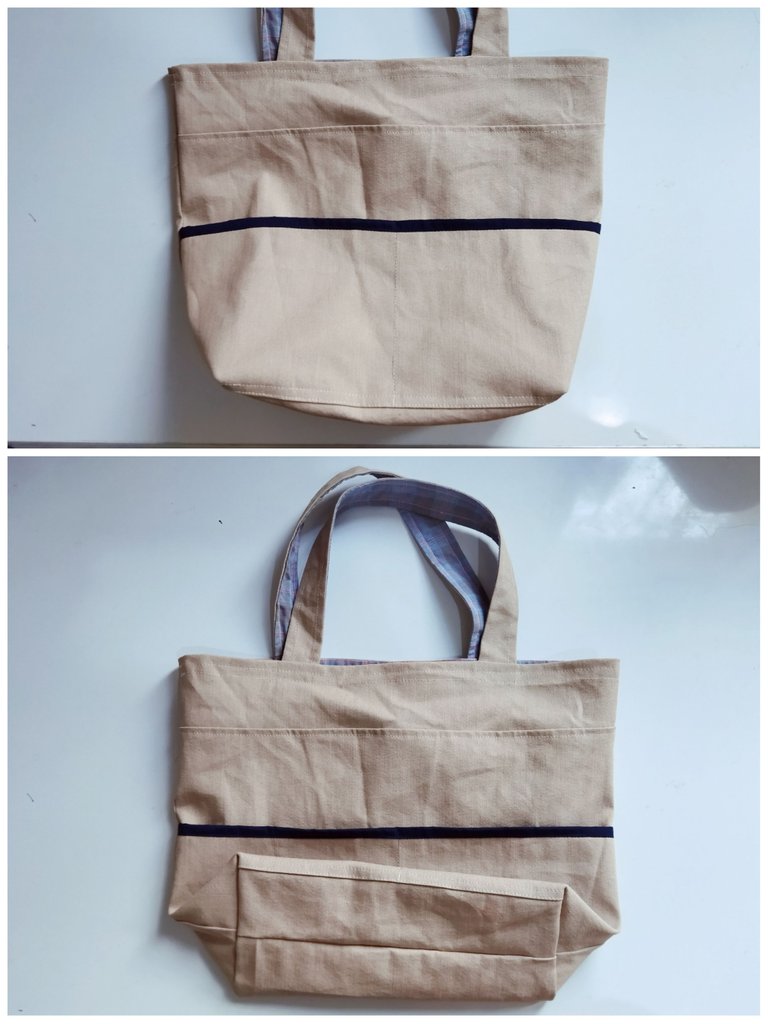
Para terminar el forro del bolso corte un rectángulo de 23 cm de alto y 42 cm de ancho, le hice el mismo procedimiento que hice para el bolso, en las puntas le corté dos cuadrados de 6×6 cm y los corté, luego cosí los laterales y la parte de abajo y luego cerré las aberturas, proseguí empatando este forro con la tira de tela se cuadros que cosimos al bolso, podemos hacer costura escondida para esto, listo esto vamos con la parte final que es introducir el gorro hacia adentro y coser la orilla del bolso como t muestro en la imagen 👆ya con esto tendríamos nuestro bolso listo.
To finish the lining of the bag I cut a rectangle of 23 cm high and 42 cm wide, I did the same procedure I did for the bag, at the ends I cut two squares of 6×6 cm and cut them, then I sewed the sides and the bottom and then closed the openings, I continued by matching this lining with the strip of checkered fabric that we sewed to the bag, we can make a hidden seam for this, ready this we go with the final part which is to introduce the cap inside and sew the edge of the bag as I show in the image 👆 and with this we would have our bag ready.
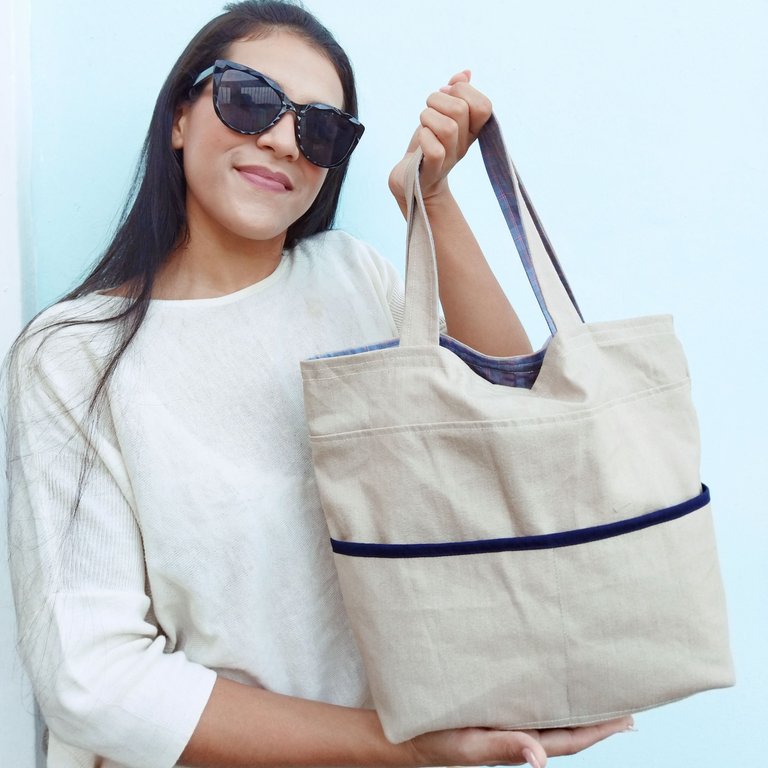
Resultado final.
Final result.
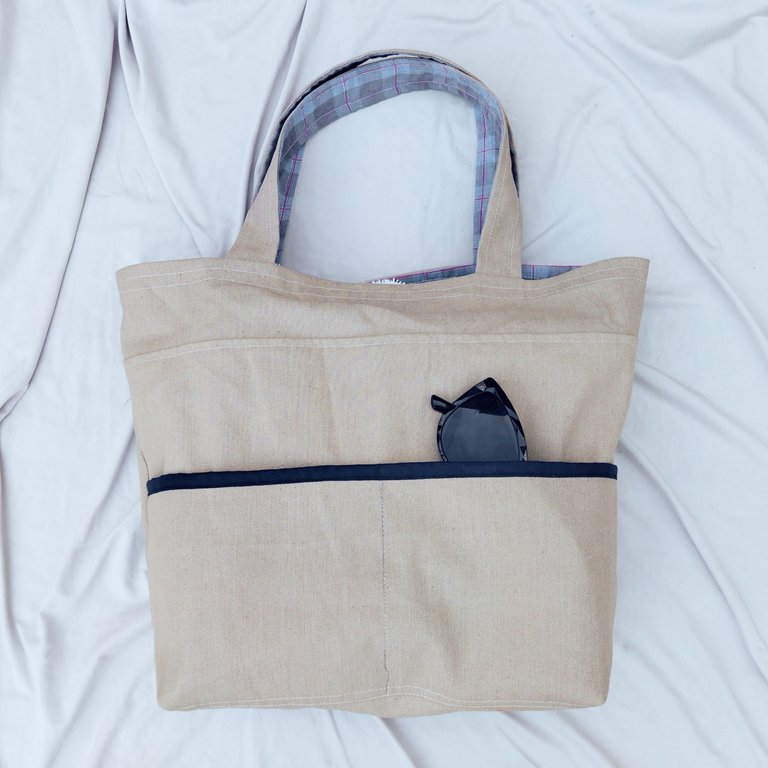

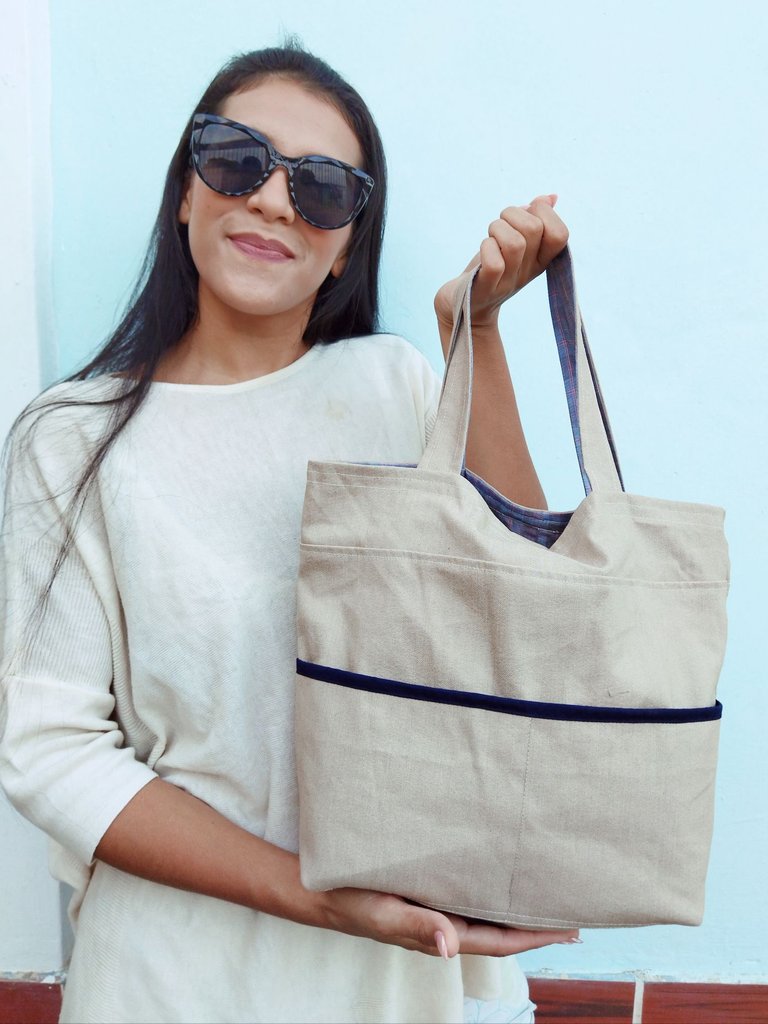
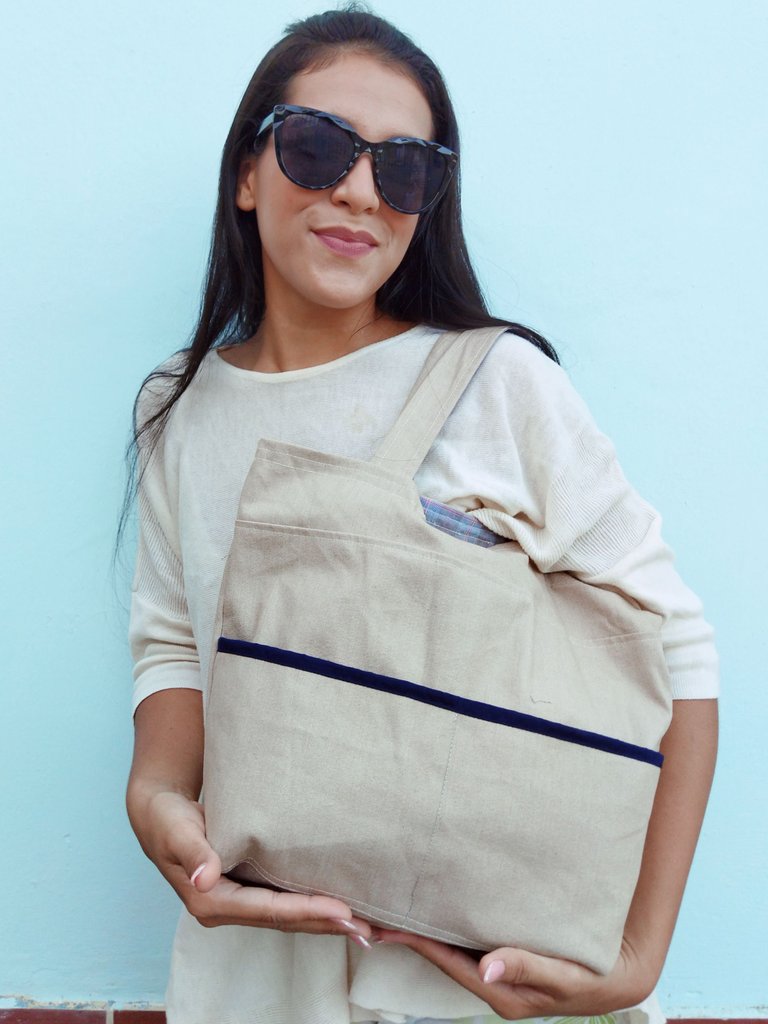
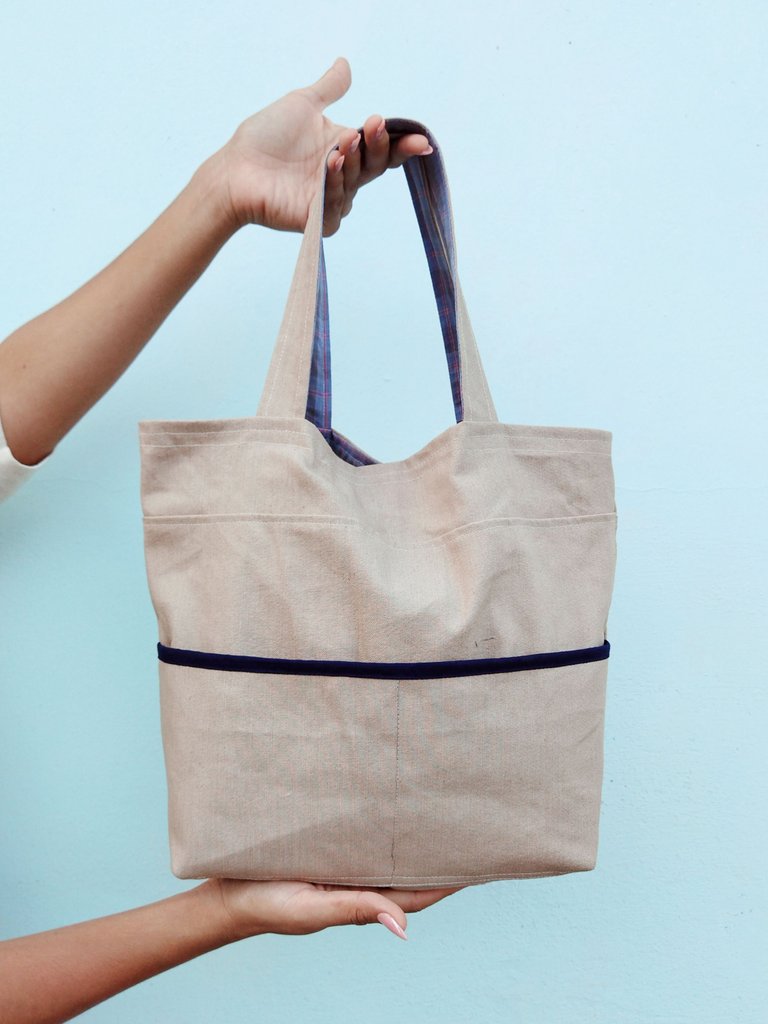
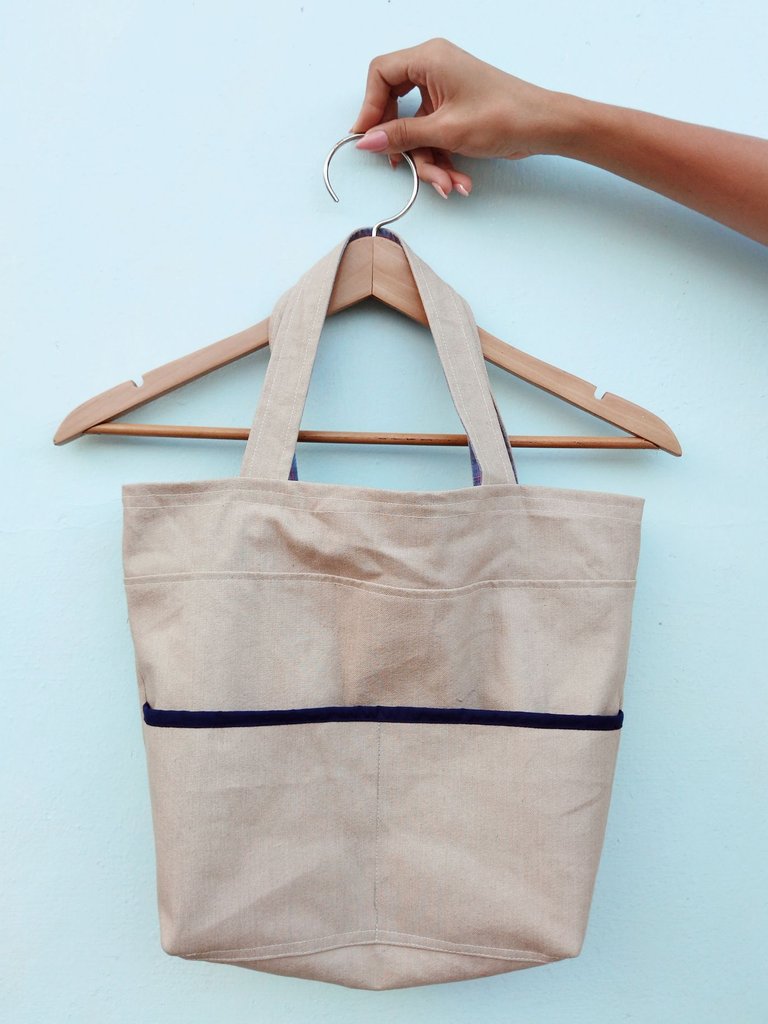

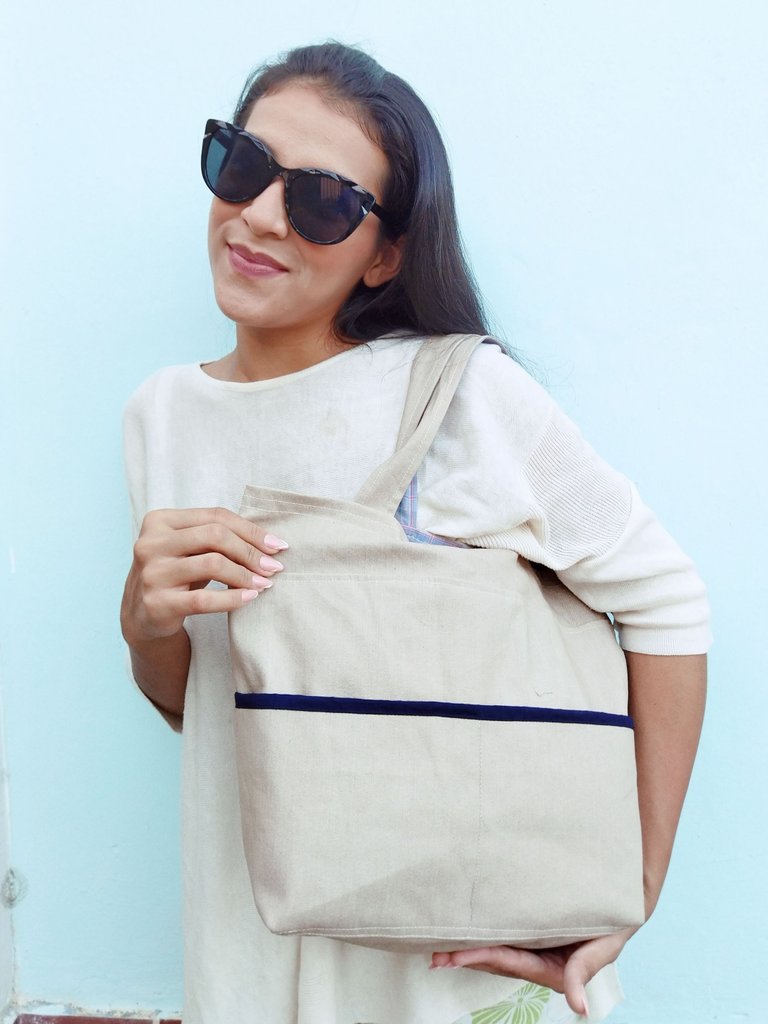
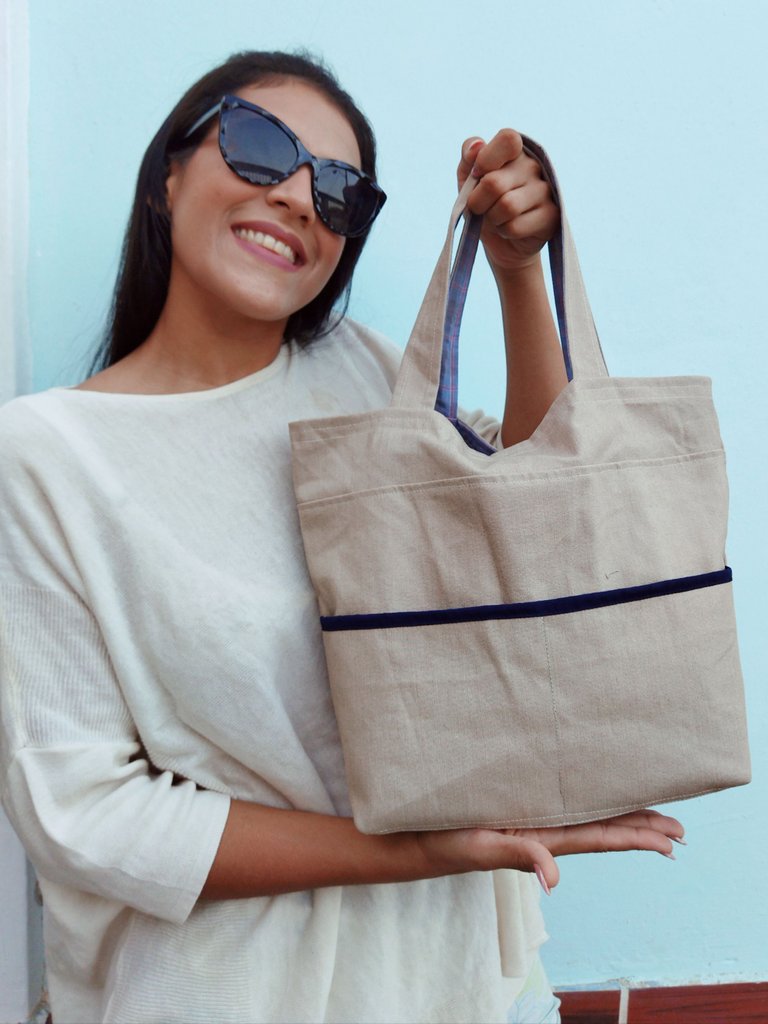
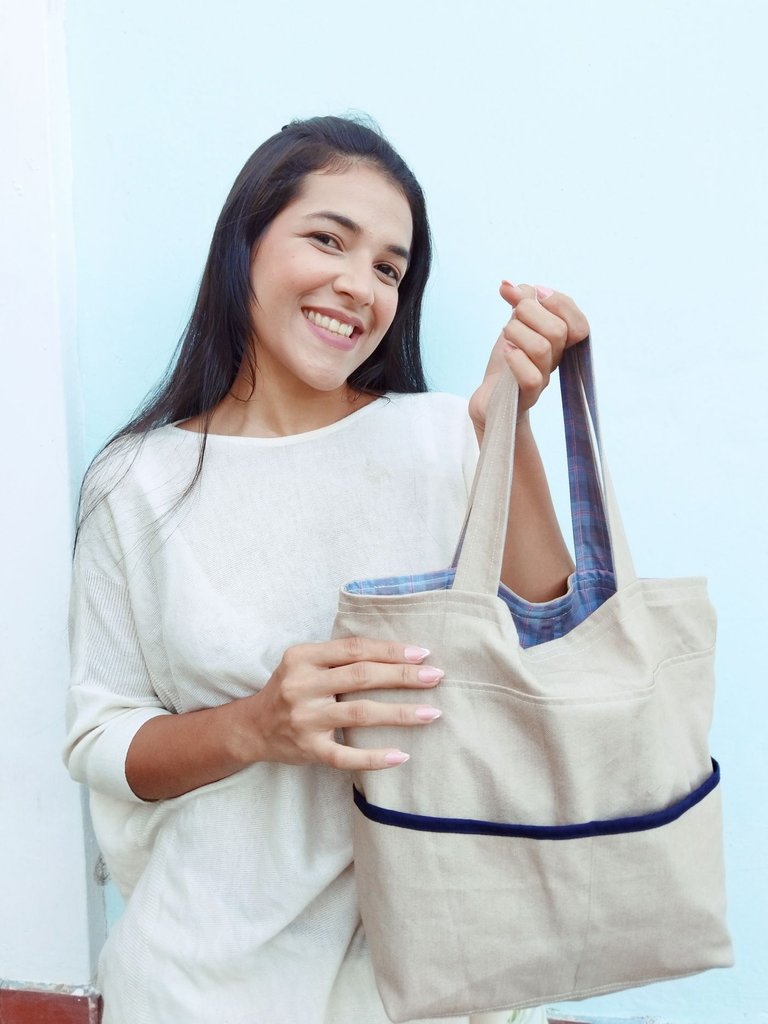
Amigos estoy enamorada de mi nuevo bolso, quedó bellísimo y los colores me fascinan, lo mejor es que es bastante espacioso entre de todo, muy útil para que cuando tengo que salir con mi bebé te go que llevarme la casa entera en el bolso jajajajaja, Espero que les hay gustado y si llegaste hasta aquí mil gracias por leer mi post ❤️🥰 un fuerte abrazo.
Friends I am in love with my new bag, it was beautiful and the colors fascinate me, the best thing is that it is quite spacious between everything, very useful for when I have to go out with my baby you go to take the whole house in the bag jajajajajajaja, I hope you liked it and if you got here a thousand thanks for reading my post ❤️🥰 a big hug.
All images are my property / Todas las imágenes son de mi propiedad
Camera: Xiaomi Redmi 9T.
Translation: Deepl.com

Wow so beautiful thanks for sharing @yulilemus02 I love what am seeing
Thanks so much ❤️❤️❤️
Nice bag you made!
Thanks ♥️
Me encanta este tipo de bolsos para salir de compras! Has realizado un hermoso trabajo! Te felicito..Saludos! Dios bendiga tus manos!
La verdad es que son geniales para salir pues cabe de todo. Gracias por tu comentario 😊😊
Fabulosa como tú:D
Gracias mi afrika, te iba a pasar las fotos antes de publicarlo y se me paso, estoy debiendo la pública del vestido.❤️❤️❤️
Siiiiii , grandioso🦋
It's a beautiful bag! I love all the fabric you used for it, especially the plaid material for the lining. This along with the beige and denim worked well together. Cute bag modeling at the end too. 😉
Enjoy the work of your hands ~ 😀
Thank you I had to sacrifice an old shirt that I loved but gave life to something beautiful, the fabrics made a very nice combination, this time it was my turn to model. Thanks for your comment ☺️☺️ s
You’re welcome! I’m sure you will enjoy your new bag to the fullest ~ 😉😊
Excelente trabajo y muy bien explicado, gracias
Gracias por tu comentario 😊
Of creativity were to be a person, certainly you'll be it, this bag is just excellent, pure masterpiece I must confess.
Thank you is a compliment to me, thank you for such a nice comment 😍😍🥰.
You're welcome, keep up the good work, I really enjoy going through your project.
Hola @yulilemus02,
Me encanta el resultado, además utilizaste una combinación de colores que me encanta. Este bolso puede ir a cualquier lugar. Ese bolsillo de afuera es super útil.
Gracias por comaprtir.
Gracias 😁 la verdad es que los colores estuvieron muy lindos, por algo guarde esas telas por un tiempo, el bolsillo es perfecto, gracias por tu lindo comentario 😍😍
Excelente, te quedo muy lindo.
What a cute and useful bag @yulilemus02! Bravo!!