[ESP-ING] 🌹Te enseño hacer un alfiletero en forma de flor súper fácil con retazos de tela. 🌹|| 🌹I show you how to make a super easy flower shaped pincushion with fabric scraps. 🌹
¡Hola comunidad de Hive!
Hello Hive community!
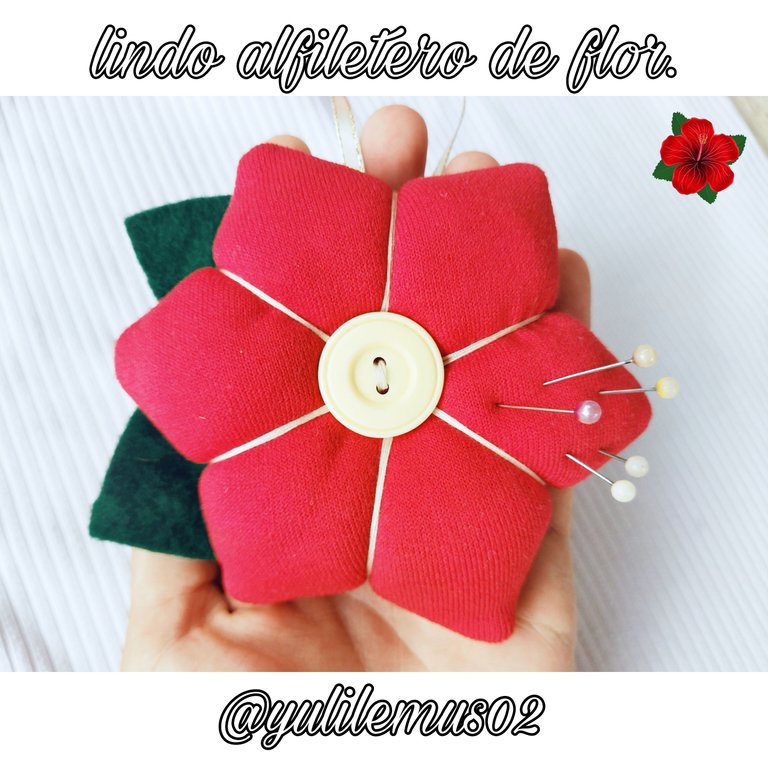
Hola queridos Needleworkers, espero hayan tenido un feliz y productivo día. Estoy muy feliz de poder compartir con todos ustedes mi proyecto de hoy, hace tiempo pensé en cambiar mi viejo alfiletero pues ya está muy viejo y deteriorado, un alfiletero es esa herramienta que todos lo costureros debemos tener a la mano literalmente, así que en mi afán de hacer uno nuevo conseguí muchas ideas pare hubo una que me gustó mucho, y es un lindo alfiletero en forma de flor, decidí hacer una flor roja que se asocia al amor, lo romántico y la pasión 🌹 así que en esta publicación te muestro como hacer este lindo alfiletero, lo más genial es que podemos utilizar cualquier retazo de tela que tengamos en casa, en esta oportunidad opte por una tela de mono pues me parece que tiene bastante cuerpo y es acolchada, pero puedes utilizar cualquier tela que gustes. espero les guste este proyecto y se animen hacerlo en casita.
Hello dear Needleworkers, I hope you had a happy and productive day. I am very happy to share with you all my project today, some time ago I thought about changing my old pincushion because it is already very old and deteriorated, a pincushion is that tool that all needleworkers must have at hand literally, so in my eagerness to make a new one I got many ideas but there was one that I really liked, and it is a nice pincushion in the shape of a flower, I decided to make a red flower that is associated with love, romance and passion 🌹 so in this post I show you how to make this cute pincushion, the coolest thing is that we can use any piece of fabric we have at home, this time I opted for a monkey fabric because I think it has enough body and is padded, but you can use any fabric you like. I hope you like this project and I encourage you to do it at home.
🧵🧷🧵🧷🧵🧷🧵🧷🧵🧷🧵🧷🧵🧷🧵🧷🧵
Necesitaremos || We will need
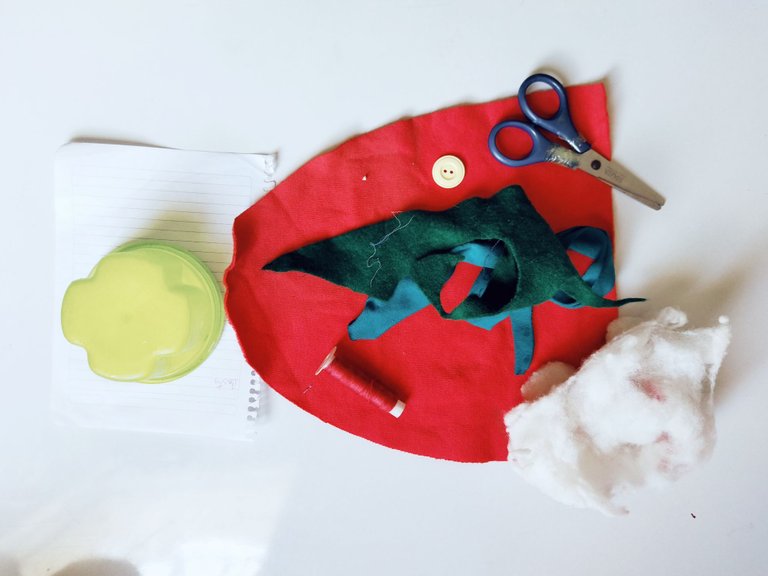
- Retazos de tela de mono roja
- Hilo rojo y hilo beige
- Guata
- Papel
- Alfileres
- Tijera
- Regla
- Lápiz
- Un botón grande
- Silicón caliente
- Retazos de fieltro verde
- Un retazo de cinta blanca
- Aguja y máquina de coser
- Red monkey fabric scraps
- Red thread and beige thread
- Wadding
- Paper
- Pins
- Scissors
- Ruler
- Pencil
- A large button
- Hot glue
- Pieces of green felt
- A piece of white ribbon
- Needle and sewing machine
🧵🧷🧵🧷🧵🧷🧵🧷🧵🧷🧵🧷🧵🧷🧵🧷🧵
Paso 1 || Step 1

Lo primero que vamos a realizar es el molde ocupé una hoja de papel para marcar un círculo que luego dividí en seis lados iguales formando un hexágono, lo recorté y y lo coloqué sobre la tela ayudándome con unos alfileres para que no se moviera y recorte.
The first thing we are going to make is the mold, I used a sheet of paper to mark a circle that I then divided into six equal sides forming a hexagon, I cut it out and placed it on the fabric helping me with some pins so that it would not move and cut it out.
Paso 2 || Step 2
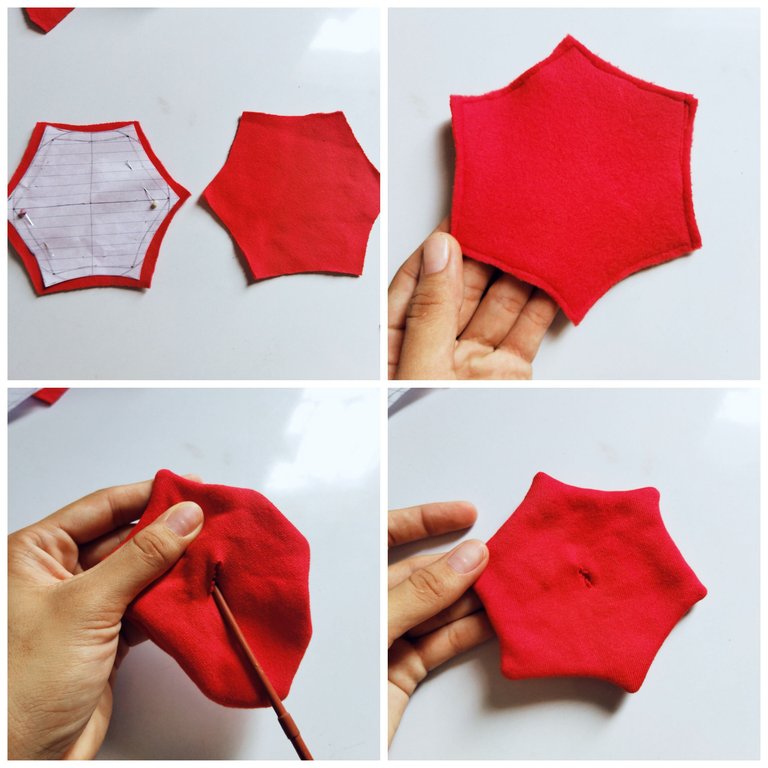
Corté dos piezas dejando medio centímetro de margen de costura, ahora enfrentamos los derechos de las piezas y cosemos, para poder voltear el hexágono hice una pequeña abertura en el medio de la pieza pero solo por un solo lado y con la ayuda de un palillo voltee la pieza dejando la costura hacia la parte interna.
I cut two pieces leaving half a centimeter seam allowance, now we face the right sides of the pieces and sew, to be able to flip the hexagon I made a small opening in the middle of the piece but only on one side and with the help of a toothpick I flipped the piece leaving the seam towards the inside.
Paso 3 || Step 3
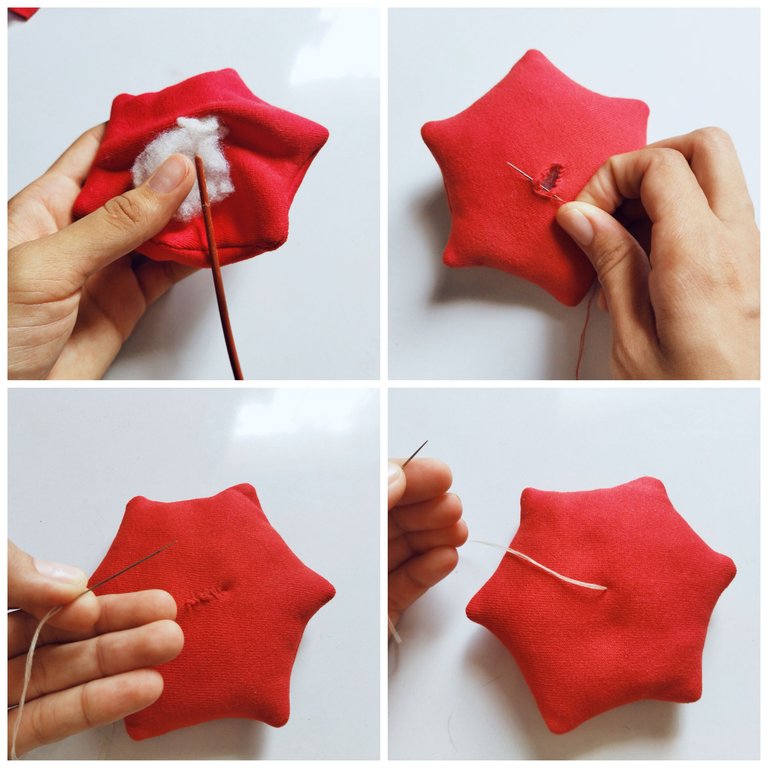
Por el mismo orificio que hicimos para voltear la pieza vamos a introducir la guata, nos ayudamos con el mismo palillo para meter el relleno, luego de que esté relleno pero que no quede tan tenso, cosemos el orificio.
Through the same hole we made to turn the piece over we are going to introduce the wadding, we help ourselves with the same toothpick to insert the stuffing, after it is stuffed but not so tight, we sew the hole.
Paso 4 || Step 4
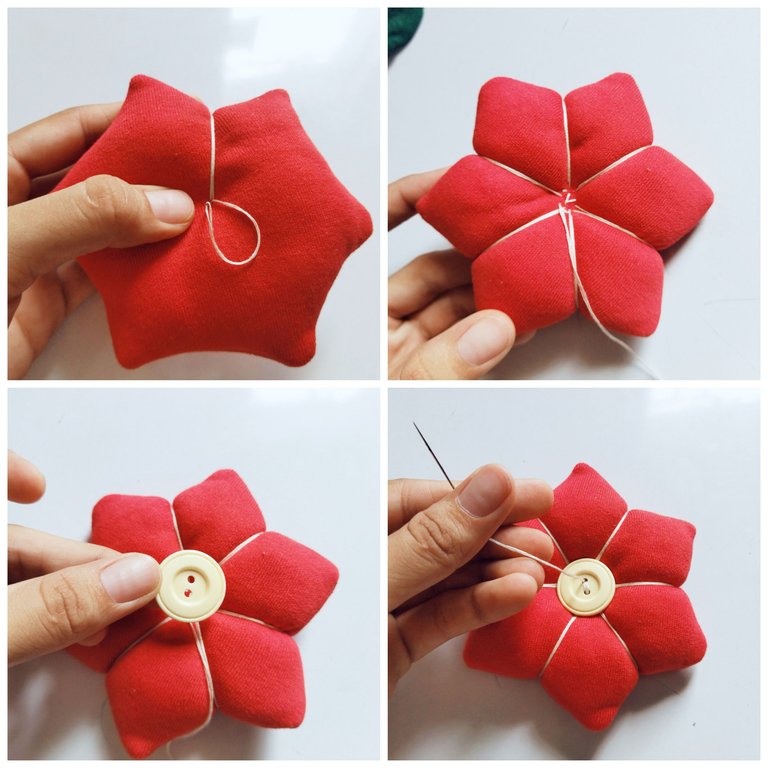
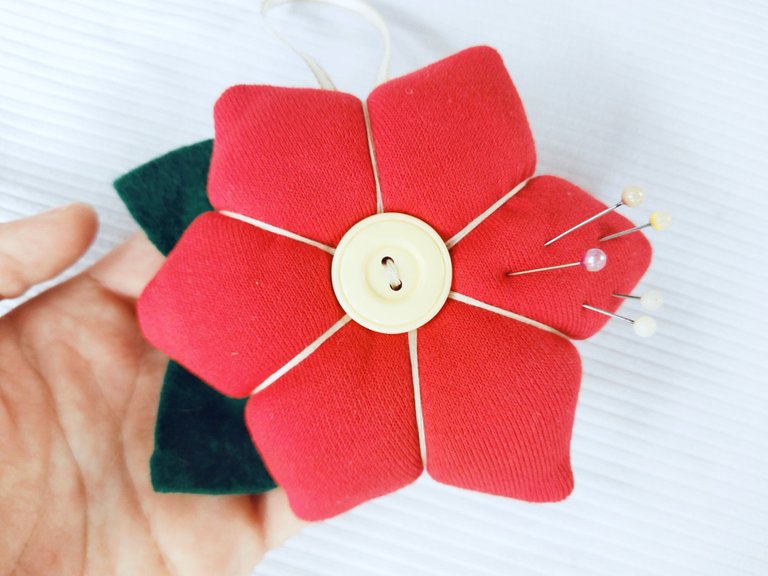
Con el hilo beige ensaltado doble vamos a hacer las divisiones de los pétalos, introducimos el hilo por el medio de la flor y sacamos llevándolo entre el medio de cada lado del hexágono, hacemos lo mismo para cada lado, podemos pasar el hilo dos o tres veces para que quede tenso, en el medio de la flor colocamos el botón aprovechando el hilo beige.
With the double beige thread we are going to make the divisions of the petals, we introduce the thread through the middle of the flower and we take it out taking it between the middle of each side of the hexagon, we do the same for each side, we can pass the thread two or three times so that it is tense, in the middle of the flower we place the button taking advantage of the beige thread.
Paso 5 || Step 5
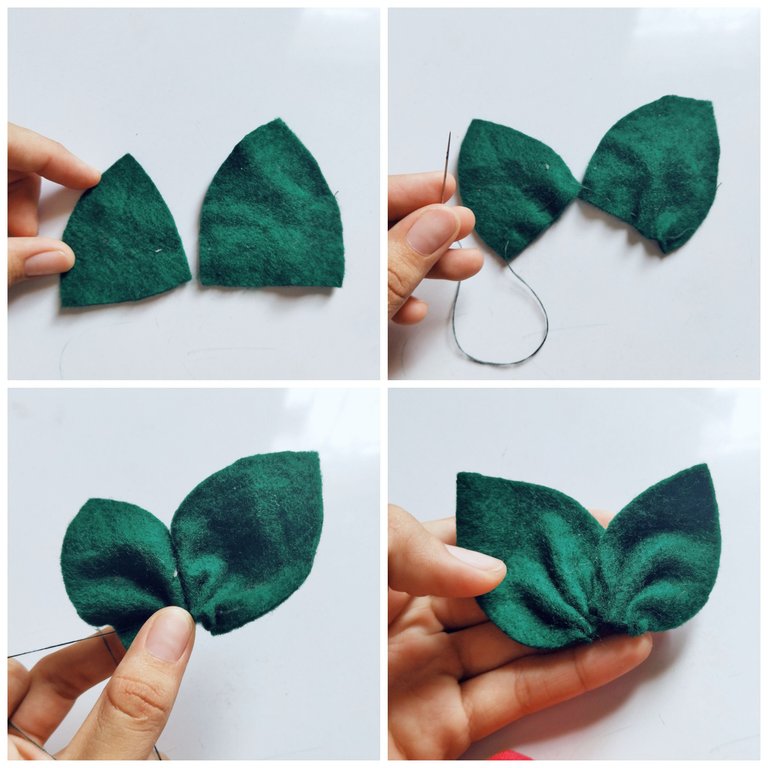
Con el fieltro verde vamos a cortar la forma de una hoja, en este caso saqué dos una más pequeña que la otra, con hilo y aguja fruncimos la orilla y unimos las dos hojas tal como te muestro en la imágen 👆👆👆
With the green felt we are going to cut the shape of a leaf, in this case I cut two leaves, one smaller than the other, with thread and needle we pucker the edge and join the two leaves as shown in the image 👆👆👆
Paso 6 || Step 6

En este último paso vamos a unir las hojas a la flor, utilicé silicón caliente para este paso, la hojas las vamos a pegar en la parte que no tiene botón, aquí también vamos a pegar la cinta y como último detalle coloqué un círculo de tela para tapar los empates.
In this last step we are going to attach the leaves to the flower, I used hot silicone for this step, we are going to glue the leaves on the part that does not have a button, here we are also going to glue the ribbon and as a last detail I placed a circle of fabric to cover the ties.
Resultado final.
Final result.
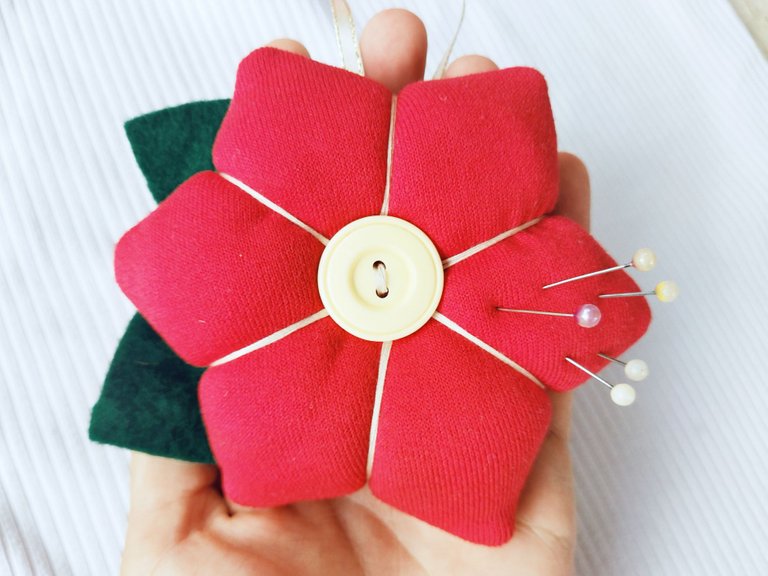
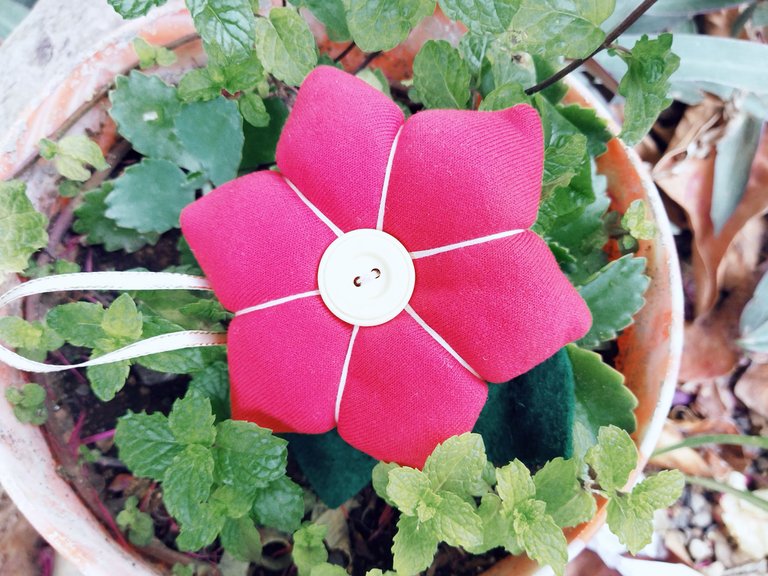
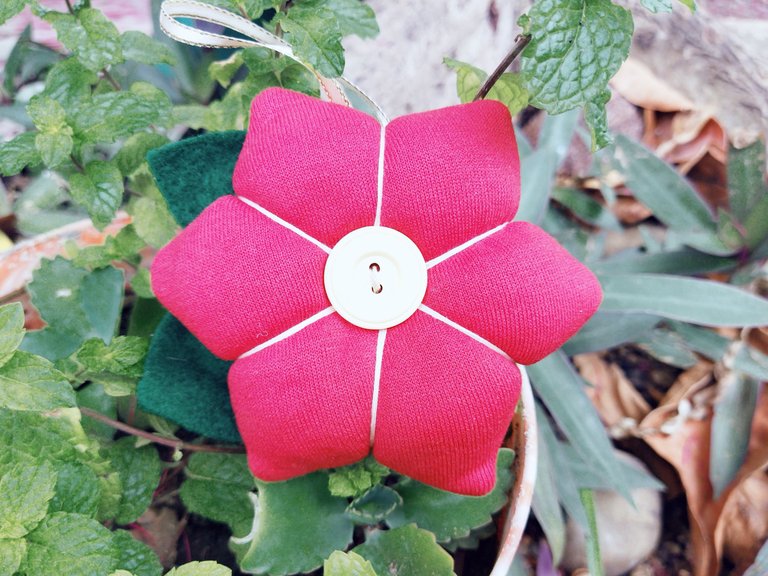
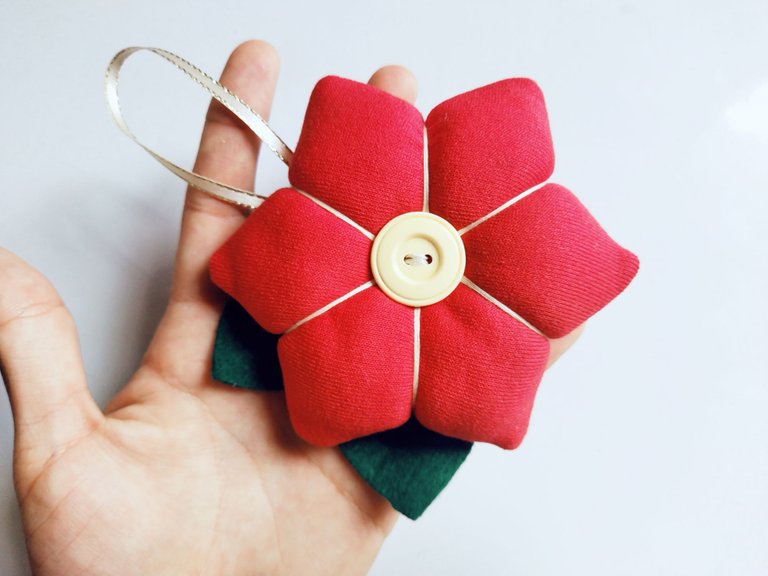

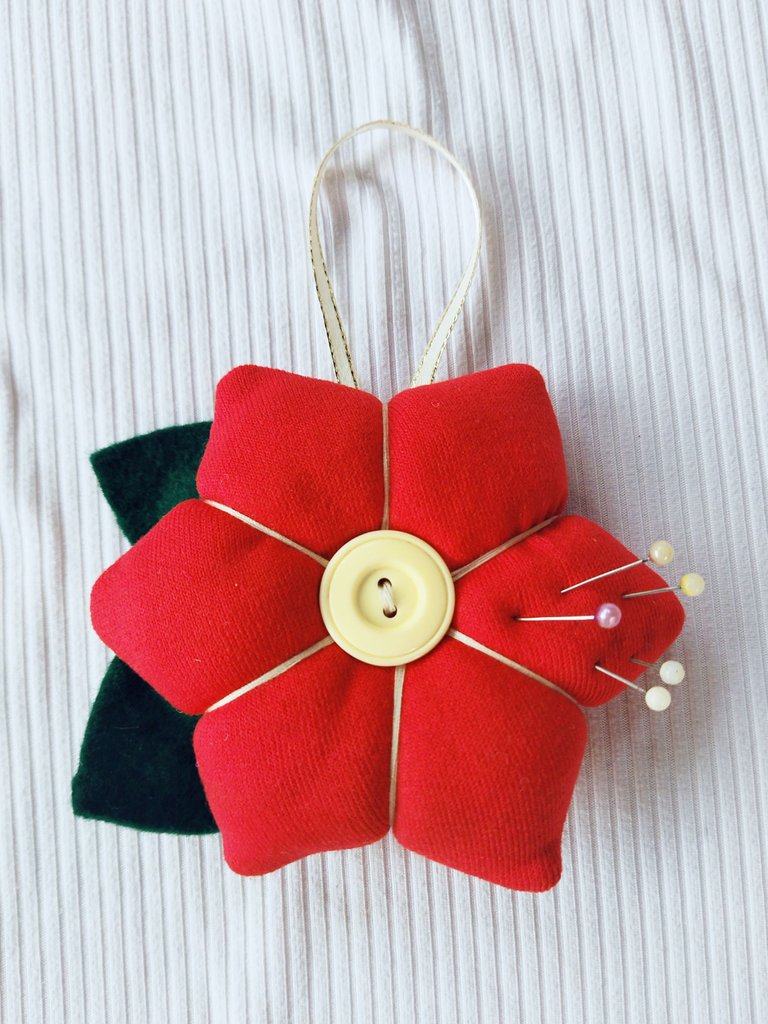
Así quedó el resultado final de esta hermosa flor alfiletero, una idea muy práctica para hacer nosotras mismas además que es muy fácil de hacer, desde el molde hasta los detalles finales, espero que este proyecto les sirva mucho y les de mucha motivación para que sigan sumando conocimientos. Espero que les hay gustado y si llegaste hasta aquí mil gracias por leer mi post ❤️🥰 un fuerte abrazo.
So was the final result of this beautiful flower pincushion, a very practical idea to do ourselves plus it is very easy to do, from the mold to the final details, I hope this project will serve you a lot and give you a lot of motivation to continue adding knowledge. I hope you liked it and if you got this far thank you very much for reading my post ❤️🥰 a big hug.
All images are my property / Todas las imágenes son de mi propiedad
Camera: Xiaomi Redmi 9T.
Translation: Deepl.com
What a pretty pin cushion and it’s nicely constructed. I would love making one like this for my mother!
Thanks for sharing :)
Yes totally cute, hey it's a good idea, make to give as a gift, if she is a seamstress for sure it will be very useful, thanks for your nice comment.
Yes, she's been sewing for over 40 years. 😊
You can never give a seamstress too many pin cushions. 😄
She must be an excellent seamstress ❤️❤️❤️
Wow this pin cushion look great, seems I'll be needing one of such to peck my several pins that seem to fall everywhere.
Yes the truth is that I have lost many pins for not having a place to pin them, I'm glad you liked it, thanks for leaving your comment 😍
You're welcome, alas and now with this, they gonna be safe in one place.
Have a blessed day.
Thank you for sharing this amazing post on HIVE!
Your content got selected by our fellow curator @kaerpediem & you just received a little thank you via an upvote from our non-profit curation initiative!
You will be featured in one of our recurring curation compilations and on our pinterest boards! Both are aiming to offer you a stage to widen your audience within and outside of the DIY scene of hive.
Join the official DIYHub community on HIVE and show us more of your amazing work and feel free to connect with us and other DIYers via our discord server: https://discord.gg/mY5uCfQ !
If you want to support our goal to motivate other DIY/art/music/homesteading/... creators just delegate to us and earn 100% of your curation rewards!
Stay creative & hive on!
I love this idea and the outcome! Bravo @yulilemus02!