[ESP-ING] 🧵Blusa acanalada con cordones laterales ✨ || 🧵Ruched blouse with side lacing ✨.
¡Hola comunidad de Hive!
Hello Hive community!
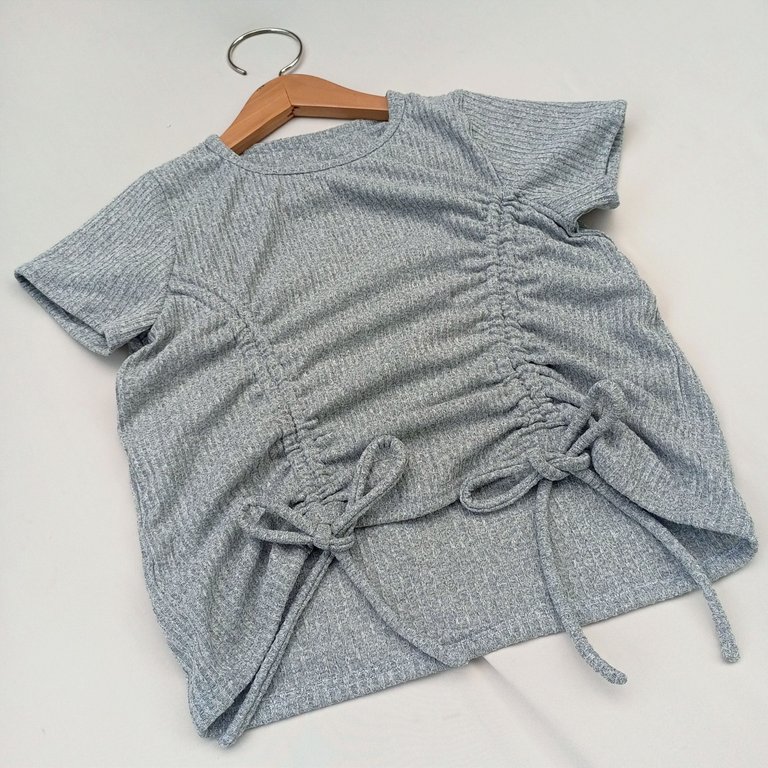
Hola queridos amantes de la costura, feliz y maravilloso miércoles, ya mitad de semana, espero su día se provechoso. Hoy les comparto la confección de una blusa en tela acanalada (micro rib) con cordones en los laterales, bueno no están tan laterales, salen desde las mangas hacía en frente de la blusa, yo cuando veía estás blusas en fotos decía: se ve difícil, cómo se hará eso? Lo podré hacer? Y la verdad es que luego de que ví como se hacía, solamente me vasto ver una blusa ya hecha, a veces no ponemos tantos límites nosotros mismos y no sabemos realmente de lo que somos capaces, está es la segunda blusa que realizo con esta técnica de los cordones y estoy fascinada, ya quiero hacer más.
Hello dear sewing lovers, happy and wonderful Wednesday, already in the middle of the week, I hope your day is profitable. Today I share with you the making of a blouse in ribbed fabric (micro rib) with laces on the sides, well they are not so lateral, they come out from the sleeves to the front of the blouse, when I saw these blouses in photos I used to say: it looks difficult, how to do that?? And the truth is that after I saw how to do it, I just saw a blouse already made, sometimes we do not put so many limits ourselves and we do not really know what we are capable of, this is the second blouse I make with this technique of laces and I am fascinated, I already want to make more.
Trabajar con el micro rib es muy fácil para mí, además que mi máquina no cose todo tipo de telas, pero con esta tela ya le he buscado la vuelta, es un tipo de tela idea para camisas y blusas pero pronto quiero hacer un pantalón para ver cómo me va, sin más que decir ve por tu hilo, aguja y telas y comencemos...
Working with the micro rib is very easy for me, besides my machine doesn't sew all kinds of fabrics, but with this fabric I have already found my way around, it's a type of fabric idea for shirts and blouses but soon I want to make a pair of pants to see how I do, without more to say go get your thread, needle and fabrics and let's start....
🧵🧷🧵🧷🧵🧷🧵🧷🧵🧷🧵🧷🧵🧷🧵🧷🧵
Necesitaremos || We will need
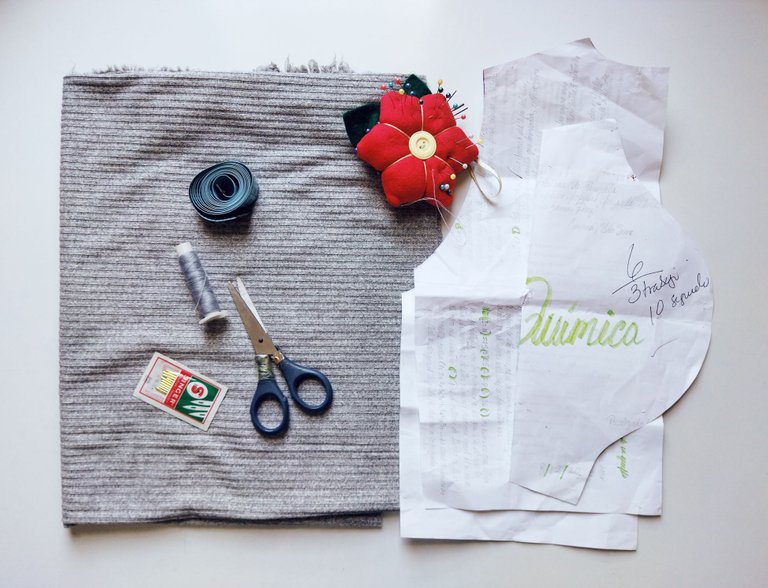
- Medio metro de tela micro rib gris
- Hilo blanco o gris
- Alfileres
- Tijera
- Cinta métrica
- Patrón
- Aguja y máquina de coser
- Half a meter of gray micro rib fabric
- White or gray thread
- Pins
- Scissors
- Tape measure
- Pattern
- Needle and sewing machine
🧵🧷🧵🧷🧵🧷🧵🧷🧵🧷🧵🧷🧵🧷🧵🧷🧵
Paso 1 || Step 1
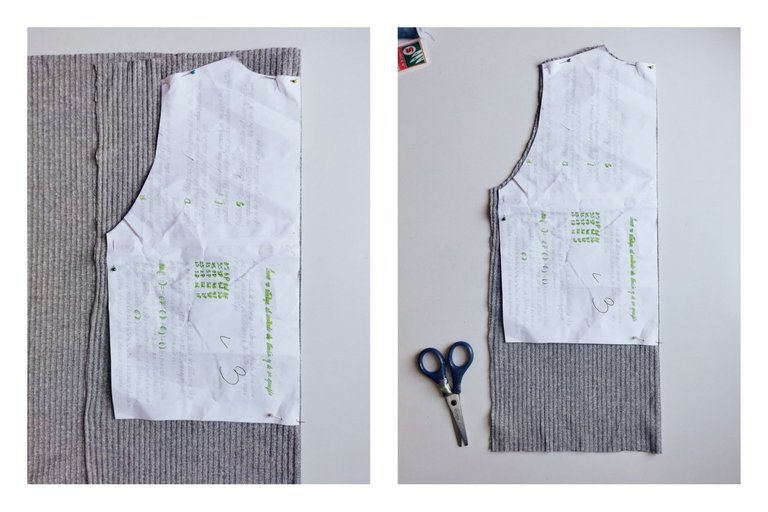
- Comenzamos doblando la tela y colocándola en una superficie plana, colocamos el patrón sobre la tela y lo sujetamos con alfileres, vamos a cortar de la tela colocando el lado que más estira en dirección horizontal, necesitamos sacar dos piezas (1 pieza delantera y 1 pieza trasera), Debemos tener en cuenta del centímetro que debemos dejar para el margen de costura, también agregué unos centímetros más del largo de la blusa.
- We start by folding the fabric and placing it on a flat surface, we place the pattern on the fabric and pin it, we are going to cut from the fabric placing the side that stretches the most in horizontal direction, we need to take out two pieces (1 front piece and 1 back piece), We must take into account the centimeter that we must leave for the seam allowance, I also added a few centimeters more than the length of the blouse.
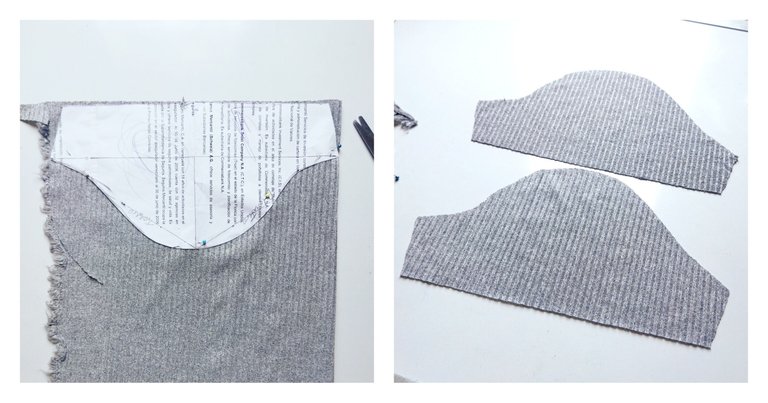
- Cortamos las mangas también, coloqué el patrón sobre la tela para que se haga más cómodo cortar lo sujetamos con alfileres, sacamos dos piezas para las mangas.
- We cut the sleeves as well, I placed the pattern on the fabric to make it more comfortable to cut, we pinned it, we took out two pieces for the sleeves.
Paso 2 || Step 2
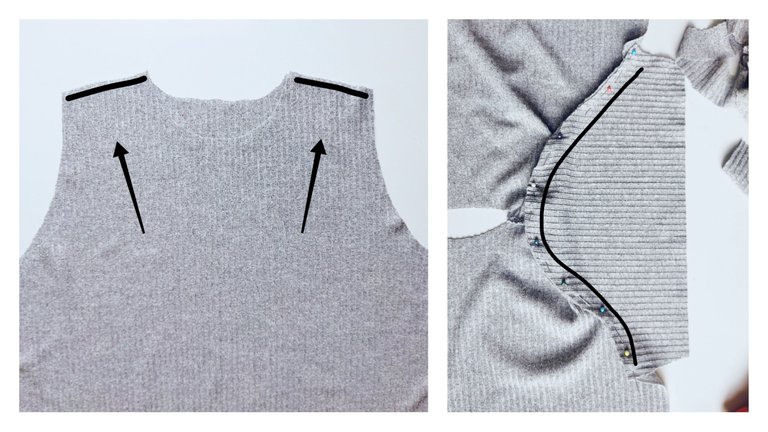
Después de tener la dos piezas cortadas (Delantera y trasera), enfrentamos los derechos de ambas piezas. Y sujetamos con alfileres las hombros de la blusa, como te muestro en la imagen. Pasamos costura recta y luego zigzag para rematar la costura en los hombros.
Teniendo los hombros de la blusa ya cosidos vamos a sujetar las manga a la sisa de la blusa, me ayude con alfileres y luego fuí a la máquina y pasé costura recta y zigzag para un mejor acabado en los bordes (👀 OJO!!! Muy pendiente de la dirección de la tela, el derecho y el revés).
- After having the two pieces cut (front and back), we face the right sides of both pieces. And pin the shoulders of the blouse, as shown in the picture. We pass straight seam and then zigzag to finish the seam on the shoulders.
- Having the shoulders of the blouse already sewn we are going to attach the sleeves to the armhole of the blouse, I helped myself with pins and then I went to the machine and passed straight seam and zigzag for a better finish on the edges (👀 EYE!!! Very aware of the direction of the fabric, the right and the wrong side).
Paso 3 || Step 3
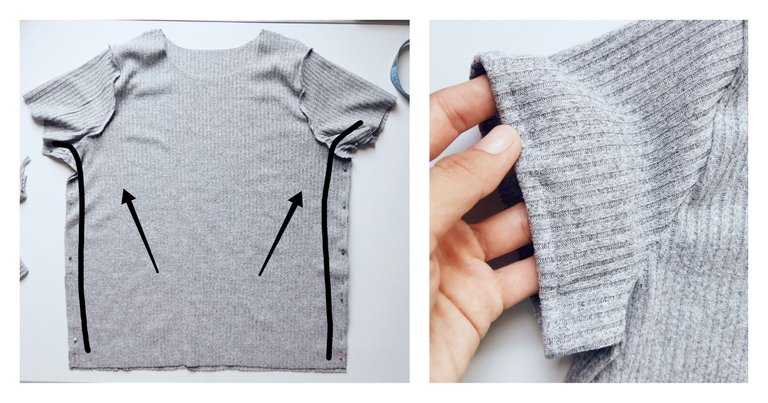
Proseguimos enfrentando los derechos de la blusa con las mangas cosidas y vamos a pasar costura desde el borde de las mangas hasta los costados cerrando los dos lados, acostumbró a pasar costura recta y zigzag.
Luego volteamos la blusa y podemos hacer las orillas, yo hice un dobladillo sencillo en los bordes de las mangas y en el ruedo de la blusa.
- We continue by facing the blouse right sides together with the sleeves sewn and we will sew from the edge of the sleeves to the sides closing both sides, I used to sew straight and zigzag seams.
- Then we turn the blouse inside out and we can make the edges, I made a simple hem on the edges of the sleeves and on the hem of the blouse.
Paso 4 || Step 4
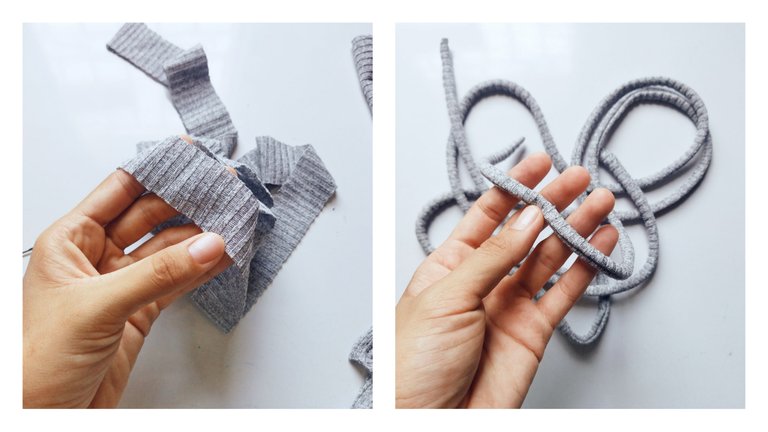
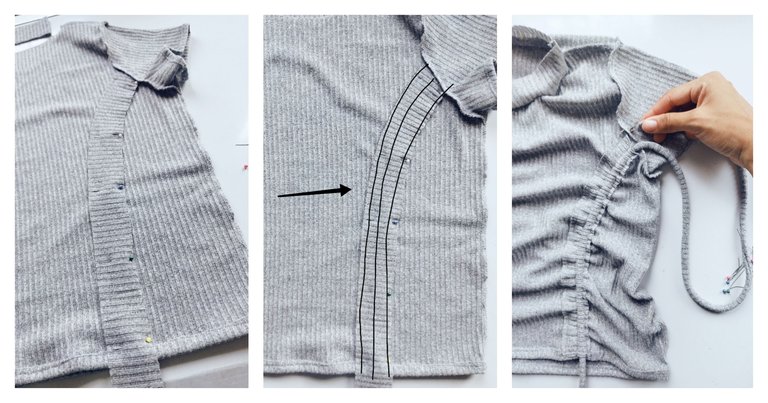
Viene la parte que yo pensé que era ma más complicada pero que para nada fué así, primero para hacer los cordones, corté tira de 3 cm de ancho y las cosí doblando a la mitad por el revés y luego con la ayuda de un palillo las voltee.
Proseguí cortando una tira de 4 cm de ancho, la cual coloqué en la parte revés de la blusa, la tira comienza desde la mitad de la manga haciendo una pequeña curva llegando hasta el frente de la camisa, cosí está tira a la blusa, el truco está en hacer dos canales por dónde pasará el cordón, entonces hacemos una costura en el medio y una costura recta a los lados de esta, dejamos el inició y el fin de la tira sin coser para poder pasar el cordón.
- Now comes the part that I thought was more complicated but it was not at all, first to make the laces, I cut a 3 cm wide strip and sewed them by folding them in half on the back side and then with the help of a toothpick I turned them over.
- I continued cutting a 4 cm wide strip, which I placed on the back of the blouse, the strip starts from the middle of the sleeve making a small curve reaching the front of the shirt, I sewed this strip to the blouse, the trick is to make two channels where the cord will pass, then we make a seam in the middle and a straight seam on the sides of this, we leave the beginning and the end of the strip without sewing to be able to pass the cord.
Paso 5 || Step 5
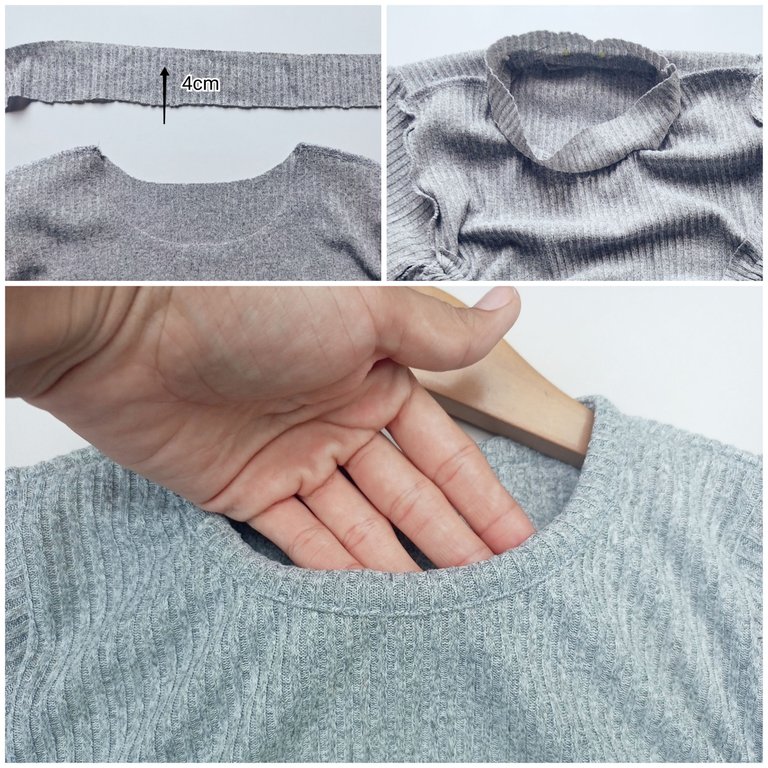
- Por último cortamos una tira de 4 cm de ancho para coser el vivo del cuello, cosemos con el derecho de la tira hacia el revés del cuello de la camisa, luego de tenerlo cosido vamos a doblar la tira a la mitad, doblemos nuevamente hacia el contorno del cuello y sujetamos con alfileres para luego coser y ya tendríamos el vivo del cuello listo.
- Finally we cut a 4 cm wide strip to sew the collar, we sew with the right side of the strip towards the back of the collar of the shirt, after having it sewn we will fold the strip in half, fold it again towards the contour of the collar and fasten with pins and then sew and we would already have the collar.
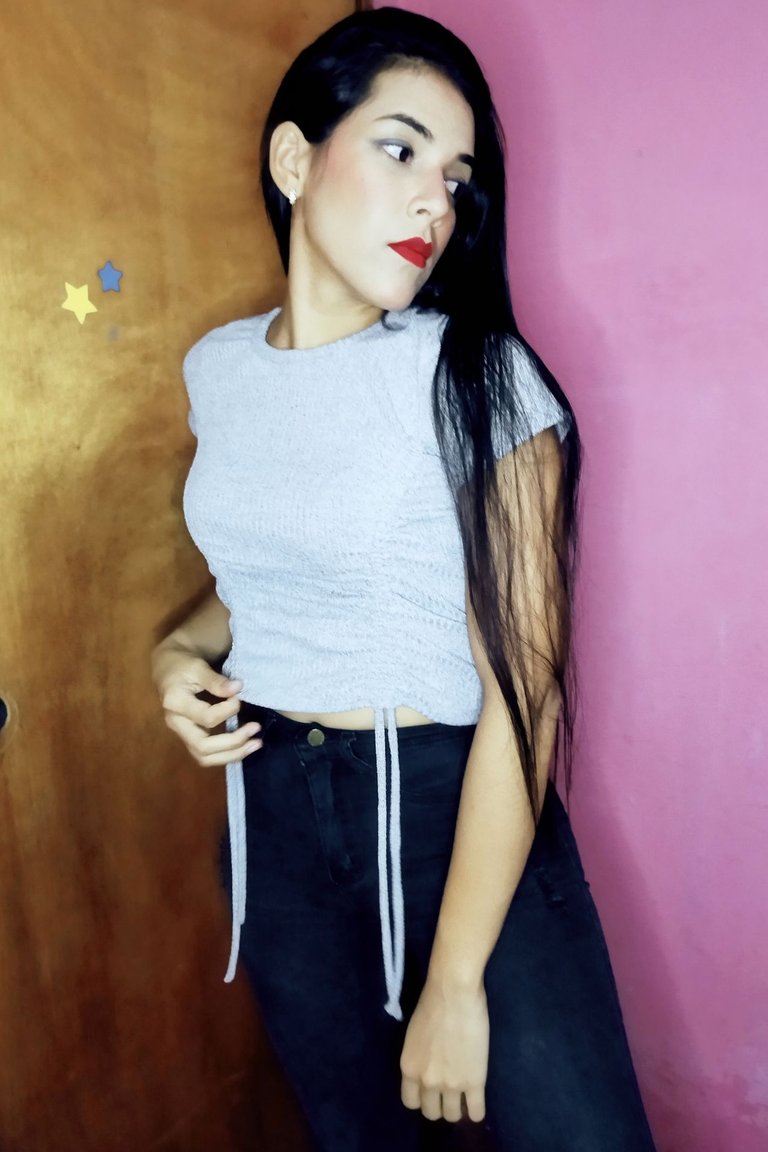
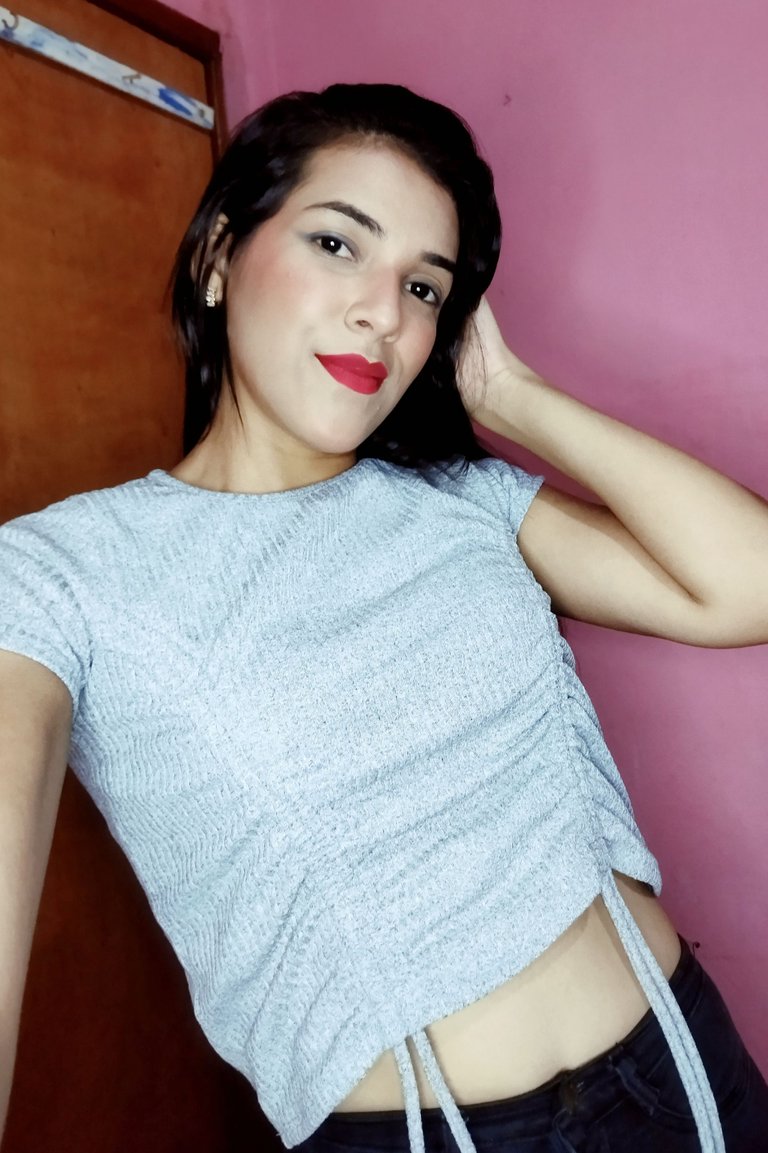
Resultado final.
Final result.
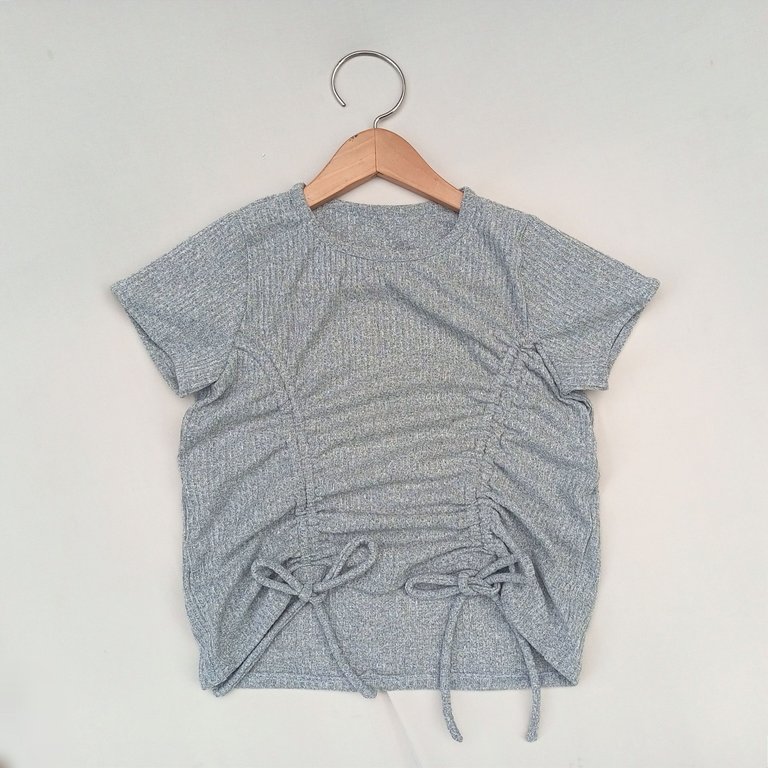
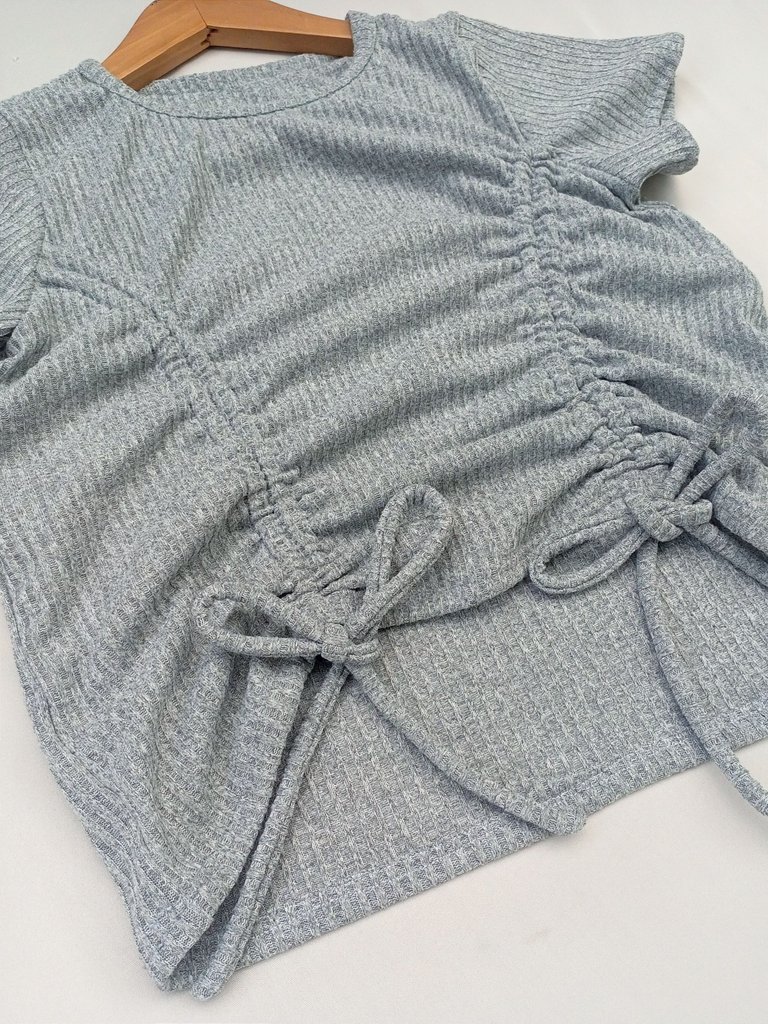
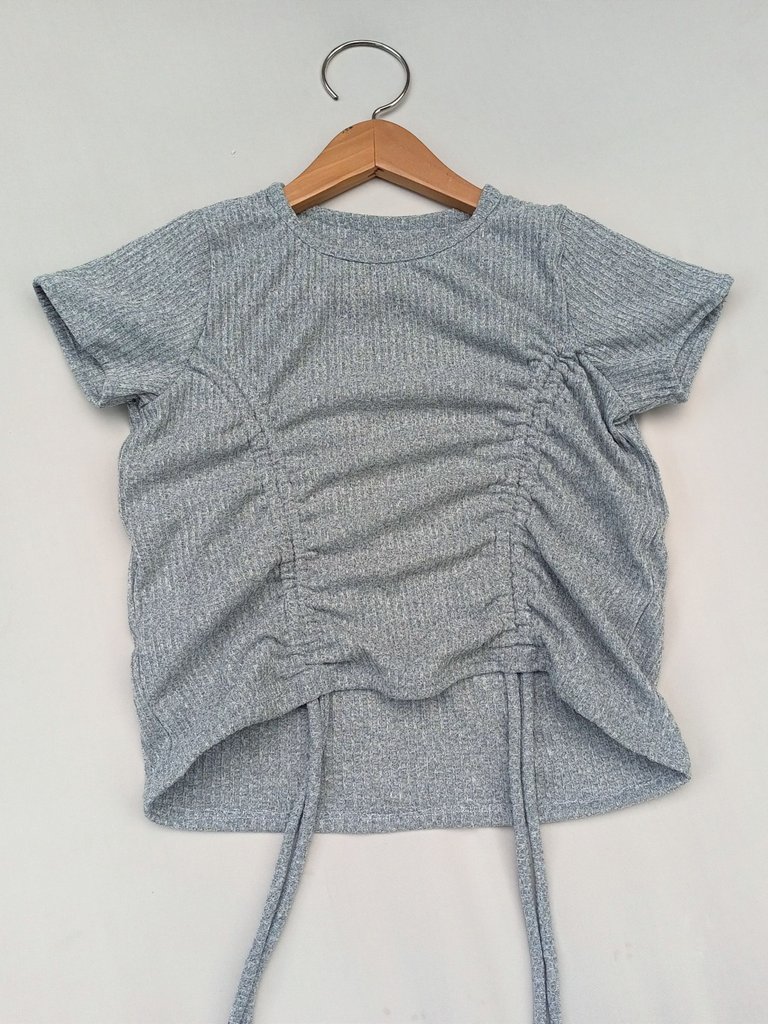
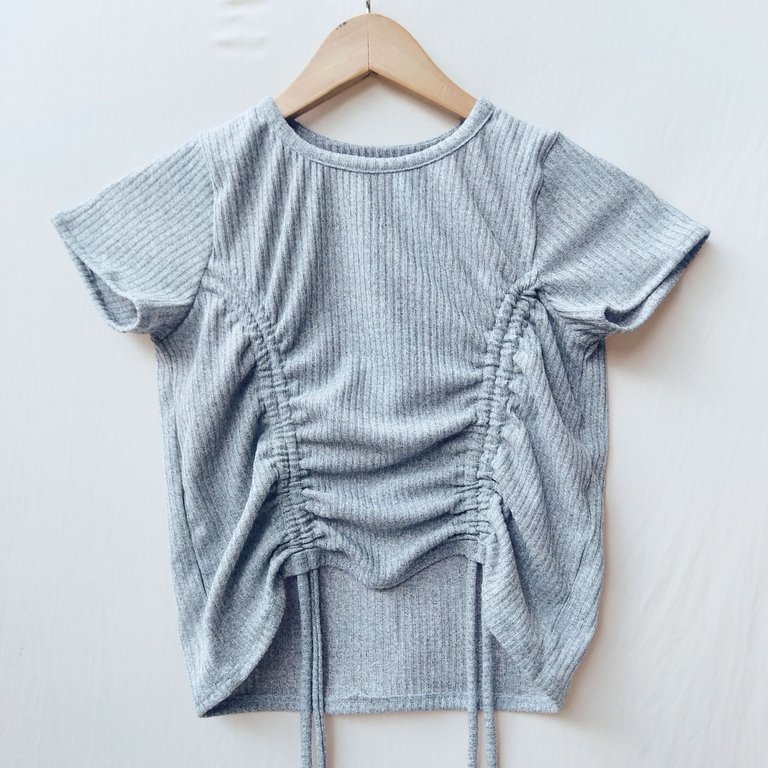
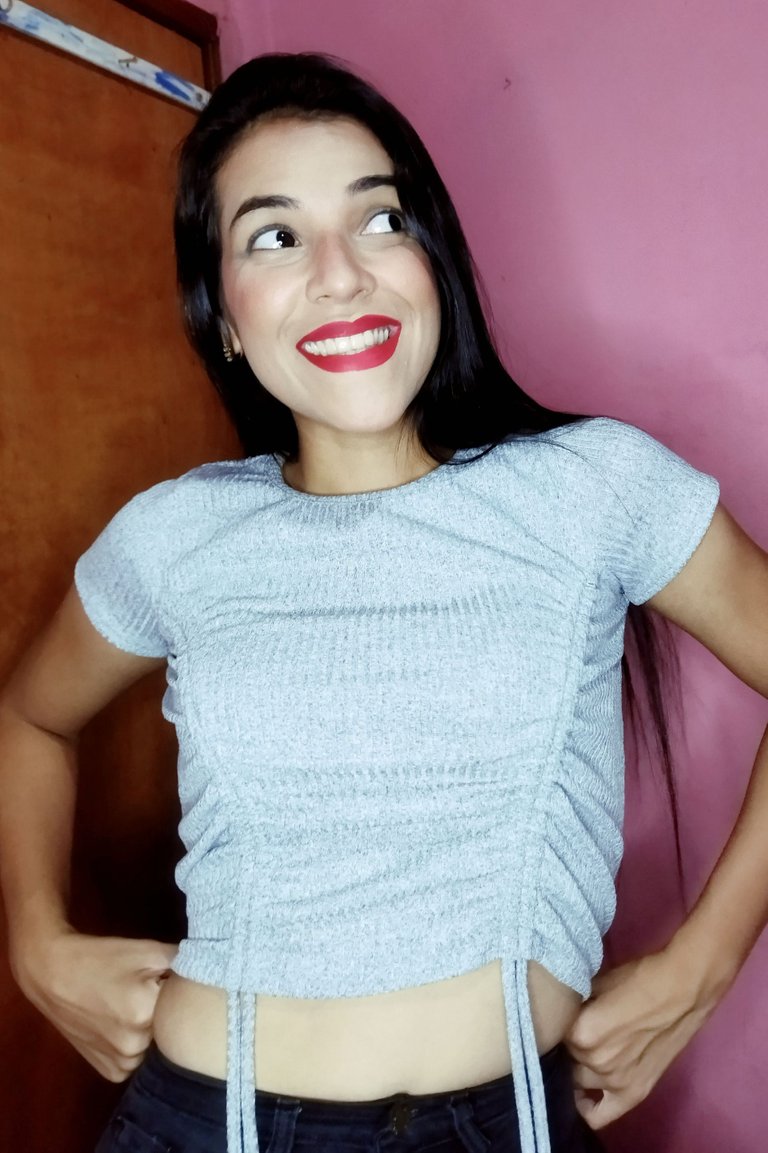
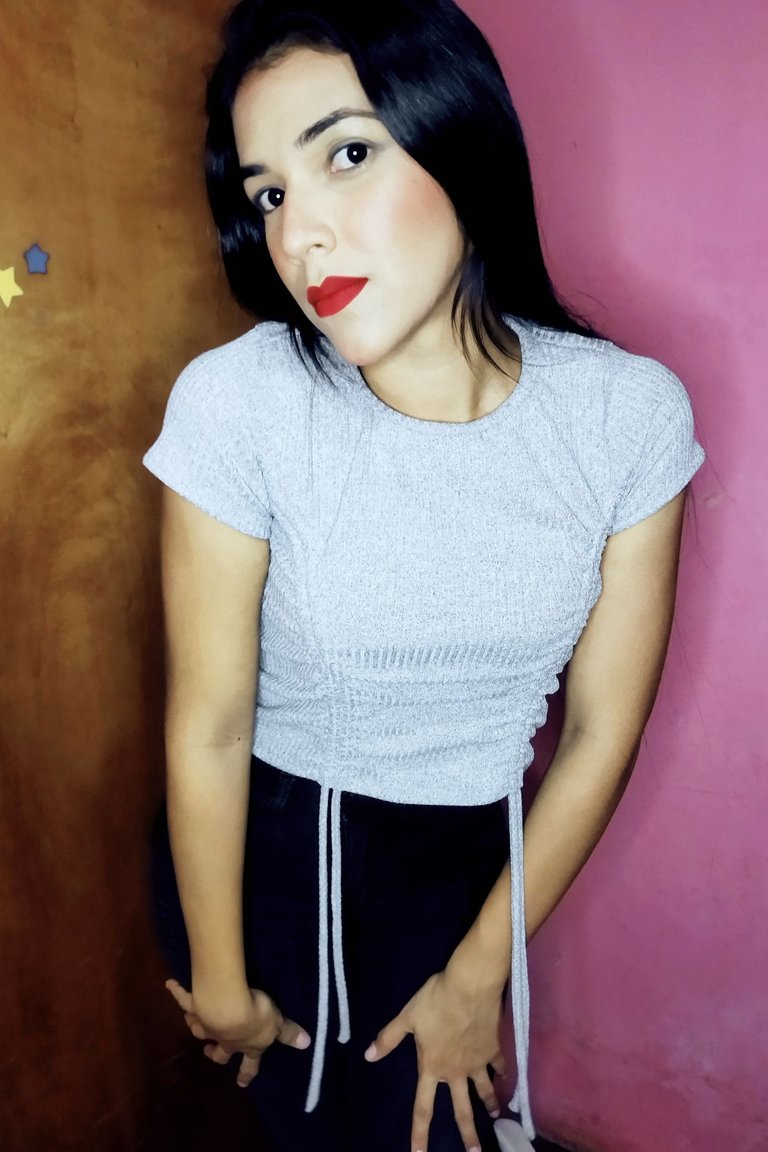
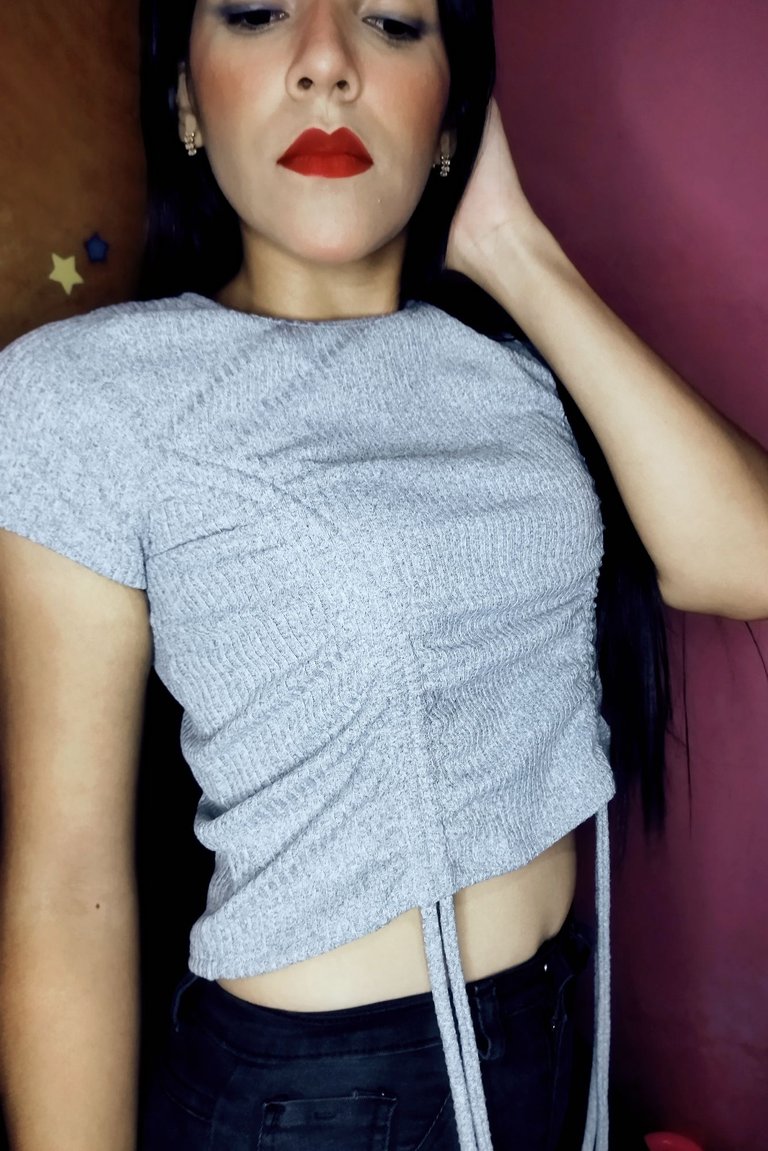
Amigos así quedó el resultado final de esta hermosa blusa en tela acanalada y cordones laterales, a mí me encantó totalmente, los cordones son una locura 😝, hasta aquí esta publicación espero que les hay gustado tanto como a mí y si llegaste hasta aquí mil gracias por leer mi post ❤️🥰 un fuerte abrazo.
Friends this was the final result of this beautiful blouse in ribbed fabric and side laces, I totally loved it, the laces are crazy 😝, so far this publication I hope you liked it as much as I did and if you got this far thank you for reading my post ❤️🥰 a big hug.
All images are my property / Todas las imágenes son de mi propiedad
Camera: Xiaomi Redmi 9T.
Translation: Deepl.com
Has sido votado por
PROYECTO ENLACE
'Conectando Ideas y Comunidades'
PROYECTO ENLACE es un proyecto de curación de habla hispana enfocado en recompensar contenido de calidad y apoyar autores en su proceso de crecimiento en HIVE.
Creemos y apostamos por el futuro de esta gran plataforma, y estamos muy emocionados de poder hacerla crecer junto a esta comunidad. Así que te invitamos a usar nuestra etiqueta ENLACE y estar atento a todas las actividades que tenemos preparadas y que estaremos publicando en breve.
¿QUIERES AUTOMATIZAR TUS GANANCIAS DE CURACIÓN? SE PARTE DEL PROYECTO ENLACE APOYANDO A NUESTRO TRAIL EN HIVE.VOTE INGRESA AQUÍ PARA CONOCER LOS DETALLES.
¿QUIERES INVERTIR ENLACE? DESCUBRE COMO HACERLO Y GENERAR INGRESOS DE FORMA SEMANAL MEDIANTE TU DELEGACIÓN DE HP AQUÍ TE EXPLICAMOS COMO.
Te invitamos a participar en nuestro servidor de Discord: https://discord.gg/3S9y7BbWfS
Atentamente
EQUIPO ENLACE 2022
Has logrado un resultado muy chic. Que bueno que no te limitas e inclusive tu máquina que no cose todo tipo de tela le das la vuelta para lograr lo que quieres.
Buen dato, que estemos pendiente de la dirección de la tela 😉
Gracias por compartir tu contenido creativo.
Saludos
Gracias 😁 siempre hay que buscarle lo bueno a todo, si la vida te da limones pues has limonada jajjaja 😂😂 gracias por tan lindo comentario ☺️
Gracias por todos los tips compartidos, esta blusa te quedó muy linda
Gracias, me alegra mucho que te haya gustado 🥰
Fabulosa mi amor
Gracias vale😁☺️🥰
It is a great job, that way of making the channel to place the strings and make it look wrinkled did not cross my mind, it seems great and now I know the steps to follow to make this style of flannels that is a trend among women for be a refreshing look for summer or party
Te quedo espectacular, justamente hoy compre tela micro rib jajaja.
Si, muy linda, en mi Feed tengo algunos modelos que he realizado 🤗
Hey! Te quedó genial ese modelo, tienes mucho talento 👏✨
Gracias sii, parece de fabrica también me impresioné del resultado final, gracias por tu comentario ☺️