[ESP/ENG] ✨Tierno Cintillo de Unicornio.//✨Unicorn Headband Tender.
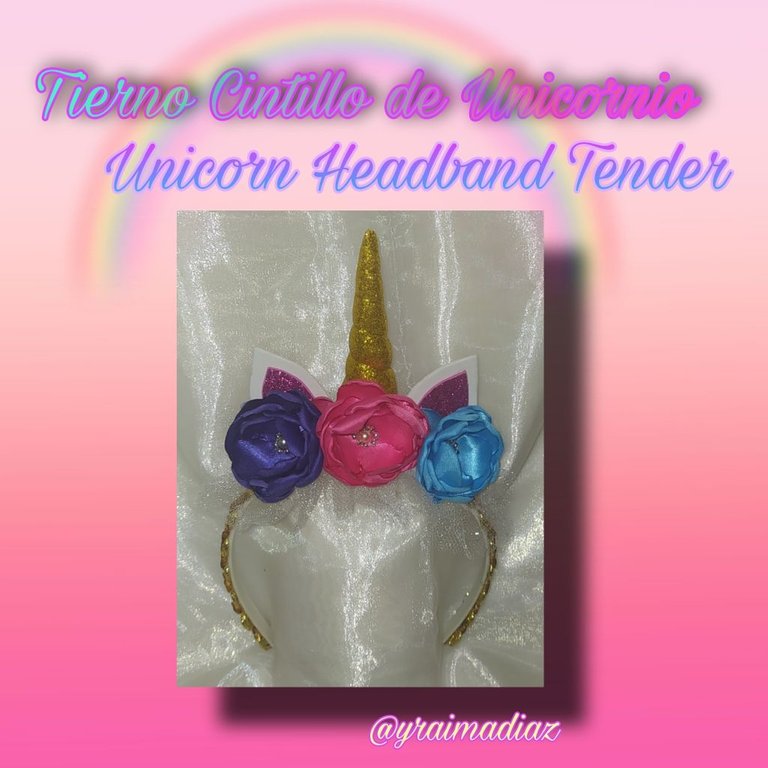
Saludos queridos amigos de esta hermosa comunidad, Dios me los bendiga grandemente el día de hoy les traigo un Tierno Cintillo de Unicornio para las consentidas de la casa .
Greetings dear friends of this beautiful community, God bless you greatly today I bring you a cute Unicorn Headband for the spoiled of the house.
Los invito a que se queden conmigo y me acompañen hasta el final para que vean cómo podemos hacer maravillas con nuestras manos.
Les estaré dejando por acá los materiales que utilice y el paso a paso.
I invite you to stay with me and join me until the end to see how we can do wonders with our hands.
I'll be leaving you here the materials I used and the step by step instruction
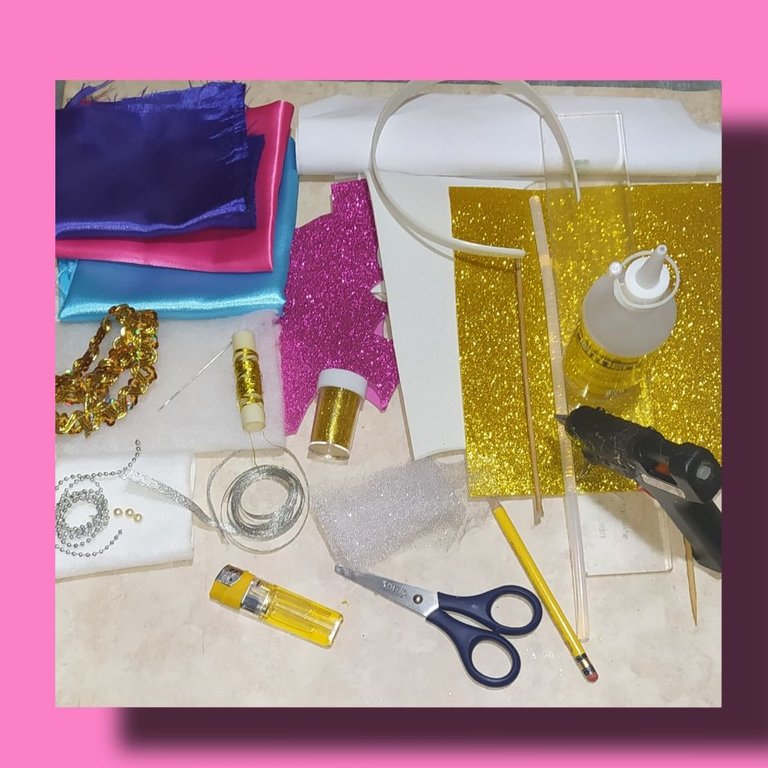
Materiales.
- Foami dorado escarchado.
- Foami fuscia escarchado.
- Foami blanco.
- Tela de satén fucsia.
- Tela de satén morada.
- Tela de satén azul claro.
- Tul blanco escarchado.
- Cinta delgada plateada.
- Guata.
- Fieltro blanco
- Silicón líquido frío.
- Barra de silicón.
- Pistola de silicón.
- Perlitas corridas plateada.
- Perlitas blancas.
- Pasamanería dorada.
- Hilo dorado.
- Cintillo.
- Tijera.
- Hoja de papel.
- Lápiz.
- Regla.
- Aguja.
- Palito de altura.
Materials.
- Golden frosted Foami.
- Frosted fuscia foami.
- White foami.
- Fuchsia satin fabric.
- Purple satin fabric.
- Light blue satin fabric.
- Frosted white tulle.
- Thin silver ribbon.
- Wadding.
- White felt.
- Cold liquid silicone.
- Silicone stick.
- Silicone gun.
- Silver beads.
- White beads.
- Gold trimmings.
- Gold thread.
- Headband.
- Scissors.
- Sheet of paper.
- Pencil.
- Ruler.
- Needle.
- Height stick.
Ahora vamos realizar el paso a paso.
Now we are going to perform the step by step.
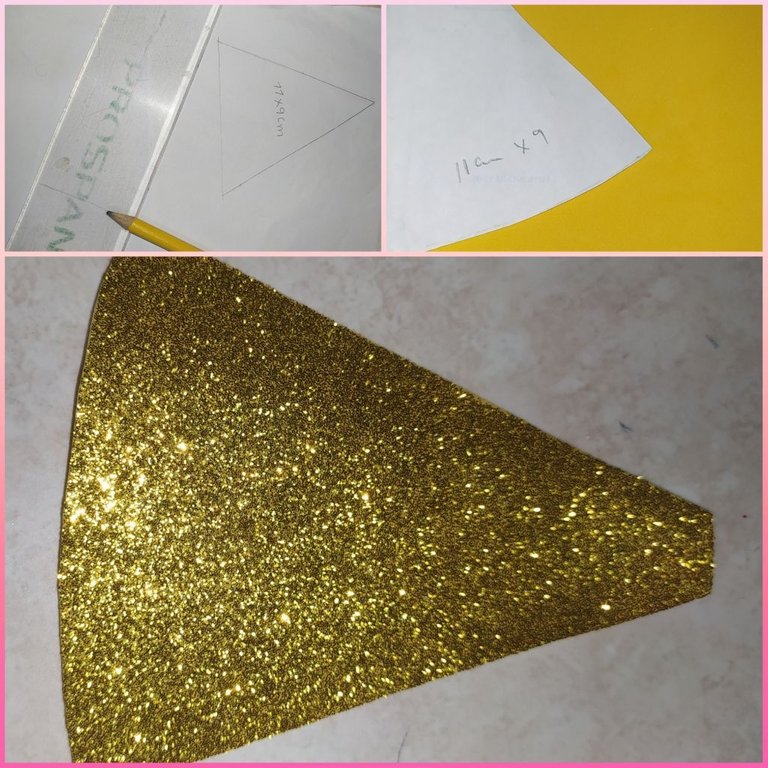
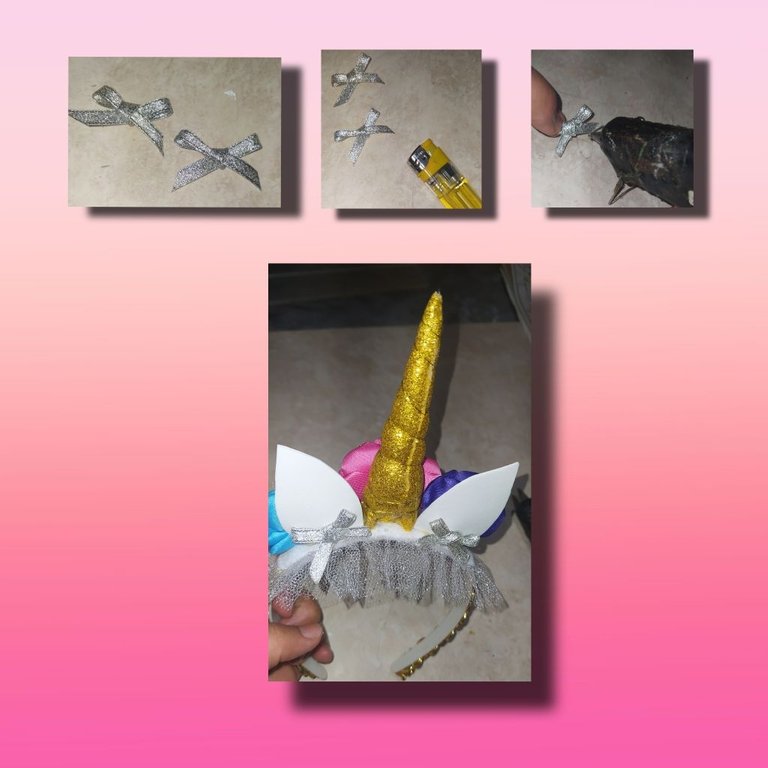
- Tomamos papel,regla y lápiz y marcamos un triangulo de 11 cm de alto con una base de 9 cm de ancho.
Now let's do the step by step.
- We take paper, ruler and pencil and mark a triangle of 11 cm high with a base of 9 cm wide.
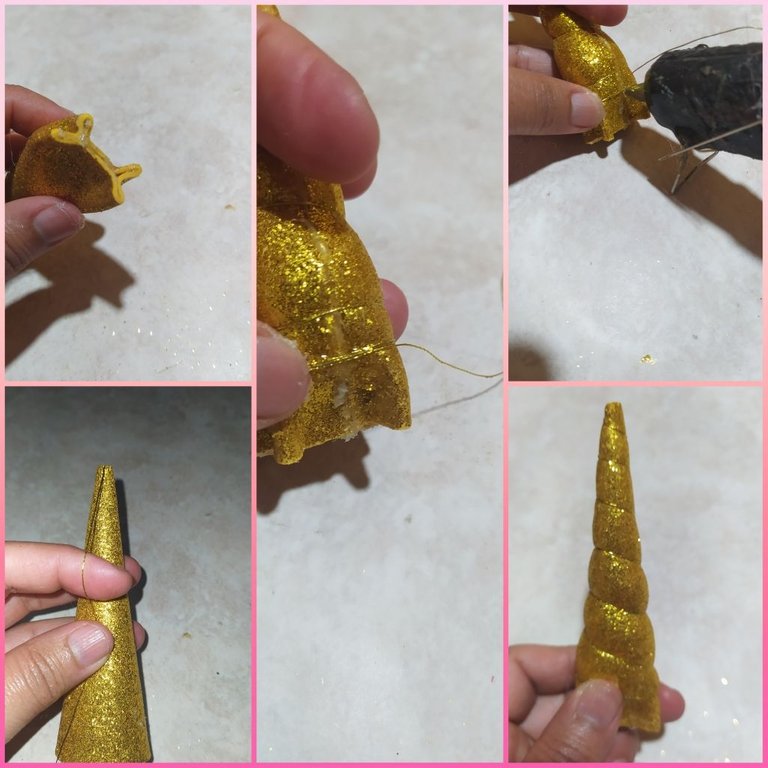
- Le recortamos la punta al triángulo
- Lo marcamos en el foami escarchado dorado y procedemos a recortar.
- Cut off the tip of the triangle
- We mark it on the gold frosted foami and proceed to cut it out.
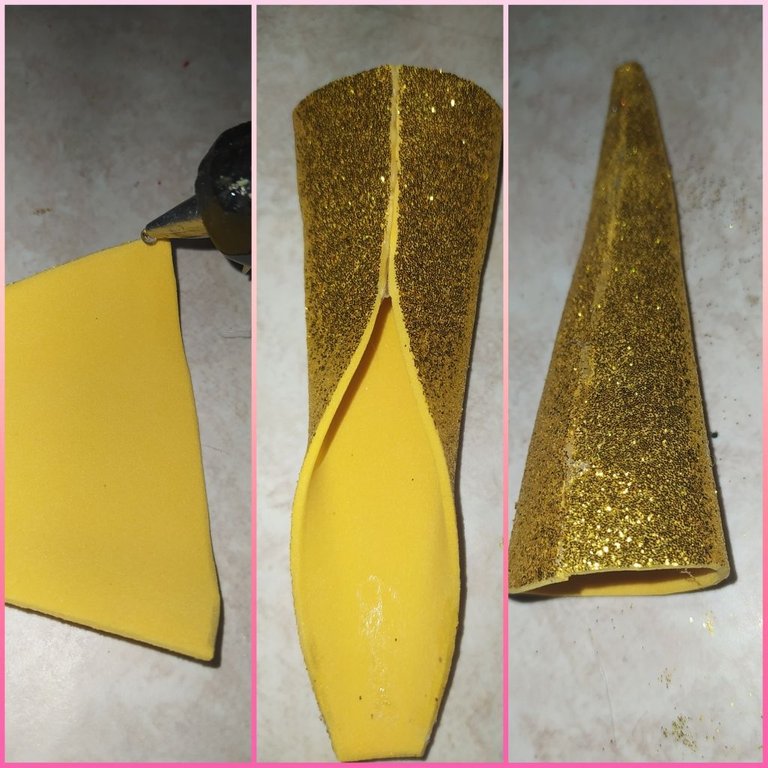
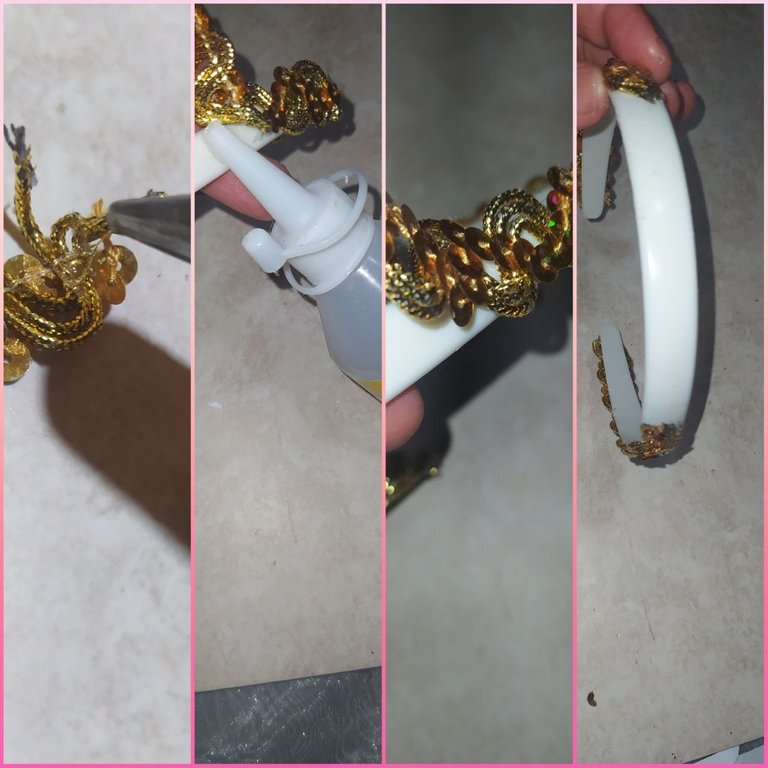
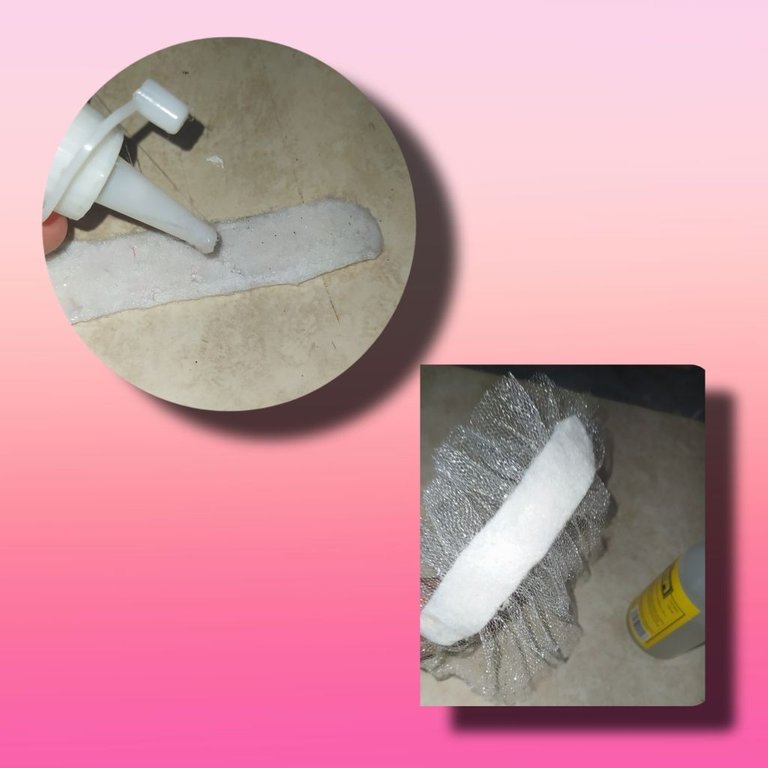
- Ahora vamos armar el cuerno.
Colocamos silicón caliente y vamos a ir pegando de abajo hacia arriba por partes hasta cerrar completamente.
- Now we are going to assemble the horn.
We put hot silicone and we are going to glue from bottom to top in parts until completely closed.
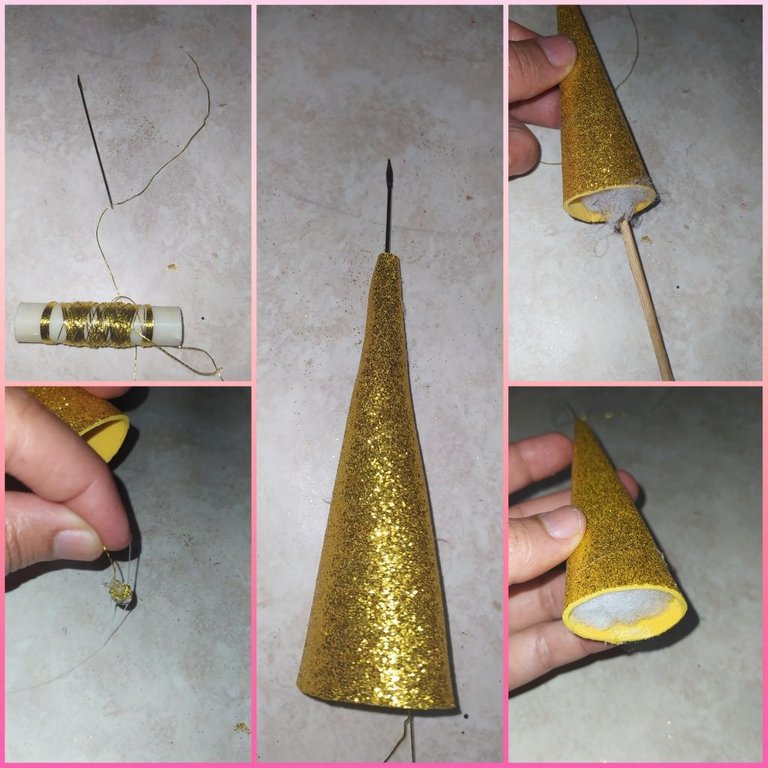
- Le colocamos como aproximadamente 25 cm de hilo dorado a la aguja le hacemos un nudo a una sola punta y le colocamos silicón caliente para que no se nos salga del cuerno,luego introducimos la aguja por la parte de abajo y que salga la punta en la parte alta del cuerno con la ayuda del palito de altura vamos introduciendo la gusta por pedacitos para que el cuerno quede bien relleno.
- We put about 25 cm of golden thread to the needle, we make a knot at one end and we put hot silicone so that it does not come out of the horn, then we introduce the needle at the bottom and the tip comes out at the top of the horn with the help of the height stick we introduce the needle in small pieces so that the horn is well filled.
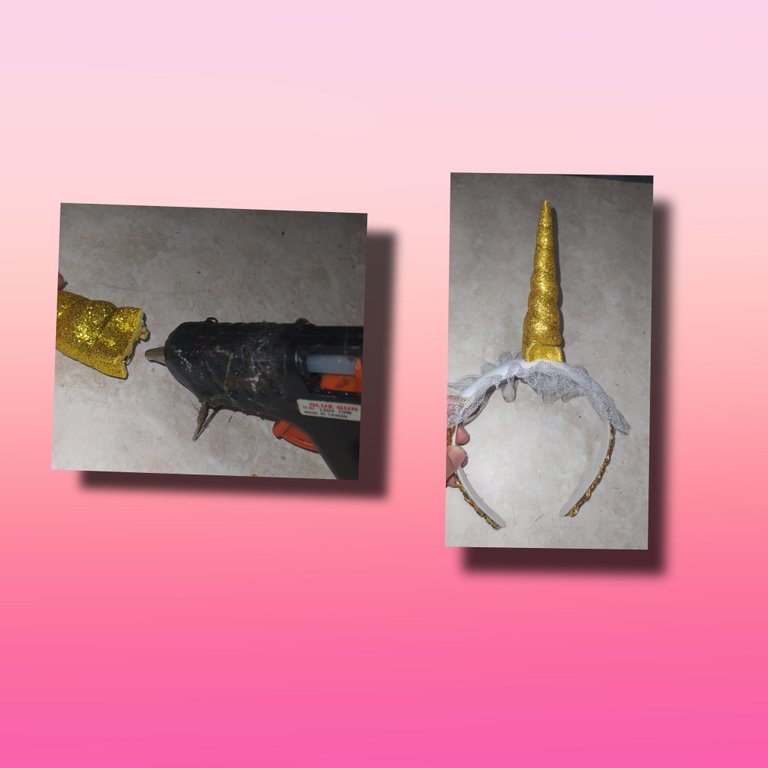
- Le colocamos silicón caliente en la parte de abajo y cerramos el cuerno.
- Luego tomamos el hilo y empezamos a darle la vuelta a el cuerno dejando una distancia como de dos centímetros en cada vuelta.
- Al llegar a la parte de abajo le colocamos un poco de silicón caliente al hilo y lo pegamos para asegurarlo.
- Así de hermoso queda el cuerno.
- We put hot silicone on the bottom and close the horn.
- Then we take the thread and we begin to turn the horn leaving a distance of about two centimeters in each turn.
- When we get to the bottom we put some hot silicone on the thread and glue it to secure it.
- This is how beautiful the horn looks
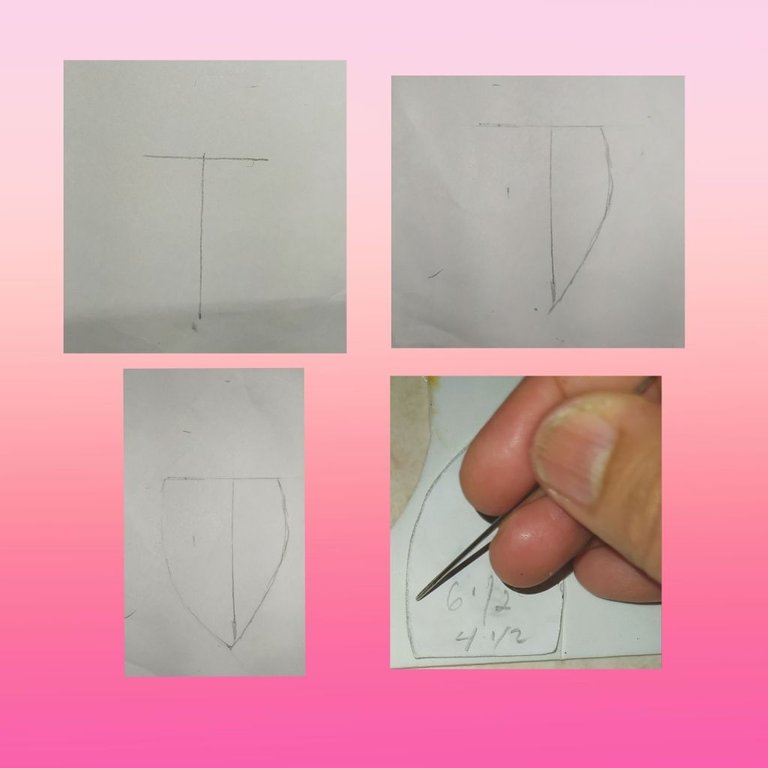
- Para sacar el patrón de las orejas marcamos como si fuera la letra L y le damos una altura de 6 1/2 cm de ancho por 4 1/2 de ancho y le damos la forma de orejas luego de haber sacado el patrón lo marcamos en el foami blanco dos veces y recortamos.
To draw the pattern of the ears we mark as if it were the letter L and give it a height of 6 1/2 cm wide by 4 1/2 cm wide and give it the shape of ears after having drawn the pattern we mark it on the white foami twice and cut it out.
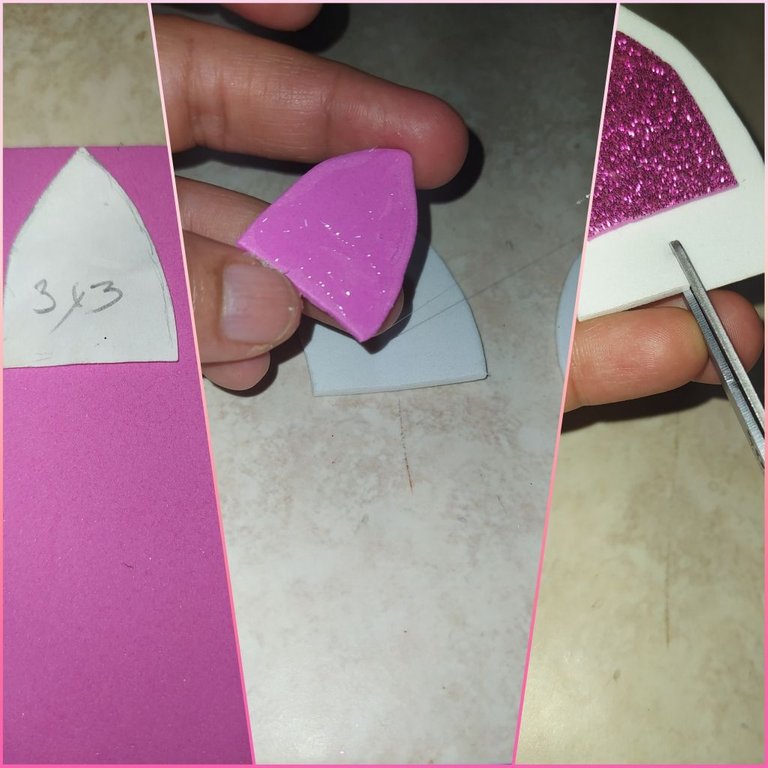
- Para sacar el patrón del centro de las orejitas hacemos lo mismo pero le colocamos una altura de 3 cm y una base dde 3 cm y le damos la forma de la orejas, luego lo marcamos en el foami fuscia escarchado y recortamos.
- Le colocamos silicón líquido y lo pegamos en el centro de la oreja blanca a una altura de un centímetro.
- En el centímetro que dejamos en la parte baja de la oreja le hacemos un piquete con la tijera.

- Luego d hacerle el.piquete a la parte blanca de la oreja le colocamos silicón caliente y pegamos y de esta forma le estamos dando profundidad a las orejitas.
- After making the puncture to the white part of the ear, we put hot silicone and glue it and in this way we are giving depth to the ears.
- Tomamos la pasamanería dorada y cortamos dos pedazos de 11 cm aproximadamente y le doblamos la punta hacia adentro a uno de los extremos le colocamos silicón para evitar que se deshilache.
- Luego la pegamos al cintillo de la base hacia el centro en ambos extremos, y dejamos un espacio vacío en el centro.
- We take the gold trimmings and cut two pieces of approximately 11 cm and fold the tip inward to one of the ends we put silicone to prevent fraying.
- Then we glue it to the headband from the base to the center at both ends, and leave an empty space in the center.
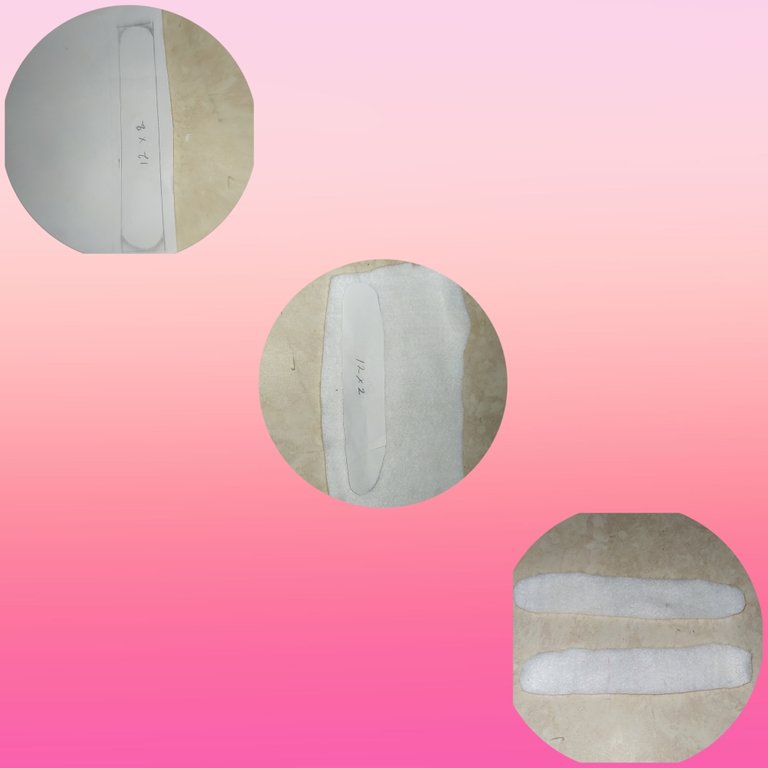
- Para sacar el patrón de la base donde colocaremos el cuerno las orejitas las flores y el tul medimos un rectángulo de 11 cm por 2 cm de ancho sacamos nuestro patrón.
- Lo colocamos encima del fieltro blanco y sacamos dos piezas.
- To make the pattern of the base where we will place the horn, the ears, the flowers and the tulle, we measure a rectangle of 11 cm by 2 cm wide and make our pattern.
- We place it on top of the white felt and take out two pieces.
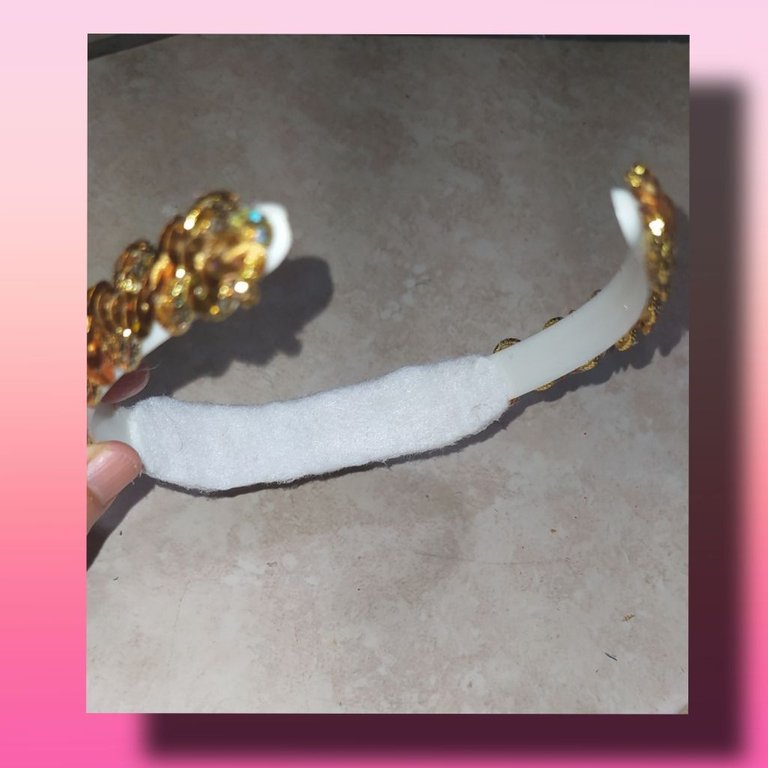
- Le colocamos silicón líquido y lo pegamos en el espacio que habíamos dejado en el cintillo en la parte de abajo.
- We put liquid silicone and glue it in the space we had left in the headband at the bottom.
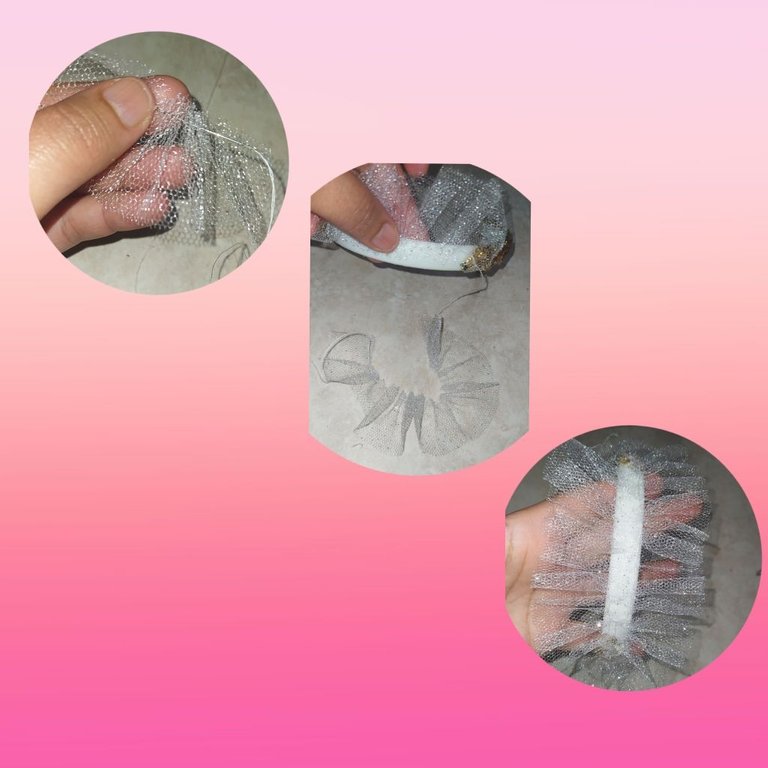
- Tomamos las tiras de tul y la arruchamos
- Luego la pegamos por todo la orilla del fieltro.
- We take the strips of tulle and crumple it up.
- Then we glue it all around the edge of the felt.
- Tomamos la otra pieza de fieltro le colocamos silicón y la pegamos encima
- We take the other piece of felt, put silicone on it and glue it on top.
- Le colocamos silicón caliente al cuerno y lo.pegsmos en todo el centro de la base.
- We put hot silicone on the horn and glue it all over the center of the base.
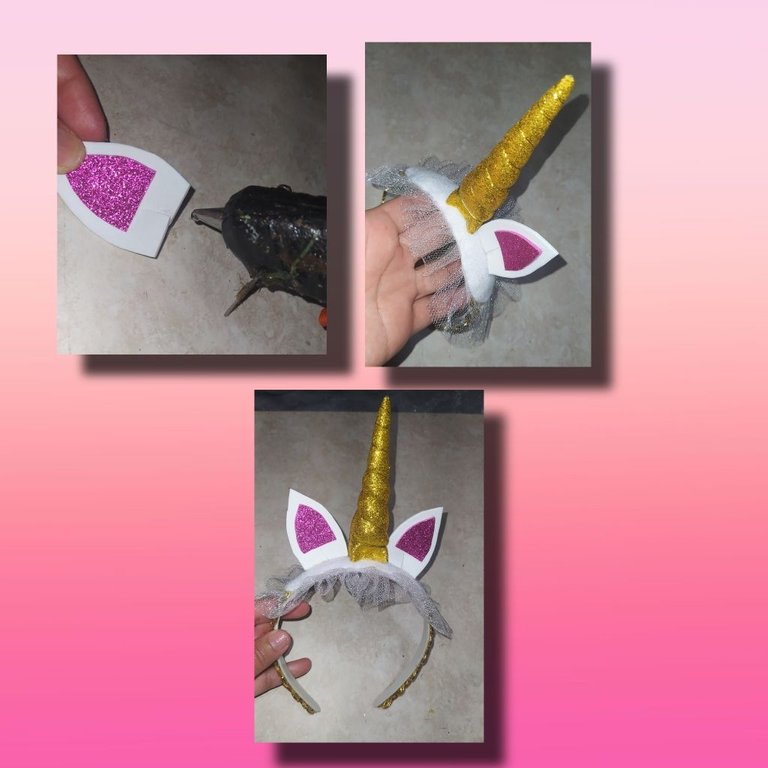
- Tomamos las orejitas le colocamos silicón caliente y la pegamos a cada lado del cuerno en todo el centro de la base.
- We take the ears, put hot silicone on them and glue them on each side of the horn in the center of the base.
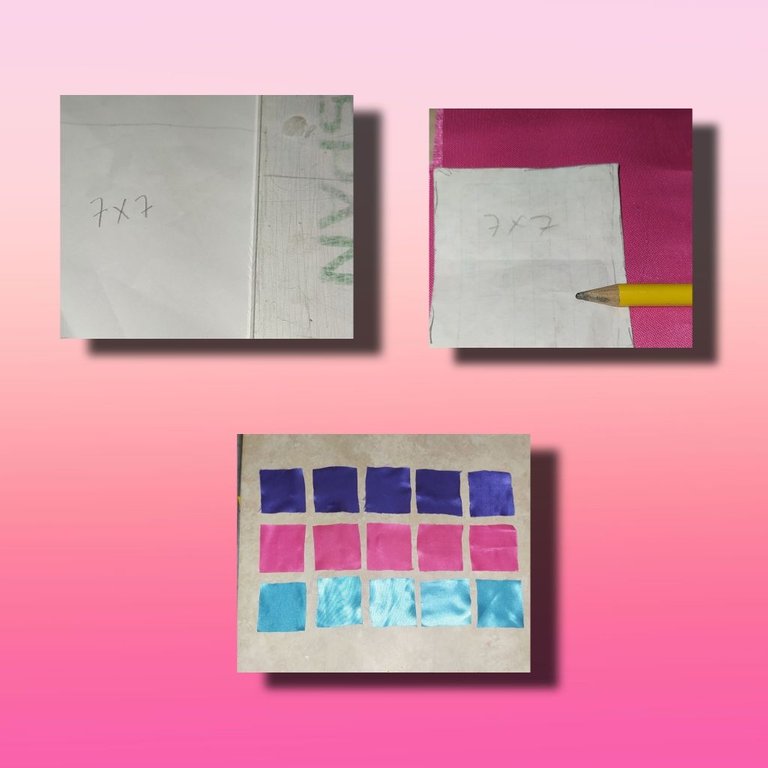
- Para sacar el patrón para hacer las flores marcamos en el papel un cuadrado que mida 7 cm x 7 cm de cada lado.
- Luego marcamos ese patrón 5 veces en cada una de las telas de satén ( fucsia, morada,azul) y recortamos.
- To make the pattern for the flowers, mark a square measuring 7 cm x 7 cm on each side on the paper.
- Then we mark that pattern 5 times on each of the satin fabrics (fuscia, purple, blue) and cut it out.
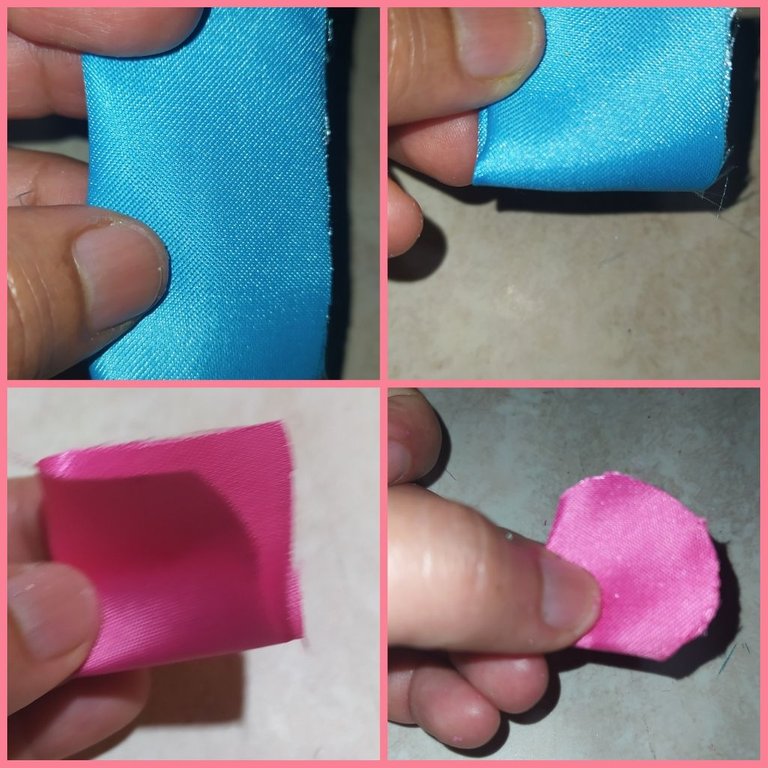
- Para hacer los pétalos de la flor doblamos el cuadrado a la mitad.
- Volvemos a doblar a la mitad.
- Ahora en el lado donde queden las puntas lo recortamos dandole forma redonda.
- To make the petals of the flower, fold the square in half.
- Fold it in half again.
- Now on the side where the tips are we cut it giving it a round shape.
- Así nos queda nuestro pétalos.
- Ahora le hacemos un pequeño corte entre cada pétalo.
- Luego con el encendedor le quemamos con mucho cuidado las orillas.
- This is how our petals look like.
- Now we make a small cut between each petal.
- Then with the lighter we carefully burn the edges of the petals.
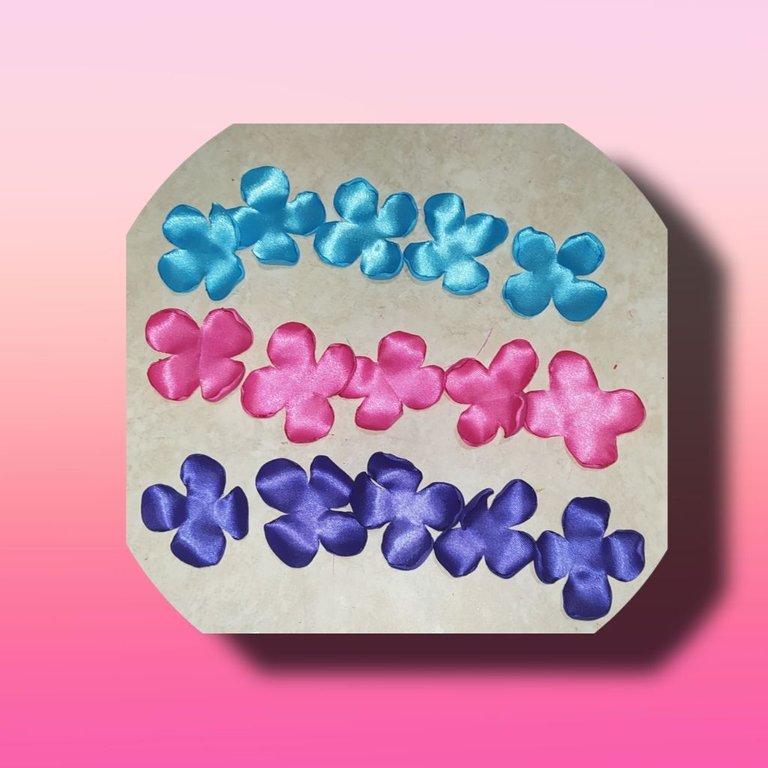
- Asi lo hacemos con cada uno de los pétalos y con cada color.
- This is how we do it with each petal and with each color.
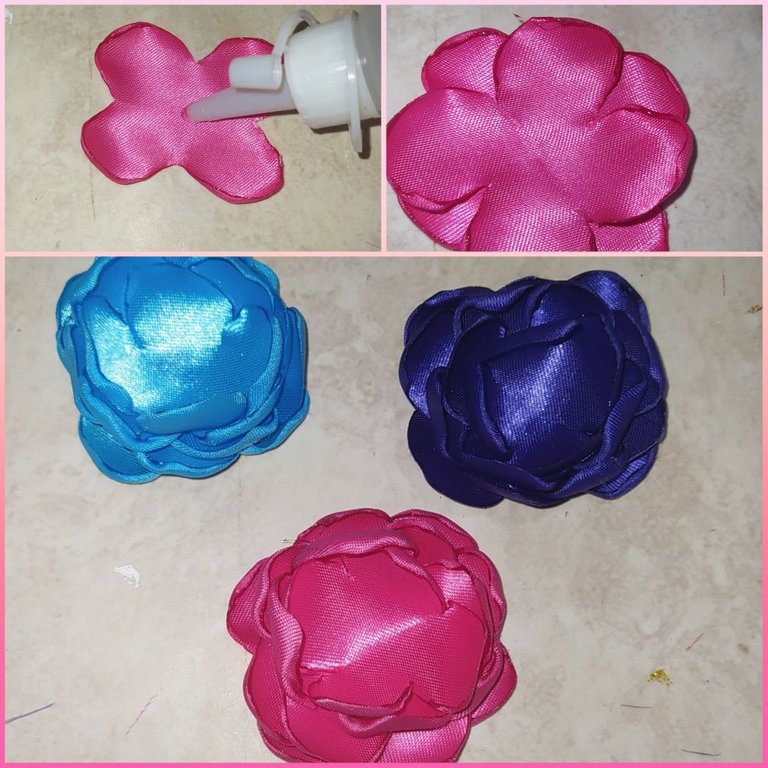
- Procedemos al armado de las flores,le colocamos silicón en el centro y vamos colocando uno a uno los 5 pétalos de cada flor dándole la forma.
- We proceed to the assembly of the flowers, we place silicone in the center and we place one by one the 5 petals of each flower giving it the shape.
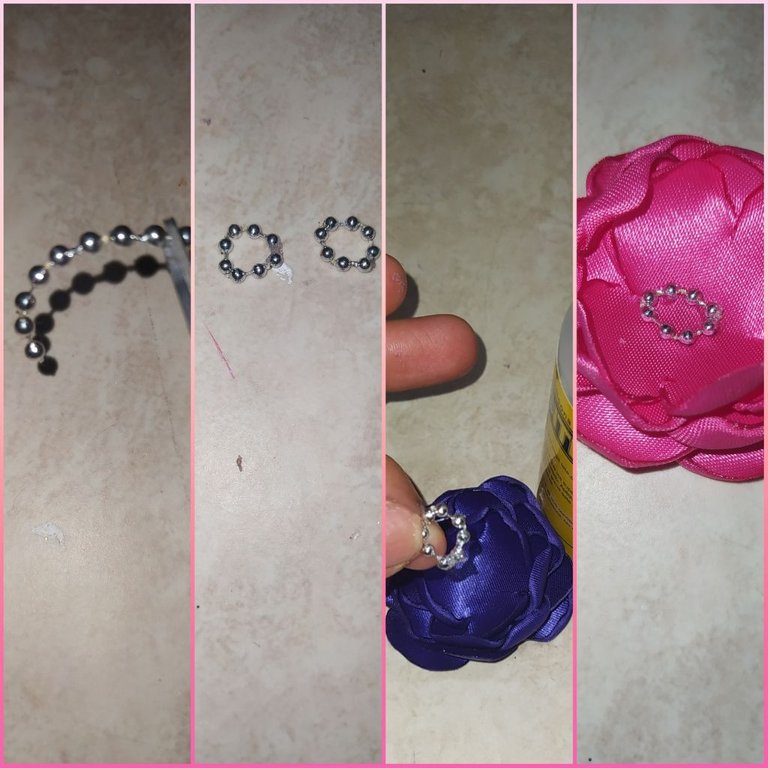
*Para hacerle el centro a nuestras flores hacemos un círculo con la perla corrida la pegamos al centro de las flores.
*To make the center of our flowers we make a circle with the pearl and glue it to the center of the flowers.
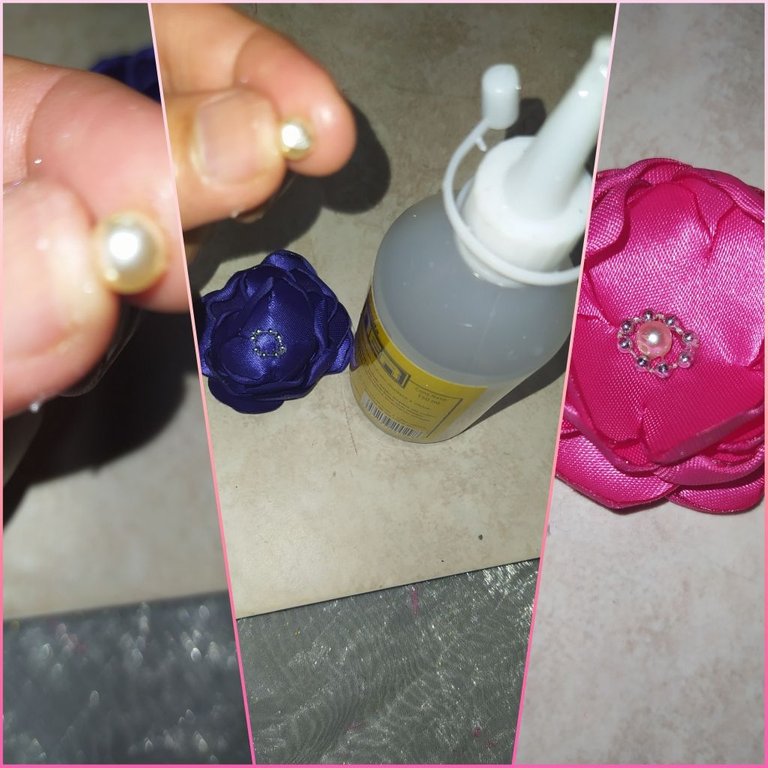
- Tomamos la perlita blanca y la pegamos en el centro.
- We take the white pearlite and glue it in the center.
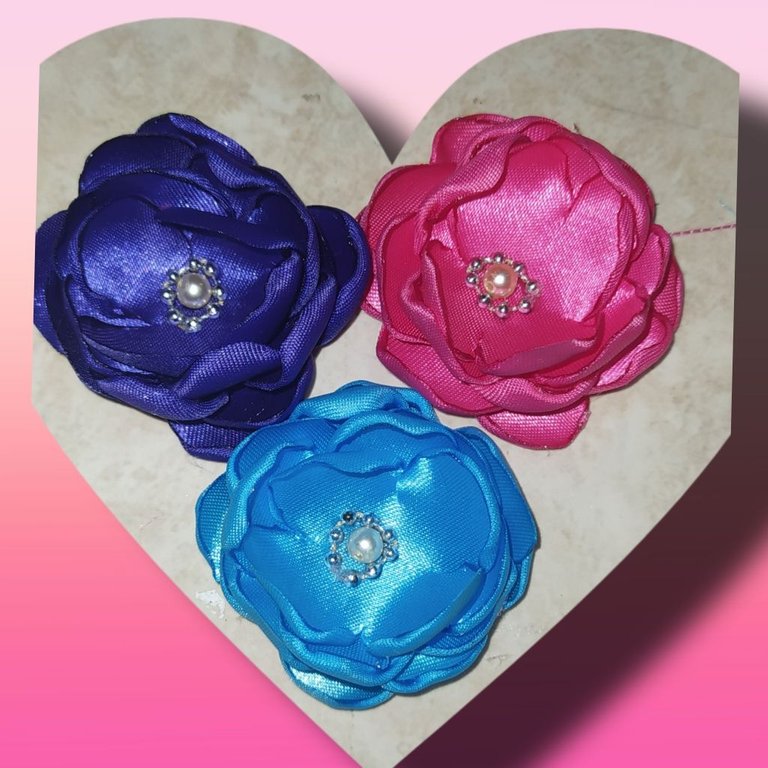
- Así de hermosas nos quedaron nuestras flores.
- This is how beautiful our flowers turned out
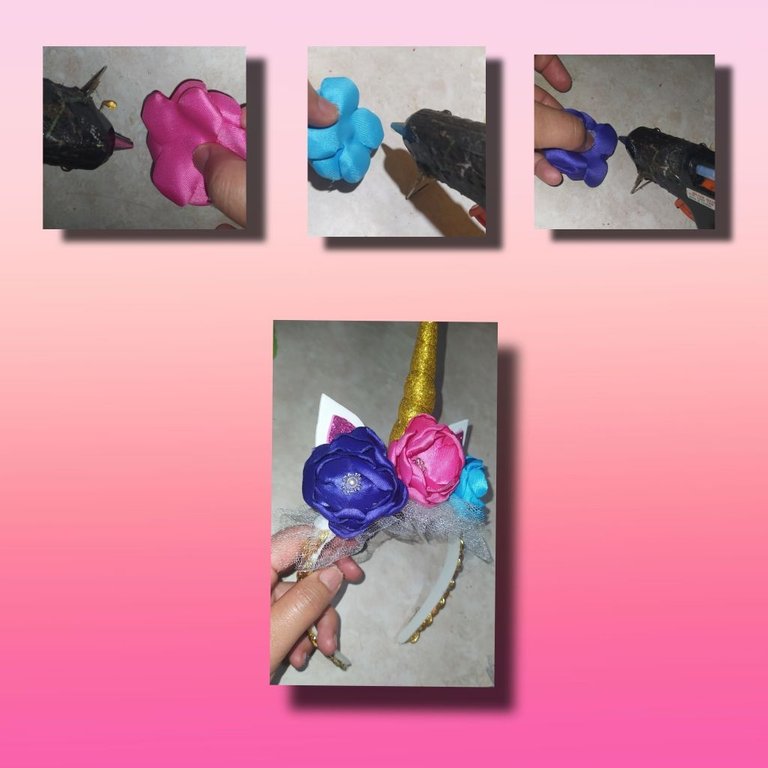
- Le colocamos silicón caliente a las flores empezando por la que va delante del cuerno y luego pegamos al lado cada una.
- We apply hot silicone to the flowers, starting with the one in front of the horn and then glue each one to the side.
Hacemos dos lacitos con la cinta plateada con el encendedor le quemamos las puntas.
Lo pegamos a la parte de atrás de las orejitas.
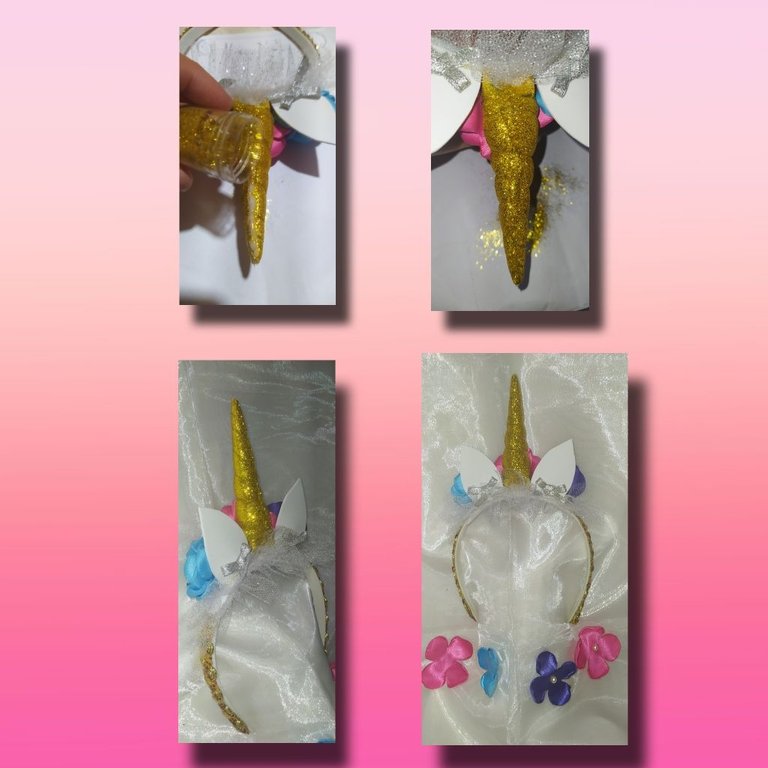
- En la parte de atrás del cuerno donde hicimos las dos uniones le colocamos un poco de pega y le vertemos encima un poco de escarcha para que nos quede perfecto.
- On the back of the horn where we made the two joints we put a little glue and pour a little frosting on top to make it perfect.
- We make two little bows with the silver ribbon and burn the ends with the lighter.
- Glue it to the back of the ears.
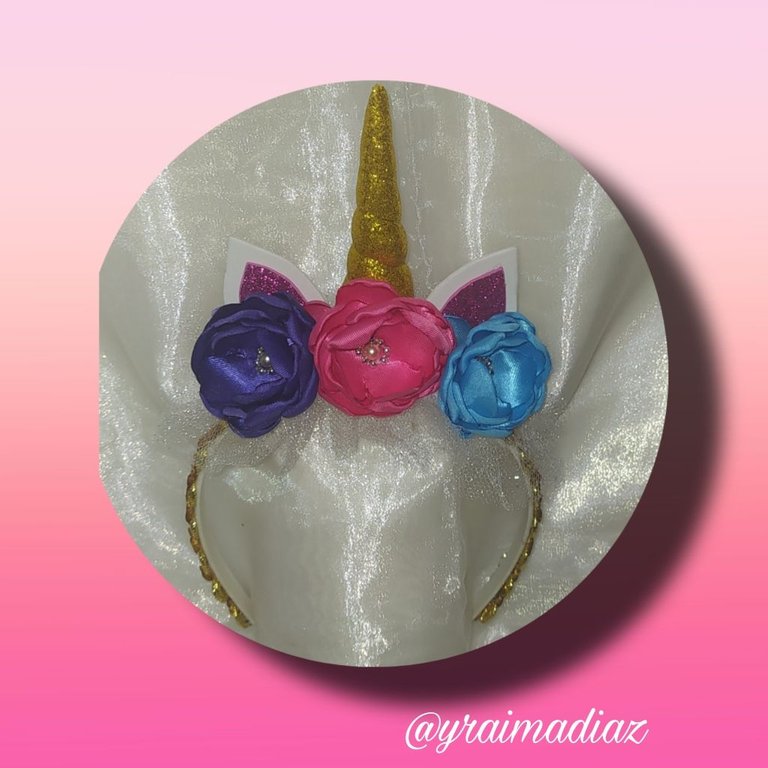
- Aquí les presento ya nuestro tierno cintillo de unicornio, y cuando llegas hasta acá dices guao que hermoso me quedo gracias Dios por bendecir mis manos y te enamoras cada día más de lo que haces.
- Here I present to you our tender unicorn headband, and when you get here you say wow how beautiful it is, thank you God for blessing my hands and you fall in love every day with what you do.
Gracias queridos amigos por leer mi post, si te quedaste conmigo hasta el final te das cuenta que es un proceso un poco largo pero es muy fácil no te olvides de comentar y de seguirme para que no te pierdas nada de las cosas bellas que estaré subiendo.
Thank you dear friends for reading my post, if you stayed with me until the end you realize that it is a long process but it is very easy, don't forget to comment and follow me so you don't miss any of the beautiful things that I will be uploading.
📝Todo el contenido es mío.
📸Fotos tomadas con teléfono Xiaomi red mi note 8.
☑️Editor de fotos PicsArt
✅Traductor deepL
📝All content is my own.
📸Photos taken with Xiaomi red mi note 8 phone.
☑️PicsArt photo editor.
✅DeepL translator
!discovery 29
Gracias @stevenson7 por tu apoyo y por seleccionar mi post
This post was shared and voted inside the discord by the curators team of discovery-it
Join our community! hive-193212
Discovery-it is also a Witness, vote for us here
Delegate to us for passive income. Check our 80% fee-back Program
Your content has been voted as a part of Encouragement program. Keep up the good work!
Use Ecency daily to boost your growth on platform!
Support Ecency
Vote for new Proposal
Delegate HP and earn more
@ecencia gracias por su apoyo es muy importante para mi
Que lindo amiga sobretodo los colores 😻
@mayifiestas gracias por tu apoyo amiga es realmente hermoso y tierno.
Thank you for sharing this amazing post on HIVE!
Your content got selected by our fellow curator @stevenson7 & you just received a little thank you via an upvote from our non-profit curation initiative!
You will be featured in one of our recurring curation compilations and on our pinterest boards! Both are aiming to offer you a stage to widen your audience within and outside of the DIY scene of hive.
Join the official DIYHub community on HIVE and show us more of your amazing work and feel free to connect with us and other DIYers via our discord server: https://discord.gg/mY5uCfQ !
If you want to support our goal to motivate other DIY/art/music/homesteading/... creators just delegate to us and earn 100% of your curation rewards!
Stay creative & hive on!
@stevenson7 @diyhub gracias por su apoyo es la un placer y un honor para mi saber que mi post fue seleccionado esto.ne motiva a hacerlo mejor cada dia