[ESP-ENG] Initiative: Elf inspired Makeup (Nature Elf) || Iniciativa: Maquillaje Inspirado en Elfos (Elfo de la naturaleza)

Hola de nuevo gente de #MakeupPower, se que ya deben estar hartos de mi pero esta semana estoy muy inspirada con los maquillajes y muy feliz por el tema del que hablé hace unos días acerca de la linda paleta nueva que compré gracias a Hive y más porque han salido muchas iniciativas muy buenas de parte de tanta gente creativa y he tenido el placer de ser invitada a algunas de ellas.
Esta vez estoy siguiendo la iniciativa de la hermosa personita @mariangeltarg cuyas ideas me fascinan y no puedo evitar hacerlas, para esta ocasión nos trajo "Maquillaje inspirados en Elfos". Debo admitir que no soy muy fan del tema de fantasía al menos en películas o libros pero en arte me encantan, eso incluye el maquillaje así que aquí traigo mi versión de está iniciativa.
¡Empecemos!

Maquillaje inspirado en Elfos: Elfo de la Naturaleza
NOTA: Como siempre, empecé hidratando mi cara y mis labios con un primer y un bálsamo labial respectivamente porque este tipo de maquillaje es pesado y lleva muchos elementos, así protejo mi piel de esta pesadez.
Ojos:
Primeramente maquille mis cejas un poco más oscuras de lo que lo hago normalmente pero sin ser exageradas ya que la forma de estas va a resaltar mis ojos.
Me aplique corrector en los párpados para que así el pigmento de las sombras sea mucho más fuerte y con una brocha de punta redondeada me coloque un color bronce en la cuenca del ojo.
Con un pincel plano me aplique corrector justo en la línea que separa mi cuenca de mi párpado móvil y lo difumine por el mismo.
En el párpado móvil previamente cubierto con corrector me maquille de una sombra dorada, lo cubri con una cantidad moderada.
Por último, me realice un delineador notorio y coloque una sombra un poco rojiza en el párpado inferior.

Rostro:
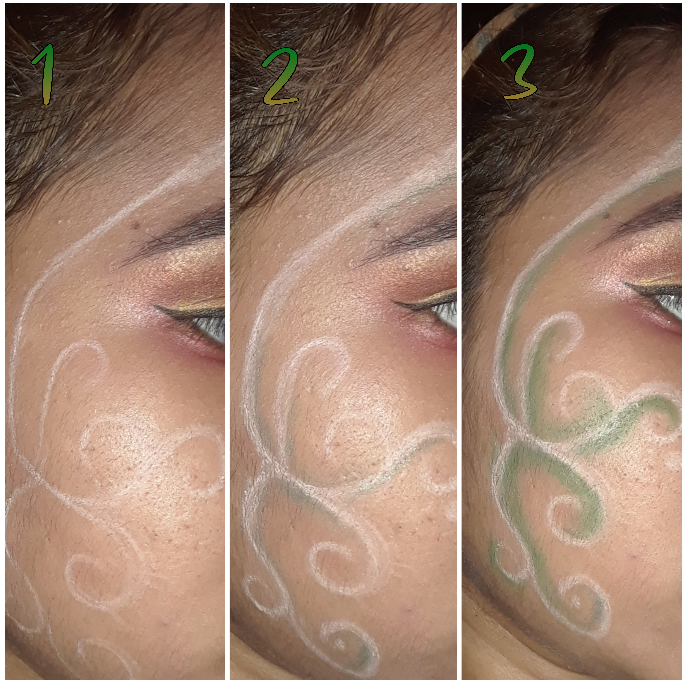
- Primero me aplique mi base y corrector de manera normal como siempre lo hago para proceder a dibujarme en la mejilla (solo una) con lápiz blanco espirales ramificados, es decir, unos se conectan con otros en forma de ramas.
- Luego con una sombra de tono verde oscuro y un pincel angular sombree estos espirales en puntos clave para que resalten.
- Por último les agregue un poquito de relieve agregando sombra negra en puntos específicos también.
Labios:
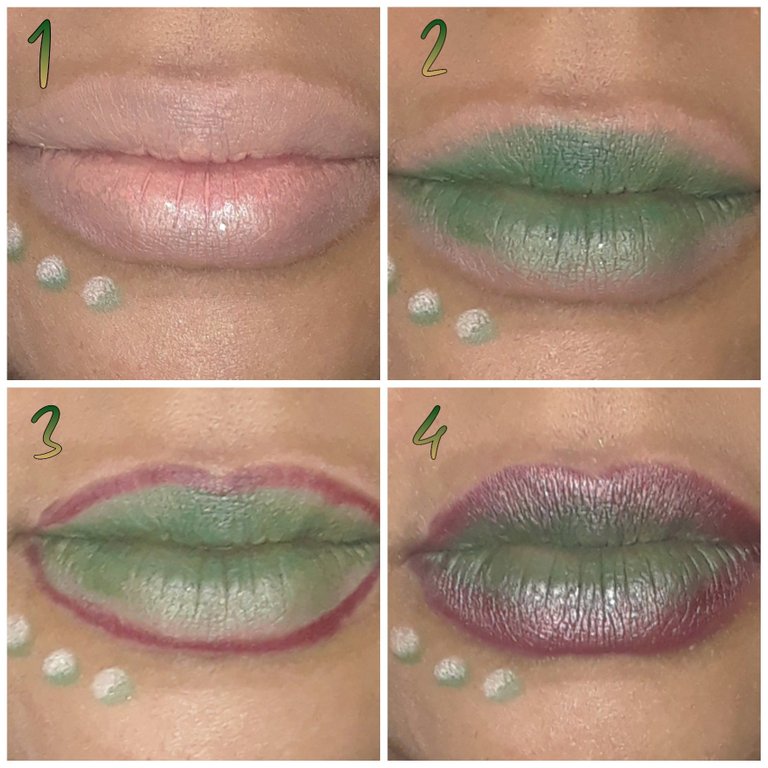
- En los labios me coloque corrector claro por la misma razón que lo hice en los ojos, para que la sombra pigmente mejor recordando aplicar un bálsamo labial antes de esto.
- Con el mismo tono verde que use en las mejillas me coloree el centro de los labios y difumine poco a poco hacia afuera, dejando en blanco la orilla de mis labios.
- Con un tono marron de lapiz labial me delinee la línea de los labios.
- Con una brocha para difuminar y con cuidado pinte con una sombra de un color muy similar al lápiz labial que use antes para delinear el resto de lo que quedaba en blanco y lo expandi hacia el centro hasta que tocara el color verde, esto trate de mezclarlo en efecto degrade.
Resultado final
Agregando un poco de glitter, polvo compacto para sellar y algo de broncer en la mejilla sin diseño, finalmente obtuve este resultado:
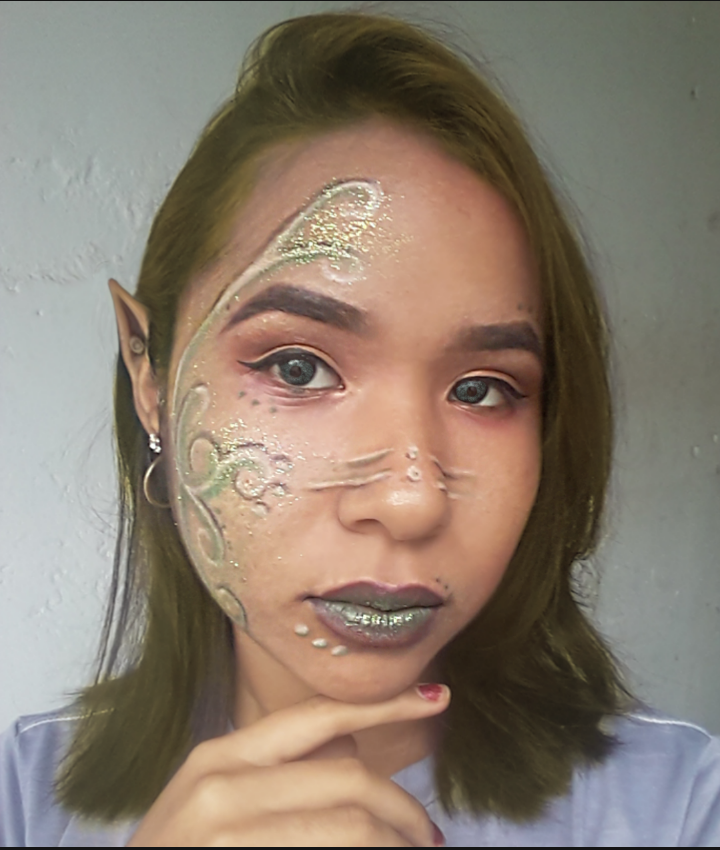
Si, señores me edite las orejas (tarde como 3 horas en descubrir como hacerlo) y también edite mis ojos y cabello para que diera el resultado lo más parecido posible al famoso personaje de fantasía que todos conocemos.
Muchas gracias a todos por leer, si son tan amantes del maquillaje como yo y quieren probar cosas nuevas los invito a unirse a esta iniciativa que de verdad está muy divertida y el resultado es hermoso, aunque siendo sincera considero que pudo quedarme mejor pero estoy segura de que a ustedes les quedará excelente así que ¡Anímense!
¡Nos vemos pronto!

Hello again #MakeupPower people, I know you must be fed up with me but this week I'm very inspired with makeup and very happy about the topic I talked about a few days ago about the nice new palette I bought thanks to Hive and more because there have been so many great initiatives from so many creative people and I've had the pleasure of being invited to some of them.
This time I'm following the initiative of the beautiful little person @mariangeltarg whose ideas fascinate me and I can't help but do them, for this occasion she brought us "Elf inspired makeup". I must admit that I'm not a big fan of fantasy theme at least in movies or books but in art I love them, that includes makeup so here I bring my version of this initiative.
Let's get started!
Elf inspired Makeup: Nature Elf
NOTE: As always, I started by moisturizing my face and lips with a primer and lip balm respectively because this type of makeup is heavy and carries a lot of elements, so I protect my skin from this heaviness.
Eyes:
First I made up my eyebrows a little darker than I normally do but without being exaggerated since the shape of these will highlight my eyes.
I applied concealer on my eyelids so that the pigment of the shadows is much stronger and with a rounded tip brush I applied a bronze color in the eye socket.
With a flat brush I applied concealer right on the line that separates my eye socket from my eyelid and blended it on the eyelid.
On my mobile eyelid, previously covered with concealer, I applied a golden shadow, covering it with a moderate amount.
Lastly, I applied a noticeable eyeline and a slightly reddish shadow on my lower eyelid.
Face:
- First I applied my foundation and concealer in the normal way as I always do to proceed to draw on my cheek (only one) with white pencil branched spirals, ie, some are connected with others in the form of branches.
- Then with a dark green shadow and an angled brush I shaded these spirals in key points to make them stand out.
- Finally I added a little bit of relief by adding black shadow at specific points as well.
Lips:
- On the lips I applied light concealer for the same reason I did on the eyes, so that the shadow would pigment better remembering to apply a lip balm before this.
- With the same green shade I used on my cheeks I colored the center of my lips and blended outwards, leaving the edges of my lips white.
- With a brown shade of lipstick I outlined my lip line.
- With a blending brush I carefully painted a shade of a very similar color to the lipstick I used before to outline the rest of what was left in white and expanded it towards the center until it touched the green color, I tried to blend it in a degrade effect.
Final result .
Adding some glitter, compact powder to seal and some bronzer on the cheek without design, I finally got this result:
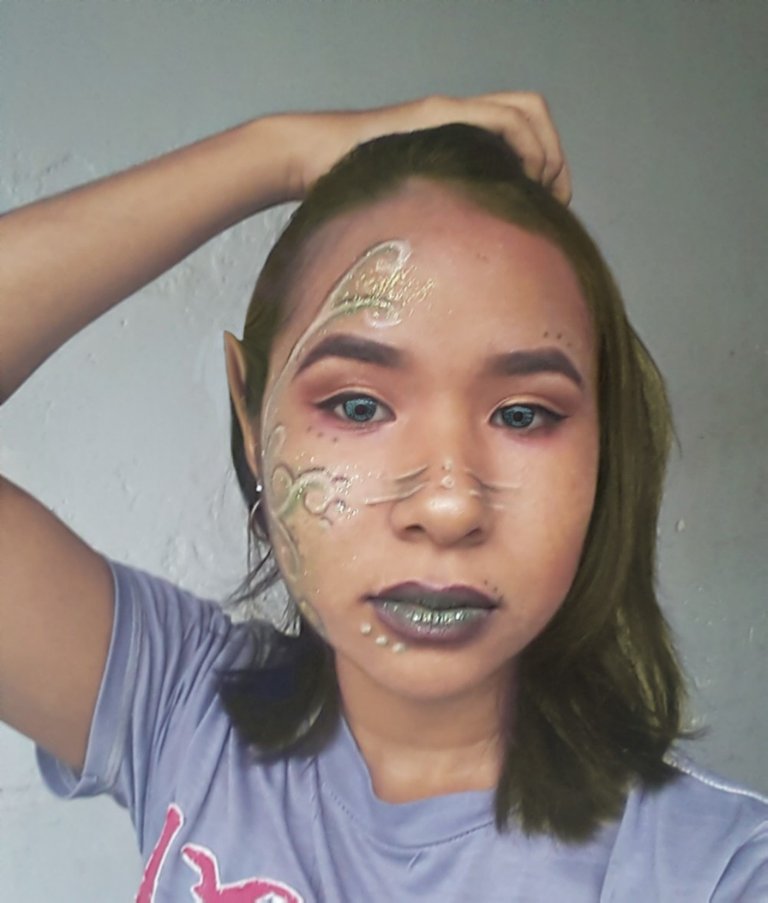
Yes, people I edited my ears (it took me about 3 hours to figure out how to do it) and I also edited my eyes and hair to give the result as close as possible to the famous fantasy character we all know.
Thank you all for reading, if you are a makeup lovers as I am and want to try new things I invite you to join this initiative that is really fun and the result is beautiful, although being honest I think mine could have been better but I'm sure it will be excellent for you so cheer up!
See you soon!
Portada hecha con/ Cover made with: PicsArt (Android)
Fotos y collages son de mi propiedad/ Photos and collages are of my property
Separadores hechos con/ Dividers made with: PicsArt (Android)
AMOOOOOOOO pareces una elfo del bosque 🥺✨ y por supuesto que nadie se cansa de tus maquillajes mujeeeer
Gracias, kaire 😍 Hice lo mejor que pude, obvio también me encantó en tuyo bb te adoro 😗
Te quedo hermosísimoo, me encanta😍
Gracias, mi amor! Me alegra que te haya gustado, estaré esperando tu siguiente iniciativa 😍
@yohadvartse Aww, me encanta ☺️💘
Me alegra que te haya gustado! 😄 Gracias por leer! 😘