Diy Cartuchera Vertical Pop Up, Super práctica y Funcional
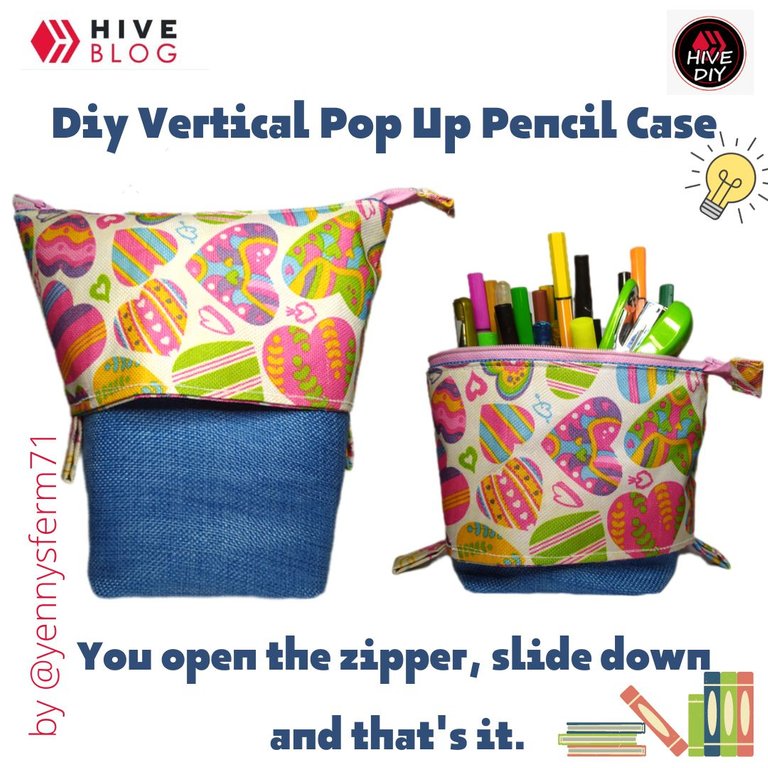
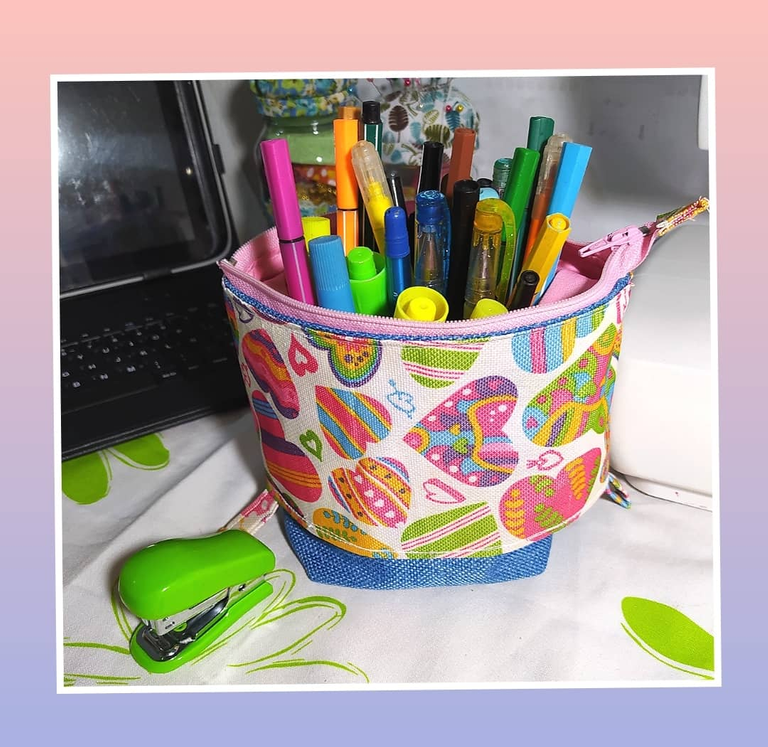
This Pop Up Vertical Pencil Case has a zipper at the top, which when you open and pull the side tabs down, all your markers, pens, colors, everything you keep in it appears neat, in sight and ready to use.... ❤️❤️You will love it...! ❤️❤️
Esta Cartuchera Vertical Pop Up tiene un cierre en su parte superior, el cual al abrir y halar por las pestañas laterales hacia abajo, aparecen todos tus marcadores, bolígrafos, colores, todo lo que guardes en ella aparece ordenado, a la vista y listo para usar... ❤️❤️La amaras..! ❤️❤️

This weekend I went out with my family and my son bought a big bag of chips, opened it and put it on the table, but first he threw the bottom of the bag in and up, and the chips came up and peeked out of the opening of the bag, and the bag was nicely assembled and standing on the table and we were all able to grab chips comfortably and cleanly without getting our hands dirty when we put them in. We all joked because we hadn't seen the bag set up like that.
It was when I remembered that years ago I made a Cartuchera that I opened it, and pulled down some strips or side tabs and my tools were exposed and tidy, as if it were a pencil holder, So today I took my notes and I bring you this Tutorial, I invite you to do it, you'll really like the practical and useful design...
Este fin de semana salí con mi familia y mi hijo compró una bolsa de papitas grandes, la abrió y la puso en la mesa, pero antes echó hacia adentro y hacia arriba el fondo de la bolsa, y las papitas subieron y se asomaron en la apertura de la bolsa, y la bolsa quedó bien armada y parada en la mesa y todos pudimos agarrar papitas de forma cómoda y limpia sin ensuciarnos las manos al meterla.. Todos bromeamos porque no habíamos visto disponer de la bolsa así.
Fue cuando recordé que hace años hice una Cartuchera que la abría, y halaba hacia abajo unas tiras o pestañas laterales y mis útiles quedaban expuestos y ordenados, como si se tratase de una portalápices, Así que hoy retomé mis apuntes y les traigo este Tutorial, que te invito a que lo hagas, de verdad que te va a gustar lo práctico y útil de su diseño...

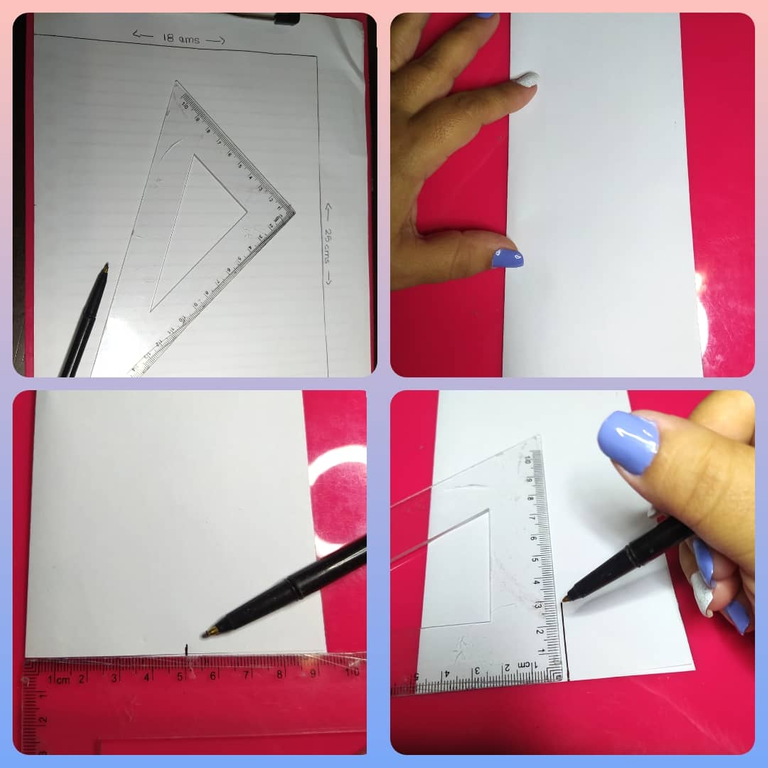
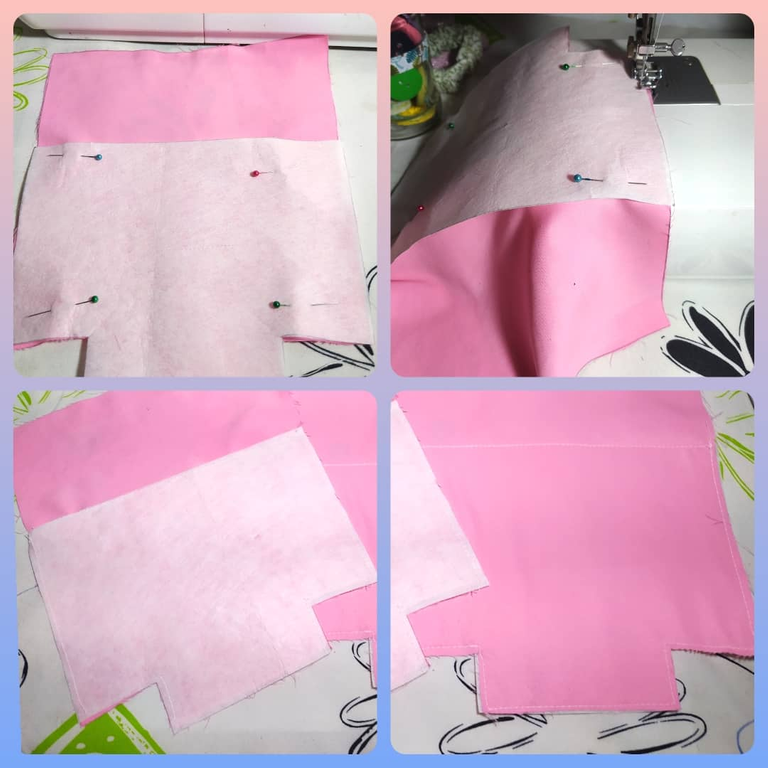
- On a sheet of paper I make a rectangle measuring 25 cm by 18 cm. Cut out.
- Fold the sheet in half, along the length.
- At the bottom towards the fold of the sheet, I mark 5 centimeters.
- At the point of the 5 cm, I go up 3 cm.
- En una hoja hago un rectángulo que mida 25 cms por 18 cms. Recorto.
- Doblo la hoja por la mitad, por el largo.
- En la parte inferior hacia el doblez de la hoja, marco 5 cms.
- En el punto de los 5 cms, subo 3 cms.
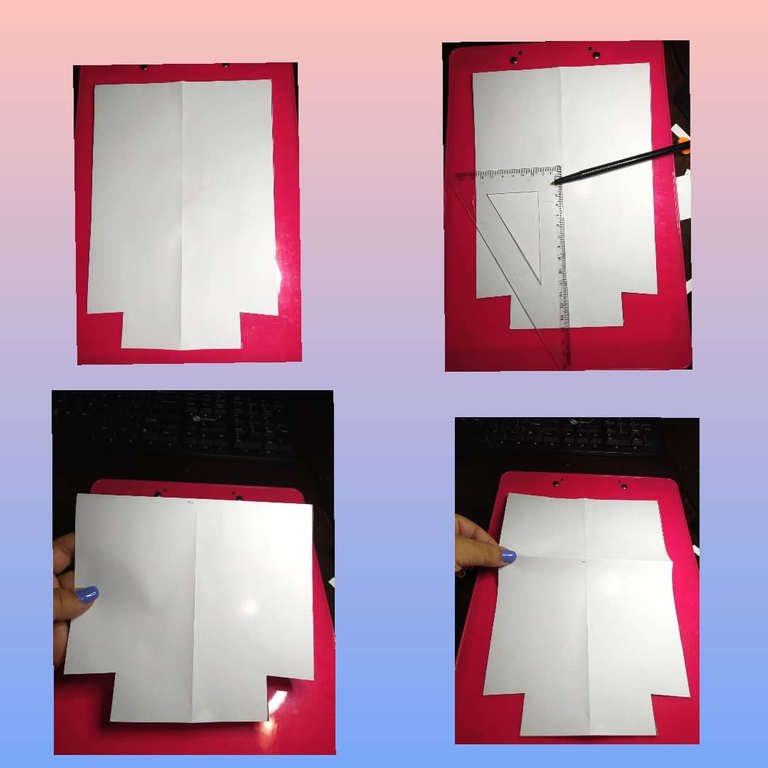
- At the same height of the 3 cm, and from the right edge I mark 1 cm.
- From the upper right edge, I draw a straight line to the previous point.
- I extend after the point, only about 2 millimeters.
- Join the 3 cm stitch to this new extended stitch.
This is the pattern . Now I cut it out.
- A la misma altura de los 3 cms, y desde el extremo derecho marco 1 cm.
- Desde el borde superior derecho, trazo una recta hasta el punto anterior.
- Prolongo luego del punto, unos 2 milímetros solamente.
- Uno el punto de los 3 cms a este nuevo punto prolongado.
Listo este es el Patrón Ahora lo recorto.

From the bottom edge up I mark 15 cms and fold the sheet. I will use this half to cut the interlining, but it is not necessary to make another pattern, just fold this one to cut the interlining and open it to cut the other pieces.
Desde el borde inferior hacia arriba marco 15 cms y doblo la hoja. Esta mitad la usaré para cortar la entretela, pero no es necesario hacer otro patrón, solo doble éste para cortar la entretela y lo abro para cortar las otras piezas.


- Sewing machine - Scissors - Pins - Thread and needle.
- Ruler - Pen
- Main fabric 25 cm
- Lining fabric 25 cm
- Interlining 20 cm
- Sky canvas 34 cm
- Zipper 20 cms
- Máquina de coser - Tijera - Alfileres - Hilo y aguja.
- Regla - Bolígrafo
- Tela principal 25 cms
- Tela de forro 25 cms
- Entretela 20 cms
- Loneta Sky 34 cms
- Cierre de 20 cms

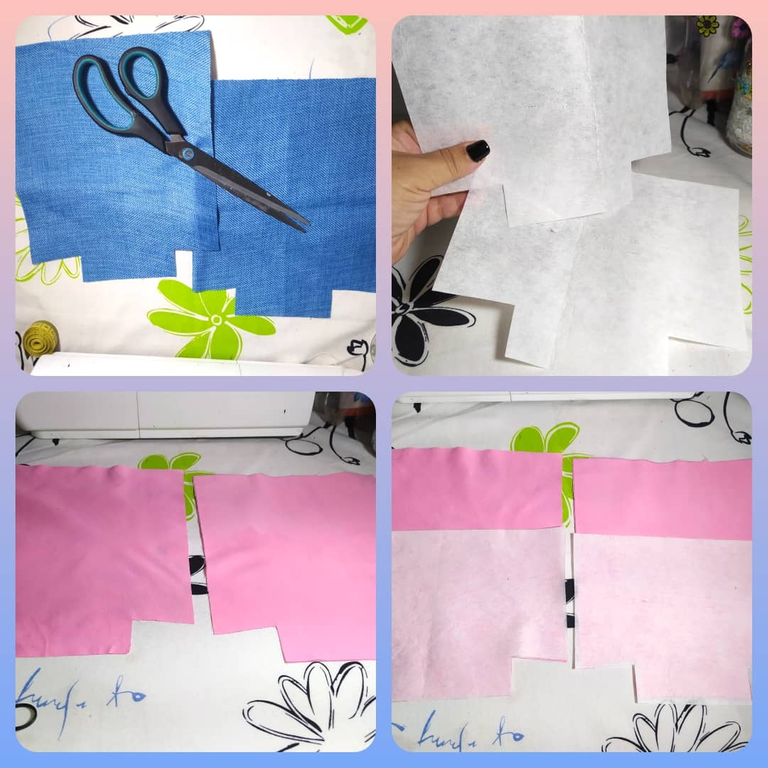
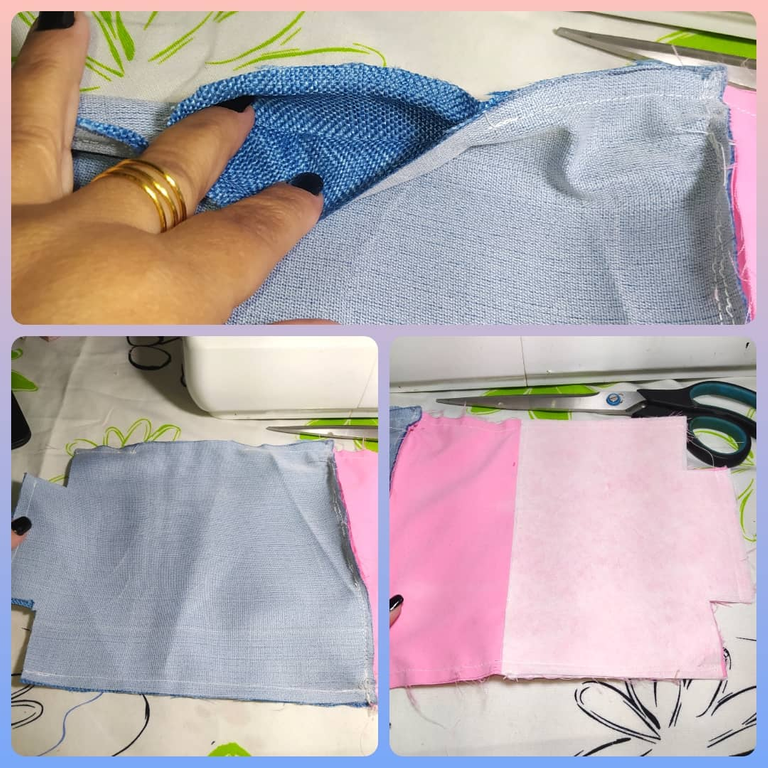
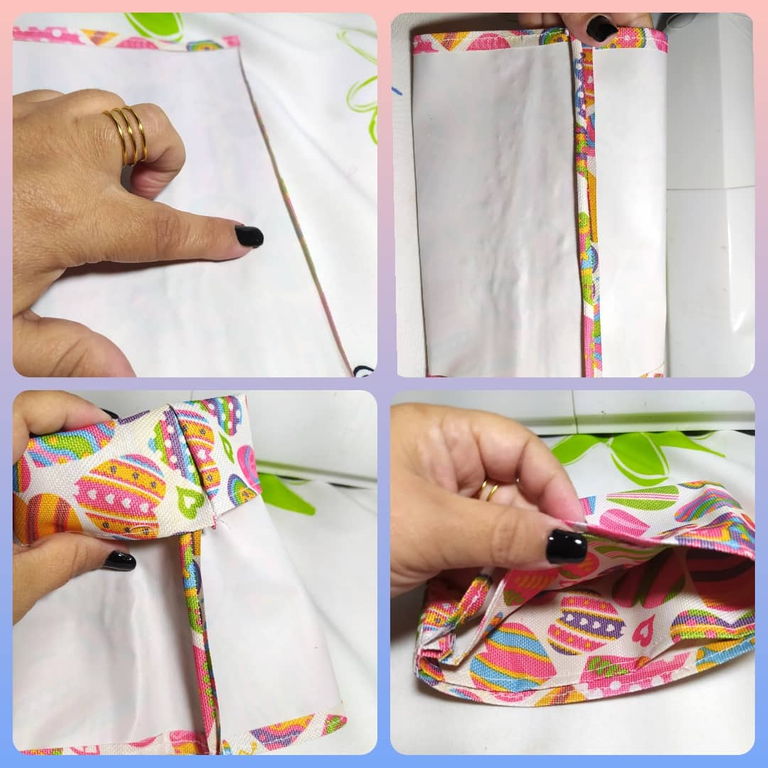
Once the pattern is ready, I proceed to cut the pieces, two whole pieces in the main fabric (I used blue), two in lining (I used pink) and two in the half of the pattern that corresponds to interlining, which I will place in the lining fabric.
Ya con el patrón listo, procedo a cortar las piezas, dos enteras en la tela principal (yo usé azul), dos en forro (yo usé rosado) y dos en la mitad del patrón que corresponde a entretela, la cual voy a ubicar en la tela del forro.
If you have glued interlining, it would be ideal, but I didn't, so I had to sew, but it's really not much work, I just pin in place and sew all around.
Si dispones de entretela con pega, sería ideal, pero yo no tenía de manera que me toco coser, pero realmente no es mayor trabajo, solo fijo con los alfileres en su lugar y coso por todo el alrededor.
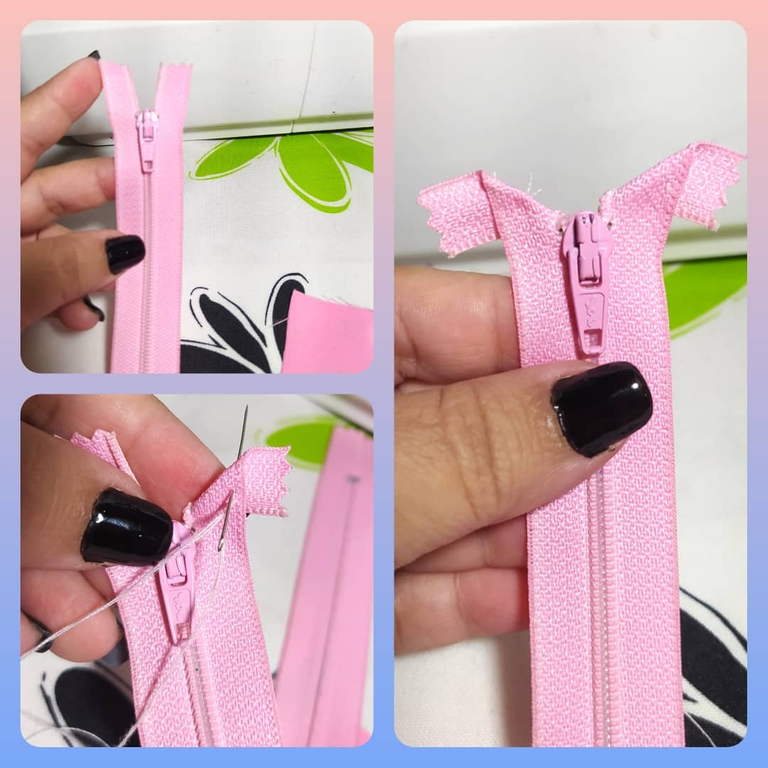
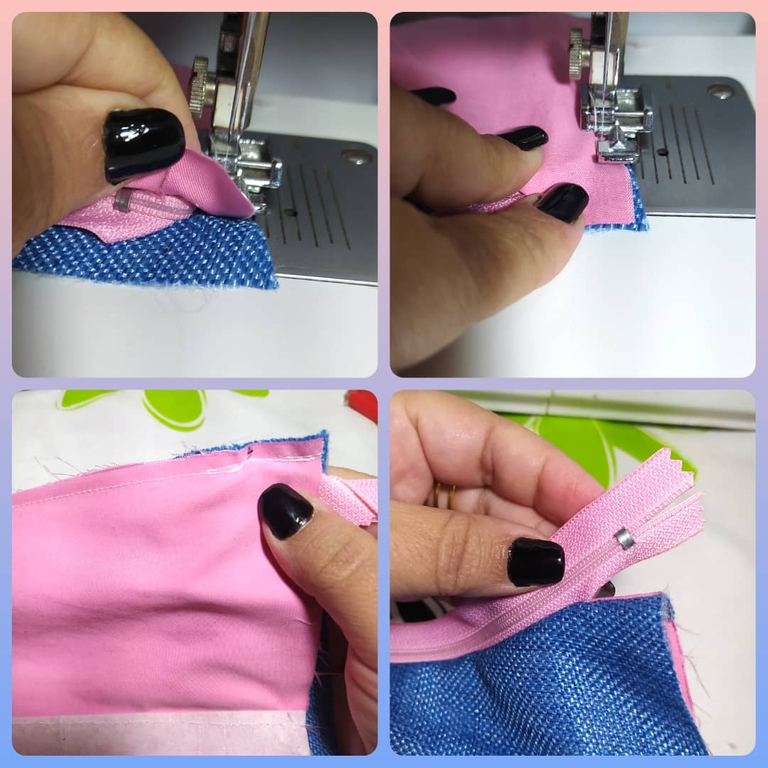
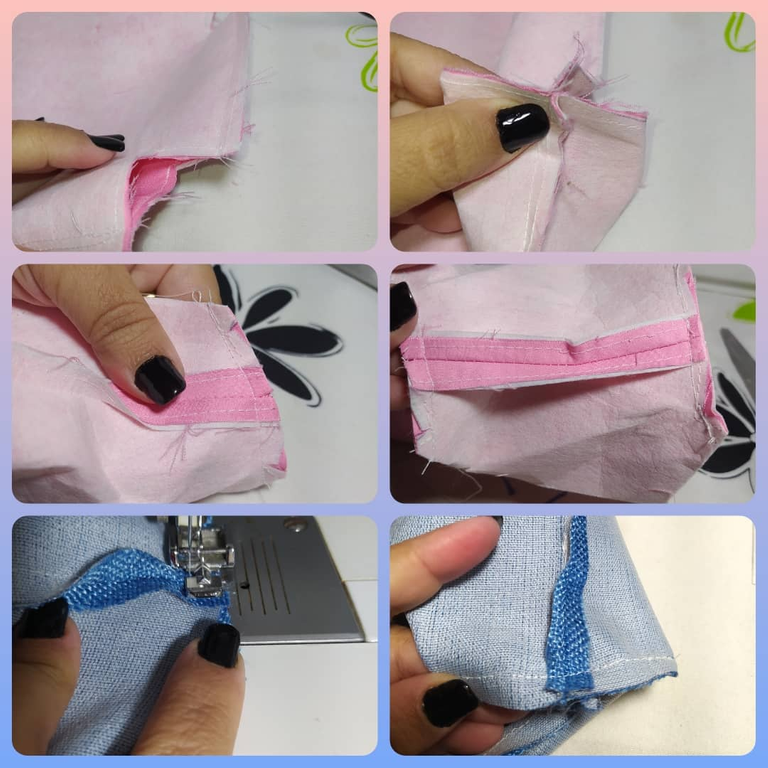
I'll work with the zipper, I could continue without this step, but it's easier if you prepare it. Both ends of the top of the zipper I fold out or to its side and make a few stitches with the needle and thread, this way I don't have to square up this zipper position so much and I can concentrate on other details of the sewing..
Trabajaré con el cierre, podría continuar sin este paso, pero es más fácil si lo preparas. Ambas puntas de la parte superior del cierre las doblo hacia afuera o hacia su lado y hago unas puntadas con la aguja e hilo, de esta manera no tengo que cuadrar tanto esta posición del cierre y puedo concentrarme en otros detalles de la confección.
Now I am going to assemble the body of the pencil case, I place the zipper on the top of the main fabric, facing the zipper and the fabric face to face, and on top I place the pink lining also matching the lining face to the fabric face. Important: Before finishing the other end of the zipper, I make a 2 cm mark to know that I should sew up to there. I fix everything with pins.
Ahora voy a armar el cuerpo de la cartuchera, ubico el cierre en la parte superior de la tela principal, enfrentando cara con cara del cierre y de la tela. y arriba coloco el forro rosado también haciendo que coincida la cara del forro con la cara de la tela. Importante: Antes de terminar el otro extremo del cierre, hago una marca de 2 cms para sabes que debo coser hasta ahí. Fijo todo con alfileres.
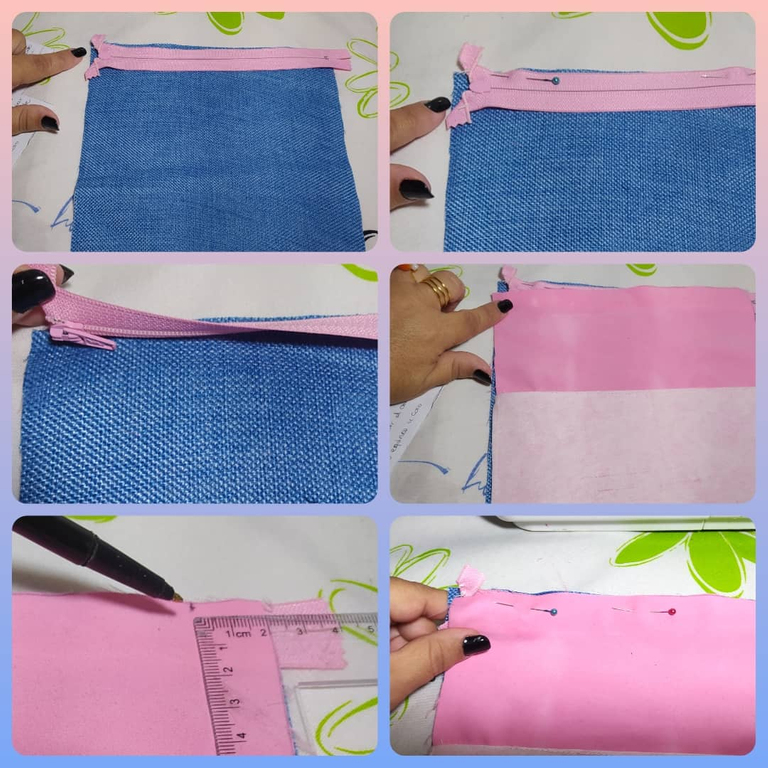
I sew a straight seam on the sewing machine, using the closing foot throughout the elaboration of this pencil case. I sew only up to the 2 cm mark, then I stop. I move this end of the zipper down, place the fabrics facing each other again, and now I finish sewing that part.
Paso una costura recta en la máquina de coser, usando en toda la elaboración de esta cartuchera el pie de cierre. Coso solo hasta la marca de los 2 cms, ahí me detengo. Muevo este extremo del cierre hacia abajo, vuelvo a colocar las telas enfrentadas, y ahora termino de coser esa parte.
Below you can see how the tail of my zipper, I put it to one side to pass the seam through the two pieces of fabric. Then, I flip the fabrics right side out and you can see how that end of the zipper looks on the outside.
A continuación puedes ver como la cola de mi cierre, la pongo a un lado para pasar la costura por las dos piezas de tela. Luego, volteo las telas al derecho y puedes ver cómo queda ese final del cierre por fuera.
Now I repeat everything exactly the same, at the other end of the fastener.
Ahora repito todo exactamente igual, en el otro extremo del cierre.
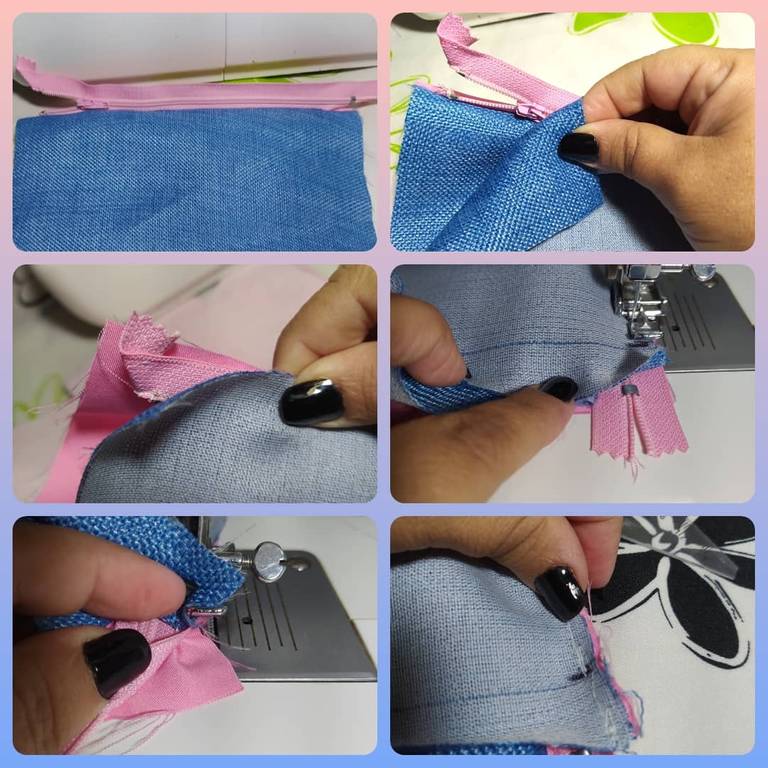
I already have the zipper with the pieces of the body of the pencil case glued, it should look like this on the front and on the lining, which will be the inner part.
Ya tengo el cierre con las piezas del cuerpo de la cartuchera pegado, debe verse así por el frente y por la parte del forro que será la parte interna.

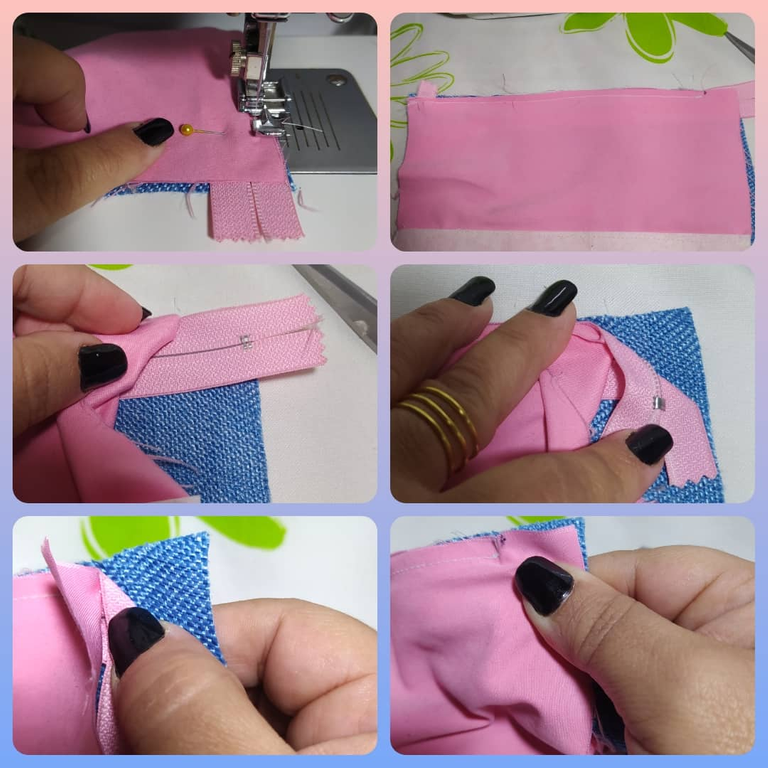
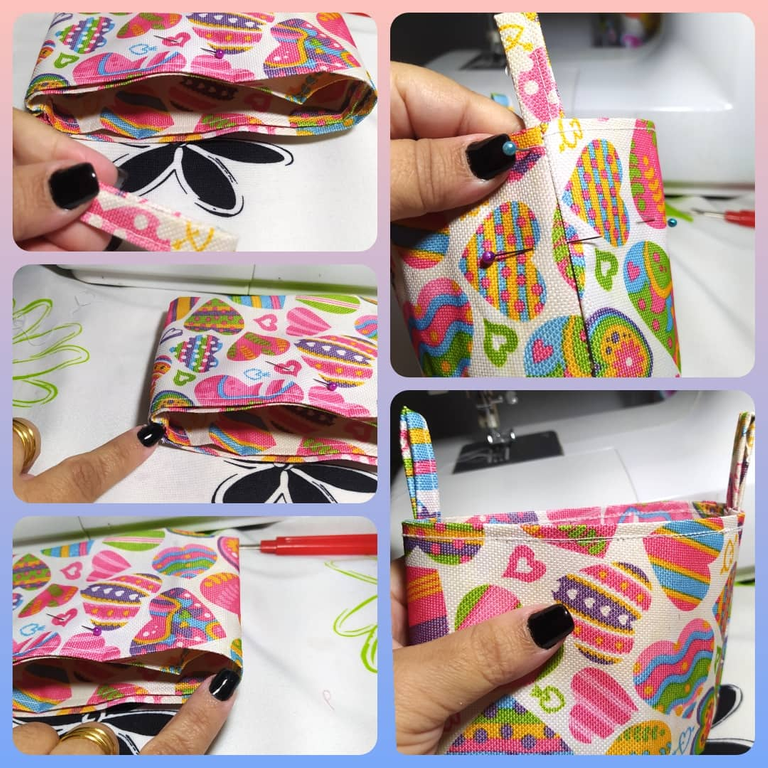
If you have made purses before, this part will be extremely familiar to you. I sew the two pieces of the main fabric together, and also the two pieces of the lining. I'm going to sew where I pointed out in the next picture, the goal is to sew all around, LESS at the corners (which will be formed later), and also not in a space of about 8 cms, since that's where the piece will flip over.
Si has hecho carteras antes, esta parte te será sumamente familiar. Encaro las dos piezas de la tela principal, y también las dos piezas del forro. Voy a coser donde señalé en la próxima foto, el objetivo es coser alrededor, Menos en las Esquinas (las cuales se formarán luego), y tampoco en un espacio de 8 cms aproximadamente, ya que por ahí se volteará la pieza.
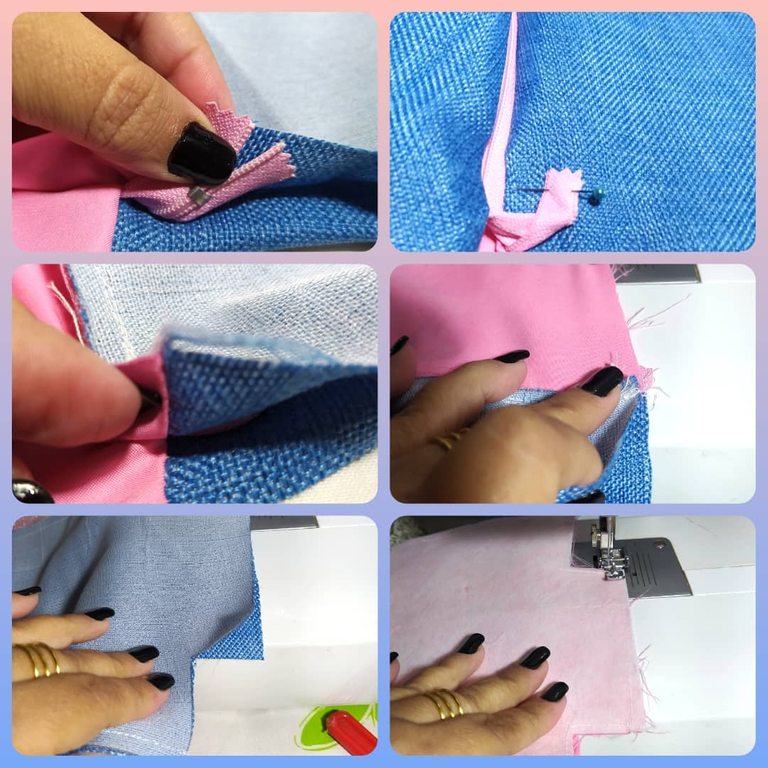
Before starting to sew, I make sure that the seams of the fabrics match well, and also **Important: I fix with a pin inward, the part of the zipper that is left in the air so that it does not join to anything.
Now I can sew... ❤️❤️❤️
Antes de comenzar a coser, me aseguro que coincidan bien las uniones de las telas, y además **Importante: fijo con un alfiler hacia adentro, la parte del cierre que queda al aire para que no se una a nada.
Ahora sí, puedo coser... ❤️❤️❤️
Here you can see how it is coming along, and the opening I left unsewn.
Aquí puedes ver como va quedando, y la apertura que dejé sin coser.
I form the corners very easy just join them in the opposite direction and sew, the 4 corners.
Formo las esquinas muy fácil solo las uno en la dirección contrario y coso, las 4 esquinas.
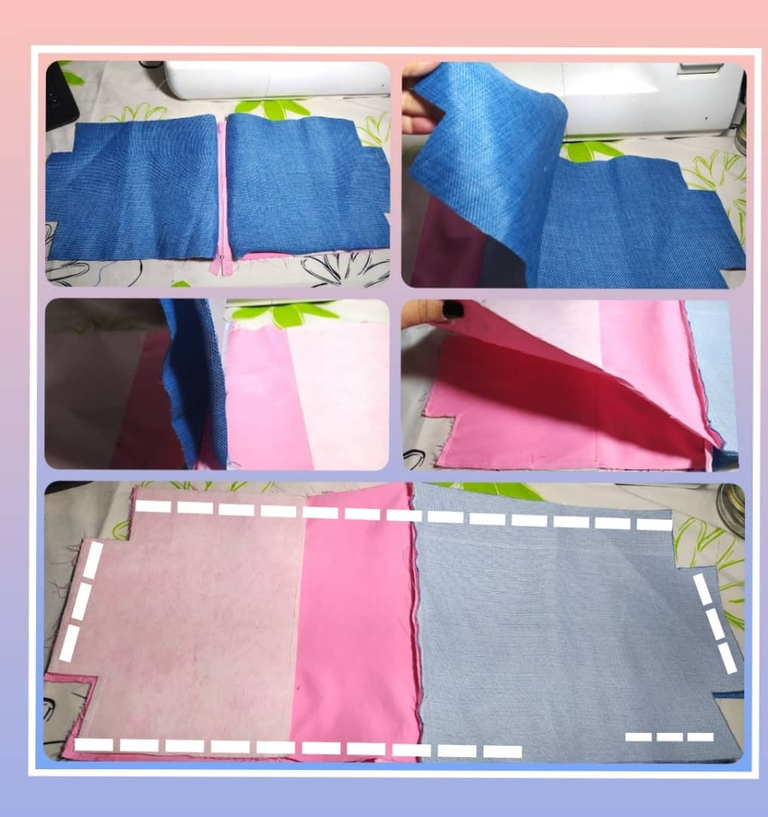
Toto what I have done is very basic of any super simple and simple bag, I flip the piece by the opening. Then I put the lining inside the main fabric and we can see the shape of the bag.
Toto lo que he hecho es muy básico de cualquier bolso super sencillo y simple, Volteo la pieza por la apertura. Luego meto el forro dentro de la tela principal y ya podemos ver bien la forma de la cartuchera.
I like to do a repise to seat the fabrics well and make sure the zipper will never be stepped on when I open it I also close my opening with a hidden hand stitch, very easy.
Me gusta hacer un repise para asentar bien las telas y asegurarme que el cierre No se pisará nunca cuando lo abra. También cierro mi apertura con una costura escondida a mano, muy fácil.

The mechanics that will allow the Pop Up of the pencil case, will be a rectangle that I decided to make in sky canvas, as it is very firm and will bring rigor to the pencil case.
I hem the lengths of the rectangle.
La mecánica que permitirá el Pop Up de la cartuchera, será una rectángulo que decidí hacerlo en loneta sky, ya que es muy firme y le aportará rigor a la cartuchera.
Hago un dobladillo por los largos del rectángulo.
Then I sew the shorter side, facing the fabric fronts.
I fold the whole piece in half, so that it is formed like a tube.
Luego coso el lado más corto, enfrentando los frentes de la tela.
Doblo toda la pieza por la mitad, para que quede formado como un tubo.
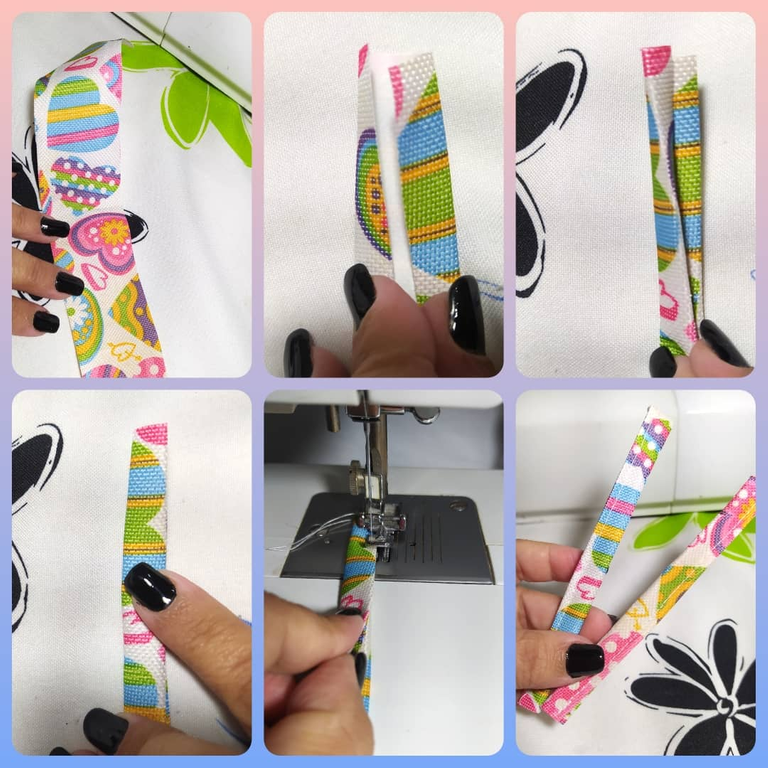
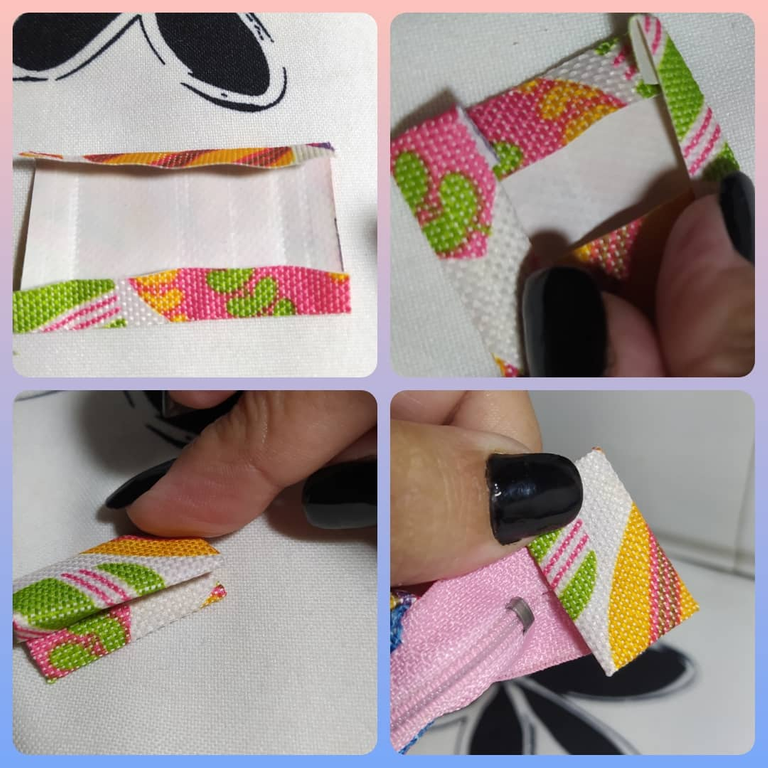
I am going to prepare the tabs that will be used to lower the whole piece. To do this I cut a strip, it can be the one that is left over, fold it twice, sew it and cut it in half to have the two tabs.
Voy a preparar las pestañas que servirán para bajar la pieza completa. Para ello corto una tira, puede ser de la que va sobrando, las doblo dos veces, coso y corto a la mitad para tener las dos pestañas.
I take again the piece I made with the sky canvas, and on the seam and on the other half, I place the tabs and sew.
Tomo de nuevo la pieza que hice con la loneta sky, y en la costura y en la otra mitad, ubico las pestañas y coso.
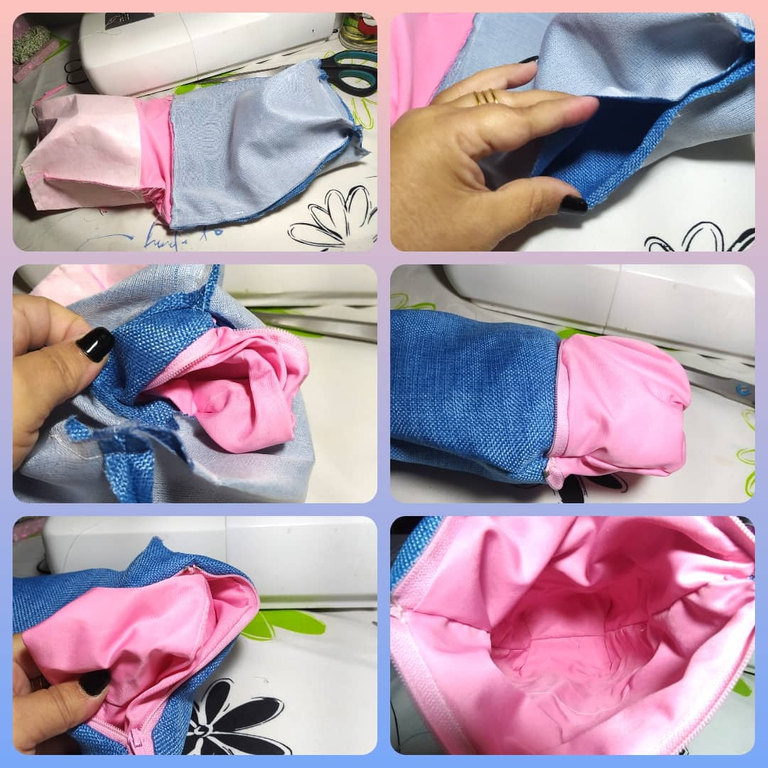
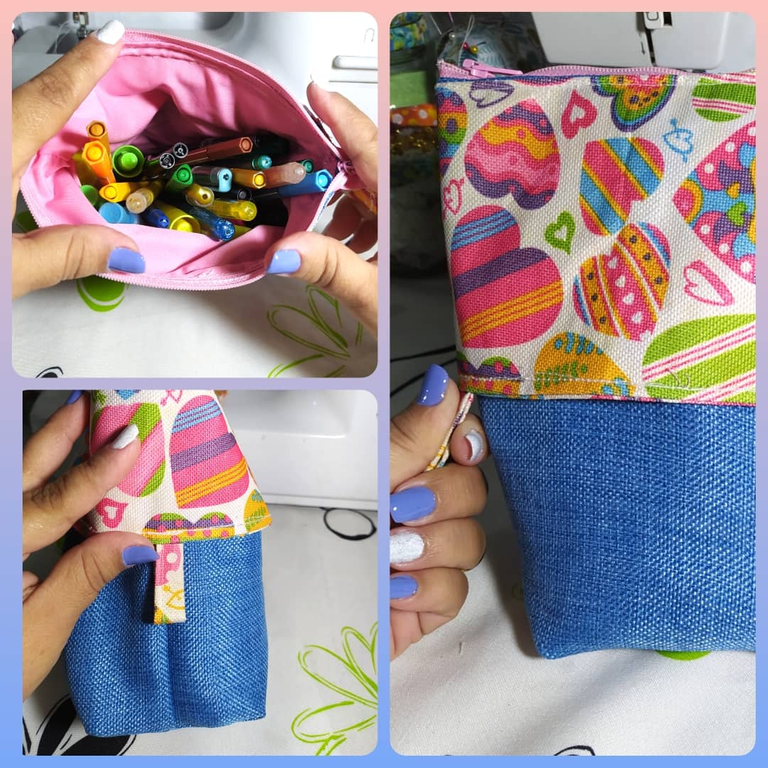
In the piece of sky canvas I just made, I insert the pencil case, leaving the tabs facing down.
I always prefer to make a basta by hand to make sure everything will fit perfectly, so on the top edge I hand sew both pieces together. Then, if I sew with a sewing machine, I remove the basta.
En la pieza de loneta sky que acabo de hacer, introduzco la cartuchera, dejando las pestañas hacia abajo.
Siempre prefiero hacer una basta a mano para asegurar que todo va a cuadrar perfecto, de manera que en el borde superior coso a mano ambas piezas. Luego, si coso a máquina de coser, y retiro la basta.
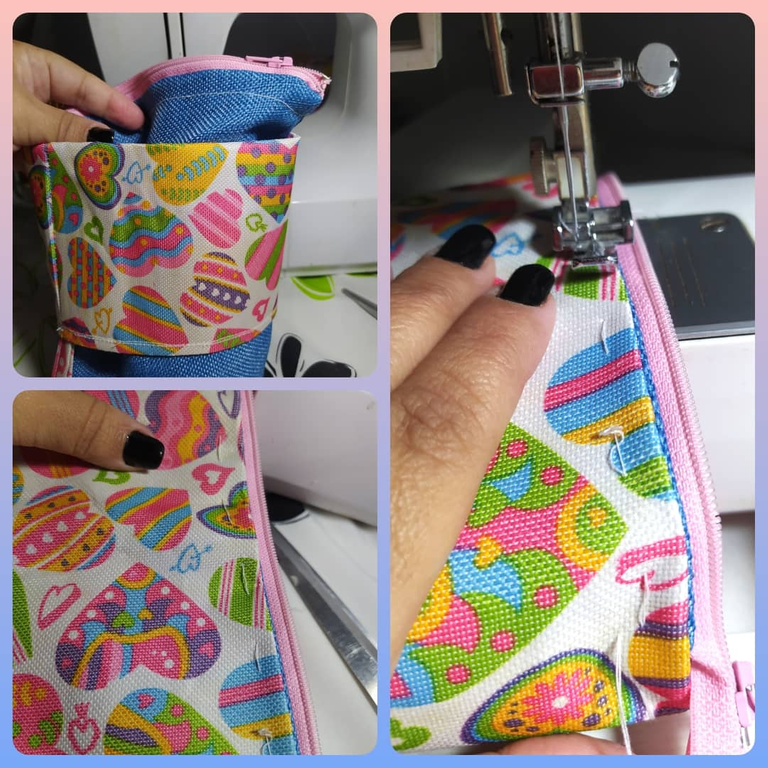
To finish, I prepare the exposed part of the zipper, making a lining or stopper with a piece of sky canvas, as shown in the photos.
Para terminar, preparo la parte expuesta del cierre, haciendo un forro o tope con un pedacito de loneta sky, como se ve en las fotos.
This beautiful Vertical Pop Up Box can be made with this step by step, if you dare to make it, you will be able to do it, each step with patience, you can read it and it will be all...d
I assure you that the next one you make, you will make it very quickly after having made one....
Esta bella Cartuchera Vertical Pop Up se logra hacer con este paso a paso, si te animas a hacerla, la vas a lograr hacer, cada paso con paciencia, lo puedes ir leyendo y te va a resultar todo...d
Te aseguro que la próxima que hagas, la vas a hacer muy rápido después de haber hecho una...
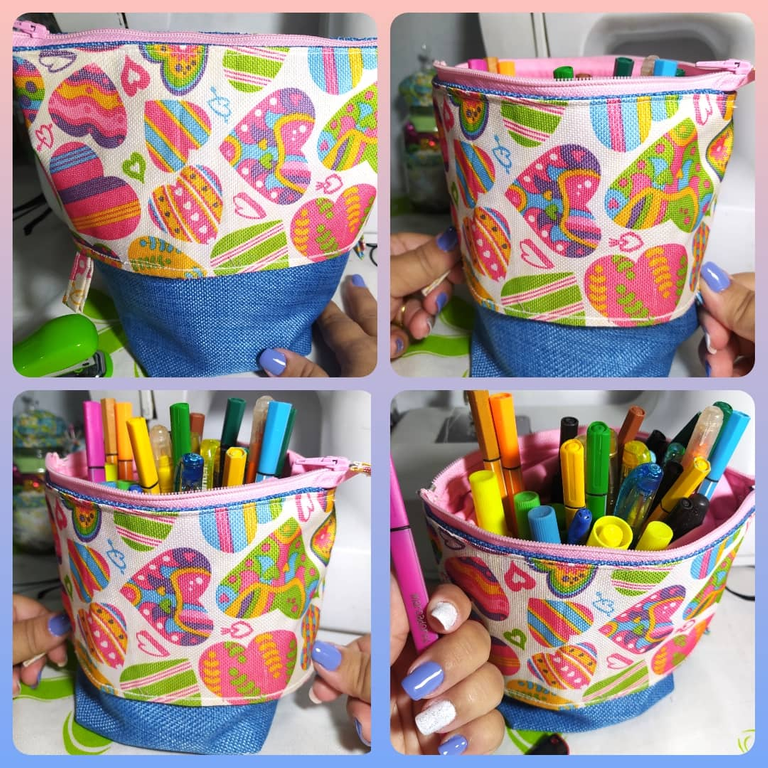
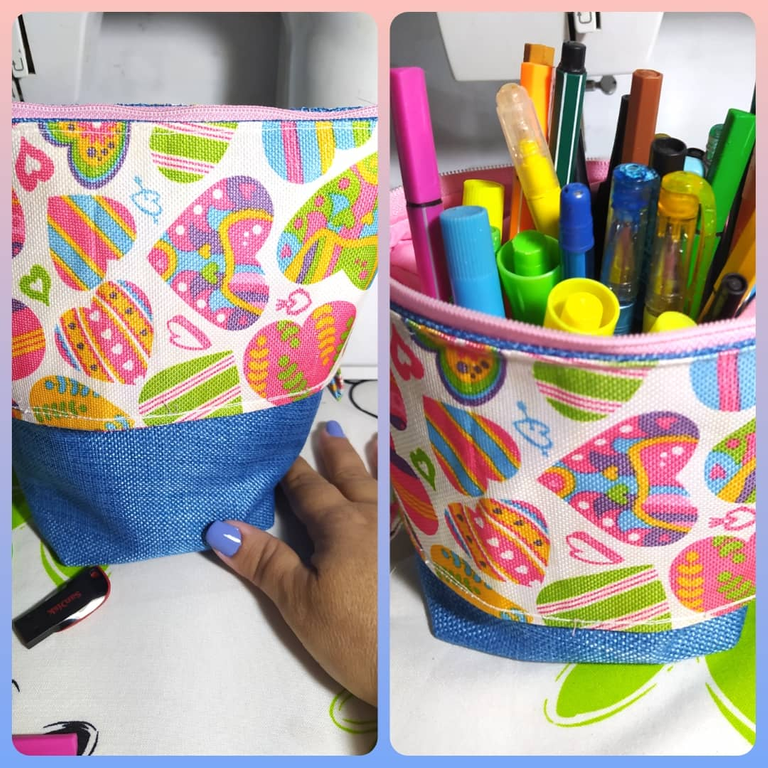
Here you can see it closed, then you open the zipper, pull the tabs down and the Cartuchera stands upright and firm, and you can use all your materials easily, you can see them all and they stay organized.
Aquí la puedes ver cerrada, luego abres el cierre, halas las pestañas hacia abajo y queda bien parada y firme la Cartuchera, y podrás utilizar todos tus materiales fácilmente, los puedes ver todos y se quedan ordenados.
I hope you liked this Tutorial, and that you are encouraged to do it, it is a very original and very functional piece. The tutorial was long, but that's because I gave you all the details in detail. If you dare to make it you will see that it is neither complicated nor long really.
Deseo que te haya gustado este Tutorial, y que te animes a hacerlo, es una pieza muy original y muy funcional. El tutorial quedó largo, pero es porque te dí porminorizadamente todos los detalles. Si te animas a hacer verás que no es ni complicado ni largo realmente.
I thank you for stopping by my Blog, and I cordially invite you to my next publication..... A hug ❤️❤️❤️❤️
Te agradezco haber pasado por mi Blog, y te inivito cordialmente a mi próxima publicación... Un abrazo ❤️❤️❤️
---------- ❤️❤️❤️❤️ ----------
Las fotos las tomé con mi teléfono Redmi Note 8 y las edité en la App Collage Maker y son de mi propiedad @yennysferm71. Por favor no las utilices sin mi Autorización.
También edité con https://www.canva.com/
Utilicé el Traductor Deepl
Mi redes sociales:
Discord: YennysYaneth#0189
Twitter: @yennysferm
Instagram: @yennysyaneth
I took the photos with my Redmi Note 8 phone and edited them in the Collage Maker App and they are my property @yennysferm71. Please do not use them without my Authorization.
I also edited with https://www.canva.com/
I used Deepl Translate
My social networks:
Discord: YennysYaneth#0189
Twitter: @yennysferm
Instagram: @yennysyaneth
https://twitter.com/yennysferm/status/1534083929665376257
The rewards earned on this comment will go directly to the people sharing the post on Twitter as long as they are registered with @poshtoken. Sign up at https://hiveposh.com.
Oh wao! me ha encantado este proyecto, tomaré nota para hacerlas a mis hijos, gracias por compartir.
Gracias amiga, me alegra que te guste. Tus hijos amaran está Cartuchera y será tema de conversación entre sus amigos.
Gracias x pasar x mi blog, es importante para mi. 🤗🤗
Excelente post. Mis felicitaciones.
Gracias... Eres muy amable. 🤗
Gracias por tan hermoso y practico proyecto, ideal para los lápices de colores de mi hijo, Saludos.
Hola mi linda, está muy hermoso tu trabajo, y lo explicas muy bien.
Saludos
Muy creativo y original. Me encantó 🥰😍. gracias por compartir tu técnica.
🎆🎇🎉🎊🌧️💐✨🌾🌱🌹🌙🌿🍃🥀⚡🌺☘️🍀🌈🌷⭐🪴🌵🌸🌟💮🌴🌳💫☀️💮☔🌲🌳🌍🌌🌠☄️🏵️🐝🌻🌼🍄🐞🦋💙☕💜🍍🎆🎇🎉🎊
Gracias a ti por ver mi publicación...🤗🤗🤗
Hola 👋🏻☺️ te quedo realmente hermosa está cartuchera , es una gran idea. Muy bonito trabajo. gracias por compartir amiga. Saludos ✨💕